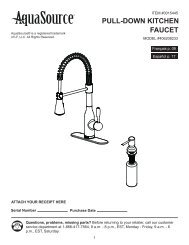
item #0071412 single handle tub & shower faucet model # 873 ...
item #0071412 single handle tub & shower faucet model # 873 ...
item #0071412 single handle tub & shower faucet model # 873 ...
- No tags were found...

Create successful ePaper yourself
Turn your PDF publications into a flip-book with our unique Google optimized e-Paper software.
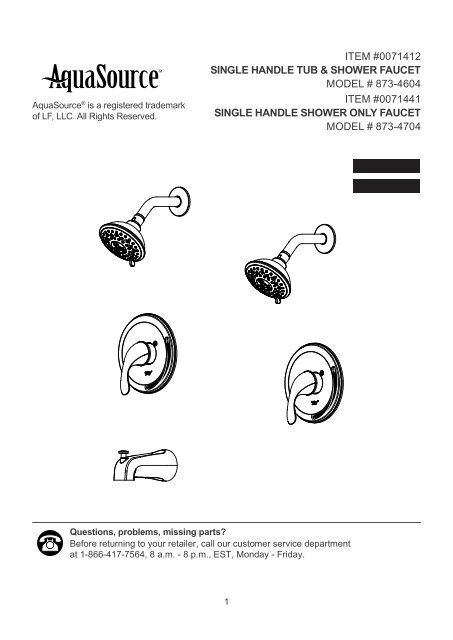
AquaSource ® is a registered trademark<br />
of LF, LLC. All Rights Reserved.<br />
ITEM <strong>#0071412</strong><br />
SINGLE HANDLE TUB & SHOWER FAUCET<br />
MODEL # <strong>873</strong>-4604<br />
ITEM #0071441<br />
SINGLE HANDLE SHOWER ONLY FAUCET<br />
MODEL # <strong>873</strong>-4704<br />
Questions, problems, missing parts<br />
Before returning to your retailer, call our customer service department<br />
at 1-866-417-7564, 8 a.m. - 8 p.m., EST, Monday - Friday.<br />
1
PACKAGE CONTENTS<br />
Part Description Quantity<br />
A Shower Flange 1<br />
B Shower Arm 1<br />
C Shower Head 1<br />
D Handle 1<br />
E Screw 2<br />
F Escutcheon 1<br />
G Valve Body 1<br />
H Plug 1<br />
I Tub Spout * 1<br />
D<br />
E<br />
C<br />
F<br />
B<br />
G<br />
A<br />
H<br />
* Not included with <strong>shower</strong> only <strong>faucet</strong>.<br />
I<br />
!<br />
WARNINGS AND CAUTIONS<br />
• Follow the installation instructions carefully. Proper installation is the installer's responsibility.<br />
• Failure to follow correct installation procedures can result in the <strong>faucet</strong> being loose, which<br />
can result in serious injury.<br />
• Check local building codes before beginning installation to ensure compliance.<br />
PREPARATION<br />
Before beginning the assembly of product, make sure all parts are present. Compare parts with<br />
package content list and diagram above. If any part is missing or damaged, do not attempt to<br />
assemble the product. Contact customer service for replacement parts.<br />
Estimated Assembly Time: 180 minutes<br />
Tools Required for Assembly: Phillips Screwdriver, Plumber's Tape, Adjustable Wrench,<br />
Allen Wrench, Hacksaw<br />
Helpful Tools: Adjustable Pliers, Pipe Wrench<br />
*IMPORTANT: Complete valve replacement** is required<br />
for this <strong>tub</strong>/<strong>shower</strong> unit. An access hole must be cut with<br />
enough room to install the new <strong>tub</strong>/<strong>shower</strong> valve inside<br />
the wall. Professional installation is recommended.<br />
2<br />
**Valve included<br />
0071412<br />
**Valve included<br />
0071441
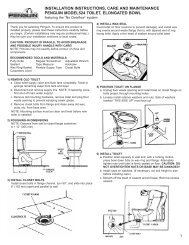
ASSEMBLY INSTRUCTIONS<br />
1. SHUT OFF WATER SUPPLY.<br />
Verify that the hole sizes and positions of holes in the wall are<br />
corrected.<br />
Recommended component measurements<br />
A.Shower and / or spout outlet hole: 1-1/4 inch diameter.<br />
B.Valve access hole: 6 inch diameter.<br />
Be sure that the black template plate's surface is flush with the<br />
finished exterior surface of the wall. Be sure to position the<br />
valve body correctly in wall. "UP" marking up. The 8 inch<br />
Minimum from the valve body to the <strong>tub</strong> spout is required for<br />
proper operation.<br />
2. SUPPLY CONNECTION LAYOUT<br />
Wrap plumber's tape around pipe threads in a clockwise<br />
direction.<br />
Connect water supplies to left (hot) and right (cold) valve body<br />
(G) inlets. Connect <strong>shower</strong> outlet pipe and <strong>tub</strong> outlet pipe to<br />
valve body. Connect Pipe Elbow (not included) to the end of<br />
the pipe.<br />
Fig. 1<br />
Fig. 2<br />
1 1/4 inch Dia<br />
30 inch<br />
Shower Only<br />
6 inch Dia<br />
48 inch<br />
Tub&Shower<br />
48 inch<br />
Shower Only<br />
8 inch MIN.<br />
1 1/4 inch Dia<br />
30 inch<br />
Tub&Shower<br />
pipe elbow<br />
<strong>shower</strong><br />
outlet pipe<br />
valve body G<br />
<strong>tub</strong> outlet pipe<br />
3. SHOWER ONLY SUPPLY CONNECTION LAYOUT<br />
Wrap plumber's tape around pipe threads in a clockwise<br />
direction.<br />
Connect water supplies to left (hot) and right (cold) valve body<br />
(G) inlets.<br />
Connect Shower Outlet Pipe to valve body (G). Plug bottom<br />
outlet with plug (H). Connect Pipe Elbow (not included) to the<br />
end of the pipe.<br />
Fig. 3<br />
plug H<br />
pipe elbow<br />
<strong>shower</strong><br />
outlet pipe<br />
valve body G<br />
bottom outlet<br />
4. FOR SHOWER ARM INSTALLATION.<br />
Insert the long end of the <strong>shower</strong> arm (B) through the flange (A)<br />
then wrap plumber's tape to both sides of <strong>shower</strong> arm. Screw<br />
long end of the <strong>shower</strong> arm into pipe elbow inside the wall.<br />
Fig. 4<br />
<strong>shower</strong> arm B<br />
<strong>shower</strong> flange A<br />
pipe elbow<br />
5. FLUSHING<br />
For Tub and Shower Combinations:<br />
Turn on Hot and Cold water supply lines allowing water to flow<br />
from <strong>tub</strong> spout outlet until all foreign matter has cleared the line.<br />
For Shower Only Combinations:<br />
Turn on Hot and Coldwater supply lines allowing water to flow<br />
from <strong>shower</strong> outlet until all foreign matter has cleared the line.<br />
Pressure must be approximately equal on both Hot and Cold<br />
sides for valve to function properly.<br />
3<br />
Fig. 5<br />
<strong>shower</strong> outlet<br />
<strong>tub</strong> spout outlet
ASSEMBLY INSTRUCTIONS<br />
6. FOR TUB SPOUT INSTALLATION<br />
Install <strong>tub</strong> spout (I). Thread spout onto threaded connection<br />
clockwise until the spout becomes flush with the finished wall.<br />
Thread sealant may be required depending on your installation<br />
method. All thread sealants may be found at your local<br />
hardware store.<br />
Fig. 6<br />
<strong>tub</strong> spout I<br />
7. Before installing escutcheon (F), remove the plastic cap from<br />
plaster guard by twisting cap in a clockwise direction.<br />
Fig. 7<br />
8. Place <strong>handle</strong> on valve stem and turn <strong>handle</strong> to full on mixed<br />
position. Turn on hot and cold water lines to full open for one<br />
minute each. Check for leakage. Shut off water at <strong>faucet</strong>.<br />
Remove the <strong>handle</strong>.<br />
Fig. 8<br />
9. Install escutcheon (F) onto valve and then insert screws (E)<br />
to attach to valve body (G). Install <strong>handle</strong> (D) and tighten<br />
using allen wrench. Attach <strong>shower</strong>head (C) to <strong>shower</strong> arm<br />
(B).<br />
ADJUSTING WATER TEMPERATURE<br />
Turn on water so that cold water is as cold as it will get and hot<br />
water is as hot as it will get. Remove the Rotational Limit Stop<br />
from the valve by sliding it off the stem. Place <strong>handle</strong> back on<br />
stem and rotate fully counterclockwise to the hottest position.<br />
Place a thermometer in a plastic tumbler and hold in the water<br />
stream. If the water temperature is above 120° F, the Rotational<br />
Limit Stop must be rotated counterclockwise to decrease<br />
temperature. Reinstall the stop by sliding it back on to the<br />
stem before reinstalling the <strong>handle</strong>.<br />
MAKE SURE COLD WATER FLOWS FROM THE VALVE<br />
FIRST.<br />
MAKE SURE WATER (AT THE HOTTEST FLOW) DOES NOT<br />
EXCEED THE TEMPERATURE LIMIT ALLOWED BY YOUR<br />
PLUMBING CODES (120° F OR 110° F).<br />
Fig. 9 <strong>shower</strong> arm B<br />
<strong>shower</strong>head C<br />
escutcheon F<br />
screw E<br />
<strong>handle</strong> D<br />
valve body G<br />
set screw<br />
Fig. 10<br />
colder<br />
hotter<br />
rotational limit stop<br />
stop on cartridge<br />
4
CARE AND MAINTENANCE<br />
• Cleaning: Clean carefully by gently wiping with a grit-free damp cloth.<br />
Use only mild soap with water.<br />
Never use acids, harsh chemicals or abrasive detergents to clean surface.<br />
TROUBLESHOOTING<br />
Problem Possible Cause Corrective Action<br />
Leaks underneath <strong>handle</strong> Bonnet has become loose or<br />
o-ring on cartridge is dirty or<br />
twisted.<br />
Tighten the bonnet. Clean or<br />
replace o-ring.<br />
Water will not shut off<br />
completely<br />
Rubber valve seat is dirty or<br />
broken.<br />
Remove <strong>handle</strong> and cartridge<br />
to check the rubber valve<br />
seat. Clean or replace it.<br />
WARRANTY<br />
LIFETIME LIMITED WARRANTY<br />
This <strong>faucet</strong> has been manufactured under the highest standard of workmanship. All parts of this<br />
<strong>faucet</strong> are warranted to be free from leaks or drips during domestic use for as long as the original<br />
purchaser owns this product. THIS EXCLUDES INDUSTRIAL, COMMERCIAL, OR BUSINESS<br />
USE. The manufacturer will replace FREE OF CHARGE, under the warranty conditions the entire<br />
unit or any part (at our option) which proves defective in material and/or workmanship under<br />
normal installation, use and service. This warranty is limited to defective parts as stated. All costs<br />
of removal and installation of the <strong>faucet</strong>, including the replacement of warranty parts are the<br />
responsibility of the purchaser. The manufacturer shall not be liable for incidental, consequential<br />
or special damages arising at or in connection with product use or performance except as may<br />
otherwise be accorded by law. This warranty gives you specific legal rights, and you may also<br />
have other rights which may vary from state to state. Any damage to this <strong>faucet</strong> as a result of misuse,<br />
abuse, neglect, accident, improper installation, or any use violating instructions furnished by us,<br />
WILL VOID THIS WARRANTY. When requesting warranty service, you will need to present a copy<br />
of your sales receipt as proof of purchase. To obtain warranty service, call our customer service<br />
department at 1-866-417-7564.<br />
5
REPLACEMENT PARTS LIST<br />
For replacement parts, call our customer service department at 1-866-417-7564,<br />
8 a.m. - 8 p.m., EST, Monday - Friday.<br />
Part Description Part #<br />
A Shower Flange RP38046*<br />
B Shower Arm RP38054*<br />
C Shower Head RP38055*<br />
D Handle RP13095*<br />
E Set Screw RP50002<br />
F Screw RP50070<br />
G Inverter RP64043<br />
H Screw RP50066*<br />
I Escutcheon RP80191*<br />
J Sleeve RP80032*<br />
K O-ring RP60018<br />
L Cartridge RP20006<br />
M Plug RP70153<br />
N Tub Spout RP33019*<br />
O Seal Seat RP70024<br />
P Seal Washer RP64133<br />
* Available in Brushed Nickel Finish<br />
Shower only <strong>faucet</strong> does not include Part N,<br />
O, or P.<br />
D<br />
F<br />
G<br />
E<br />
H<br />
I<br />
C<br />
B<br />
K<br />
J<br />
P<br />
O<br />
A<br />
N<br />
L<br />
M<br />
6