2 WIRE INTERCOM SYSTEM
2 WIRE INTERCOM SYSTEM
2 WIRE INTERCOM SYSTEM
- No tags were found...

You also want an ePaper? Increase the reach of your titles
YUMPU automatically turns print PDFs into web optimized ePapers that Google loves.
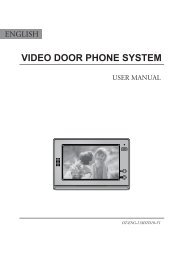
ENGLISH<br />
2 <strong>WIRE</strong> <strong>INTERCOM</strong> <strong>SYSTEM</strong><br />
USER MANUAL<br />
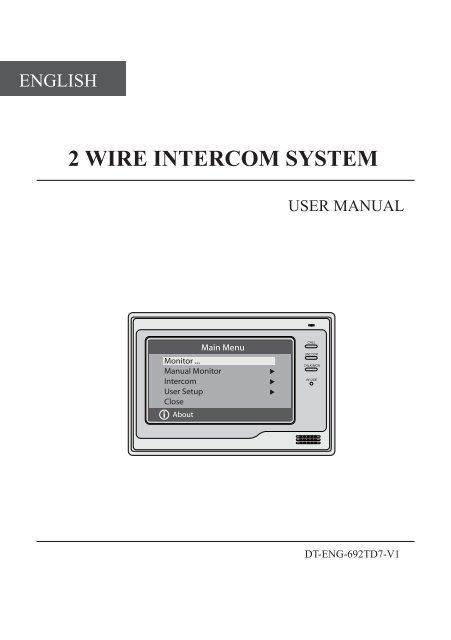
Main Menu<br />
Monitor ...<br />
Manual Monitor<br />
Intercom<br />
User Setup<br />
Close<br />
i<br />
About<br />
CALL<br />
UNLOCK<br />
TALK/MON<br />
IN-USE<br />
DT-ENG-692TD7-V1
ON<br />
DIPS<br />
1 2 3 4 5 6<br />
L1<br />
L2<br />
1<br />
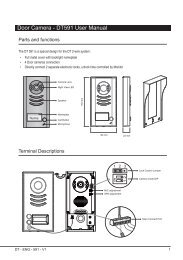
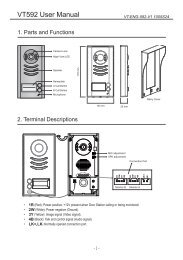
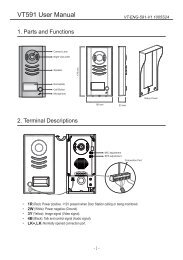
1. Parts and Functions<br />
LCD Touch Screen<br />
Microphone<br />
Main Menu<br />
Monitor ...<br />
Manual Monitor<br />
Intercom<br />
User Setup<br />
Close<br />
i About<br />
CALL<br />
UNLOCK<br />
TALK/MON<br />
IN-USE<br />
CALL button<br />
UNLOCK button<br />
TALK/MON button<br />
LED indicator<br />
Speaker<br />
Ventilation Vent<br />
Mounting Hook<br />
BT1<br />
BT2<br />
EH<br />
GND<br />
VD<br />
Connection Port<br />
Mounting Hook<br />
Key functions<br />
LCD screen<br />
LED Indicator<br />
Unlock button<br />
Call button<br />
Talk/Mon button<br />
Microphone<br />
Mounting hook<br />
Connection port<br />
Speaker<br />
Display the visitors' image<br />
Show the working status of monitor<br />
Press to release the door<br />
Press to activate intercom function<br />
Press to communicate hands free with visitor<br />
Press to view the outdoor condition in standby mode<br />
Receive voice from the user<br />
Use to hang up the monitor<br />
Bus terminal<br />
Send out vioce from the visitor
2<br />
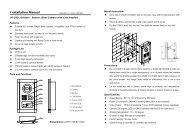
2. Monitor Mounting<br />
145~160 cm<br />
1. Use the screws to fix the Mounting Bracket on the mounting box.(fitting accesories<br />
includes a Bracket (Two pieces of 4X25 screws are needed for fastening the<br />
Mounting Bracket), Special 2 wire cables to connect with Monitor)<br />
2. Wire the system correctly(see the later connection chapter) then hang the Monitor<br />
on the Mounting Bracket firmly.<br />
3. Main Menu<br />
1. Touch the screen anywhere on monitor in standby mode, the date/time page will be<br />
showed. (the date/time page will be closed in 1 minute if no operation)<br />
2. Touch the screen again, main menu page will be showed as follows.<br />
12/28/2010 Thu.<br />
06 : 44 AM<br />
Main Menu<br />
Monitor ...<br />
Manual Monitor<br />
Intercom<br />
User Setup<br />
Close<br />
i About
3<br />
4. Basic Door Release Operation<br />
1. Press CALL button on outdoor station, the<br />
Monitor rings, at the same time, the screen<br />
displays the visitor image.<br />
DS-1 00:23<br />
2. Press TALK/MON Button on monitor or touch<br />
icon on screen, you can communicate hands<br />
free with the visitor for 90 seconds.After finishing<br />
communication,press TALK/MON button again<br />
or touch icon to end the communication. If nobody answers the phone, the<br />
screen will be turned off automatically after 30 seconds.<br />
3. During talking state, Press UNLOCK Button or touch or icon to open the<br />
corresponding door for the visitor.<br />
4. When the monitor is in standby mode, press TALK/MON Button(or touch<br />
Monitor ... item on main menu page), The screen can display the view of outside.<br />
If multi door stations are installed, touch icon to get into the camera switch<br />
mode(or direct touch Manual Monitor item on main menu page). You can touch<br />
camera 1/2/3/4 to monitor the door station or CCTV camera you want.See the<br />
following diagrams.(Press TALK/MON button again to end monitoring.)<br />
DS-1 00:23<br />
Monitor Select<br />
Camera 1 ...<br />
Camera 2 ...<br />
Camera 3 ...<br />
Camera 4 ...<br />
Monitor Time Set ...<br />
Exit Home<br />
5. Intercom Function<br />
When the monitor is in standby mode, press CALL<br />
Button to enter Intercom Function page(or direct<br />
touch Intercom item on main menu page).<br />
Exit<br />
Intercom<br />
Intercom Call ...<br />
Inner Call ...<br />
Direct Call Guard Unit ...<br />
Home
4<br />
1. Intercom Call: User in one apartment can call other apartments in the system. the<br />
namelist will be created automatically by the system. Touch a name you want on<br />
the screen, then touch icon or press CALL<br />
Intercom Call<br />
Button on monitor to dial.(Note:1. touch icon<br />
or press CALL button again to redial. 2. Press<br />
TALK/MON button to cancel the call. 3.The<br />
DIP switches code of each monitor must set<br />
different.)<br />
[ 00 ] Jim. Zhang<br />
[ 01 ] Calo. Liu<br />
[ 02 ] Jacko. Zhang<br />
[ 03 ] Philips. Chen<br />
[ 04 ] Hebe. Zhang<br />
[ 05 ] Tony. Li<br />
Exit Calling Next Page<br />
2. Inner Call: If multi Monitors are installed in the<br />
same apartment, select Inner Call, all the other Monitors will ring at the same time,<br />
whichever Monitor answers the call, conversation is started.and the other monitors<br />
will stop ringing at the same time.(note:the DIP switches setting of all monitors<br />
must be same. )<br />
3. Direct Dial Guard unit: A Monitor can be assigned as Guard Unit Monitor; when<br />
the Guard Unit Monitor answers the call, conversation with the guard person is<br />
started..<br />
6. Basic Setup Instructions<br />
Ring Tone Settings<br />
Touch User Setup item on main menu page to enter setup page.Touch Door Station Call<br />
Tone, Inercom Call Tone or DoorBell Tone item, There are 12 pieces ring tones can be<br />
selected.touch a ring tone you want, then touch icon to save and exit.(touch icon<br />
to cancel the setting and return last page, touch icon to get into main menu page)<br />
Door Station Call Tone:set the ring tone calling from outdoor station.<br />
Intercom Tone:set the ring tone calling from other apartments.<br />
DoorBell tone:set the ring tone calling from door bell.<br />
Exit<br />
User Setup (1)<br />
Door Station Call Tone ...<br />
Intercom Call Tone ...<br />
DoorBell Tone ...<br />
Clock ...<br />
Next Page<br />
Home<br />
Door Station Call Tone<br />
Selected: 06<br />
1 Carmen 5 Sonatine 9 Do Re Me<br />
2 Ding Dong 6 Edelweiss 10 Happy Birthday<br />
3 Rain 7 Going Home 11 Jingle Bells<br />
4 For Alice 8 Congratulation 12 Telephone Ring<br />
Cancel Home Save&Exit
5<br />
Ring Volume and Night Ring Volume Setting<br />
You can set a ring volume for day time and night<br />
time individually, 6:00 AM~18:00 PM is the day<br />
time and 18:00 PM~6:00 AM is the night time by<br />
default,if you don't want to be disturbed at night,you<br />
can set the night ring volume to 0.<br />
Touch User Setup item on main menu page to<br />
enter setup page,then touch Next Page item to enter<br />
User Setup 2 page, select Ring Volume Setting or<br />
Night Ring Volume item. then touch ▲ / ▼ icon to<br />
increase / decrease the value; After finish, touch<br />
icon to save and exit.(touch icon to cancel the<br />
setting and return last page, touch icon to get into<br />
main menu page)<br />
User Setup (2)<br />
Ring Volume ...<br />
Night Ring Volume ...<br />
TPC Configure ...<br />
Restore to default ...<br />
Last Page<br />
Exit<br />
Home<br />
Ring Volume<br />
Current : 05<br />
Cancel Home Save&Exit<br />
7. Date and Time Setting<br />
Touch User Setup item on main menu page to enter<br />
setup page, touch Clock... item. a digital keypad<br />
will be showed on screen, input date and time by<br />
touching the digital keypad,use * icon to move the<br />
location. After finish, touch icon to save and<br />
exit.(touch icon to cancel the setting and return<br />
last page.)<br />
Clock<br />
2010 - 12 - 28 15 : 00<br />
1 2 3<br />
4 5 6<br />
7 8 9<br />
*<br />
0 #<br />
Cancel Save&Exit<br />
8. Monitor Time settig<br />
Touch Manual Monitor item on main menu page<br />
to get into camera switch mode, select Monitor Time<br />
Set... item. touch ▲ / ▼ icon to increase / decrease<br />
the value; After finish, touch icon to save and<br />
exit.(touch icon to cancel the setting and return<br />
last page, touch icon to get into main menu page)<br />
Monitor Time Select<br />
Current : 01min<br />
Cancel Home Save&Exit
6<br />
9. Restore to Default<br />
Touch User Setup item on main menu page to enter setup page,then touch Next Page<br />
item to enter User Setup 2 page, touch Restore to default item ,a message will be asked<br />
to confirm the restore operation. If touch icon ,All settings will be restored to<br />
default, if you don't want to restore, touch icon to cancel the operation.(Note that the<br />
restore to default operation will not change the time setting and the datas.)<br />
Exit<br />
User Setup (2)<br />
Ring Volume ...<br />
Night Ring Volume ...<br />
TPC Configure ...<br />
Restore to default ...<br />
Last Page<br />
Home<br />
Restore to Default<br />
Are you sure to<br />
Restore all to default<br />
Cancel OK<br />
10. Monitor Parameter Setting<br />
How to enter the installation setting page<br />
Main Menu<br />
Monitor ...<br />
Manual Monitor<br />
Intercom<br />
User Setup<br />
Close<br />
i About<br />
H/W : DT14-CT a1.3<br />
S/W:<br />
V17.11.418.00<br />
Local addr: ---<br />
Unlock timing: ---<br />
Unlock2 select: -<br />
Video standard: -<br />
Language: ---<br />
Exit<br />
Input Code Number:[- - - -]<br />
1 2 3<br />
4 5 6<br />
7 8 9<br />
*<br />
0 #<br />
Exit Home<br />
1.Touch item<br />
on main menu page.<br />
2.Touch the screen<br />
anywhere and hold for<br />
2s.<br />
3.A digital keypad<br />
will be showed.<br />
How to set the monitor as a Guard Monitor<br />
A Monitor can be assigned as Guard Unit Monitor; when the Guard Unit Monitor<br />
answers the call, conversation with the guard person is started..<br />
The code number of 8004 is used to set the monitor as a guard unit monitor and 8005 is<br />
used to cancel this function.
1<br />
2<br />
3<br />
4<br />
1<br />
2<br />
3<br />
4<br />
1<br />
2<br />
3<br />
4<br />
1<br />
2<br />
3<br />
4<br />
7<br />
How to set the slave monitor address<br />
Maximum 4 monitors can be connected in one apartment,one master monitor together<br />
with 3 slave monitors, so you should set the address correctly.(note:must have one<br />
monitor to be set as master monitor)<br />
The code of 8000 is used to set the master monitor.<br />
The code of 8001 is used to set the first slave monitor .<br />
The code of 8002 is used to set the second slave monitor .<br />
The code of 8003 is used to set the third slave monitor .<br />
Note:touch * button to cancel the input,touch # to save the settings.<br />
.How to set date and time format<br />
The system offers two methods of date and time.<br />
The code number of 8008 is used to set the date format as month/date/year<br />
The code number of 8009 is used to set the date format as date/month/year<br />
The code number of 8012 is used to set the time format as 12 hour system<br />
The code number of 8013 is used to set the time format as 24 hour system<br />
How to set the monitor panel on<br />
In default mode,when receive a calling,the master and slave monitors will ring at the<br />
same time,and just the master monitor can display the image while the slave monitors<br />
can not.But the settings can be changed,you can set the master monitor and all the slave<br />
monitors to panel on at the same time when receiving a call, just input the code number<br />
of 8006 on each slave monitor.
8<br />
How to set the unlock parameter<br />
Unlock mode:<br />
There are two unlock modes: 1.power-on- to-unlock type:unlock mode=0(by default)<br />
2.power-off-to-unlock:unlock mode=1.<br />
The code number of 8010 is used to set the unlock mode to 0<br />
The code number of 8011 is used to set the unlock mode to 1<br />
Unlock time:<br />
The unlock time can be changed by yourself at any time.it can be set from 1 to 9 seconds.<br />
The code number from 8021 to 8029 are used to set the unlock time to 1~ 9 seconds.<br />
How to set the menu language<br />
The monitor can support multi languages and it is so simple and fast, just input the<br />
corresponding language code on monitor.The language code number are as follows:<br />
8101: English<br />
8102: French<br />
8103: Spanish<br />
8104: Italian<br />
8105: German<br />
8106: Dutch<br />
8107: Portuguese<br />
8108: S-Chinese<br />
8109: T-Chinese<br />
8110: Greek<br />
8111: Turkish<br />
8112: Polish<br />
8113: Russian<br />
8114: Slovakia<br />
8115: Hungray<br />
8116: Czech<br />
Note:the monitor can only support 4 types of languages.English,French,Spanish and<br />
German are default.But you can customize any 4 languages by yourself.The language<br />
which is unavailable will be set to English in default.
9<br />
11. Screen and Volume Adjustment<br />
During monitoring or talking, touch icon,the ADJUST MENU will be displayed.<br />
Touch and select the adjustment item you want; touch / icon to decrease / increase<br />
the value.<br />
1. The first item is Scene mode selection: Total 4<br />
screen modes can be selected in sequence: Normal,<br />
User, Soft and Bright. Whenever you modify<br />
Brightness or colour, Scene item will be set to User<br />
mode automatically.<br />
2. The Brightness and Colour item is for the image<br />
quality setting, adjust the value to get the best<br />
image you like.<br />
3. The Ratio item is for screen display adjustment,you can set to 16:9 or 4:3.<br />
4. The Talk Volume item is for talking volume adjustment.<br />
Scene<br />
Normal<br />
Bright 6<br />
Color 6<br />
Ratio 16:9<br />
Talk Volume 2<br />
5. Note that all the modifications will be performed immediately after the operation.<br />
Touch icon to exit the adjust page.<br />
Exit<br />
Dec<br />
Inc<br />
12. Specification<br />
●●<br />
Power supply for indoor monitor:●● ● DC 24V<br />
●●<br />
Power consumption:● ●● Standby 1.5W; Working status 10W<br />
●●<br />
Monitor screen: ● 7 Inch digital color LCD<br />
●●<br />
Display Resolutions: ● 800*3(R, G, B) x 480 pixels<br />
●●<br />
Video signal: ● 1Vp-p, 75Ω, CCIR standard<br />
●●<br />
Wiring: ● 2 wires, non-polarity<br />
●●<br />
Dimension: ● 155(H)×225(W)×28(D)mm
Note<br />
10
DT-ENG-692TD7-V1<br />
The design and specifications can be changed without notice to the user. Right to<br />
interpret and copyright of this manual are preserved.