Top Gun - FineScale Modeler
Top Gun - FineScale Modeler
Top Gun - FineScale Modeler
- No tags were found...

Create successful ePaper yourself
Turn your PDF publications into a flip-book with our unique Google optimized e-Paper software.
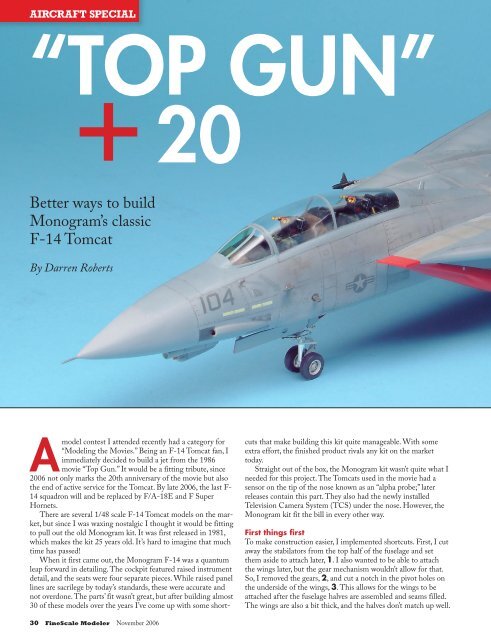
AIRCRAFT SPECIAL<br />
“<strong>Top</strong> <strong>Gun</strong>”<br />
+ 20<br />
Better ways to build<br />
Monogram’s classic<br />
F-14 Tomcat<br />
By Darren Roberts<br />
A<br />
model contest I attended recently had a category for<br />
“Modeling the Movies.” Being an F-14 Tomcat fan, I<br />
immediately decided to build a jet from the 1986<br />
movie “<strong>Top</strong> <strong>Gun</strong>.” It would be a fitting tribute, since<br />
2006 not only marks the 20th anniversary of the movie but also<br />
the end of active service for the Tomcat. By late 2006, the last F-<br />
14 squadron will and be replaced by F/A-18E and F Super<br />
Hornets.<br />
There are several 1/48 scale F-14 Tomcat models on the market,<br />
but since I was waxing nostalgic I thought it would be fitting<br />
to pull out the old Monogram kit. It was first released in 1981,<br />
which makes the kit 25 years old. It’s hard to imagine that much<br />
time has passed!<br />
When it first came out, the Monogram F-14 was a quantum<br />
leap forward in detailing. The cockpit featured raised instrument<br />
detail, and the seats were four separate pieces. While raised panel<br />
lines are sacrilege by today’s standards, these were accurate and<br />
not overdone. The parts’ fit wasn’t great, but after building almost<br />
30 of these models over the years I’ve come up with some shortcuts<br />
that make building this kit quite manageable. With some<br />
extra effort, the finished product rivals any kit on the market<br />
today.<br />
Straight out of the box, the Monogram kit wasn’t quite what I<br />
needed for this project. The Tomcats used in the movie had a<br />
sensor on the tip of the nose known as an “alpha probe;” later<br />
releases contain this part. They also had the newly installed<br />
Television Camera System (TCS) under the nose. However, the<br />
Monogram kit fit the bill in every other way.<br />
First things first<br />
To make construction easier, I implemented shortcuts. First, I cut<br />
away the stabilators from the top half of the fuselage and set<br />
them aside to attach later, 1. I also wanted to be able to attach<br />
the wings later, but the gear mechanism wouldn’t allow for that.<br />
So, I removed the gears, 2, and cut a notch in the pivot holes on<br />
the underside of the wings, 3. This allows for the wings to be<br />
attached after the fuselage halves are assembled and seams filled.<br />
The wings are also a bit thick, and the halves don’t match up well.<br />
30 <strong>FineScale</strong> <strong>Modeler</strong> November 2006
1 /48 Scale | Aircraft | How-to<br />
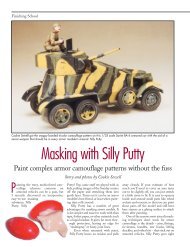
To commemorate the retirement of the Tomcat<br />
and the 20th anniversary of the movie “<strong>Top</strong><br />
<strong>Gun</strong>,” Darren modeled “Maverick’s” jet from the<br />
Monogram kit. FSM photo.<br />
1 2<br />
The first thing Darren does is separate the horizontal stabilizers from the<br />
upper fuselage half.<br />
Next up is removing the working swing-wing gear to make it possible to<br />
add the wings after assembling the fuselage.<br />
A simple remedy is to level the mating surfaces with a sanding<br />
stick, 4. This thins the wings and improves the fit.<br />
The office<br />
Before the fuselage could be assembled, the cockpit needed to be<br />
completed and installed. The cockpit detail is good, 5, despite its<br />
vintage. With careful painting and dry-brushing, it looks great. I<br />
painted the entire tub and instrument panels dark gull gray (FS<br />
36231) and the individual bezels and consoles a very dark gray.<br />
After dry-brushing with gunship gray (FS 36118), I picked out<br />
the knobs and switches with white. I dry-brushed with gunship<br />
gray one more time and gave the entire tub a wash of thinned<br />
Tamiya smoke (No. X-19) This leaves a gloss finish, so I sprayed<br />
clear flat over the entire tub.<br />
Installation of the cockpit leaves tricky-to-fill gaps. I turned<br />
the fuselage upside down and set the cockpit inside, then applied<br />
a bead of gap-filling super glue along the back edge of the tub to<br />
secure the assembly, 6.<br />
Chop, drill, and slice<br />
Monogram molded a little bit of the fuselage sides with the<br />
intake trunks. If the intakes are installed as is, the seam is difficult<br />
November 2006 www.finescale.com 31
3<br />
The pivot points on the swing wings also have to<br />
be removed.<br />
4<br />
To improve the fit of the wing halves, Darren<br />
sanded the inside surfaces.<br />
5 6<br />
All Darren needed to do was paint the raised and<br />
recessed details of the Tomcat’s “office.”<br />
Gaps around the back edge of the cockpit tub<br />
were eliminated with gap-filling super glue.<br />
7 8<br />
Removing the small section from the intake trunks makes it easier to fill<br />
fuselage seams.<br />
Joining the small section to the fuselage without the intake trunk in the way<br />
is an obvious improvement.<br />
32 <strong>FineScale</strong> <strong>Modeler</strong> November 2006
9 10<br />
Darren sharpened the blunt nose cone with various<br />
grades of sanding sticks.<br />
To make the intake trunks fit better, Darren<br />
refined the shape of the mating surfaces.<br />
11 12<br />
Sharper corners allow the intake trunks to fit more tightly.<br />
Thinning the aft edges of the trunks also helps.<br />
to fill. I cut away the fuselage sections from the intake trunks<br />
with a razor saw, 7, and glued them onto the fuselage, 8. I left<br />
the intake tunnels for later.<br />
I wanted to attach the radome before puttying so everything<br />
could be blended together. Since the early Monogram kit didn’t<br />
come with a nose alpha probe, I used a pin instead. My kit’s<br />
radome had a deformed tip, but five minutes with a coarse-grade<br />
sanding stick smoothed it to the correct shape, 9. I drilled a hole<br />
in the tip of the radome and super glued the pin from the inside.<br />
I cut the pin off at the correct length and sanded its tip to remove<br />
any rough edges. With the alpha probe in place, I attached the<br />
radome, puttied the seams, let it dry, and sanded everything<br />
smooth. I lost the raised detail when sanding the seams, but I<br />
would take care of that later.<br />
Monogram’s intake tunnels present several seams that are<br />
awkward to fill. I decided to forgo some of this work by installing<br />
my own line of Steel Beach Accessories vinyl F-14 FOD covers<br />
on the front of the intakes. With the covers on, nobody can see<br />
the seams inside the intakes. But there are still seams on the outsides<br />
to fill: With a hobby knife, I shaved away the placement<br />
wedges on the fuselage, 10 and 11. I also thinned down the<br />
inside of the intakes where they attach to the fuselage to make<br />
them fit better, 12. I glued the intakes into place, puttied, and<br />
sanded the seam smooth.<br />
Get those legs in shape<br />
The landing gear is nicely detailed, but it doesn’t quite attach to<br />
the model at the correct angle. If you’re not careful, the finished<br />
main landing gear has a strange, canted appearance. To help<br />
avoid this, I drilled a hole in the small connecting point on the<br />
intake tunnel, 13. Then I sanded down the inside of the gear leg,<br />
14. This provides some room for the gear to be glued into the<br />
well. I also sanded the end of the retraction strut where it glues to<br />
the well, as it’s a bit too long, 15. This helped me place the gear<br />
legs correctly.<br />
Break out the paint gun<br />
With construction complete, it was time for my favorite part of<br />
modeling – painting! After watching the “<strong>Top</strong> <strong>Gun</strong>” movie a few<br />
dozen times, I could see the paint job on the Tomcats featured in<br />
the film was less than pristine. Maverick’s Tomcat had a patchwork<br />
of touch-up colors as well as an entire replacement panel in<br />
a completely different color.<br />
I began by spraying the base colors for the Tactical Paint<br />
Scheme (TPS), 16. I used Model Master Acryl paint; it covers<br />
well, it’s easy to hand-paint small areas and, best of all, it has little<br />
odor. I sprayed the top side blue gray (FS 35237), the sides of the<br />
fuselage and tails dark ghost gray (FS 36320), and the undersides<br />
light ghost gray (FS 36375).<br />
November 2006 www.finescale.com 33
13 14<br />
Holes drilled in the intake trunks help align the main gear struts.<br />
Sanding the inboard side of the main strut helps prevent splayed gear.<br />
15 16<br />
Shortening the end of the retraction strut also helps the installation.<br />
Here’s the fuselage put together and masked prior to applying the standard<br />
TPS camouflage paint pattern.<br />
17 18<br />
To simulate frequent retouching to the real aircraft, Darren outlined panels<br />
with gunship gray.<br />
Over the gunship gray are thin lines of light ghost gray.<br />
34 <strong>FineScale</strong> <strong>Modeler</strong> November 2006
19 20<br />
The “retouching” looks prototypical on the wings.<br />
To accent panel lines, Darren used a fine draftsman’s pen guided by lowtack,<br />
easy-to-remove Post-it Notes.<br />
21<br />
The pen is followed by a scrubbing with burnt-umber pastel chalk dust.<br />
22<br />
Excess ink and chalk dust is removed with a dampened cotton swab.<br />
With the base colors dry, it was time to make Mav’s “<strong>Top</strong><br />
<strong>Gun</strong>” Tomcat look not-so “top.”<br />
During the last few decades, Navy jets have looked pretty<br />
ragged. To keep salt air from corroding exposed metal, paint on<br />
Navy jets is constantly retouched. The color of paint used really<br />
doesn’t matter as long as it’s gray. When these touch-ups are<br />
done, the fresh paint is considerably lighter than the surrounding<br />
area, which has collected dirt and grime. To replicate this, I<br />
sprayed the panel lines and various other areas with gunship gray<br />
(FS 36118), 17. Switching to a fine-tipped nozzle on my airbrush,<br />
I went back over these areas with light ghost gray, 18. The<br />
trick is to leave a hint of the gunship gray at the edges of the<br />
lighter color, 19. I blended everything with a light misting of<br />
dark ghost gray over all the upper surfaces.<br />
I find rescribing both tedious and daunting. So, I didn’t sand<br />
off the kit’s raised panel lines, instead accenting them with a<br />
draftsman’s .005" ink pen. Using a Post-it Note as a straightedge,<br />
I ran the pen along each panel line, 20. Next, I scoured burntumber<br />
pastel chalk dust along select panel lines with a stub brush,<br />
21. I wiped off the excess ink and chalk with a damp cotton<br />
swab, 22.<br />
But, what could I do about the areas where sanding obliterated<br />
the panel lines (pretty much the entire forward fuselage section)<br />
Again, the ink pen came to my rescue. Using thin strips of<br />
low-tack masking tape, I marked each panel line and simply drew<br />
it on, 23. Again, the pastel chalk and damp cotton swab followed<br />
up. The result is convincing: panel lines with a fraction of the<br />
work required by rescribing, 24. This method also was a lot more<br />
forgiving of mistakes, as I had a few seconds to wipe away the<br />
wet ink if necessary.<br />
Maverick and Goose<br />
I was able to find a set of Testors kit decals from its “<strong>Top</strong> <strong>Gun</strong>”<br />
F-14 release. Both Maverick’s and Iceman’s markings are on the<br />
November 2006 www.finescale.com 35
23 24<br />
Most of the raised panel lines had been sanded down on the nose during<br />
seam cleanup<br />
Darren drew new panel lines with the ink pen.<br />
25 26<br />
After the final flat overcoat, Darren added a little more grunge with an oil<br />
wash.<br />
Excess oil wash was removed with a cloth dampened in Turpenoid.<br />
sheet – but who wants to make a model of the bad guy’s jet The<br />
decals were a little thick, but they settled down nicely with some<br />
Micro Sol. To avoid decal silvering, I brushed Future floor polish<br />
under the decals, then wiped up the excess with a damp paper<br />
towel. When all the decals were in place, I sprayed a coat of<br />
Future to seal everything, then flat-coated the entire model with<br />
Model Master Acryl clear flat.<br />
Finishing touches<br />
When the flat coat was dry, I added one final oil wash for<br />
“grime.” I thinned lamp-black artist’s oil paint to the consistency<br />
of milk with Turpenoid and brushed it along all of the panel<br />
lines, both raised and engraved, 25. (Turpenoid won’t harm the<br />
underlying paint or decals.) I let it sit for about 30 minutes while<br />
the oil paint dried, then wiped excess oil paint from the panel<br />
lines using a paper towel dampened with Turpenoid, 26. Don’t<br />
let the oil wash sit too long, though, because once it cures, its<br />
stains are difficult to remove.<br />
With that, my F-14 was finished. It was fun to bring back<br />
those fond childhood memories by building the old Monogram<br />
kit. It also gave me an excuse to watch “<strong>Top</strong> <strong>Gun</strong>” a few more<br />
times! FSM<br />
36 <strong>FineScale</strong> <strong>Modeler</strong> November 2006
The end of an era: Goodbye to the F-14 Tomcat<br />
Designed to fill a Navy requirement<br />
for a fleet defense fighter to<br />
replace the aging F-4 Phantom II, the<br />
Tomcat was conceived after the failed<br />
attempt to develop a joint Navy/Air<br />
Force fighter, the F-111A and B.<br />
Cost overruns and lack of performance<br />
had doomed the Navy F-111B<br />
from reaching operational service. Its<br />
death came at a Senate Committee<br />
meeting with Navy higher-ups. When<br />
asked if the underpowered F-111B<br />
could meet requirements with more<br />
powerful engines, Admiral Thomas<br />
Connolly, for which the Tomcat is<br />
named, answered, “Mister Chairman,<br />
all the thrust in Christendom couldn’t<br />
make a fighter out of that airplane.”<br />
With that, the F-14 Tomcat was born.<br />
For the past 34 years, the F-14 has<br />
graced the decks of U.S. Navy aircraft<br />
carriers sailing around the world. The<br />
Grumman aircraft has served with 30<br />
fleet squadrons, been involved in<br />
numerous conflicts, and proven<br />
throughout its distinguished career to<br />
be one of the most capable fighters of<br />
all time.<br />
It began its service at the end of<br />
the Vietnam War, covering the evacuation<br />
of Saigon from the deck of the<br />
USS Enterprise. In the 1980s, Tomcat<br />
crews shot down four Libyan airplanes<br />
and intercepted an airliner carrying<br />
terrorists. They have flown<br />
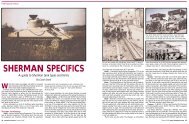
One of the last Tomcats in service, a VF-213 “Black Lions” F-14 taxis to the bow catapult on the<br />
USS Theodore Roosevelt (CVN-71). The aircraft boasts full-color markings and, coincidentally, a<br />
213 nose number. Darren Roberts photo.<br />
countless hours in the skies of Iraq.<br />
Most recently, F-14s have participated<br />
in action over Afghanistan, and they<br />
are ending their service dropping<br />
bombs in Operation Iraqi Freedom.<br />
I’ve been fortunate over the years<br />
to have seen a number of F-14s up<br />
close. My most memorable experience<br />
was a visit to the USS Theodore<br />
Roosevelt (CVN-71) during work-ups<br />
for the last Tomcat cruise. I was able<br />
to photograph flight operations of the<br />
last F-14 squadrons, VF-31 and VF-<br />
213.<br />
By the time you read this, all the<br />
Tomcats will have been retired. New<br />
jets have come along, but the F-14<br />
Tomcat will forever be a part of thousands<br />
of aviation enthusiasts’ – and<br />
modelers’ – memories.<br />
– Darren Roberts<br />
NAME<br />
YEAR<br />
VF-1 Wolfpack (1972 – 1993)<br />
VF-2 Bounty Hunters (1972 – 2003)<br />
VF-11 Red Rippers (1980 – 2005)<br />
VF-14 <strong>Top</strong>hatters (1974 – 2001)<br />
VF-21 Freelancers (1984 – 1996)<br />
VF-24 Fighting Renegades (1975 – 1996)<br />
VF-31 Tomcatters (1980 – 2006)<br />
VF-32 Swordsmen (1973 – 2005)<br />
VF-33 Tarsiers/Starfighters (1981 – 1993)<br />
VF-41 Black Aces (1976 – 2001)<br />
VF-51 Screaming Eagles (1978 – 1995)<br />
VF-74 Bedevilers (1983 – 1994)<br />
VF-84 Jolly Rogers (1975 – 1995)<br />
VF-101 Grim Reapers (1975 – 2005)<br />
VF-102 Diamondbacks (1981 – 2002)<br />
Operational F-14 Tomcat Fleet Squadrons<br />
NAME<br />
YEAR<br />
VF-103 Sluggers/Jolly Rogers (1983 – 2005)<br />
VF-111 Sundowners (1978 – 1995)<br />
VF-114 Aardvarks (1975 – 1993)<br />
VF-124 <strong>Gun</strong>fighters (1972 – 1994)<br />
VF-142 Ghostriders (1974 – 1995)<br />
VF-143 Pukin’ Dogs (1974 – 2005)<br />
VF-154 Black Knights (1984 – 2003)<br />
VF-191 Satan’s Kittens (1986 – 1988)<br />
VF-194 Red Lightnings (1986 – 1988)<br />
VF-201 Hunters (1986 – 1998)<br />
VF-202 Superheats (1987 – 1994)<br />
VF-211 Checkmates (1975 – 2004)<br />
VF-213 Black Lions (1976 – 2006)<br />
VF-301 Devil’s Disciples (1985 – 1994)<br />
VF-302 Stallions (1985 – 1994)<br />
November 2006 www.finescale.com 37