DMX-Player L - DMX4ALL GmbH
DMX-Player L - DMX4ALL GmbH
DMX-Player L - DMX4ALL GmbH
- No tags were found...
You also want an ePaper? Increase the reach of your titles
YUMPU automatically turns print PDFs into web optimized ePapers that Google loves.
<strong>DMX</strong>-<strong>Player</strong> L<br />
User Manual
<strong>DMX</strong>-<strong>Player</strong> L 2<br />
Description<br />
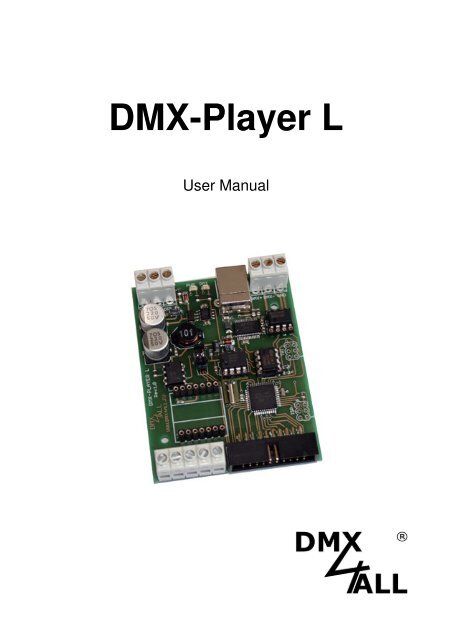
The <strong>DMX</strong>-<strong>Player</strong> L is a <strong>DMX</strong>-StandAlone device. The scenes provided in the PC can<br />
be loaded by USB on the device. Without PC the deposited scenes will be<br />
reproduced. The selection of the Scene can occur in different way. An application in<br />
the live operation with connected PC is as possible.<br />
Due to the easy handling the application is possible in decoration and presentation<br />
sections.<br />
IR INPUT<br />
IR<br />
DECODER<br />
POWER<br />
CONTROL<br />
RESET<br />
RTC<br />
SWITCH<br />
CONTROL<br />
DIGITAL<br />
INPUT<br />
PROGRAM<br />
CONTROL<br />
DIGITAL<br />
CONTROL<br />
RISC<br />
CONTROLLER<br />
MEMORY<br />
<strong>DMX</strong><br />
INTERFACE<br />
LED-DIMMER*<br />
<strong>DMX</strong>-OUT<br />
LED-OUT<br />
Energy Saving Design:<br />
By modern switch-power-supply-technology it will be generated less warmth<br />
considerably and therefore the energy consumption is lowered.<br />
Data Sheet<br />
Voltage supply:<br />
7-24V DC / 250mA (Without LED-Dimmer BABY)<br />
<strong>DMX</strong>-OUT:<br />
channels<br />
Internal clock (RTC)<br />
Digital control-input for control per button<br />
Program-Trigger up to 16 Timer possible<br />
Brightness-control per UP/DOWN button, Poti or IR<br />
Playback rate per UP/DOWN button, Poti or IR<br />
scenes Selection:<br />
first 10 per button<br />
first 16 per button-Matrix 4x4<br />
first 25 per button-Matrix 5x5<br />
up to 250 scenes per numerical keypad with ENTER and BLACKOUT<br />
first 10 per RC5 IR-remote control<br />
- USB-Connection to transfer of the scenes or as a PC <strong>DMX</strong>-Interface in the live<br />
operation<br />
- 8Kbyte Stand-Alone-Memory (up to 32kByte with 24C256 possible)<br />
- <strong>DMX</strong>-LED-Dimmer BABY slip-on<br />
Board-dimensions:<br />
64,2mm x 82mm
<strong>DMX</strong>-<strong>Player</strong> L 3<br />
Installation USB<br />
The Interface installation happens in two parts.<br />
Part 1: Installation the USB-driver<br />
- Put the <strong>DMX</strong> interface to a free USB port of your PC.<br />
There appears the announce-ment<br />
which was found new hardware.<br />
- Follow the hardware assistant and select for the drivers source Other Source<br />
specify and afterwards the place for the driver<br />
- Certify the located driver with Next and complete the driver’s installation with<br />
Finish/Complete.<br />
Part 2: Installation Vitrual COM-Port<br />
- After the installation of the USB driver a USB-Serial-Port will be automatically<br />
identify.<br />
There also appears the announcement new hardware was found.<br />
- Follow the hardware assistant and select for the drivers source Other Source<br />
specify and afterwards the place for the driver<br />
- Certify the located driver with Next and complete the driver’s installation with<br />
Finish/Complete.<br />
The installation can differ according to the used operating system and driver's<br />
version.<br />
The newest driver you can find on our hompage<br />
www.dmx4all.de
<strong>DMX</strong>-<strong>Player</strong> L 4<br />
Connections<br />
Voltage supply<br />
GND - 0V<br />
V+ - + 7 - 24V DC<br />
DIG IN - Control Input<br />
LED-Display<br />
RED - POWER OK<br />
GREEN - <strong>DMX</strong> OK<br />
Connection<br />
GND<br />
<strong>DMX</strong>-<br />
<strong>DMX</strong>+<br />
USB Connection<br />
TWI-Interface<br />
SCL<br />
NC<br />
+5V<br />
1<br />
SDA<br />
NC<br />
GND<br />
Scenememory<br />
EEPROM 8k (24C64)<br />
(Standard)<br />
EEPROM 32k /24C256)<br />
LED-Dimmer<br />
Expandability<br />
for <strong>DMX</strong>-LED-Dimmer BABY<br />
which is available as<br />
equipment<br />
Control-Access<br />
1 - PRG1 11 - SPD+<br />
2 - PRG2 12 - SPD-<br />
3 - PRG3 13 - INTENS+<br />
4 - PRG4 14 - INTENS-<br />
5 - PRG5 15 - PRG+<br />
6 - PRG6 16 - IR<br />
7 - PRG7 17 - SCL<br />
8 - PRG8 18 - SDA<br />
9 - PRG9 19 - GND<br />
10 - PRG10 20 - +5V<br />
For wiring see the following<br />
pages
<strong>DMX</strong>-<strong>Player</strong> L 5<br />
Program selection<br />
The selection of the deposited scenes can be effected with different wirings. Which<br />
wiring is used, must be configured in the Setup-Menu or the <strong>DMX</strong>-Configurator (For<br />
this see the part Configuration).<br />
The last selected scene will be recorded and after re-starting automatically<br />
launched.<br />
►See „Running one scene after power on“<br />
Selection per 10 button<br />
The first 10 stored scenes can be called directly about up to 10 buttons.<br />
Connection:<br />
PRG1<br />
PRG2<br />
PRG3<br />
PRG10<br />
1 2<br />
3<br />
10<br />
GND<br />
Selection about Button-Matrix 4x4 or 5x5<br />
With a Matrix-wiring it is possible to call up to 25 Programs per one button.<br />
Connection Matrix 4x4:<br />
PRG1 PRG2 PRG3 PRG4<br />
PRG5<br />
PRG6<br />
PRG7<br />
PRG8<br />
1 2 3 4<br />
5 6 7 8<br />
9 10 11 12<br />
13 14 15 16
<strong>DMX</strong>-<strong>Player</strong> L 6<br />
Connection Matrix 5x5:<br />
PRG1 PRG2 PRG3 PRG4<br />
PRG5<br />
PRG6<br />
PRG7<br />
PRG8<br />
PRG9<br />
PRG10<br />
1 2 3 4<br />
5<br />
6 7 8 9<br />
10<br />
11 12 13 14<br />
15<br />
16 17 18 19<br />
20<br />
21 22 23 24 25<br />
Selection about numeric keypad with ENTER and BLACKOUT<br />
The input of the executive Scene happens with the numeric keypad and next ENTER.<br />
The programs 1 up to 250 are possible.<br />
In addition, with the switch BLACKOUT the blackout function can be switched-on and<br />
switched-off with the key. The button ENTER automatically switches off the blackout<br />
function.<br />
Exampel: Scene 28: ‚2’ + ‚8’ + ‚ENTER’<br />
Scene 146: ‚1’ + ‚4’ + ‚6’ + ‚ENTER’<br />
Connection:<br />
PRG1 PRG2 PRG3<br />
PRG4<br />
PRG5<br />
PRG6<br />
PRG7<br />
BLACK<br />
OUT<br />
1 2 3<br />
4 5 6<br />
7 8 9<br />
0 ENTER<br />
Selection about 8-Bit-BCD Signal<br />
With a BCD control-signal up to 250 Scenes can be called. Therefore the 8 bits of the<br />
BCD signal to the entrances PRG1 to PRG8 have to be established.
<strong>DMX</strong>-<strong>Player</strong> L 7<br />
Brightness Setting<br />
The brightness setting can be carried out per UP/DOWN button or Potentiometer.<br />
INTENS+<br />
INTENS-<br />
+5V<br />
INTENS+<br />
+ -<br />
10k<br />
GND<br />
GND<br />
INTENS-<br />
Wiring with UP/DOWN button<br />
Wiring with Potentiometer<br />
During the operation the brightness value will be saved with the UP/DOWNbutton<br />
and retained during shutdown the <strong>DMX</strong>-<strong>Player</strong> L.<br />
Speed Setting<br />
The speed setting can be carried out per UP/DOWN button or Potentiometer.<br />
SPD+<br />
SPD-<br />
+5V<br />
SPD+<br />
+ -<br />
10k<br />
GND<br />
GND<br />
SPD-<br />
Wiring with UP/DOWN button<br />
Wiring with Potentiometer<br />
During the operation the speed value will be saved with the UP/DOWN-button and<br />
retained during shutdown the <strong>DMX</strong>-<strong>Player</strong> L.
Program StandAlone-function<br />
<strong>DMX</strong>-<strong>Player</strong> L 8<br />
The <strong>DMX</strong>-<strong>Player</strong> L has a user programmable StandAlone-function. The Scenes<br />
arranged in the PC (programmes) will be transferred once to the interface and then<br />
can be replayed.<br />
The software <strong>DMX</strong>-Configurator serves for the production and programming of the<br />
scenes. Under the menu point Settings→Communication settings the interface above<br />
which the <strong>DMX</strong>-Configurator finds the connected hardware will be set.<br />
Timer-<br />
Setting<br />
Step-admin<br />
Scenes-admin<br />
In the left part there is the scenes admin. Here the scenes can be set up and fixed in<br />
the order.<br />
The right part shows the step admin. Every Scene exists of one step at least. For the<br />
setting of different <strong>DMX</strong> values there are controller available. These are marked with<br />
the channel number. To reach all 512 <strong>DMX</strong> channels, you must select the <strong>DMX</strong><br />
channel area with the underneath horizontal racketeer. For every step different <strong>DMX</strong>values<br />
can be set for every channel.<br />
Furthermore for every step the fade time and residence time will be set with Fade<br />
Time and Wait Time.<br />
You can write the provided scenes in the Stand-Alone-memory of the <strong>DMX</strong> player<br />
"S". The transfer of the scenes to the interface can be started under<br />
Hardware→Write data.<br />
Attention: This process can last some time! Please, do not break off the transfer and<br />
wait for certification of the <strong>DMX</strong>-Configurators.
Executing a Scene after starting<br />
<strong>DMX</strong>-<strong>Player</strong> L 9<br />
After starting a specific scene can be replayed. For this, by compilating the scene in<br />
the <strong>DMX</strong>-Configurator the Default Scene on Start have to be denoted. If this is<br />
denoted, the selected scene under Default Scene on Start will be achieved by<br />
starting the <strong>DMX</strong>-<strong>Player</strong> L.<br />
Configuring the <strong>DMX</strong>-<strong>Player</strong> L<br />
The <strong>DMX</strong>-<strong>Player</strong> L can be configured about the <strong>DMX</strong>-Configurator from the version<br />
1.5. Select therefore Settings→Hardware settings by connected <strong>DMX</strong>-<strong>Player</strong> L. It<br />
appears the following dialogue:<br />
The first 6 selection fields fix<br />
the connected button<br />
configuration. Only one<br />
choice is possible<br />
Fade between Scenes<br />
allows fading between<br />
scenes<br />
Fill <strong>DMX</strong> outputs 512 <strong>DMX</strong>channels,<br />
from channel 193<br />
with the value 0.<br />
Configurating the used<br />
remote control: RC5 remote<br />
or <strong>DMX</strong>4ALL LED<br />
Configurating the DIG IN<br />
control input<br />
The configuration is transferred and stored by OK to the <strong>DMX</strong> player L.
<strong>DMX</strong>-<strong>Player</strong> L 10<br />
Internal Clock (RTC)<br />
The <strong>DMX</strong> player L disposes of an internal clock with which scenes can be start at<br />
adjustable times.<br />
Time setting<br />
Select in the <strong>DMX</strong>-Configurator<br />
Hardware→Syncronize Clock .<br />
Now the topical PC-PC-system-time will<br />
transferred on the <strong>DMX</strong> player L.<br />
Digital Input Control DIG IN<br />
The digital Input Control DIG-IN of the <strong>DMX</strong>-<strong>Player</strong> L can be configurated as follows:<br />
(see <strong>DMX</strong>-<strong>Player</strong> L configurating)<br />
- Process next program<br />
- Switch On/AOFF<br />
- ON/OFF (short activity)<br />
and brightness setting (long activity)<br />
- Process next program (short activity)<br />
and brightness setting (long activity)<br />
- Process „Default scene on start”<br />
The wiring of the Input control will be carried out as shown in the following view:<br />
7-24V<br />
GND<br />
GND<br />
V+<br />
DIG IN<br />
<strong>DMX</strong>-<strong>Player</strong> L
<strong>DMX</strong>-<strong>Player</strong> L 11<br />
IR-Operation<br />
The <strong>DMX</strong> player L allows an IR-Operation by means of external IR-Sensor. An IR-<br />
Sensor is connected to the Pin 16 of the Control connection.<br />
The stored scenes can be called by IR-remote control.<br />
The <strong>DMX</strong> player L can be used by <strong>DMX</strong>4ALL LED remote control.<br />
Operating with <strong>DMX</strong>4ALL LED-remote control<br />
The program selection happens about the keys 1,2,3 ... 9,0 according to the<br />
programs from the 1 up to 9. The key 0 is for a free colour setting.<br />
About the keys + and – the brightness and the speed is adjustable as well as is<br />
possible for a program selection.<br />
After actuating the key SPEED, the speed is adjustable;<br />
After actuating the key PROG SELECT, the programs are selectable;<br />
After actuating the key R, G or B, the brightness is adjustable.<br />
A separate setting for Red, Green and Blue is not<br />
possible.<br />
The switch BLACK OUT activates and deactivates<br />
the BlackOut-function. Besides the brightness<br />
setting will be persist.<br />
The switch FLASH activates and deactivates the<br />
Flash-function, which engaging all Channels on<br />
100%. Besides the brightness setting will be<br />
persist.
<strong>DMX</strong>-<strong>Player</strong> L 12<br />
CE-conformity<br />
This assembly (board) is controlled by a microprocessor and<br />
uses high frequency (8MHz). To get the characteristics of the<br />
assembly in relation to the CE-conformity, an installation in a<br />
compact metal casing is necessary.<br />
Risk-Notes<br />
You purchased a technical product. Conformable to the best available technology the<br />
following risks should not excluded:<br />
Failure risk: The device can drop out partially or completely at any time without<br />
warning. To reduce the probability of a failure a redundant system structure is<br />
necessary.<br />
Initiation risk: For the installation of the board, the board must be connected and<br />
adjusted to foreign components according to the device paperwork. This work can<br />
only be done by qualified personnel, which read the full device paperwork and<br />
understand it.<br />
Operating risk: The Change or the operation under special conditions of the<br />
installed systems/components could as well as hidden defects cause to breakdown<br />
within the running time.<br />
Misusage risk: Any nonstandard use could cause incalculable risks and is not<br />
allowed.<br />
Warning: It is not allowed to use the device in an operation, where the safety of<br />
persons depend on this device.
<strong>DMX</strong>4ALL <strong>GmbH</strong><br />
Reiterweg 2A<br />
D-44869 Bochum<br />
Germany<br />
© Copyright 2013 <strong>DMX</strong>4ALL <strong>GmbH</strong><br />
All rights reserve. No part of this manual may be reproduced in any form (photocopy, pressure, microfilm or in another<br />
procedure) without written permission or processed, multiplied or spread using electronic systems.<br />
All information contained in this manual was arranged with largest care and after best knowledge. Nevertheless errors are to be<br />
excluded not completely. For this reason I see myself compelled to point out that I can take over neither a warranty nor the legal<br />
responsibility or any adhesion for consequences, which decrease/go back to incorrect data. This document does not contain<br />
assured characteristics. The guidance and the characteristics can be changed at any time and without previous announcement.


