Outlook Calendar for Full-Time Faculty Class/Office Hours
Outlook Calendar for Full-Time Faculty Class/Office Hours
Outlook Calendar for Full-Time Faculty Class/Office Hours

You also want an ePaper? Increase the reach of your titles
YUMPU automatically turns print PDFs into web optimized ePapers that Google loves.
<strong>Class</strong> & <strong>Office</strong> Hour <strong>Calendar</strong><br />
Do not access calendar through webmail (OWA)<br />
Go to Start Menu, Programs, <strong>Outlook</strong><br />
A. Create Additional <strong>Calendar</strong>s<br />
In addition to the default Microsoft <strong>Outlook</strong> <strong>Calendar</strong>, you can create other <strong>Outlook</strong> calendars. For example, you can<br />
create a calendar <strong>for</strong> your <strong>Office</strong> <strong>Hours</strong>.<br />
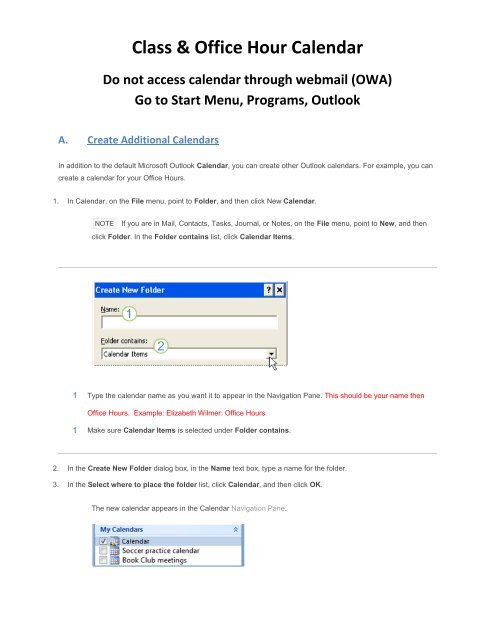
1. In <strong>Calendar</strong>, on the File menu, point to Folder, and then click New <strong>Calendar</strong>.<br />
NOTE<br />
If you are in Mail, Contacts, Tasks, Journal, or Notes, on the File menu, point to New, and then<br />
click Folder. In the Folder contains list, click <strong>Calendar</strong> Items.<br />
Type the calendar name as you want it to appear in the Navigation Pane. This should be your name then<br />
<strong>Office</strong> <strong>Hours</strong>. Example: Elizabeth Wilmer: <strong>Office</strong> <strong>Hours</strong><br />
Make sure <strong>Calendar</strong> Items is selected under Folder contains.<br />
2. In the Create New Folder dialog box, in the Name text box, type a name <strong>for</strong> the folder.<br />
3. In the Select where to place the folder list, click <strong>Calendar</strong>, and then click OK.<br />
The new calendar appears in the <strong>Calendar</strong> Navigation Pane.
To view a calendar, select the check box <strong>for</strong> the calendar name. When multiple check boxes are selected,<br />
the calendars appear in side-by-side view.<br />
B. Schedule <strong>Class</strong> and <strong>Office</strong> Hour times<br />
1. Create a new appointment
2. Schedule the Appointment. Example a MWF 9-10:00 office hour<br />
3. Make each scheduled time a recurring appointment
4. Format the recurring appointment. Include start time, end time,<br />
weekly pattern, select days of the week, start date of Aug. 22, and<br />
end date of Dec. 10.<br />
5. Hit “Save & Close”
C. Print your <strong>Calendar</strong><br />
1. Go to the file menu and select Print<br />
2. Under Print Style, select weekly style and under Print Range<br />
define the dates of a week of classes. Then hit Page Setup.
3. Here you can select the hours of the day that you want printed<br />
and whether you want the work week or the weekends. To set<br />
the hours of the day use the down hour <strong>for</strong> “Print From” and<br />
“Print To”. To get just the work week, select the “Only Print<br />
Workdays” box. To get the entire week, leave this box<br />
unchecked.<br />
4. Hit “Print” , then in the next window hit “Ok”
D. Share the <strong>Calendar</strong><br />
1. Select Only Your <strong>Office</strong> Hour <strong>Calendar</strong>. All others should be deselected.<br />
2. Right click that calendar<br />
3. Select “Share (name of your calendar)”<br />
4. In the To… box send this to Sandy Shelton, Lynn Painter, Lacey Carey<br />
and Debbie Yancey.<br />
5. Hit Send<br />
Congratulations, you’re done !