CFTECH - Classic Ford
CFTECH - Classic Ford
CFTECH - Classic Ford

Create successful ePaper yourself
Turn your PDF publications into a flip-book with our unique Google optimized e-Paper software.
CFTech<br />
17<br />
18<br />
19<br />
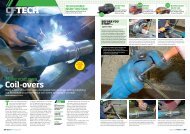
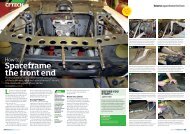
The resulting two components bolt together so<br />
our next job is to weld in some captive nuts — the<br />
screws are temporary but...<br />
...The bolts on the back aren’t. Dave securely<br />
Mig-welds these to the back plate with the two<br />
bolted up to prevent distortion.<br />
Once cooled, we separate the two once more and<br />
begin fitting the outer ring in place at the height<br />
we established earlier.<br />
20<br />
21<br />
22<br />
Dave initially tacks the ring in place, then goes<br />
round and adds some strategic 25 mm long<br />
seam-welds — these don’t need welding shut at<br />
the gaps around to allow oil to feed in.<br />
23<br />
Finished — it is now ready to be bolted<br />
back onto the engine, which now has full<br />
oil control!<br />
Next job is to securely bolt the two together,<br />
which we do with stainless cap-head screws<br />
along with thread lock...<br />
...And to make doubly sure, spring washers too.<br />
You need as much insurance as possible to<br />
prevent the components coming loose — that<br />
equals engine wipe-out!<br />
120 September 2010