Model MYB-2 StereoMaxx Spatial Image Enlarger - DIGITAL ...
Model MYB-2 StereoMaxx Spatial Image Enlarger - DIGITAL ...
Model MYB-2 StereoMaxx Spatial Image Enlarger - DIGITAL ...
- No tags were found...

Create successful ePaper yourself
Turn your PDF publications into a flip-book with our unique Google optimized e-Paper software.
modulation sciences, inc.<br />
12A World’s Fair Drive • Somerset, NJ 08873 USA<br />
Voice (732) 302-3090 • Fax (732) 302-0206<br />
Toll-Free in USA (800) 826-2603<br />
Web Site: www.modsci.com<br />
Technical Manual<br />
<strong>Model</strong> <strong>MYB</strong>-2<br />
<strong>StereoMaxx</strong><br />
<strong>Spatial</strong> <strong>Image</strong> <strong>Enlarger</strong>
<strong>StereoMaxx</strong><br />
Revision 2<br />
Operations Manual<br />
TABLE OF CONTENTS<br />
MODEL <strong>MYB</strong>-2............................................................................................................................................................................ 1<br />
<strong>StereoMaxx</strong> .............................................................................................................................................................................1<br />
STEREOMAXX MANUAL ADDENDUM....................................................................................................................................5<br />
SUMMARY.................................................................................................................................................................................... 5<br />
LOW FREQUENCY ENHANCEMENT ROLL OFF....................................................................................................................... 5<br />
HIGH FREQUENCY ENHANCEMENT ROLL OFF ...................................................................................................................... 5<br />
WIDTH LIMIT THRESHOLD....................................................................................................................................................... 7<br />
MONO MUTE THRESHOLD........................................................................................................................................................ 7<br />
ANTI-SPLASH JUMPER.............................................................................................................................................................. 8<br />
STEP ONE.......................................................................................................................................................................................10<br />
CHAPTER 1....................................................................................................................................................................................13<br />
INTRODUCTION......................................................................................................................................................................... 13<br />
1.1 Features .....................................................................................................................................................................15<br />
1.2 Benefits.......................................................................................................................................................................15<br />
CHAPTER 2....................................................................................................................................................................................17<br />
INSTALLATION PROCEDURE................................................................................................................................................... 17<br />
2.1 Physical Location ....................................................................................................................................................17<br />
2.2 Placement in the Air Chain....................................................................................................................................17<br />
2.3 Special Considerations...........................................................................................................................................18<br />
2.3.1 Multiband Processors........................................................................................................................................18<br />
2.3.2 Optimod®.............................................................................................................................................................19<br />
2.3.3 AM Stereo.............................................................................................................................................................19<br />
2.3.4 Phase Correctors ................................................................................................................................................19<br />
2.3.5 Air Chain with Phase Corrector......................................................................................................................19<br />
2.4 Hookup.......................................................................................................................................................................19<br />
2.4.1 Connector Wiring Diagram..............................................................................................................................21<br />
2.4.2 Electronic Output ...............................................................................................................................................21<br />
2.4.3 Gain.......................................................................................................................................................................21<br />
CHAPTER 3....................................................................................................................................................................................23<br />
PRELIMINARY SET UP ............................................................................................................................................................. 23<br />
3.1 Set the Right Channel Balance .............................................................................................................................23<br />
3.2 Front Panel Readings.............................................................................................................................................23<br />
3.3 Set the Level Adjust..................................................................................................................................................23<br />
3.4 Front Panel Readings.............................................................................................................................................24<br />
3.5 Set the Controls........................................................................................................................................................24<br />
CHAPTER 4....................................................................................................................................................................................25<br />
FINAL ADJUSTMENTS AND CONTROLS................................................................................................................................ 25<br />
4.1 Reading the Indicators............................................................................................................................................25<br />
4.2 The IMAGE WIDTH Indicator................................................................................................................................25<br />
4.2.1 Mono Signal ........................................................................................................................................................25<br />
4.2.2 Stereo Signal .......................................................................................................................................................27<br />
2
<strong>StereoMaxx</strong><br />
Revision 2<br />
Operations Manual<br />
4.3 The AUTOMATIC WIDTH LIMITING Indicator..................................................................................................27<br />
4.3.1 Full Enhancement...............................................................................................................................................27<br />
4.3.2 No Enhancement.................................................................................................................................................28<br />
4.4 Control Functions....................................................................................................................................................28<br />
4.5 Getting Started .........................................................................................................................................................28<br />
4.6 The WIDTH Control .................................................................................................................................................28<br />
4.6.1 30% Indication....................................................................................................................................................30<br />
4.7 The DEPTH Control.................................................................................................................................................30<br />
4.8 The DIFFUSION Control........................................................................................................................................30<br />
4.9 The BYPASS SWITCH..............................................................................................................................................32<br />
4.10 In Conclusion............................................................................................................................................................32<br />
CHAPTER 6....................................................................................................................................................................................35<br />
COMMON SETUP QUESTIONS................................................................................................................................................. 35<br />
CHAPTER 7....................................................................................................................................................................................42<br />
THEORY OF OPERATION ......................................................................................................................................................... 42<br />
7.1 Simplified Block Diagram......................................................................................................................................42<br />
7.2 Multipath...................................................................................................................................................................45<br />
CHAPTER 8....................................................................................................................................................................................48<br />
SPECIFICATIONS....................................................................................................................................................................... 48<br />
CHAPTER 9....................................................................................................................................................................................51<br />
STEREOMAXX BLOCK DIAGRAM .......................................................................................................................................... 51<br />
CHAPTER 10 .................................................................................................................................................................................54<br />
REGULAR MAINTENANCE....................................................................................................................................................... 54<br />
10.1 TROUBLE SHOOTING.............................................................................................................................................54<br />
10.1.1 Audio Problems...................................................................................................................................................54<br />
10.1.2 Enhancement Problems .....................................................................................................................................56<br />
10.2 STEREOMAXX SCHEMATIC.................................................................................................................................... 59<br />
INTERNAL JUMPERS................................................................................................................................................................. 62<br />
Input Impedance..................................................................................................................................................................62<br />
Electronic Output ...............................................................................................................................................................62<br />
INDEX 1...........................................................................................................................................................................................64<br />
WARRANTY AND DISCLAIMER.............................................................................................................................................. 64<br />
INDEX 2...........................................................................................................................................................................................66<br />
ABBREVIATIONS AND SYMBOLS USED IN PARTS LISTS..................................................................................................... 66<br />
Abbreviations Used in Parts Descriptions.....................................................................................................................67<br />
PARTS LIST..................................................................................................................................................................................68<br />
3
<strong>StereoMaxx</strong><br />
Revision 2<br />
Operations Manual<br />
THIS PAGE INTENTIONALLY LEFT BLANK<br />
4
<strong>StereoMaxx</strong><br />
Revision 2<br />
Operations Manual<br />
<strong>StereoMaxx</strong> Manual Addendum<br />
Summary<br />
After extensive field experience, several modifications to the <strong>StereoMaxx</strong> were<br />
found useful. Two additional user adjustments were made available. One permits<br />
setting how wide the signal can become before automatic width reduction begins.<br />
The other sets the point where <strong>StereoMaxx</strong> considers a signal to be monaural and<br />
ceases to enhance it.<br />
Another modification is a strap option to roll off the high frequency response of the<br />
enhancement channel. This makes the <strong>StereoMaxx</strong> sound more “mellow” to some<br />
listeners. Please note, this affects only the enhancement channel and has no<br />
effect on the original stereo signal.<br />
In addition, the low frequency response was rolled off somewhat to prevent<br />
frequencies that have little impact on the stereo effect from receiving any<br />
enhancement.<br />
All <strong>StereoMaxx</strong> units shipped since March 1988 have these modifications. Anyone<br />
owning a unit not modified should notify Modulation Sciences in writing, providing<br />
the serial number of their unit. We will provide assistance in upgrading the unit.<br />
Low Frequency Enhancement Roll Off<br />
The value of R26 has been changed from 8.2K to 3.9K. This raises the low<br />
frequency crossover on the L-R circuit an octave above its original value, thus<br />
raising the lowest frequency that will receive enhancement.<br />
This modification prevents very low frequency such as from a low register organ<br />
note or record warp from “capturing” the processor. Because this modification<br />
has no undesirable side effects, it is a permanent change.<br />
High frequency Enhancement Roll Off<br />
On some program material the effect of the <strong>StereoMaxx</strong> sounds “splashy.”<br />
Installing a jumper at PS12 removes this problem and makes <strong>StereoMaxx</strong> sound<br />
5
<strong>StereoMaxx</strong><br />
Revision 2<br />
Operations Manual<br />
more “mellow.” Since this problem only affects certain types of program material<br />
and some stations may not want the <strong>StereoMaxx</strong> to sound that “mellow,” this<br />
addition was done as a strap option.<br />
6
<strong>StereoMaxx</strong><br />
Revision 2<br />
Operations Manual<br />
Width Limit Threshold<br />
Some stations want to achieve more <strong>StereoMaxx</strong> enhancement before the<br />
automatic width limiting takes over. A trimmer (RV6), accessible through the top<br />
of the unit, provides the factory set width limiting when fully counter-clockwise.<br />
As it is rotated clockwise, the point where the automatic width limiting starts<br />
taking over increases, thus increasing the maximum amount of enhancement<br />
available. The factory set width limiting can always be restored by setting the<br />
control full counter-clockwise.<br />
Mono Mute Threshold<br />
When the width indication drops below a certain amount, the <strong>StereoMaxx</strong> ceases<br />
all enhancements. This is to prevent adding unneeded enhancement of a mono<br />
source such as a DJ. Monaural sources sometimes appear to be somewhat stereo<br />
because of a small, unintended, level or phase imbalance between Left an right<br />
channels. The mono Mute Threshold control (RV7) allows for adjusting the point<br />
where the <strong>StereoMaxx</strong> decides that a signal is mono and it should stop enhancing.<br />
Counter-clockwise adjustment causes enhancement of material that is more<br />
monaural.<br />
7
<strong>StereoMaxx</strong><br />
Revision 2<br />
Operations Manual<br />
Anti-Splash Jumper<br />
8
<strong>StereoMaxx</strong><br />
Revision 2<br />
Operations Manual<br />
THIS PAGE INTENTIONALLY LEFT BLANK<br />
9
<strong>StereoMaxx</strong><br />
Revision 2<br />
Operations Manual<br />
STEP ONE<br />
Here is your Modulation Sciences' <strong>StereoMaxx</strong>. Please follow the unpacking<br />
instructions below:<br />
1. Save all packing materials. You may need them later to ship or<br />
move the <strong>StereoMaxx</strong>.<br />
2. Inspect the <strong>StereoMaxx</strong> for any sign of damage. If you find any<br />
damage to the unit, report it immediately to both the carrier and<br />
to Modulation Sciences.<br />
3. Complete the registration card and return it to Modulation<br />
Sciences. Registration insures that you will receive any<br />
engineering notes on your <strong>StereoMaxx</strong> and will speed any<br />
warranty claims.<br />
10
<strong>StereoMaxx</strong><br />
Revision 2<br />
Operations Manual<br />
THIS PAGE INTENTIONALLY LEFT BLANK<br />
11
<strong>StereoMaxx</strong><br />
Revision 2<br />
Operations Manual<br />
12
<strong>StereoMaxx</strong><br />
Revision 2<br />
Operations Manual<br />
Chapter 1<br />
Introduction<br />
This manual will help you set up and use your <strong>StereoMaxx</strong> to give your station a<br />
big, unique sound and an enhanced stereo image that adds audio excitement to hifi<br />
stereos, auto radios and portable "boom-boxes". If you are installing a<br />
<strong>StereoMaxx</strong> for the first time, please read the manual completely before starting.<br />
The sections on HOOKUP and PRELIMINARY SETUP will get you on the air with the<br />
<strong>StereoMaxx</strong> quickly and easily.<br />
The section on FINE TUNING will help you adjust the <strong>StereoMaxx</strong> to your program<br />
format.<br />
The final section contains a detailed discussion of the theory of operation, the<br />
technical data on the <strong>StereoMaxx</strong>, and a trouble-shooting guide. In the unlikely<br />
event that something goes wrong with your <strong>StereoMaxx</strong>, information on factory<br />
service and warranty is also included here.<br />
If you have any questions not answered by this manual, or comments, please call<br />
us on our toll free line: (800) 826-2603.<br />
13
<strong>StereoMaxx</strong><br />
Revision 2<br />
Operations Manual<br />
14
<strong>StereoMaxx</strong><br />
Revision 2<br />
Operations Manual<br />
1.1 Features<br />
The Modulation Sciences <strong>StereoMaxx</strong> is the first broadcast audio <strong>Spatial</strong> <strong>Image</strong><br />
<strong>Enlarger</strong>. <strong>StereoMaxx</strong> enhances and enlarges your station's stereo image, for a<br />
dramatically bigger, fuller sound.<br />
The SteroMaxx controls provide the flexibility to enhance program material of any<br />
format to any taste. The final adjustments are done "by ear" - not to anyone<br />
else's preconceived notion of how your station should sound. With the exception<br />
of exclusively mono formats, any format can be enhanced. The <strong>StereoMaxx</strong> is not<br />
a loudness processor. It works with any loudness processor you use, for example,<br />
Optimod(r), Texar(r), or CRL(r). <strong>Spatial</strong> image enhancement is a completely<br />
different effect from loudness processing. The impact is dramatic on any kind of<br />
stereo radio - from large rack systems to portable boom boxes and headphone<br />
radios.<br />
1.2 Benefits<br />
Unlike earlier attempts at enhancing the stereo image, <strong>StereoMaxx</strong> is 100% mono<br />
compatible. It causes no phase problems - in fact, it causes no problems at all.<br />
<strong>StereoMaxx</strong> constantly monitors the music to avoid over-enhancing material which<br />
is already widely-separated. And it works as well on any stereo broadcast system:<br />
AM, FM or TV.<br />
This brings us to what the <strong>StereoMaxx</strong> will not do: It causes no loss of monaural<br />
loudness, no increase in multipath, no image smearing of musical notes, no jet<br />
streaming.<br />
The <strong>StereoMaxx</strong> is not a "black box". It uses fully disclosed, patented technology.<br />
This is the newest product from Eric Small and the Modulation Sciences design<br />
team. Our CP-803 Composite Clipper is on the air at over 1500 radio stations,<br />
keeping them loud, clean and legal. And our Sidekick is the industry standard<br />
SCA generator.<br />
15
<strong>StereoMaxx</strong><br />
Revision 2<br />
Operations Manual<br />
16
<strong>StereoMaxx</strong><br />
Revision 2<br />
Operations Manual<br />
Chapter 2<br />
Installation Procedure<br />
2.1 Physical Location<br />
The <strong>StereoMaxx</strong> will operate over a wide range of temperatures, so physical<br />
placement of the unit is not critical. The <strong>StereoMaxx</strong> is rated for operation from<br />
32 to 122 Fahrenheit (0 to 50 Celsius), and can withstand the rigors of most<br />
transmitter rooms.<br />
If you are using an STL, the <strong>StereoMaxx</strong> can be located at the studio and the signal<br />
sent out over a composite or discrete STL.<br />
Wherever you locate <strong>StereoMaxx</strong>, thoughtful placement will make its setup and<br />
adjustment more convenient. The unit is supplied ready to mount in a 19 inch<br />
rack. Ideally, it should be mounted at eye level. The environment should be<br />
conducive to critical listening. If the location permits monitoring with a variety of<br />
receivers, so much the better.<br />
2.2 Placement in the Air Chain<br />
The <strong>StereoMaxx</strong> will work in any air chain arrangement. As a general rule, the<br />
<strong>StereoMaxx</strong> can be connected anywhere in the chain before the final limiter.<br />
The placement of the <strong>StereoMaxx</strong> in the air chain is one factor in controlling what<br />
sound it produces - though few locations will produce a "bad" sound. Our<br />
recommendations are based on what other users have tried and liked. However,<br />
feel free to experiment.<br />
17
<strong>StereoMaxx</strong><br />
Revision 2<br />
Operations Manual<br />
The more consistent the levels of the signals driving the <strong>StereoMaxx</strong>, the easier it<br />
is to set up and adjust.<br />
2.3 Special Considerations<br />
2.3.1 Multiband Processors<br />
Stand alone multiband processors such as the Texar Audio Prims® need<br />
special consideration when installing and setting up the <strong>StereoMaxx</strong>. The<br />
best solution to the problem of using the <strong>StereoMaxx</strong> with mulitband<br />
processors is to locate the <strong>StereoMaxx</strong> before the input to the multiband. If<br />
the <strong>StereoMaxx</strong> must be located after the output of a multiband processor,<br />
precise adjustment of the processor is needed. This is to prevent the<br />
multiband from acting somewhat as a stereo synthesizer and creating L-R<br />
signal on monaural programming.<br />
For the Texar Prisms® “precise adjustment” means carefully following the<br />
directions in the Texar manual, paragraph 1.8.3, “Establishing the L-R<br />
channel Null.” Other multiband processors should be checked carefully to<br />
insure that they can be adjusted to prevent the generation of spurious L-R<br />
information in mono.<br />
18
<strong>StereoMaxx</strong><br />
Revision 2<br />
Operations Manual<br />
2.3.2 Optimod<br />
If there is an Optimod® in the system, the <strong>StereoMaxx</strong> should precede it.<br />
2.3.3 AM Stereo<br />
The <strong>StereoMaxx</strong> will work with both Kahn and Motorola AM Stereo systems,<br />
producing dramatic improvements for listeners who have stereo receivers.<br />
2.3.4 Phase Correctors<br />
The sound that results if the <strong>StereoMaxx</strong> precedes the input of a phase<br />
corrector is rather bizarre and should be avoided. If your air chain includes<br />
any automatic phase corrector, such as the Howe Phase Chaser®, the<br />
<strong>StereoMaxx</strong> should be placed following its output.<br />
2.3.5 Air Chain with Phase Corrector<br />
2.4 Hookup<br />
The <strong>StereoMaxx</strong> is placed in the air chain using two pairs of three-pin XLR-type<br />
connectors. These connectors are used instead of a barrier strip for reliability and<br />
ease of hookup. No special requirements exist for the input signal except that the<br />
level balance between Left and Right channels be within 1 dB<br />
All four connectors should have consistent polarity. In any system, Pin 1 should be<br />
Chassis Ground. Pin 2 and pin 3 may be either “signal hi” or “signal low” as long<br />
as the wiring pattern is consistent.<br />
19
<strong>StereoMaxx</strong><br />
Revision 2<br />
Operations Manual<br />
20
<strong>StereoMaxx</strong><br />
Revision 2<br />
Operations Manual<br />
2.4.1 Connector Wiring Diagram<br />
The balanced input of the <strong>StereoMaxx</strong> is supplied from the factory with a 600Ω<br />
termination strapped in. Moving jumpers on the circuit board makes the input high<br />
impedance bridging.<br />
Instructions for changing this input termination are in the section, INTERNAL<br />
JUMPERS.<br />
The input level can range from –10 VU to +10 VU, where 0 VU equals 0 dBm<br />
600Ω for a sinewave. The output is balanced and low impedance, designed to<br />
drive a 600Ω load.<br />
2.4.2 Electronic Output<br />
The standard output on the <strong>StereoMaxx</strong> has high quality Jensen<br />
transformers. They produce no measurable degradation of the audio quality<br />
while delivering significant advantages. These advantages include output<br />
quality that is independent of the balance of the load, RF protection, and<br />
lightning protection.<br />
Some broadcasters prefer an all electronic output, so a kit for converting the<br />
<strong>StereoMaxx</strong> to transformerless output is available from Modulation<br />
Sciences. The kit consists of two IC’s that plug into existing sockets on the<br />
main PC board, a new output wiring harness, and detailed instructions.<br />
2.4.3 Gain<br />
The <strong>StereoMaxx</strong> always has nearly unity gain. In a 600Ω system, the gain<br />
is approximately –0.5 dB. In a bridging system, the gain is approximately<br />
+0.5 dB. With electronic output, the gain is exactly unity if the output<br />
21
<strong>StereoMaxx</strong><br />
Revision 2<br />
Operations Manual<br />
termination is properly set.<br />
22
<strong>StereoMaxx</strong><br />
Revision 2<br />
Operations Manual<br />
Chapter 3<br />
Preliminary Set Up<br />
Once the <strong>StereoMaxx</strong> is hooked up, you are ready for preliminary set-up.<br />
3.1 Set the Right Channel Balance<br />
The stereo balance adjustment is made with the “R CH BAL” control. This is a<br />
critical adjustment, and should be done with care.<br />
Drive the <strong>StereoMaxx</strong> with a monaural signal (Left = Right) from the console, such<br />
as the DJ mike. Place the <strong>StereoMaxx</strong> in OPERATE (the BYPASS button dark), set<br />
the DIFFUSION control to 6, and set the WIDTH CONTROL TO 10 (maximum).<br />
3.2 Front Panel Readings<br />
Adjust the “R CH BAL” control until the IMAGE WIDTH indicator shows a minimum<br />
indication (only the center LED lit).<br />
3.3 Set the Level Adjust<br />
The "LVL ADJ" control is not a gain control (the gain remains at near unity) -- it<br />
adjusts the operating point of the <strong>StereoMaxx</strong> for best signal-to-noise ratio, and is<br />
therefore not critical.<br />
Three level indicators on the front panel provide the indication needed for quick<br />
easy setting of this control.<br />
With normal stereo program material driving the <strong>StereoMaxx</strong>, adjust the "LVL<br />
ADJ" until the green LED is on most of the time.<br />
23
<strong>StereoMaxx</strong><br />
Revision 2<br />
Operations Manual<br />
The red LED should only flash occasionally during especially hot program material.<br />
The yellow LED should only be on during soft passages.<br />
A dark indication (no LED's on) should be avoided except during long pauses.<br />
When none of the LED's are on, the <strong>StereoMaxx</strong>'s enhancement circuits are<br />
automatically switched off.<br />
3.4 Front Panel Readings<br />
Once the level and balance adjustments are made, the LEVEL LED’s should be<br />
observed for some time while a variety of program material is played. This will<br />
ensure that the level adjustment is a good compromise for all operating conditions.<br />
3.5 Set the Controls<br />
A good starting point for the WIDTH, DEPTH and DIFFUSION controls to get you on<br />
the air is:<br />
24
<strong>StereoMaxx</strong><br />
Revision 2<br />
Operations Manual<br />
Chapter 4<br />
Final Adjustments and Controls<br />
The adjustment of the operating controls is subjective -- a matter of taste. There<br />
is no formula for these adjustments. You need to tinker with them until the<br />
<strong>StereoMaxx</strong> sounds best to YOU.<br />
The first rule for setting up the <strong>StereoMaxx</strong> (or any other processor for that<br />
matter), is to be able to listen to the air signal while adjusting the processor. It is<br />
also important that critical listening be done with a variety of radios, ranging from<br />
headphone type radios, to "boom boxes", to auto radios in real cars, and finally, on<br />
a good component hi-fi like a studio monitor system.<br />
The better your monitoring system, the more subtle the <strong>StereoMaxx</strong> effect will be.<br />
For this reason, try to make your critical judgements on the types of radios that<br />
are typical of what most of your audience listens with.<br />
4.1 Reading the Indicators<br />
The IMAGE WIDTH and AUTOMATIC WIDTH LIMITING indicators measure the<br />
output signal from SteroMaxx. If the unit is in BYPASS mode, they show the<br />
unprocessed signal. When the unit is switched to operate mode, they show the<br />
enhanced signal. This is one way to see how much <strong>StereoMaxx</strong> is enhancing a<br />
particular signal.<br />
4.2 The IMAGE WIDTH Indicator<br />
With a mono signal, the IMAGE WIDTH indicator is just a single point in the center<br />
of the display (the sound image is centered between the speakers).<br />
4.2.1 Mono Signal<br />
With a fully stereo signal, the indicator is at maximum indication (the sound image<br />
is widest).<br />
25
<strong>StereoMaxx</strong><br />
Revision 2<br />
Operations Manual<br />
26
<strong>StereoMaxx</strong><br />
Revision 2<br />
Operations Manual<br />
4.2.2 Stereo Signal<br />
The display always lights up evenly on both sides of the center of the indicator<br />
without differentiating between sounds all the way to the Left or all the way to the<br />
Right. Thus, a full width indication is produced by a signal only on the left channel<br />
or only on the right channel.<br />
4.3 The AUTOMATIC WIDTH LIMITING Indicator<br />
A stereo signal which is already greatly separated should not be enhanced by<br />
<strong>StereoMaxx</strong>. Enhancing such a signal would create more L-R than L+R.<br />
Broadcast stereo systems assume that the L-R signal will never be greater then the<br />
L+R signal. <strong>StereoMaxx</strong> contains circuitry to control the L-R level. The action of<br />
this circuitry shows no deflection inward, you are getting the full enhancement<br />
effect as set by the front panel controls.<br />
4.3.1 Full Enhancement<br />
As <strong>StereoMaxx</strong> reduces the amount of enhancement to control the L-R level, the<br />
indicator shows a pair of dots starting at the outside of the display and moving<br />
toward the center. When the dots are at the center, <strong>StereoMaxx</strong> is producing<br />
essentially no enhancement. (This is equivalent to turning the WIDTH control to<br />
0).<br />
27
<strong>StereoMaxx</strong><br />
Revision 2<br />
Operations Manual<br />
4.3.2 No Enhancement<br />
4.4 Control Functions<br />
Any attempt to describe in words what something sounds like is doomed to failure.<br />
However, in order to help provide a starting point, we will make the attempt.<br />
Please keep in mind that the descriptions are general and only intended to get you<br />
started. The only way to understand the impact of <strong>StereoMaxx</strong> on your station is<br />
by experimenting with it. Subjectively, the controls interact with one another.<br />
Each varies a single electronic parameter of the <strong>StereoMaxx</strong>, such as delay time or<br />
return level. However, these electronic adjustments have a combined effect on<br />
the overall “ feeling” of the processor. But again, the only way for you to<br />
understand the range of possibilities of the <strong>StereoMaxx</strong> is to experiment with it<br />
while listening on a variety of receivers and in various environments.<br />
4.5 Getting Started<br />
As you begin to fine-tune the <strong>StereoMaxx</strong>, we suggest that you take each control<br />
fully clockwise then fully counter clockwise, one at a time, to get a feel for the<br />
range of each adjustment.<br />
4.6 The WIDTH Control<br />
Of all the controls, WIDTH has the greatest effect on the sound of the station. It is<br />
the amount of enhanced signal returned to the Left and Right output channels and<br />
directly controls the overall impact of the <strong>StereoMaxx</strong>. Turning this control all the<br />
way down effectively bypasses the <strong>StereoMaxx</strong>. As the control is advanced, the<br />
overall effect increases. Too much WIDTH will cause ringing and a “tinny” sound<br />
on “open” program material, such as solo piano. If the AUTOMATIC WIDTH<br />
LIMITING indicator always shows a substantial amount of width limiting (deflection<br />
inward), you should turn down the WIDTH control. Once this display shows about<br />
30% indication, turning up the WIDTH control will not produce more enhancement.<br />
If you want maximum possible enhancement, you should adjust the WIDTH control<br />
so that the AUTOMATIC WIDTH LIMITING indicator show 0% to 20% on your<br />
least separated piece of stereo program material.<br />
28
<strong>StereoMaxx</strong><br />
Revision 2<br />
Operations Manual<br />
29
<strong>StereoMaxx</strong><br />
Revision 2<br />
Operations Manual<br />
4.6.1 30% Indication<br />
<strong>StereoMaxx</strong> will then automatically adjust the amount of enhancement to produce<br />
a maximum width stereo signal.<br />
4.7 The DEPTH Control<br />
The length of time the L-R audio is digitally delayed is called DEPTH. This control<br />
has a subtle but important impact on the sound of the station.<br />
The DEPTH control will bring a third dimension to your stereo sound. As the delay<br />
time is increased, the sense of depth of the musical image seems to increase. It is<br />
as though the instruments had acquired depth as well as width. The impact of this<br />
effect depends greatly on the acoustics of the listening room.<br />
Too much delay (towards 10) will produce "doubling" on certain program material.<br />
The solution is to reduce the setting of the DEPTH control until the "doubling"<br />
effect goes away. The control range allows for more than enough desired effect<br />
without any audible doubling.<br />
4.8 The DIFFUSION Control<br />
The DIFFUSION control provides a means to hold the sound image of instruments<br />
in place. DIFFUSION is the percentage of direct signal that is bled around the<br />
delay. It controls the amount of undelayed difference signal in the output of the<br />
unit in order to lock the stereo image in place.<br />
This "wandering" of the stereo image occurs mainly on program material that is<br />
recorded in "true" stereo. This is sometimes called "legitimately" miked stereo.<br />
Such a recording technique is rare in popular music, where most recording is a<br />
multichannel "mike mix". Mike-mixed material is not prone to drifting in position<br />
and no direct signal is needed to stabilize it.<br />
The DIFFUSION control provides 100% delayed (no bleed-around) when the control<br />
is set at 10 (fully clockwise). At 0 (fully counterclockwise), the signal is all direct,<br />
30
<strong>StereoMaxx</strong><br />
Revision 2<br />
Operations Manual<br />
with no delayed component at all.<br />
31
<strong>StereoMaxx</strong><br />
Revision 2<br />
Operations Manual<br />
Too much undelayed difference signal (toward 0) in the output will sound "tight".<br />
Too little (toward 10) will cause the stereo image to de-stabilize or "swim" around<br />
on certain recordings. This is most commonly a problem in Beautiful Music,<br />
Classical or Easy Listening formats.<br />
4.9 The BYPASS SWITCH<br />
The BYPASS SWITCH serves an important role during setup of the <strong>StereoMaxx</strong>. It<br />
makes possible simple and rapid comparison of processed and unprocessed sound.<br />
This is an ideal method for gauging the impact of various control adjustments. The<br />
BYPASS SWITCH disables only the enhancement channel, and thus has no effect<br />
on the gain of the system. No click is generated when the switch is operated, so<br />
comparisons can be made during regular programming.<br />
4.10 In Conclusion<br />
It may take several days of "tinkering" to find the right settings for your needs.<br />
But be assured that the effort of finding a set of adjustments that fit your format<br />
and market will be rewarded by a unique and attention-getting sound for your<br />
station.<br />
32
<strong>StereoMaxx</strong><br />
Revision 2<br />
Operations Manual<br />
THIS PAGE INTENTIONALLY LEFT BLANK<br />
33
<strong>StereoMaxx</strong><br />
Revision 2<br />
Operations Manual<br />
34
<strong>StereoMaxx</strong><br />
Revision 2<br />
Operations Manual<br />
Chapter 6<br />
Common Setup Questions<br />
Because the <strong>StereoMaxx</strong> is a new concept in audio processing, we have found that<br />
some questions arise frequently during initial installations. The following are some<br />
of the more common questions and their answers:<br />
1. I punch <strong>StereoMaxx</strong> in and out, but I don't seem to hear any difference.<br />
Take the <strong>StereoMaxx</strong> into a production studio, connect it to the monitoring<br />
system and play some music off either disc or CD through it. Compare it to<br />
the sound of the MSI demo cassette. Depending on the material and the<br />
speakers, the effect should be rather dramatic, at least as much so as the<br />
cassette. If not, be certain that the input level is sufficient to keep the<br />
green LVL LED on most of the time. Check the balance of the Left and<br />
Right channels. Are they within 1 dB<br />
Next, look at the LED bar graphs. Is the "IMAGE WIDTH" indicator showing<br />
a one-half to three-quarters expansion much of the time If not, something<br />
may be wrong with the stereo separation of the signal driving the unit.<br />
When <strong>StereoMaxx</strong> is in OPERATE (the BYPASS SWITCH dark), the<br />
"AUTOMATIC WIDTH LIMITING" indicator should be hovering between 0%<br />
and 30% - around the extreme outside. If it is indicating width reduction by<br />
being near the center most of the time, try some other program material<br />
that is not as highly separated. Also, reduce the setting of the WIDTH<br />
control until the width limiting indicator opens up. If nothing seems to help,<br />
the input signals may be out of phase, or one channel may be dead, or<br />
totally unrelated material may be on the Left and Right channels.<br />
If you still can not get <strong>StereoMaxx</strong> to sound like the demo cassette, call MSI<br />
on our toll free line - (800) 826-2603. If <strong>StereoMaxx</strong> sounds dynamite in the<br />
production studio, but still doesn't seem to do much on the air, read on.<br />
35
<strong>StereoMaxx</strong><br />
Revision 2<br />
Operations Manual<br />
36
<strong>StereoMaxx</strong><br />
Revision 2<br />
Operations Manual<br />
2. The <strong>StereoMaxx</strong> sounds great in a studio, but doesn't make it on the air.<br />
The problem may be in the music playback equipment or the audio<br />
processing. First of all, how good is the stereo separation as measured in<br />
the style of a "Proof of Performance" If the separation is below 30dB,<br />
especially above 5 kHz, something is wrong with your transmission system<br />
and no amount of processing will improve the separation.<br />
If the transmission separation is OK, then look carefully at the source of<br />
music. It is very easy to lose a lot of stereo separation, especially above 5<br />
kHz, in the process of dubbing from an LP to cartridge in a production studio,<br />
and then playing the cartridge back on a machine in the air studio. Cart<br />
systems that record matrix (L+R, L-R) seem to be a consistent source of<br />
degraded separation. Check this by actually recording an audio sweep on<br />
one channel at -10 VU, and measuring the separation on a few playback<br />
machines.<br />
Turntables can degrade separation a lot if the pickup cartridge and stylus<br />
are not in good condition and correctly adjusted. Check out the turntable<br />
with a test record such as those available from the National Association of<br />
Broadcasters.<br />
Audio processing can also degrade the stereo image by removing the<br />
subjective (psychoacoustic) cues to separation. High frequency roll off in<br />
limiters is the most common problem. Even though a limiter may measure<br />
perfectly flat, a lot of highs get removed under program conditions. A good<br />
test for this is to compare the off-air signal with a good disc or CD of the<br />
same cut. If it sounds "dull," not only are highs being lost, but separation is<br />
too.<br />
The cure is to readjust the processing for less high frequency roll off try<br />
another brand of limiter. If adjusting the processor works, but reduces<br />
loudness too much, a Modulation Sciences CP-803 Composite Processor will<br />
allow increased loudness without reducing the high end.<br />
37
<strong>StereoMaxx</strong><br />
Revision 2<br />
Operations Manual<br />
38
<strong>StereoMaxx</strong><br />
Revision 2<br />
Operations Manual<br />
3. <strong>StereoMaxx</strong> works great, but multipath seems to have gotten worse.<br />
Multipath is the great bugaboo of FM broadcasting. Ever present, impossible<br />
to measure, poorly understood, it is the catch-all for anything that goes<br />
wrong in FM coverage that can not pinned on something definite.<br />
Often any change at a station will produce reports of increased multipath.<br />
In fact, nothing the station can do has any actual effect on multipath. What<br />
does change with such things as peak L-R subchannel energy is the<br />
"susceptiblity" of the signal to multipath. Weather is the only parameter<br />
that has an actual short term impact on multipath. It is very difficult to<br />
identify what causes notacable changes in multipath when, for example,<br />
driving the same route at different times. Is it the weather that has changed<br />
the reflectivity of the local terrain and buildings, or has some change at the<br />
station increased multipath susceptibility<br />
It is well understood that increased stereo separation will increase<br />
susceptibility to multipath. Because <strong>StereoMaxx</strong> does not increase the peak<br />
level of L-R significantly, it does not make the signal any more susceptible to<br />
multipath than it would be while playing a recording of the same stereo<br />
width.<br />
Simple matrix devices significantly increase the peak level of the L-R<br />
subchannel, but the <strong>StereoMaxx</strong> does not increase this peak level<br />
appreciably. In fact, <strong>StereoMaxx</strong> does not increase the average L-R<br />
anymore than a traditionally recorded selection of the same subjective<br />
separation would.<br />
There are several things to do if, after installing the <strong>StereoMaxx</strong>, multipath<br />
seems to increase. First, be certain something really has changed. Make no<br />
adjustments of station equipment for several days and each day ask if there<br />
has been any change in multipath. Don't tell the multipath experts that you<br />
didn't make any changes, just ask if any difference was noted. Don't be<br />
surprised if significant changes are reported each day. And don't discredit<br />
your observers; they may only be responding to differences in the weather.<br />
Another station parameter that has a significant effect on multipath<br />
suspectibility is the amount of synchronous AM produced by the transmitter.<br />
Synchronous AM will increase the peak level of the L-R subchannel. Tuning<br />
the transmitter for minimum synchronous AM will reduce the effect of<br />
naturally occurring multipath. If you need an application note on reducing<br />
39
<strong>StereoMaxx</strong><br />
Revision 2<br />
Operations Manual<br />
synchronous AM, contact Modulation Sciences for a copy. Our toll free<br />
number is (800) 826-2603.<br />
40
<strong>StereoMaxx</strong><br />
Revision 2<br />
Operations Manual<br />
THIS PAGE INTENTIONALLY LEFT BLANK<br />
41
<strong>StereoMaxx</strong><br />
Revision 2<br />
Operations Manual<br />
Chapter 7<br />
Theory of Operation<br />
As the <strong>StereoMaxx</strong> processes the signal, the incoming audio channels are<br />
subtracted to form a difference signal, L-R. This difference signal is delayed 3 to<br />
15 milliseconds, then split into the Left output channel and the other is mixed into<br />
the Right output channel.<br />
Note that the stereo is never converted into sum and difference format, processed,<br />
then converted back to Left and Right.<br />
7.1 Simplified Block Diagram<br />
Let’s examine what is happening, by first extracting a difference signal to use in<br />
the enhancement process, we guarantee that only stereo information will be acted<br />
upon. When a mono signal is fed into <strong>StereoMaxx</strong>, no difference signal is produced<br />
and thus no enhancement will take place. This insures that a DJ’s voice will stay<br />
put—not wander or be diffused between the speakers.<br />
Next the difference signal is delayed. This delay is the most critical step in<br />
<strong>StereoMaxx</strong> because it creates the subjective effect of "bigness". Electrically, it<br />
42
<strong>StereoMaxx</strong><br />
Revision 2<br />
Operations Manual<br />
offsets the enhanced signal in time so that it no longer adds and subtracts from the<br />
stereo signal in a predictable way. This prevents <strong>StereoMaxx</strong> from increasing the<br />
peak modulation of the L-R subchannel much beyond what it would be without<br />
enhancement.<br />
More technically, the delay decorrelates the enhancement signal from the stereo<br />
program.<br />
Another way to look at the process is that by using delay, the enhancement "fills<br />
up" the brief periods of silence between the notes in the music. The average<br />
energy in the L-R channel increases, but not the peak amplitude.<br />
By re-inserting the delayed signal into the Left and Right stereo channels out-ofphase,<br />
the effect is made inaudible to monaural listeners. This is important,<br />
because with the point source of a mono signal, the delayed signal would sound<br />
strange.<br />
The tendency to de-stabilize the image of some stereo material was cured by<br />
bleeding some signal around the delay line. Not much, about 15 dB below program<br />
level. However, this small undelayed component in the output seems to hold the<br />
image "locked" in place, without any significant affect on monaural compatibility.<br />
Another concern was how <strong>StereoMaxx</strong> would affect material that was already<br />
highly separated. Too much of even a good thing can sound bad. To prevent this,<br />
a control circuit was added: AUTOMATIC WIDTH LIMITING. This unique circuit<br />
senses how "stereo" the program material is. If it is "big enough", the gain of the<br />
L-R enhancement channel is reduced. Below this threshold the L-R gain is<br />
constant.<br />
Two LED bar indicators on the front panel indicate the status of these circuits.<br />
The lower one, IMAGE WIDTH, displays as an expanding line the ratio of L-R to<br />
L+R. Above it is a display of AUTOMATIC WIDTH LIMITING. This indicator<br />
moves inward to indicate reduced gain in the L-R enhancement channel.<br />
If either the Left or Right channel goes silent, the enhancement must squelch off.<br />
This prevents the enhancement from being heard on a channel without program. It<br />
also prevents enhancing impulse noise that might appear on the silent channel.<br />
Another special circuit takes care of signals that are "almost" monaural, but not<br />
quite. For example, a console can add enough level unbalance and phase shift<br />
between left and right channels to make the DJ mike seem a bit stereo. A stereo<br />
threshold detector prevents these marginal signals from being enhanced as though<br />
43
<strong>StereoMaxx</strong><br />
Revision 2<br />
Operations Manual<br />
they were stereo.<br />
Because <strong>StereoMaxx</strong> operates in the time domain rather than the amplitude<br />
domain, it is fully compatible with all processing used in broadcasting<br />
44
<strong>StereoMaxx</strong><br />
Revision 2<br />
Operations Manual<br />
7.2 Multipath<br />
Problems with multipath discourage many stations that try to increase their stereo<br />
width. In addition to loss of monaural loudness, using simple linear matrices to<br />
increase L-R energy also increase L-R peak levels. As the peak level of the L-R<br />
channel increase, the impact of any multipath increases too. This effect<br />
devastates the effective coverage of a station. It doesn't matter how many<br />
millivolts of signal you've got if the station sounds so distorted by multipath that no<br />
one will listen to it.<br />
<strong>StereoMaxx</strong> avoids these problems by not increasing the peak level of the L-R<br />
subchannel significantly over what it would be without <strong>StereoMaxx</strong>. The result<br />
increases stereo image size without degrading the sound quality or coverage of the<br />
station.<br />
<strong>StereoMaxx</strong> will not cause any additional multipath susceptibility than would result<br />
from broadcasting a selection of the same separation.<br />
45
<strong>StereoMaxx</strong><br />
Revision 2<br />
Operations Manual<br />
THIS PAGE INTENTIONALLY LEFT BLANK<br />
46
<strong>StereoMaxx</strong><br />
Revision 2<br />
Operations Manual<br />
47
<strong>StereoMaxx</strong><br />
Revision 2<br />
Operations Manual<br />
Chapter 8<br />
Specifications<br />
Size:<br />
H x W x D –Inches (mm)<br />
1-3/4" x 19" x 12-1/4" (44.5 x 483 x 311)<br />
Power:<br />
50/60 Hz AC<br />
100 - 130 V, 1/4 A maximum<br />
200 - 260 V, 1/8 A maximum<br />
Temperature Range:<br />
0 to 50 degrees Celsius<br />
Controls:<br />
Width<br />
Depth<br />
Diffusion<br />
R CH BAL<br />
LVL ADJ<br />
The amount of enhanced signal returned to the Left and<br />
Right output channels<br />
The length of time the L-R audio is digitally delayed<br />
The percentage of direct signal that is bled around the<br />
delay<br />
Trims to + 1 dB the level of the Right Channel<br />
Sets the operating point for the <strong>StereoMaxx</strong><br />
Indicators:<br />
<strong>Image</strong> Width<br />
Automatic<br />
Width Limiting<br />
LED bar indicator measuring the ratio of L-R to L+R.<br />
This width indication is independent of level.<br />
LED bar indicator displaying the width reduction voltage.<br />
It is analogous to the gain reduction signal in a<br />
48
<strong>StereoMaxx</strong><br />
Revision 2<br />
Operations Manual<br />
compressor.<br />
49
<strong>StereoMaxx</strong><br />
Revision 2<br />
Operations Manual<br />
Audio Inputs<br />
Switchcraft® A3F connectors<br />
Input impedance 600Ω or 20KΩ,<br />
internally jumper selectable<br />
Level -10 to +10 VU 1<br />
(20 V P-P maximum)<br />
Audio Outputs:<br />
Electronic Output<br />
Gain:<br />
Switchcraft® A3M connectors<br />
Minimum load impedance 600Ω<br />
Actual output impedance 100Ω<br />
Maximum output level +10 VU 1<br />
(20 V P-P)<br />
Conversion Kit available which provides for an active<br />
electronic output in addition to the Jensen transformer<br />
outputs supplied as standard equipment.<br />
(L or R INPUT TO L or R OUTPUT)<br />
0 ± 1dB<br />
1 Note 1: 0 VU = 0 dBm, 600Ω sine wave<br />
50
<strong>StereoMaxx</strong><br />
Revision 2<br />
Operations Manual<br />
Chapter 9<br />
<strong>StereoMaxx</strong> Block Diagram<br />
51
<strong>StereoMaxx</strong><br />
Revision 2<br />
Operations Manual<br />
THIS PAGE INTENTIONALLY LEFT BLANK<br />
52
<strong>StereoMaxx</strong><br />
Revision 2<br />
Operations Manual<br />
53
<strong>StereoMaxx</strong><br />
Revision 2<br />
Operations Manual<br />
Chapter 10<br />
Regular Maintenance<br />
The <strong>StereoMaxx</strong> requires no routine maintenance.<br />
10.1 TROUBLE SHOOTING<br />
Simple troubleshooting of <strong>StereoMaxx</strong> can be performed using only audio signals<br />
and the indicators on <strong>StereoMaxx</strong>, but you cannot do most of this while it is on the<br />
air. You will need to be able to vary its input level, and to drive only one channel<br />
at a time. An ideal test setup would be in a production room where you can feed<br />
its inputs with your program signal and monitor its output signal.<br />
If you have equipment to measure frequency response, distortion, and noise, the<br />
input and output amps can be checked with <strong>StereoMaxx</strong> set to BYPASS. The<br />
results should be similar to the measurements of an excellent audio amplifier.<br />
10.1.1 Audio Problems<br />
Set the R CH BAL control to the center of its rotation. With <strong>StereoMaxx</strong> in<br />
BYPASS, its output level should be the same as its input level. Its output<br />
impedance is about 100 Ohms, so its output level does not vary significantly<br />
from a bridging load to a 600Ω load. (NOTE: this is not true if you have the<br />
active balanced output option. In this case, the output impedance is 600Ω.<br />
See the instructions supplied with the option.) If you are measuring level<br />
DIRECTLY at the input and output connectors, the levels should be within 1<br />
dB. If they aren’t, <strong>StereoMaxx</strong> is sick. Note, however, that <strong>StereoMaxx</strong> is<br />
supplied from the factory set for 600Ω input impedance. This may load the<br />
preceding piece of equipment, so the level may drop when <strong>StereoMaxx</strong> is<br />
connected. If you are not using a 600Ω system, you should set <strong>StereoMaxx</strong><br />
for bridging input impedance by following the instructions in the section on<br />
INTERNAL JUMPERS.<br />
54
<strong>StereoMaxx</strong><br />
Revision 2<br />
Operations Manual<br />
55
<strong>StereoMaxx</strong><br />
Revision 2<br />
Operations Manual<br />
10.1.2 Enhancement Problems<br />
These steps should be performed in order, since the results of later steps<br />
may depend on control settings made in earlier steps.<br />
1. Set <strong>StereoMaxx</strong> to BYPASS (flashing red), and apply a sine wave to<br />
the left input only. Signal level should be between 0 and + 10 VU (0<br />
VU = 0 dBm, 600Ω).<br />
2. Set LVL ADJ so the LEVEL indicator shows green or yellow. The<br />
IMAGE WIDTH indicator should be at full scale (widest expansion),and<br />
the AUTOMATIC WIDTH LIMITING indicator should show no indication<br />
(widest expansion)<br />
3. Reduce the input level until the yellow LEVEL indicator just goes off<br />
(the entire display dark). Then reduce the input level an additional 10<br />
dB. The IMAGE WIDTH indicator should read 0.<br />
4. Restore the input level to its original setting. Set the WIDTH control<br />
to 10, the DELAY control to 5, and the DIFFUSION control to 10.<br />
Release the BYPASS button (dark, not flashing). With left channel<br />
only audio, the IMAGE WIDTH indicator should be at full scale, and<br />
the AUTOMATIC WIDTH LIMITING indicator should read 80% to<br />
100%.<br />
Front Panel Readings<br />
5. Turn the DIFFUSION control to 0. The AUTOMATIC WIDTH CONTROL<br />
indicator reading may reduce somewhat, but should still read at least<br />
40% inward deflection.<br />
All of the above tests should produce identical results with rightchannel-only<br />
audio instead of left-channel-only audio.<br />
6. Set the DIFFUSION control to 10. Apply mono audio (same signal to<br />
56
<strong>StereoMaxx</strong><br />
Revision 2<br />
Operations Manual<br />
both left and right inputs). If the LEVEL indicator does not show green<br />
or yellow, reset LVL ADJ so that it does. The IMAGE WIDTH<br />
indicator should read 0 (only one LED in center on). If it does not,<br />
adjust the R CH BAL control to get this indication.<br />
If the <strong>StereoMaxx</strong> fails any of these tests, it is probably ill. Call us to<br />
arrange repair. If the <strong>StereoMaxx</strong> passes all of these tests, but still<br />
does not seem to operate properly, call us for advice.<br />
57
<strong>StereoMaxx</strong><br />
Revision 2<br />
Operations Manual<br />
58
<strong>StereoMaxx</strong><br />
Revision 2<br />
Operations Manual<br />
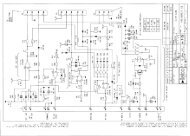
10.2 <strong>StereoMaxx</strong> Schematic<br />
59
<strong>StereoMaxx</strong><br />
Revision 2<br />
Operations Manual<br />
60
<strong>StereoMaxx</strong><br />
Revision 2<br />
Operations Manual<br />
61
<strong>StereoMaxx</strong><br />
Revision 2<br />
Operations Manual<br />
Internal Jumpers<br />
Input Impedance<br />
<strong>StereoMaxx</strong> is supplied from the factory with 600Ω input impedance. To<br />
select bridging (20 KΩ) input impedance, move jumpers PS7 and PS8 to the<br />
BRIDGE position.<br />
To restore 600Ω input impedance, move the jumpers to the TERM position.<br />
Electronic Output<br />
Please call us at (800) 826-2603 to order the Electronic Output Conversion<br />
Option kit. Instructions for installing electronic output are included as part<br />
of the package.<br />
62
<strong>StereoMaxx</strong><br />
Revision 2<br />
Operations Manual<br />
THIS PAGE INTENTIONALLY LEFT BLANK<br />
63
<strong>StereoMaxx</strong><br />
Revision 2<br />
Operations Manual<br />
Index 1<br />
Warranty and Disclaimer<br />
We warrant the equipment sold shall be free from defects in materials and<br />
workmanship under normal use and service for a period of three (3) years from the<br />
date of the delivery when properly installed. Our sole obligation under this<br />
warranty shall be limited to repair or replacement at our option of any such part or<br />
parts of the product which our examination shall disclose to our satisfaction to be<br />
defective.<br />
If you wish to have warranty services performed at our facilities, You shall obtain<br />
from us, in advance, permission to return the equipment and shall ship it properly<br />
packed with transportation and insurance prepaid. Service performed at our<br />
facilities under this warranty shall include parts plus labor. It is expressly agreed<br />
that our obligation to repair and replace defective parts is your sole and exclusive<br />
remedy.<br />
THE WARRANTY TO REPAIR OR REPLACE DEFECTIVE PARTS ARE EXPRESSLY IN<br />
LIEU OF AND HEREBY IN DISCLAIMER OF ALL OTHER EXPRESS WARRANTIES,<br />
AND ARE IN LIEU OF AND IN DISCLAIMER AND EXCLUSION OF ANY IMPLIED<br />
WARRANTIES OF MERCHANTABILITY, FITNESS FOR A PARTICULAR PURPOSE,<br />
AS WELL AS ALL OTHER IMPLIED WARRANTIES, IN LAW OR IN EQUITY, AND OF<br />
ALL OBLIGATIONS OR LIABILITY ON OUR PART. THERE ARE NO WARRANTIES<br />
WHICH EXTEND BEYOND THE DESCRIPTION HEREOF.<br />
Our liability does not include any labor charges for replacement of parts,<br />
adjustments, repairs or any other work done outside our factory, unless such work<br />
is authorized in writing by us. Our obligation to repair or replace shall not apply to<br />
any equipment which shall have been repaired or altered outside our factory in any<br />
way, subjected to negligence, misuse, unauthorized alteration or abuse, or<br />
damaged in transit.<br />
OUR LIABILITY HEREUNDER SHALL NOT INCLUDE LOSSES OF ANTICIPATED<br />
PROFITS OR SPECIAL INCIDENTAL OR CONSEQUENTIAL DAMAGES.<br />
64
<strong>StereoMaxx</strong><br />
Revision 2<br />
Operations Manual<br />
THIS PAGE INTENTIONALLY LEFT BLANK<br />
65
<strong>StereoMaxx</strong><br />
Revision 2<br />
Operations Manual<br />
Index 2<br />
Abbreviations and Symbols Used in Parts Lists<br />
Some parts in the following list are marked with an asterisk (*). When this symbol<br />
precedes a component, it means that the part has been tested by Modulation<br />
Sciences and should not be replaced without consulting the factory. Abbreviations<br />
of Manufacturer's Names<br />
ALLENBRADL<br />
AMP<br />
BOURNS<br />
CENTRALAB<br />
DBX<br />
HEWLETTPAC<br />
ITTSCHADOW<br />
KEYSTONE<br />
MALLORY<br />
MSI<br />
NATIONALSE<br />
PANDUIT<br />
SAMTEC<br />
SFETECHNOL<br />
SPRAGUELEC<br />
SWITCHCRAF<br />
TEXASINSTR<br />
WIMA<br />
Allen-Bradley Co.<br />
Amp Special Industries<br />
Bourns, Inc. Electronic Components<br />
Centralab, Inc.<br />
DBX Inc.<br />
Hewlett-Packard<br />
ITT Schadow, Inc.<br />
Keystone Electronics Corp.<br />
Mallory Capacitor Co.<br />
Modulation Sciences, Inc.<br />
National Semiconductor Cor<br />
Panduit Corp.<br />
Samtec<br />
San Fernando Electronic Technology<br />
Sprague Electric Company<br />
Switchcraft, Inc.<br />
Texas Instruments<br />
WIMA Div., Inter-Technical Group, Inc.<br />
66
<strong>StereoMaxx</strong><br />
Revision 2<br />
Operations Manual<br />
Abbreviations Used in Parts Descriptions<br />
AE Aluminum Electrolytic Capacitor<br />
CC Carbon Composition Resistor<br />
CF Carbon Film Resistor<br />
DT Dip Tantalum<br />
MC Monolithic Ceramic Capacitor<br />
MF Metal Film Resistor<br />
MY Mylar Capacitor<br />
NF Nanofarads<br />
PC Printed Circuit<br />
PF Picofarads<br />
PS Polystyrene Capacitor<br />
PY Polyester/Mylar Capacitor<br />
SM Silver Mica Capacitor<br />
UF Microfarads<br />
67
<strong>StereoMaxx</strong><br />
Revision 2<br />
Operations Manual<br />
Parts List<br />
MSI PART<br />
NUMBER<br />
QTY DESCRIPTION REFERENCE DESIGNATOR MANUFACTURER MANUFACTURER PART<br />
NUMBER<br />
V01-<strong>MYB</strong>M<br />
A02-S203FT001 2 200 OHM 1-T FLAT TP RV200-RV201 BOURNS 3386P1-201<br />
A02-S204FT001 1 2K 1-T FLAT TRIMPOT RV8 BOURNS 3386P1-202<br />
A02-S205FT001 1 TRIMPOT, 01T 20K0 FS TOP RV202 BOURNS 3386P1-203<br />
A02-S504FT001 2 5 K 1-T FLAT TRIMPOT RV6,RV9 BOURNS 3386P1-502<br />
A02-S504US001 1 5K UPRIGHT TRIMPOT RV1 BOURNS 3386W1-502<br />
A02-S505FT001 2 50K 1-T FLAT TRIMPOT RV5,RV7 BOURNS 3386P1-503<br />
A03-1RUA25502 3 POTENTIOMETER, 25K0 LINEAR RV3-RV4,RV300 CLAROSTAT 308NPC-25K<br />
A03-2RUA10501 1 POTENTIOMETER, 10K0 LINEAR RV2 ALLENBRADL 70P4G024S103U<br />
A04-1002JMEG1 5 CAP 10PF MC 10% C3-C4,C8-C9,C12 CENTRALAB CN15A100K<br />
A04-1006HMCH1 16 .1 UF 50 V 20% MC C15,C26,C37,C204,C215- CENTRALAB CZ20C104M<br />
C218,C302-C303,C312-<br />
C313,C316-C318,C32<br />
A04-1006JPNF1 4 .1 UF 5% 100V PY C11,C21-C23 WIMA MKS4RM7 0.1/100/5<br />
(7.5MM)<br />
A04-1007GTNH1 10 1 UF 35 V DT C25,C28-C30,C38,C207,C300- SPRAGUE 199D105X0035BB1<br />
C301,C304,C314<br />
A04-1007HPNF1 3 1 UF 5% 63V PY LS 10MM C5,C10,C13 Wima# MKS4RM10<br />
1uf/5/63 (10mm)<br />
A04-1008FTNH1 2 10 UF 25 V DT C17-C18 SPRAGUE 199D106X0025CB1<br />
A04-2202JMAG1 5 22 PF 100 V 10% MC C19-C20,C39-C40,C308 CENTRALAB CN15A220K<br />
A04-2703RSND1 4 270 PF 1% SM C1-C2,C6-C7 DM15FD271F03<br />
A04-3302JMAG1 2 33 PF 100 V 10% MC C306-C307 CENTRALAB CN15A330K<br />
A04-3307FTNH1 2 3.3 UF 25 V DT C14,C24 SPRAGUE 199D335X0025BB1<br />
68
<strong>StereoMaxx</strong><br />
Revision 2<br />
Operations Manual<br />
A04-3902RCAF1 1 39 PF CER DISC, NPO, 0.25 LS C309 MALLORY CMC390J<br />
A04-4706HPNF2 1 0.47 UF 5% 63V PY C209 WIMA MKS4RM7 0.47/63/5<br />
(7.5MM)<br />
A04-4708BTNH1 1 47 UF 6 V DT C319 ITTCAP TAP47M6.3<br />
A04-5602HCAF1 2 56 PF 5 % COG DISC C310-C311 MALLORY CEC560J<br />
A04-6802JMAG1 1 68 PF 100 V 10% MC C16 CENTRALAB CN15A680K<br />
A04-6803HMBG1 1 680 PF 50 V 10% MC C42 CENTRALAB CW15C681K<br />
A04-6807FTNH1 8 6.8 UF 25 V DT C27,C31-C36,C315 SPRAGUE 199D685X0025CB1<br />
A10-020971521 1 CRYSTAL 2.097152 MHZ,HC33/U X300 JANCRYSTAL MP HC 33/U<br />
AT4-1004HMAD1 12 1 NF MC (BINNED BY 0.1%) C200-C203,C205-<br />
(FOR MSI USE parts do not go to vendo<br />
C206,C208,C210-C214 ONLY)<br />
B01-4003 3 RECTIFIER DIODE D300-D302 VARIOUS 1N4003<br />
B01-4148 17 GLASS DIODE D1,D3-D7,D12-D18,D20-D22,D26 VARIOUS 1N4150<br />
B02-753A 1 6.2 V ZENER DIODE D19 VARIOUS 1N753A<br />
B04-P3906 1 LOW POWER PNP TRANSISTOR Q1 VARIOUS 2N3906<br />
BT1-4148 4 1N4148 DIODE (BINNED D8-D11parts must be installed by MSI PARTS B01-4148 (TESTED)<br />
VOLTAGE)<br />
MSI)<br />
C01-1B0000003 4 NE5534P TI OP AMP, PLASTIC U7-U8,U23-U24 SIGNETICS NE5534N<br />
C01-1F0000005 1 LM310N VOLTAGE FOLLOWER U203 NATIONALSE LM310N<br />
C01-2B0000001 3 NE5532P DUAL OP AMP, U1,U201,U206 TEXASINSTR NE5532P (TI ONLY)<br />
PLASTIC<br />
C01-2F0000002 8 LF412CN Dual OP AMP Nsc# U2,U6,U10-U14,U17 NATIONALSE LF412CN<br />
C01-2F0000007 9 TL082CP RAYTHEON DUAL OP U3-U4,U9,U15-<br />
MOTOROLA TL082CP<br />
AMP<br />
U16,U18,U20,U200,U205<br />
C01-2F0000008 1 DUAL JFET OP AMP U204 MOTOROLA MC34082P (OR AP)<br />
C04-400000001 1 QUAD COMPARATOR U19 NATIONALSE LM339AN<br />
C07-100000001 1 VCA That Corp.# 2151 U5 DBX 2151<br />
C13-000000001 2 LM3914N U21-U22 NATIONALSE LM3914N<br />
D01-4008X0001 2 4 BIT BINARY ADDER U313-U314 MOTOROLA MC14008<br />
D01-401300001 2 DUAL D FLIP-FLOP U306-U307 MOTOROLA MC14013<br />
D01-4040X0001 2 12 BIT RIPPLE COUNT U305,U315 MOTOROLA MC14040<br />
69
<strong>StereoMaxx</strong><br />
Revision 2<br />
Operations Manual<br />
D01-4049X0001 1 HEX INVERTING BUFFER U308 TOSHIBA SCL4049BE<br />
D01-4071X0001 3 QUAD OR GATE U309,U311,U321 MOTOROLA MC14071BCP<br />
D01-4076X0001 1 QUAD D REG, 3-STATE U302 NATIONALSE CD4076BCN<br />
D01-4081X0001 3 CMOS IC QUAD 2-INPUT & GATE U310,U319-U320 RCA CD4081BE<br />
D02-000000002 1 12 STAGE BINARY COUNTER U312 MOTOROLA MC74HC4040N<br />
D03-000000016 1 2048 X 8 HS CMOS RAM U303 SONY CXK5816PS-12<br />
D05-AD0800002 1 8 BIT A/D CONV U317 NATIONALSE ADC0804LCN<br />
D05-AD1200003 1 12 BIT A/D CONVERTER U301 AD7572JN12<br />
D05-DA1200002 1 12 BIT D/A CONVERTER U304 ANALOGDEVI AD7548KN<br />
D06-040100101 1 ANALOG SWTCH (SILICONIX U202 SILICONIX DG211CJ<br />
ONLY)<br />
E01-I20000003 1 RED HI-BRIGHT LED S1 SOLICO / MEC XSOLR-312<br />
E01-S20000002 1 RED LED W/LONG CATHODE D25 LUMEX SSL-LX4673ID<br />
E01-S40000002 1 YELLOW LED W/LONG Cathode D23 LUMEX SSL-LX4673YD<br />
E01-S50000002 1 GREEN LED D2 HEWLETTPAC HLMP-1840<br />
E01-S50000003 1 GREEN LED W/LONG CAT D24 LUMEX SSL-LX4673GD<br />
E03-LED000003 2 10 SEGMENT GREEN DISPLAY MD1-MD2 LUMEX SSA-LXB103GD<br />
E03-LED000004 2 10 SEGMENT YELLOW DISPLAY MD3-MD4 LUMEX SSA-LXB103YD<br />
H05-008000001 26 8 PIN EDGE GRIP SS US1-US4,US6-US18,US20,US23- AMP 2-640463-2<br />
US24,US200-US201,US203-<br />
US206<br />
H05-014000002 9 14 PIN FACE GRIP SS US19,US306-US307,US309- AMP 2-641261-20<br />
US311,US319-US321<br />
H05-016000002 8 16 PIN FACE GRIP SS US202,US302,US305,US308,US3 AMP 2-641262-20<br />
12-US315<br />
H05-018000002 2 18 PIN FACE GRIP SS US21-US22 AMP 2-641263-20<br />
H05-020000002 2 20 PIN FACE GRIP SS US304,US317 AMP 2-641264-20<br />
H05-024000002 1 24 PIN FACE GRIP SS US303 AMP 2-641266-20<br />
H05-024000003 1 24 PIN NARROW FG SS US301 ROBINSON ICE-243-S-TG<br />
NUGENT<br />
H08-001PMS001 16 TEST POINTS TP1,TP5-TP14,TP201- OXLEY 040/30P/KP2/L<br />
70
<strong>StereoMaxx</strong><br />
Revision 2<br />
Operations Manual<br />
TP203,TP301-TP302<br />
H08-003PMW001 7 3 PIN WW STRIP PS6-PS8,PS10-<br />
SAMTEC TSW-103-09-GS<br />
PS11,PS201,PS12<br />
H08-004PMS002 2 MASCON HEAD,4-PIN W/GOLD PS2,PS9 PANDUIT MLSS100-4-DA<br />
H08-005PMS001 2 MASCON 5-PIN HEAD. W/ GOLD PS1,PS4 PANDUIT MLSS100-5-DA<br />
H08-006PMW001 1 3x2 RT ANG PINSTRIP PS5 SAMTEC BST-103-09TD-230RA<br />
H14-S00800001 1 8 MACH PIN SIL US5 SAMTEC SS-108-G-2<br />
H19-002000001 7 0.1` WW PIN JUMPER BERG 65474-001<br />
I02-010200202 1 ALT ACT LIGHT PB Switch Hi- S1 ITTSCHADOW MPXX012UEEN2201<br />
W/LED<br />
J01-260000001 4 BUS WIRE, TINNED, 26AWG J201,J300-302, (QTY IN INCH)<br />
J03-P242X0001 2 RED 24 AWG stranded hook-up wire PS3-2 TO <strong>MYB</strong>WPS1-2<br />
J03-P243X0001 2 Orange 24 AWG stranded hook-up wire PS3-3 TO <strong>MYB</strong>WPS1-3<br />
J03-P244X0001 2 Yellow 24 AWG stranded hook-up wire PS3-4 TO <strong>MYB</strong>WPS1-4<br />
J03-P248X0001 2 Grey 24AWG stranded hook-up wire PS3-1 TO <strong>MYB</strong>WPS1-1<br />
K02-3122 2 #6 NYLON FLAT WASHER KEYSTONE 3122<br />
K04-1450B 2 4/40 X 3/8` HEX SPAC KEYSTONE 1450B<br />
K04-1450C 1 4/40 X 1/2` HEX SPACER KEYSTONE 1450C<br />
K04-1547A 1 1/4` X 4/40 RND SPCR KEYSTONE 1547A<br />
L03-PWBSERLAB 1 SERIAL LABEL (KAPTON) CRITCHELY CR3-KG10F<br />
O03-4/40E2501 12 4/40 x 1/4 Sems, philips pan VARIOUS NONE<br />
O03-4/40M2501 1 4/40 X 1/4` ROUND HD,SLOTTED VARIOUS NONE<br />
Z01-102 3 10 OHM 1/4W 5% CF R120,R302,R308 VARIOUS 1/4 W 5 % CF<br />
Z01-103 1 100 OHM 1/4W 5% CF R219 VARIOUS 1/4 W 5 % CF<br />
Z01-104 3 1K 1/4W 5% CF R71,R74,R106 VARIOUS 1/4 W 5 % CF<br />
Z01-105 6 10K 1/4W 5% CF R35,R44,R100,R102,R304-R305 VARIOUS 1/4 W 5 % CF<br />
Z01-106 1 100K 1/4W 5% CF R312 VARIOUS 1/4 W 5 % CF<br />
Z01-107 3 1 M 1/4W 5% CF R25,R50,R107 VARIOUS 1/4 W 5 % CF<br />
Z01-108 1 10 M 1/4W 5% CF R306 VARIOUS 1/4 W 5 % CF<br />
Z01-115 2 11 K 1/4W 5% CF R310-R311 VARIOUS 1/4 W 5 % CF<br />
Z01-128 1 12 M 1/4W 5% CF R139 VARIOUS 1/4 W 5 % CF<br />
Z01-153 1 150 OHM 1/4W 5% CF R113 VARIOUS 1/4 W 5 % CF<br />
71
<strong>StereoMaxx</strong><br />
Revision 2<br />
Operations Manual<br />
Z01-154 1 1.5 K 1/4W 5% CF R42 VARIOUS 1/4 W 5 % CF<br />
Z01-155 2 15K 1/4W 5% CF R47,R82 VARIOUS 1/4 W 5 % CF<br />
Z01-187 1 1.8 M 1/4W 5% CF R91 VARIOUS 1/4 W 5 % CF<br />
Z01-205 1 20 K 1/4W 5% CF R92 VARIOUS 1/4 W 5 % CF<br />
Z01-223 3 220 OHM 1/4W 5% CF R109,R111,R240 VARIOUS 1/4 W 5 % CF<br />
Z01-224 1 2.2K 1/4W 5% CF R307 VARIOUS 1/4 W 5 % CF<br />
Z01-225 1 22K 1/4W 5% CF R46 VARIOUS 1/4 W 5 % CF<br />
Z01-226 6 220K 1/4W 5% CF R7,R16-R17,R101,R103,R105 VARIOUS 1/4 W 5 % CF<br />
Z01-228 1 22M 1/4W 5% CF R89 VARIOUS 1/4 W 5 % CF<br />
Z01-244 2 2.4 K 1/4W 5% CF R133-R134 VARIOUS 1/4 W 5 % CF<br />
Z01-394 1 3.9 K 1/4W 5% CF R26 VARIOUS 1/4 W 5 % CF<br />
Z01-474 2 4.7K 1/4W 5% CF R88,R90 VARIOUS 1/4 W 5 % CF<br />
Z01-512 1 51 OHM 1/4W 5% CF R36 VARIOUS 1/4 W 5 % CF<br />
Z01-567 1 5.6 M 1/4W 5% CF R104 VARIOUS 1/4 W 5 % CF<br />
Z01-625 1 62 K 1/4W 5% CF R43 VARIOUS 1/4 W 5 % CF<br />
Z01-682 1 68 OHM 1/4W 5% CF R48 VARIOUS 1/4 W 5 % CF<br />
Z01-683 2 680 OHM 1/4W 5% CF R118,R218 VARIOUS 1/4 W 5 % CF<br />
Z01-684 1 6.8 K 1/4W 5% CF R53 VARIOUS 1/4 W 5 % CF<br />
Z01-823 2 820 OHM 1/4W 5% CF R117,R119 VARIOUS 1/4 W 5 % CF<br />
Z02-1004 6 1.0 K 1/4W 1% MF R41,R77,R79,R112,R205,R225 VARIOUS 1/4 W 1 % MF<br />
Z02-1005 25 10.0 K 1/4W 1% MF R15,R19-R22,R51-R52,R55,R60-<br />
R63,R67-R70,R85<br />
R93-<br />
R94,R98,R206,R21<br />
3,R226,R233,R236<br />
1/4 W 1 % MF<br />
Z02-1006 2 100 K 1/4W 1% MF R86,R97 VARIOUS 1/4 W 1 % MF<br />
Z02-1007 2 1.00 M 1/4W 1% MF R72,R75 VARIOUS 1/4 W 1 % MF<br />
Z02-1025 2 10.2 K 1/4W 1% MF R207,R227 VARIOUS 1/4 W 1 % MF<br />
Z02-1075 1 10.7 K 1/4W 1% MF R216 VARIOUS 1/4 W 1 % MF<br />
Z02-1104 2 1.10 K 1/4W 1% MF R212,R232 VARIOUS 1/4 W 1 % MF<br />
Z02-1105 1 11.0 K 1/4W 1% MF R87 VARIOUS 1/4 W 1 % MF<br />
Z02-1106 1 110 K 1/4W 1% MF R96 VARIOUS 1/4 W 1 % MF<br />
Z02-1216 1 121 K 1/4W 1% MF R38 VARIOUS 1/4 W 1 % MF<br />
72
<strong>StereoMaxx</strong><br />
Revision 2<br />
Operations Manual<br />
Z02-1245 3 12.4 K 1/4W 1% MF R29-R31 VARIOUS 1/4 W 1 % MF<br />
Z02-1305 1 13.0 K 1/4W 1% MF R234 VARIOUS 1/4 W 1 % MF<br />
Z02-1375 2 13.7 K 1/4W 1% MF R209,R229 VARIOUS 1/4 W 1 % MF<br />
Z02-1505 3 15.0 K 1/4W 1% MF R33,R84,R214 VARIOUS 1/4 W 1 % MF<br />
Z02-1696 2 169 K 1/4W 1% MF R39-R40 VARIOUS 1/4 W 1 % MF<br />
Z02-1915 1 19.1 K 1/4W 1% MF R237 VARIOUS 1/4 W 1 % MF<br />
Z02-2005 4 20.0 K 1/4W 1% MF R49,R56,R203,R223 VARIOUS 1/4 W 1 % MF<br />
Z02-2104 1 2.10 K 1/4W 1% MF R110 VARIOUS 1/4 W 1 % MF<br />
Z02-2105 2 21.0 K 1/4W 1% MF R54,R59 VARIOUS 1/4 W 1 % MF<br />
Z02-2215 2 22.1K 1/4W 1% MF R78,R80 VARIOUS 1/4 W 1 % MF<br />
Z02-2265 1 22.6 K 1/4W 1% MF R28 VARIOUS 1/4 W 1 % MF<br />
Z02-2325 2 23.2 K 1/4W 1% MF R200,R220 VARIOUS 1/4 W 1 % MF<br />
Z02-2434 2 2.43 K 1/4W 1% MF R14,R73 VARIOUS 1/4 W 1 % MF<br />
Z02-2495 2 24.9 K 1/4W 1% MF R217,R235 VARIOUS 1/4 W 1 % MF<br />
Z02-2554 2 2.55 K 1/4W 1% MF R210,R230 VARIOUS 1/4 W 1 % MF<br />
Z02-2745 1 27.4 K 1/4W 1% MF R32 VARIOUS 1/4 W 1 % MF<br />
Z02-2875 1 28.7 K 1/4W 1% MF R83 VARIOUS 1/4 W 1 % MF<br />
Z02-3013 4 301 OHM 1/4W 1% MF R129-R132 VARIOUS 1/4 W 1 % MF<br />
Z02-3014 1 3.01 K 1/4W 1% MF R303 VARIOUS 1/4 W 1 % MF<br />
Z02-3015 2 30.1 K 1/4W 1% MF R27,R99 VARIOUS 1/4 W 1 % MF<br />
Z02-3324 1 3.32 K 1/4W 1% MF R76 VARIOUS 1/4 W 1 % MF<br />
Z02-3485 2 34.8 K 1/4W 1% MF R202,R222 VARIOUS 1/4 W 1 % MF<br />
Z02-3834 3 3.83 K 1/4W 1% MF R57,R201,R221 VARIOUS 1/4 W 1 % MF<br />
Z02-3924 2 3.92 K 1/4W 1% MF R34,R58 VARIOUS 1/4 W 1 % MF<br />
Z02-4224 2 4.22 K 1/4W 1% MF R23-R24 VARIOUS 1/4 W 1 % MF<br />
Z02-4755 3 47.5 K 1/4W 1% MF R116,R208,R228 VARIOUS 1/4 W 1 % MF<br />
Z02-4756 1 475 K 1/4W 1% MF R95 VARIOUS 1/4 W 1 % MF<br />
Z02-4992 1 49.9 OHM 1/4W 1% MF R37 VARIOUS 1/4 W 1 % MF<br />
Z02-4994 4 4.99 K 1/4W 1% MF R64-R66,R309 VARIOUS 1/4 W 1 % MF<br />
Z02-6043 2 604 OHM 1/4W 1% MF R135-R136 VARIOUS 1/4 W 1 % MF<br />
Z02-6193 2 619 OHM 1/4W 1% MF R123-R124 VARIOUS 1/4 W 1 % MF<br />
73
<strong>StereoMaxx</strong><br />
Revision 2<br />
Operations Manual<br />
Z02-6195 2 61.9 K 1/4W 1% MF R45,R114 VARIOUS 1/4 W 1 % MF<br />
Z02-6814 3 6.81 K 1/4W 1% MF R81,R108,R115 VARIOUS 1/4 W 1 % MF<br />
Z02-8253 1 825 OHM 1/4W 1% MF R313 VARIOUS 1/4 W 1 % MF<br />
Z02-8254 1 8.25 K 1/4W 1% MF R18 VARIOUS 1/4 W 1 % MF<br />
Z02-9095 1 90.9 K 1/4W 1% MF R215 VARIOUS 1/4 W 1 % MF<br />
Z02-9534 4 9.53 K 1/4W 1% MF R204,R211,R224,R231 VARIOUS 1/4 W 1 % MF<br />
Z02-XXXX 2 RESISTOR 1% SELSCT AT TEST R121-R122 VARIOUS 1/4 W 1 % MF<br />
Z14-1005 16 10.0K RN55.1% 1/4W 50 PPM R1-R6,R8-R13,R137-R138,R238- MILITARY RN55 1/4W 0.10%<br />
R239<br />
Z14-4994 4 4.99K RN55 .1% 25OR 50 PPM R125-R128 MILITARY RN55 1/4 W 0.10%<br />
Z20-470409S01 1 4.7K X 9 SIP resistor network RN300 SPRAGUE 256CK472X2PD<br />
74
<strong>StereoMaxx</strong><br />
Revision 2<br />
Operations Manual<br />
MSI PART<br />
NUMBER<br />
QTY DESCRIPTION REFERENCE<br />
DESIGNATOR<br />
MANUFACTURER<br />
MANUFACTURER PAR<br />
NUMBER<br />
VO3-<strong>MYB</strong>P<br />
A04-<br />
3 .1 UF 50 V 20% MC C4-C5,C9 CENTRALAB CZ20C104M<br />
1006HMCH1<br />
A04-<br />
3 1 UF 35 V DT C6-C8 SPRAGUE 199D105X0035BB1<br />
1007GTNH1<br />
A04-220AGANI1 2 2200 UF 50 V 20% AE C1-C2 PANA ECE-B1VFS222<br />
A04-<br />
1 4700 uF 16V AE C3 SIEMENS 82009-4700/16<br />
470ADANH1<br />
A08-D12234201 1 34 VAC CT PC MT XFRM T1 MAGNETCOIL 4-05-3-034<br />
A08-D60113201 1 TRANSFORMER Mci# 4-05-2- T2 MAGNETCOIL 4-05-2-012<br />
012<br />
B01-4003 6 RECTIFIER DIODE D1-D6 VARIOUS 1N4003<br />
C02-<br />
1 -15 VOLT REGULATOR U2 VARIOUS UA79M15<br />
1N152M001<br />
C02-<br />
1 +15 VOLT REGULATOR U1 VARIOUS UA78M15<br />
1P152M001<br />
C02-<br />
1 5 VOLT LOW DROP REG. U3 SGSATES L4805CV<br />
1P501M002<br />
H08-<br />
1 5 PIN END CONNECTOR,GOLD J4 PANDUIT CE100F24-5-DA<br />
005CFW001<br />
PLAT<br />
H11-<br />
1 Crimp lug, screw size 6 ZIERICKMAN A3651W/.144"HOLE<br />
CRN160401<br />
H20-<br />
4 PC MT MALE<br />
P1-P4 KEYSTONE 1267<br />
MP0000001<br />
QUICKCONNECTOR<br />
J03-P240X0001 38 Black 24 AWG stranded hook-up<br />
1550<br />
wire<br />
J03-P242X0001 16 RED 24AWG stranded hookup<br />
wire<br />
UL1007<br />
75
<strong>StereoMaxx</strong><br />
Revision 2<br />
Operations Manual<br />
J03-P243X0001 16 Orange 24AWG stranded hookup<br />
wire<br />
J03-P247X0001 16 Violet/Purple 24 awg, stranded<br />
K02-000000003 2 ELECT. ISOLATING THE U1-U2 1ST TWO VOLTAGE<br />
REGUALTORS!<br />
K02-3051 3 NO 2 SHOULDER BUSH U1-U3 KEYSTONE 3051<br />
K06-4INCH 1 4 INCH CABLE TIES FASTEN HARNESS TO HEYMANMANU 3510NT90<br />
BOARD<br />
K06-D08477 2 11` LADDER CABLE TIE DENNISON 8477<br />
K08-<strong>MYB</strong>PMB 1 MOUNTING BRACKET MB1 MSI <strong>MYB</strong>P-MB<br />
L03-<br />
1 SERIAL LABEL (KAPTON) CRITCHELY CR3-KG10F<br />
PWBSERLAB<br />
L03-<br />
VMRHINSUL<br />
1 4.5 X 5.75 X 7MIL MY C1,C2 We make here w/ Lexan<br />
Material<br />
L03-<br />
VMRHINSUL<br />
1 4.5 X 5.75 X 7MIL MY C3 We make here w/ Lexan<br />
Material<br />
O03-2/56M3801 4 2/56 X 3/8 Round head, philips VARIOUS NONE<br />
O03-2/56P0001 4 2/56 PC MT. PEM NUT PENNENGINE KF2-256<br />
U05-<strong>MYB</strong>P 1 ASSEMBLY LABOR, V03-<strong>MYB</strong>P<br />
76