- Page 1 and 2:
User Manual for PLC Programming wit
- Page 3 and 4:
Content 1 A Brief Introduction to C
- Page 5 and 6:
8 The License Manager 8-1 8.1.1 Cre
- Page 7 and 8:
A Brief Introduction to CoDeSys 1 A
- Page 9:
A Brief Introduction to CoDeSys 1.3
- Page 12 and 13:
Project Components... The call of a
- Page 14 and 15:
Project Components... Calling a fun
- Page 16 and 17: Project Components... In FBD : PLC_
- Page 18 and 19: Languages... Data types Visualizati
- Page 20 and 21: Languages... LDN BOOL2 (*save the n
- Page 22 and 23: Languages... BOOL2 := FALSE; END_CA
- Page 24 and 25: Languages... FOR loop • If the va
- Page 26 and 27: Languages... 2.2.3 Sequential Funct
- Page 28 and 29: Languages... An example for an IEC
- Page 30 and 31: Languages... is stored in the branc
- Page 32 and 33: Languages... Contact Each network i
- Page 34 and 35: Debugging, Online Functions... Moni
- Page 37 and 38: Chapter 3 - We Write a Little Progr
- Page 39 and 40: 3 - We Write a Little Program For t
- Page 41 and 42: 3 - We Write a Little Program At fi
- Page 43 and 44: 3 - We Write a Little Program Actio
- Page 45 and 46: 3 - We Write a Little Program Progr
- Page 47 and 48: 3 - We Write a Little Program The n
- Page 49 and 50: 3 - We Write a Little Program The r
- Page 51: 3 - We Write a Little Program CoDeS
- Page 54 and 55: The Main Window... In order to see
- Page 56 and 57: Project Options... • Log • Buil
- Page 58 and 59: Project Options... Autodeclaration:
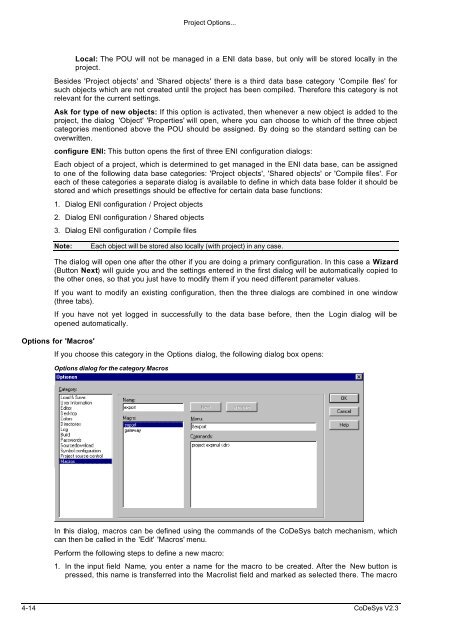
- Page 60 and 61: Project Options... If you have chos
- Page 62 and 63: Project Options... Here the comment
- Page 64 and 65: Project Options... Using the option
- Page 68 and 69: Managing Projects... 'File' 'Open'
- Page 70 and 71: Managing Projects... implementation
- Page 72 and 73: Managing Projects... 'File' 'Print'
- Page 74 and 75: Managing Projects... Window for pas
- Page 76 and 77: Managing Projects... Translate proj
- Page 78 and 79: Managing Projects... If a translati
- Page 80 and 81: Managing Projects... Dialog box for
- Page 82 and 83: Managing Projects... Please Note: I
- Page 84 and 85: Managing Projects... If the report
- Page 86 and 87: Managing Projects... 4.3.1 'Project
- Page 88 and 89: Managing Projects... Dialog 'Login'
- Page 90 and 91: Managing Projects... Dialog showing
- Page 92 and 93: Managing Projects... Label Version
- Page 94 and 95: Managing Objects in a Project... 'N
- Page 96 and 97: Managing Objects in a Project... Di
- Page 98 and 99: Managing Objects in a Project... On
- Page 100 and 101: General Editing Functions... 4.5 Ge
- Page 102 and 103: General Editing Functions... 'Edit'
- Page 104 and 105: General Online Functions... 'Edit'
- Page 106 and 107: General Online Functions... VAR PER
- Page 108 and 109: General Online Functions... Before
- Page 110 and 111: General Online Functions... Dialog
- Page 112 and 113: General Online Functions... 'Online
- Page 114 and 115: Window set up... 4.7 Window set up.
- Page 117 and 118:
5 - Editors in CoDeSys 5 Editors in
- Page 119 and 120:
5 - Editors in CoDeSys Input Variab
- Page 121 and 122:
5 - Editors in CoDeSys con1:INT:=12
- Page 123 and 124:
5 - Editors in CoDeSys • All iden
- Page 125 and 126:
5 - Editors in CoDeSys In the onlin
- Page 127 and 128:
5 - Editors in CoDeSys If the POU h
- Page 129 and 130:
5 - Editors in CoDeSys 'Insert' 'Op
- Page 131 and 132:
5 - Editors in CoDeSys IL Editor wi
- Page 133 and 134:
5 - Editors in CoDeSys 5.3.2 The Ed
- Page 135 and 136:
5 - Editors in CoDeSys of the netwo
- Page 137 and 138:
5 - Editors in CoDeSys Depending on
- Page 139 and 140:
5 - Editors in CoDeSys 'Extras' 'Se
- Page 141 and 142:
5 - Editors in CoDeSys All editors
- Page 143 and 144:
5 - Editors in CoDeSys The contact
- Page 145 and 146:
5 - Editors in CoDeSys The coil now
- Page 147 and 148:
5 - Editors in CoDeSys 'Insert' 'Pa
- Page 149 and 150:
5 - Editors in CoDeSys setting is d
- Page 151 and 152:
5 - Editors in CoDeSys If IEC steps
- Page 153 and 154:
5 - Editors in CoDeSys 2. Text fiel
- Page 155 and 156:
5 - Editors in CoDeSys 'Extras' 'Se
- Page 157 and 158:
5 - Editors in CoDeSys 'Extras' 'Co
- Page 159 and 160:
5 - Editors in CoDeSys 'Extras' 'Or
- Page 161 and 162:
5 - Editors in CoDeSys Example: Sel
- Page 163:
5 - Editors in CoDeSys PINs in macr
- Page 166 and 167:
Global Variables, Variable Configur
- Page 168 and 169:
Global Variables, Variable Configur
- Page 170 and 171:
Global Variables, Variable Configur
- Page 172 and 173:
Library Manager... variable. You ca
- Page 174 and 175:
Log... Remove Library With the 'Edi
- Page 176 and 177:
PLC Configuration Storing the proje
- Page 178 and 179:
PLC Configuration All modules start
- Page 180 and 181:
PLC Configuration Modul id: The Mod
- Page 182 and 183:
PLC Configuration 6.5.5 Configurati
- Page 184 and 185:
PLC Configuration The GSD file pert
- Page 186 and 187:
PLC Configuration Basisparameter di
- Page 188 and 189:
PLC Configuration The Properties bu
- Page 190 and 191:
PLC Configuration 6.5.7 Configurati
- Page 192 and 193:
PLC Configuration given Guard COB-I
- Page 194 and 195:
PLC Configuration cyclic - synchron
- Page 196 and 197:
PLC Configuration CAN settings of a
- Page 198 and 199:
Target Settings Target-Support-Pack
- Page 200 and 201:
Task Configuration... • A task na
- Page 202 and 203:
Task Configuration... may be extend
- Page 204 and 205:
Watch and Receipt Manager... The sc
- Page 206 and 207:
Watch and Receipt Manager... Watch
- Page 208 and 209:
Sampling Trace Dialog Box for Trace
- Page 210 and 211:
Sampling Trace Display of the Sampl
- Page 212 and 213:
Sampling Trace 'Load Values' Be awa
- Page 214 and 215:
Parameter Manager 6.10.1 Dialog Tar
- Page 216 and 217:
Parameter Manager 6.11.2 Der Parame
- Page 218 and 219:
Parameter Manager Now close the tem
- Page 220 and 221:
Parameter Manager attributes. To en
- Page 222 and 223:
PLC Browser In a selection box the
- Page 224 and 225:
Tools %V If NAME is a variable name
- Page 226 and 227:
Tools The table lists all tools for
- Page 228 and 229:
Tools Parameter Path of the file wh
- Page 230 and 231:
Tools Mark the entry 'Tools' in the
- Page 232 and 233:
Tools • a project data base for w
- Page 235 and 236:
8 - The License Manager 8 The Licen
- Page 237 and 238:
9 - DDE Communication with CoDeSys
- Page 239 and 240:
9 - DDE Communication with CoDeSys
- Page 241 and 242:
APPENDIX 10 APPENDIX Appendix A: IE
- Page 243 and 244:
IEC Operators and additional norm e
- Page 245 and 246:
IEC Operators and additional norm e
- Page 247 and 248:
IEC Operators and additional norm e
- Page 249 and 250:
IEC Operators and additional norm e
- Page 251 and 252:
IEC Operators and additional norm e
- Page 253 and 254:
IEC Operators and additional norm e
- Page 255 and 256:
IEC Operators and additional norm e
- Page 257 and 258:
IEC Operators and additional norm e
- Page 259 and 260:
IEC Operators and additional norm e
- Page 261 and 262:
IEC Operators and additional norm e
- Page 263 and 264:
IEC Operators and additional norm e
- Page 265 and 266:
Appendix B: Operands in CoDeSys App
- Page 267 and 268:
Appendix B: Operands in CoDeSys $P
- Page 269:
Appendix B: Operands in CoDeSys %QB
- Page 272 and 273:
Standard data types Time Data Types
- Page 274 and 275:
Defined data types FUNCTION CheckBo
- Page 276 and 277:
Defined data types References For e
- Page 279 and 280:
Appendix D: CoDeSys Libraries Appen
- Page 281 and 282:
Appendix D: CoDeSys Libraries LD CO
- Page 283 and 284:
Appendix D: CoDeSys Libraries Examp
- Page 285 and 286:
Appendix D: CoDeSys Libraries CLK :
- Page 287 and 288:
Appendix D: CoDeSys Libraries Examp
- Page 289 and 290:
Appendix D: CoDeSys Libraries As so
- Page 291 and 292:
Appendix D: CoDeSys Libraries Decla
- Page 293 and 294:
Appendix D: CoDeSys Libraries Examp
- Page 295 and 296:
Appendix D: CoDeSys Libraries A P-c
- Page 297 and 298:
Appendix D: CoDeSys Libraries IN of
- Page 299 and 300:
Appendix D: CoDeSys Libraries If th
- Page 301 and 302:
Appendix E: Operators and Library M
- Page 303 and 304:
Appendix E: Operators and Library M
- Page 305:
Appendix E: Operators and Library M
- Page 308 and 309:
Command File (cmdfile) Commands onl
- Page 310 and 311:
Command File (cmdfile) Commands dir
- Page 312 and 313:
Command File (cmdfile) Commands 'Co
- Page 315 and 316:
Appendix G: Siemens Import Appendix
- Page 317 and 318:
Appendix G: Siemens Import BE, BEA,
- Page 319:
Appendix G: Siemens Import redirect
- Page 322 and 323:
Command File (cmdfile) Commands 10.
- Page 324 and 325:
Command File (cmdfile) Commands Tar
- Page 326 and 327:
Command File (cmdfile) Commands Tar
- Page 328 and 329:
Command File (cmdfile) Commands Tar
- Page 330 and 331:
Command File (cmdfile) Commands 10.
- Page 332 and 333:
Command File (cmdfile) Commands 10.
- Page 334 and 335:
Key Combinations 'File' 'Print' 'Fi
- Page 336 and 337:
Key Combinations 'Insert' 'Step-Tra
- Page 339 and 340:
Appendix J: Compiler Errors and War
- Page 341 and 342:
Appendix J: Compiler Errors and War
- Page 343 and 344:
Appendix J: Compiler Errors and War
- Page 345 and 346:
Appendix J: Compiler Errors and War
- Page 347 and 348:
Appendix J: Compiler Errors and War
- Page 349 and 350:
Appendix J: Compiler Errors and War
- Page 351 and 352:
Appendix J: Compiler Errors and War
- Page 353 and 354:
Appendix J: Compiler Errors and War
- Page 355 and 356:
Appendix J: Compiler Errors and War
- Page 357 and 358:
Appendix J: Compiler Errors and War
- Page 359 and 360:
Appendix J: Compiler Errors and War
- Page 361 and 362:
Appendix J: Compiler Errors and War
- Page 363 and 364:
Appendix J: Compiler Errors and War
- Page 365 and 366:
Appendix J: Compiler Errors and War
- Page 367 and 368:
Appendix J: Compiler Errors and War
- Page 369 and 370:
Appendix J: Compiler Errors and War
- Page 371 and 372:
Appendix J: Compiler Errors and War
- Page 373:
Appendix J: Compiler Errors and War
- Page 376 and 377:
Errors Changing connections 5-40 Cr
- Page 378 and 379:
Errors Set as project configuration
- Page 380 and 381:
Errors Insert Label in CFC 5-38 Ins
- Page 382 and 383:
Errors Function 5-13 Function Block
- Page 384 and 385:
Errors Cut/Copy/Paste line 6-55 Del
- Page 386 and 387:
Errors SFCTip 2-19 SFCTipMode 2-19
- Page 388:
Errors Window 4-62 Window Arrange S