Map GPS Coordinates - GPS Map Coordinates ... - Global Mapper
Map GPS Coordinates - GPS Map Coordinates ... - Global Mapper
Map GPS Coordinates - GPS Map Coordinates ... - Global Mapper

You also want an ePaper? Increase the reach of your titles
YUMPU automatically turns print PDFs into web optimized ePapers that Google loves.
Metadata<br />
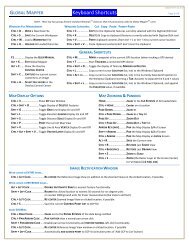
<strong>Global</strong> <strong>Map</strong>per User's Manual<br />
• Use 3D Line Features as Constraints (i.e. Breaklines) - If this option is checked, any line and area<br />
features that have elevation values associated with them will be treated as constraints/breaklines. This<br />
will ensure that elevation values along the line/area boundary will be consistent with the elevation that<br />
should be along the line.<br />
• Flatten 3D Area Features - If you have any area/polygon features with elevation in the selected layers<br />
that you are gridding, they will be treated as flattened areas rather than just additional 3D data<br />
points/constraints. This allows you to create flattened areas like lakes and also nice terrain surfaces<br />
from things like building models. If only 3D area features are present, any grid locations outside of<br />
the areas will be marked as invalid, otherwise the grid locations within areas will just be flattened to<br />
the area heights and the remainder of the grid will be generated as usual.<br />
• Taper 3D Area Features Using Curve Value - If you have any area/polygon features with elevation in<br />
the selected layers that you are gridding and you also checked the option to flatten 3D area features,<br />
the taper option allows you to specify that rather than making the areas absolutely flat, the edges<br />
should be tapered with the area elevation existing near the centroid of the area and the elevation<br />
applied for the area dwindling to zero as you reach the area edge. The curve value specifies the<br />
exponent to apply to the percent distance a sample location is between the area centroid and the area<br />
edge to adjust the height applied at that location. Values less than 1 will make the edge steepness<br />
progressively greater (i.e. flatter at the middle, then steep edges), while values larger than one cause<br />
the steepness to be near the area centroid and flatter towards the edges, while a value of 1 provides for<br />
a linear taper. For example if you want to simulate a sand bunker for a golf course, a value of around<br />
0.5 provides a decent simulation of a bunker.<br />
• Ignore Zero Elevations - If checked, this option will cause any features with an elevation value of zero<br />
to be ignored. This is useful if you have a data set where features with no known elevation are marked<br />
with an elevation of zero.<br />
• Save Triangulated Network (TIN) as a Vector Layer - If checked, this option will cause a separate<br />
vector layer with area features for each 3D triangle created as part of the triangulation and gridding<br />
process. This is known as the TIN surface.<br />
• Heights Relative to Ground - If you check this option, all elevation values from the selected vector<br />
layers will be treated as relative to the height of any loaded underlying terrain surface (like a DEM).<br />
This is very handy for doing things like creating building models where you just know the building<br />
height above ground and not above sea level.<br />
• Fill Entire Bounding Box Instead of Just Inside Convex Hull - If you check this option, the generated<br />
elevation grid will contain valid values filling the entire bounding box specified for the gridding<br />
operation. Otherwise, the valid values will only fill out to the convex hull polygon of the data being<br />
gridded.<br />
• Export Grids Directly to <strong>Global</strong> <strong>Map</strong>per Grid Files - If checked, this option will cause the generated<br />
elevation grid file(s) to be directly exported to <strong>Global</strong> <strong>Map</strong>per Grid (GMG) files. This is useful when<br />
you are triangulating and gridding a very large collection of data and also using the Gridding tab to<br />
split the operation into smaller pieces. By directly exporting the results to GMG files you can create<br />
elevation grids that normally would not all fit into memory.<br />
Pressing the Metadata... button displays metadata for the selected overlay. The actual metadata dialog<br />
displayed depends on the type of the selected overlay. The metadata dialog for a SDTS DLG is shown below.<br />
<strong>Map</strong> <strong>GPS</strong> <strong>Coordinates</strong> - <strong>GPS</strong> <strong>Map</strong> <strong>Coordinates</strong> - <strong>GPS</strong><strong>Coordinates</strong> <strong>Map</strong> 134