
Create successful ePaper yourself
Turn your PDF publications into a flip-book with our unique Google optimized e-Paper software.
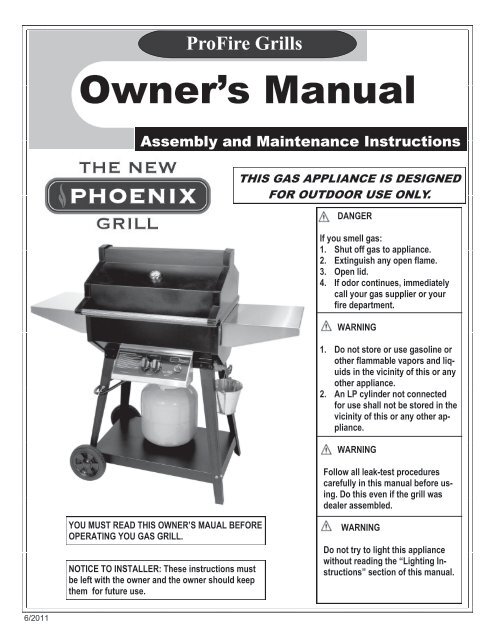
ProFire <strong>Grill</strong>s<br />
Owner’s <strong>Manual</strong><br />
Assembly and Maintenance Instructions<br />
THIS GAS APPLIANCE IS DESIGNED<br />
FOR OUTDOOR USE ONLY.<br />
DANGER<br />
If you smell gas:<br />
1. Shut off gas to appliance.<br />
2. Extinguish any open flame.<br />
3. Open lid.<br />
4. If odor continues, immediately<br />
call your gas supplier or your<br />
fire department.<br />
WARNING<br />
1. Do not store or use gasoline or<br />
other flammable vapors and liquids<br />
in the vicinity of this or any<br />
other appliance.<br />
2. An LP cylinder not connected<br />
for use shall not be stored in the<br />
vicinity of this or any other appliance.<br />
WARNING<br />
Follow all leak-test procedures<br />
carefully in this manual before using.<br />
Do this even if the grill was<br />
dealer assembled.<br />
YOU MUST READ THIS OWNER’S MAUAL BEFORE<br />
OPERATING YOU GAS GRILL.<br />
NOTICE TO INSTALLER: These instructions must<br />
be left with the owner and the owner should keep<br />
them for future use.<br />
WARNING<br />
Do not try to light this appliance<br />
without reading the “Lighting Instructions”<br />
section of this manual.<br />
6/2011
Safety<br />
DANGER<br />
Failure to follow the Dangers, Warnings and Cautions contained in this Owner’s <strong>Manual</strong> may result in serious bodily<br />
injury or death, or in a fire or an explosion causing damage to property.<br />
WARNINGS<br />
Do not store a spare or disconnected liquid propane cylinder under or near the barbecue.<br />
Improper assembly may be dangerous. Please carefully follow the assembly instructions in this manual.<br />
After a period of storage, and/or nonuse, the <strong>Phoenix</strong> Gas Barbecue <strong>Grill</strong> should be checked for gas leaks and burner obstructions<br />
before use. See instructions in this manual for correct procedures.<br />
Do not operate the <strong>Phoenix</strong> Gas Barbecue <strong>Grill</strong> if there is a gas leak present.<br />
Do not use a flame to check for gas leaks.<br />
Combustible materials should never be within 18 inches of the bottom, back or sides of your <strong>Phoenix</strong> Gas<br />
Barbecue <strong>Grill</strong>.<br />
Do not put a barbecue cover or anything flammable on, or in the storage area under the barbecue.<br />
Children should never use your <strong>Phoenix</strong> Gas Barbecue <strong>Grill</strong>. Accessible parts of the barbecue may be very hot. Keep young children<br />
away while it is in use.<br />
You should exercise reasonable care when operating your <strong>Phoenix</strong> Gas Barbecue <strong>Grill</strong>. It will be hot during<br />
cooking or cleaning and should never be left unattended, or moved while in operation.<br />
Should the burners go out while in operation, turn all gas valves off. Open lid and wait five minutes before<br />
attempting to relight, using the lighting instructions.<br />
Do not use charcoal or lava rock in your <strong>Phoenix</strong> Gas Barbecue <strong>Grill</strong>.<br />
Never lean over open grill or place hands or fingers on the front edge of cooking box.<br />
Do not enlarge the valve orifices or burner ports when cleaning the valves or burners.<br />
The <strong>Phoenix</strong> Gas Barbecue <strong>Grill</strong> should be thoroughly cleaned on a regular basis.<br />
Liquid propane gas is not natural gas. The conversion or attempted use of natural gas in a liquid propane<br />
unit or liquid propane gas in a natural gas unit is dangerous and will void your warranty.<br />
Do not attempt to disconnect any gas fitting while your barbecue is in operation.<br />
Use heat-resistant barbecue mitts or gloves when operating barbecue.<br />
LIQUID PROPANE GAS UNITS ONLY<br />
Use the regulator that is supplied with your <strong>Phoenix</strong> Gas Barbecue <strong>Grill</strong>.<br />
Do not attempt to disconnect the gas regulator or any gas fitting while your barbecue is in operation.<br />
A dented or rusty propane cylinder may be hazardous and should be checked by your local liquid propane<br />
supplier. Do not use a liquid propane cylinder with a damaged valve.<br />
Although your liquid propane cylinder may appear to be empty, gas may still be present, and the propane<br />
cylinder should be transported and stored accordingly.<br />
If you see, smell or hear the hiss of escaping gas from the liquid propane cylinder:<br />
1. Move away from the liquid propane cylinder.<br />
2. Do not attempt to correct the problem yourself.<br />
3. Call your fire department.<br />
2
Contents<br />
TABLE OF CONTENTS<br />
Safety (Dangers & Warnings)……………………………………………. 2<br />
Warranty…………………………………………………………………….. 4<br />
Know Your <strong>Grill</strong>…………………………………………………………… 5<br />
General Instructions………………………………………………………. 6<br />
Assembly…………………………………………………………………… 7-8<br />
Gas & LP Tank Connections…………………………………………….. 9<br />
Leak Testing & Lighting The <strong>Grill</strong>………………………………………. 10<br />
Maintenance………………………………………………………………… 11-12<br />
Cooking Tips……………………………………………………………….. 13-14<br />
Troubleshooting…………………………………………………………… 15<br />
Parts Information………………………………………………………….. 16<br />
Accessories………………………………………………………………… 17-18<br />
Questions and Answers………………………………………………….. 19<br />
3
LIMITED WARRANTY<br />
ProFire <strong>Grill</strong>s LLC offers to the original purchaser a Limited Warranty on all grill components as described below. These components will be<br />
free from defects in material and workmanship (excluding paint) when subject to normal domestic use and service. The highest quality paint is<br />
used where applicable, but due to various atmosphere conditions, chemicals, fertilizers, care, cleaning and actual use, no extended warranty can<br />
be made on paint. Also, for these reasons the limited warranty does not cover rust or aluminum oxidation, unless there is a loss of structural integrity<br />
on the grill components.<br />
Warranty coverage begins on the original date of purchase, confirmed by return registration card and bill of sale. Proof of purchase is required<br />
to validate warranty.<br />
Any component that proves defective within the warranty period will, if returned to the factory freight prepaid, be repaired or replaced free of<br />
charge. Warranties shall not apply, nor will ProFire assume responsibility for damages that might result from failure to follow ProFire’s instructions,<br />
local codes, or when the grill has been tampered with, or altered in any way ProFire shall not be liable for any transportation charges, labor<br />
costs, or export duties.<br />
Repair or replacement of a <strong>Phoenix</strong> gas grill part does not extend the limited warranty beyond its original term from date of purchase, or<br />
begin a new limited warranty period.<br />
This warranty does not include the cost of any inconvenience or property damage due to the failure of the product and does not cover damage<br />
due to misuse, abuse, accident, damage arising out of transportation of the product, or damage incurred through commercial use of the products.<br />
This express warranty is the sole warranty given by the manufacturer and is in lieu of all other warranties, expressed or implied, including<br />
implied warranty of merchantability or fitness for a particular purpose.<br />
ALL WARRANTIES are null & void if grills are put into commercial or community use such as by hotels, condominium associations, apartment<br />
committees, etc.<br />
ProFire <strong>Grill</strong>s 5565 North 124th Street, Butler, WI 63007<br />
Gas <strong>Grill</strong> Warranty Terms<br />
***Lifetime***<br />
(Against Rust Through)<br />
•Stainless Steel <strong>Grill</strong> Top and Bottom • Cast Aluminum <strong>Grill</strong> Top & Bottom Side Pieces (Paint Excluded) •Control Panel •Stainless<br />
Steel or Aluminum Column •Deck/Patio Base •Portable Base •Cast Aluminum Open Frame Cart •Stainless Steel Cooking grid<br />
•Stainless Steel Fasteners<br />
10-Year Warranty: Stainless Steel Burner •Stainless Steel & Aluminum Drip Pan •Stainless Steel Side Shelves 5-Year Warranty:<br />
Against Rust Through on Black Aluminized <strong>Grill</strong> Top & Bottom (Paint Excluded) 1-Year Warranty: All other components including;<br />
•Igniter System •Gas Valve •Knobs<br />
Transportation and shipping costs.<br />
Labor for replacement or repairs.<br />
Removal and reinstallation cost.<br />
The costs of a service call to diagnose a problem.<br />
Damage from accident, misuse, alteration, abuse, improper<br />
installation or storage.<br />
Inoperable due to improper installation or storage.<br />
WHAT IS NOT COVERED<br />
Finishes on surface that are damaged by improper installation,<br />
improper storage, accident, misuse, abuse or alteration.<br />
All warranties are non-transferable and apply only to the original<br />
purchaser.<br />
Warranties are null & void if grills are put into commercial or<br />
community use.<br />
Burners, clogged due to rust or food residue.<br />
This warranty does not imply or assume any responsibility for consequential damages that might result from use, misuse, or improper installation of this<br />
cooking appliance.<br />
This warranty does not cover claims which do not involve defective workmanship or materials.<br />
A bill of sale, cancelled check, or payment record should be kept to verify purchase date and establish warranty period.<br />
MODEL IDENTFICATION<br />
Your <strong>Phoenix</strong> Gas Barbecue <strong>Grill</strong> is identified by a model number and a serial number located on the left side of the control panel. Always use both the<br />
model and serial numbers when contacting Modern Home Products about your grill. For future reference, take the time now to record the model and<br />
serial numbers below:<br />
MODEL NUMBER: ________________ SERIAL NUMBER: ________________ DATE PURCHASED: ________________<br />
How to contact us: phone: 262.781.4657, 888.781.4657 fax: 262.781.3965, 888.781.3965 E-mail: info@profiregrills.com or write: Customer Service,<br />
ProFire <strong>Grill</strong>s, 5565 North 124th Street, Butler, Wisconsin 53007.<br />
4
GETTING TO KNOW YOUR PHOENIX GAS GRILL<br />
Heat Indicator<br />
Sta-Kool<br />
Stainless<br />
Steel<br />
Handle<br />
<strong>Grill</strong> Lid<br />
Stainless Steel Side Table<br />
Left Side<br />
of Burner<br />
Control<br />
Right Side of<br />
Burner Control<br />
Electronic<br />
Igniter<br />
Drip Pan Drain<br />
Valve<br />
LP Hose Ring<br />
Holder<br />
Grease Collector<br />
Bucket<br />
Short Legs<br />
LP Tank Not<br />
Included With<br />
The Purchase<br />
Of The <strong>Grill</strong><br />
Lower Shelf<br />
Bolts To Each<br />
Leg<br />
Long Legs<br />
Gas Valve In Back<br />
Of Control Panel<br />
INSIDE VIEW<br />
REAR VIEW<br />
Vents<br />
Dual Burner and<br />
Gas Collector Box<br />
Drip Pan<br />
Vent Slide<br />
Cooking Grid<br />
5
General Instructions<br />
Your <strong>Phoenix</strong> gas barbecue is a portable outdoor cooking appliance.<br />
With the <strong>Phoenix</strong> gas barbecue you can grill, roast, steam,<br />
smoke and even bake with results that you cannot duplicate with<br />
an indoor kitchen appliance. The closed lid and juices dripping on a<br />
hot surface produces that “great outdoor flavor” in the food.<br />
•These instructions will give you the minimum requirements for<br />
assembling your <strong>Phoenix</strong> grill. Please read the instructions carefully<br />
before using your grill. Improper assembly can be dangerous.<br />
•Not for use by children.<br />
•If there are local codes that apply to portable gas grills, you will<br />
have to conform to them. Installation must conform with local codes<br />
or, in the absence of local codes, with either the National Fuel Gas<br />
Code, ANSIZ223,1/NFPA 54, Natural Gas and with Propane Installation<br />
Code, CSA B149.1, or Propane Storage and Handling Code.<br />
B149.2, or the Standard for Recreational Vehicles, ANSI A<br />
119.2NFPA 1192, and CSA Z240 RV Series, Recreational Vehicle<br />
Code, as applicable.<br />
•For LP Gas Models-The Pressure regulator supplied with the<br />
<strong>Phoenix</strong> grill must be used. This regulator is set for 11 inches of<br />
water column (pressure). NOTE: Only Worthington, Manchester, or<br />
Wolfdale brand cylinders should be used with this appliance.<br />
•For Natural Gas Models– <strong>Grill</strong> is designed to operate at a pressure<br />
of 7 inches water column (W.C.) (1.75 kPa). Check your gas<br />
utility for local pressure. Pressures other than approximately 7<br />
inches W.C. could affect the performance of your grill.<br />
•Do not use with charcoal fuel.<br />
•Check that the area under the control panel and the bottom tray<br />
are free fromn debris that might obstruct the flow of combustion or<br />
ventilation air.<br />
•The areas around the LP cylinder must be free and clear from<br />
debris.<br />
•Replacement pressure regulators and hose assemblies must<br />
be those specified by ProFire <strong>Grill</strong>s, LLC.<br />
WARNING: Only use this grill outdoors in a well ventilated<br />
area. Do not use in a garage, building, breezeway or any<br />
other enclosed area.<br />
WARNING: Keep ventilation openings for cylinder free and<br />
clear from debris.<br />
WARNING: Your <strong>Phoenix</strong> grill shall not be used under overhead<br />
combustible construction.<br />
WARNING: Your <strong>Phoenix</strong> grill is not intended to be installed<br />
in or on recreational vehicles and/or boats.<br />
WARNING: Do not use the grill within 24 inches of combustible<br />
materials to back or sides of the grill.<br />
WARNING: The entire cooking box gets hot when in use. Do<br />
not leave unattended.<br />
WARNING: Keep any electrical supply cord and the fuel supply<br />
hose away from any heated surface.<br />
WARNING: Keep the cooking area clear of flammable vapors<br />
and liquids such as gasoline, alcohol, etc., and combustible<br />
materials.<br />
WARNING: Never store an extra (spare) LP cylinder under or<br />
near the <strong>Phoenix</strong> grill.<br />
WARNING: The LP cylinder used with your barbecue must<br />
be with a listed OPD (overfilling Prevention Device) and a<br />
QCC1 or Type 1 (CGA810) cylinder connection. The cylinder<br />
connection must be compatible with the grill connection.<br />
FOR INSTALLATION IN CANADA<br />
These instructions, while generally acceptable, do not<br />
necessarily comply with the Canadian Installation<br />
Codes, particularly with piping above and below<br />
ground. In Canada the installation of this appliance<br />
must comply with local codes and/or Standard CSA-<br />
B149.2 (Propane Storage and Handling Code).<br />
STORAGE AND/OR NONUSE<br />
•The gas must be turned off at the liquid propane cylinder or at<br />
the main supply intake when the <strong>Phoenix</strong> grill is not in use.<br />
•When the <strong>Phoenix</strong> grill is stored indoors, the gas supply must be<br />
DISCONNECTED and the LP cylinder stored outdoors in a wellventilated<br />
space.<br />
•LP cylinder must be stored outdoors in a well-ventilated area out<br />
of reach of children. Disconnected LP cylinder must not be stored<br />
in a building, garage or any other enclosed area.<br />
•When the LP cylinder is not disconnected from the <strong>Phoenix</strong> grill<br />
the appliance and LP tank must be kept outdoors in a wellventilated<br />
space.<br />
•The <strong>Phoenix</strong> grill should be checked for gas leaks and any obstructions<br />
in the burner tubes before using. (See Section:<br />
“Maintenance/Annual Maintenance).<br />
•Check that the areas under the control panel and under grill are<br />
free from debris that might obstruct the flow of combustion or<br />
ventilation air.<br />
6
Cast Leg Cart Assembly<br />
Tools Required For Assembly:<br />
7/16” Wrench, 7/16” Socket Wrench with Extension, 3/8”<br />
Wrench.<br />
CAUTION: Edges of some of the grill parts may be sharp,<br />
use care when assembling grill.<br />
CAUTION: While handling the grill head be very careful not<br />
to damage the Venturi Tubes or the Ceramic Ignitor Insulator<br />
which protrudes from below the grill.<br />
CART HARDWARE<br />
Carton contains the following components for the cart mounting:<br />
Please check to be sure that all parts are included before proceeding.<br />
Contact your dealer or the factory if any parts are missing.<br />
Long Legs 2<br />
Short Legs 2<br />
Lower Shelf Frame 1<br />
8" Rubber Wheels 2<br />
Axle 22 1/2" 1<br />
Axle Hitch Pins 2<br />
1 1/2” Fender Washers 4<br />
1/4-20 x 1 1/4” Hex Head 8<br />
Hub Caps 2<br />
Hose Retaining Ring 1<br />
1/4-20x1/2” Hex Head 6<br />
1/4-20x3/4” Hex Head 8<br />
1/4-20 Kep Nut 14<br />
10-24x1/2" Rd.Hd. Slot 1<br />
10-x24 Kep Nut 1<br />
Step 1: Leg Assembly (Fig 2)<br />
1. Tip the grill head bottom on end as shown in Fig. 2<br />
(TIP: work on protected area such as: carpet, tarp<br />
or one of the boxes to protect cart finish).<br />
2. Attach the two short legs to the left end of the grill<br />
head bottom with the “Hose Ring Hole” leg facing<br />
grill front. Note: The short legs are stamped on<br />
the inside (Front or Back). Use two 1/4-20x3/4"<br />
Hex Head Bolt for each leg. Insert bolts from inside<br />
grill box, attach leg and fasten with 1/4-20 Kep nuts.<br />
3. Attach the two long legs to the right end of the grill<br />
head bottom. Use two 1/4-20x3/4" Hex Head Bolt<br />
for each leg, insert bolts from inside grill box, attach<br />
leg and fasten with 1/4-20 Kep nuts.<br />
4. Attach the Hose Clamp ring to the front left short leg with<br />
the 10x24x1/2” Round Head slotted bolt and 10-21 Kep<br />
Nut. (Fig 3)<br />
FINGER TIGHTEN ALL BOLTS UNTIL<br />
LOWER SHELF IS ATTACHED.<br />
Right Side<br />
Long Legs<br />
Complete View of Cart Assembly<br />
Front of <strong>Grill</strong><br />
Short Legs<br />
Top View<br />
Short Legs<br />
FIG. 2<br />
Hose Ring<br />
FIG. 1<br />
Lower<br />
Shelf Bolts to Each<br />
Leg<br />
Long Legs<br />
FIG. 3<br />
WARNING: The hose must<br />
be secured to the leg with he<br />
Hose Retention Clamp. Failure<br />
to do so could cause<br />
damage to the hose resulting<br />
in a fire or explosion<br />
which can cause serious<br />
bodily injury or death, and<br />
damage to property.<br />
7
Step 2: Lower Shelf and Axle Assembly<br />
1. Bolt shelf to the (4) legs as follow:<br />
(Fig. 3) carts uses (4) 1/4-20 x 1/2" Hex Head bolts and<br />
KEP nuts to fasten the frame to the long legs and<br />
(2) 1/4-20x1/2" Hex Head bolts to fasten the frame<br />
to the short legs.<br />
Note: Do Not Completely Tighten At This Point<br />
2. Install (1) axle hitch pin into the small end hole. Slide (1)<br />
wheel onto axle, hubcap<br />
side out.<br />
3. Slide open axle end through the short leg holes<br />
and install remaining wheel, washer and hitch pin.<br />
Install hubcaps after the cart bolts are completely<br />
tightened.<br />
Stand grill upright to seat legs and tighten all bolts<br />
and nuts making legs and frame rigid. Recheck fasteners<br />
for tightness.<br />
.<br />
Step 3: Installing the Side Shelves<br />
Mount the shelves using the (8) 1 1/4” x 1/4 x 20 bolts and<br />
1 1/2” Fender washers on the bottom mounting holes<br />
. (Fig. 4)<br />
FIG. 4<br />
Step 4: Install the Lid<br />
Carefully place lid onto the grill bottom and align the holes of<br />
the upper and lower hinges. Install the lid pins and securing<br />
clips. (Fig. 5)<br />
FIG. 3<br />
FIG. 5<br />
Assembly this order.<br />
Axle<br />
Wheel<br />
Hitch Pin<br />
Hub Cap<br />
8
Gas & Tank Connections<br />
CONNECTING THE LP CYLINDER (Fig. 8)<br />
1. Slip the LP cylinder into the grill LP Tank Mounting. Position<br />
the LP cylinder so that the tank valve receives the regulator<br />
without kinking or creating sharp bends in the hose. Secure<br />
the tank to the grill base.<br />
2. The Regulator has a large plastic nut - QCC-1 fitting - for<br />
hand tightening (no tools required) and a RIGHT HAND<br />
THREAD (turn clockwise). Connect the regulator to the cylinder<br />
by inserting the regulator nipple into the tank valve.<br />
Tighten the large plastic nut CLOCKWISE by<br />
hand until secure.<br />
COUPLING<br />
NUT<br />
VALVE<br />
OUTLET<br />
NIPPLE<br />
REGULATOR<br />
HANDWHEEL<br />
CYLINDER<br />
VALVE<br />
DUST<br />
CAP & STRAP<br />
Fig. 8<br />
REMOVAL OF THE LP CYLINDER<br />
1. Close the LP tank valve.<br />
2. Unscrew the QCC-1 plastic nut BY HAND COUNTERCLOCK-<br />
WISE (to the left).<br />
3. Loosen the LP cylinder from the Tank Mounting<br />
4. Lift cylinder off.<br />
WARNING: If you exchange your LP cylinder, make sure<br />
you get a similar tank in return.<br />
Your exchanged LP cylinder must be equipped with a<br />
QCC-1 or type-1 valve and an OPD (Overflowing Prevention<br />
Device). Other LP cylinders may not be compatible<br />
with your grill connection.<br />
LP-GAS CYLINDER FILLING & HANDLING<br />
A qualified attendant, who fills the cylinder by weight, should fill<br />
your LP cylinder at an authorized LP gas dealer. Improper filling is<br />
dangerous.<br />
When transporting the LP cylinder be sure the plastic dust cover<br />
is in place over the valve. This keeps the valve threads free of<br />
dirt.<br />
Do not handle the cylinder roughly.<br />
Do not apply heat directly to the cylinder.<br />
Air must be removed from a new LP cylinder before the initial<br />
filling. Your LP dealer is equipped to do this.<br />
The cylinder supply system must be arranged for vapor withdrawal<br />
Always keep and store cylinders in an upright, secure position.<br />
Use this grill outdoors in a well-ventilated area. Do not use in a<br />
garage, building, or any other enclosed area.<br />
Storage of an outdoor cooking gas appliance indoors is permissible<br />
only the cylinder is disconnected and removed from the<br />
outdoor cooking gas appliance.<br />
If the outdoor cooking appliance is not in use, the gas must be<br />
turned off at the supply cylinder.<br />
Cylinders must be stored outdoors out of reach of children and<br />
must not be stored in a building, garage or any other enclosed<br />
area.<br />
LP GAS CYLINDERS SAFE HANDLING TIPS<br />
Liquid propane (LP) gas is a petroleum product as are gasoline<br />
and natural gas. LP gas is a gas at regular temperatures and<br />
pressures. Under moderate pressure, inside a cylinder, LP gas<br />
is a liquid. As the pressure is released, the liquid readily vaporizes<br />
and becomes gas.<br />
LP gas has an odor similar to natural gas. Be aware of this<br />
odor.<br />
LP gas is heavier than air. Leaking gas collects in low areas<br />
and prevents dispersion.<br />
To fill, take the LP cylinder to your local authorized LP dealer, or<br />
look up “gas-propane” in the yellow pages to find authorized<br />
dealers.<br />
A new LP cylinder must be purged before the first filling. Your<br />
LP dealer is equipped to do this.<br />
An LP cylinder must be transported, installed and stored in an<br />
upright position.<br />
LP cylinders should not be handled roughly.<br />
Never store or transport an LP cylinder where the temperatures<br />
can reach 125 degrees. Never leave an LP cylinder in a car on<br />
a hot day.<br />
Always close the LP cylinder valve before disconnecting the<br />
tank or any other gas fitting.<br />
Always close the LP Cylinder valve after using grill.<br />
Do not use a damaged LP cylinder. Dented, rusty or a damaged<br />
LP cylinder valve may be hazardous and should be replaced<br />
with a new one immediately.<br />
● Never fill the LP cylinder beyond 80% full.<br />
● Do not store a spare LP gas cylinder under or near the<br />
grill.<br />
If this information is not followed exactly, a fire causing<br />
death or serious injury may occur.<br />
9
Leak Testing & Lighting <strong>Grill</strong><br />
Leak Testing<br />
LEAK TEST ALL GAS CONNECTIONS BEFORE USING<br />
YOUR GRILL.<br />
DO NOT SMOKE WHILE LEAK TESTING.<br />
DO NOT LEAK TEST WITH A MATCH OR OPEN<br />
FLAME.<br />
DO NOT USE A GRILL THAT IS LEAKING GAS.<br />
YOU SHOULD TEST FOR GAS LEAKS EVERY TIME<br />
YOU DISCONNECT AND RECONNECT A GAS FITTING.<br />
PERFORM A LEAK TEST EVEN IF YOUR GRILL WAS<br />
DEALER OR STORE ASSEMBLED.<br />
DO NOT IGNITE BURNERS WHEN LEAK TESTING.<br />
LEAK TESTING<br />
1. For LP models, leak test with a full propane cylinder.<br />
2. For systems other than self-contained LP cylinders:<br />
A. The grill and its individual shut-off valve must be disconnected<br />
from the gas supply piping systems during any<br />
pressure testing of that system at test pressures in<br />
excess of 1/2 psi (3.5 kPa).<br />
B. The grill must be isolated from the gas supply piping<br />
system by closing its own manual shut off valve during<br />
any pressure testing of the gas supply piping system at<br />
pressures equal to or less than 1/2 psi (3.5 kPa).<br />
1. <strong>Grill</strong> burner control valves should be turned off and the gas<br />
turned on at source.<br />
2. Apply soap solution to all gas connections.<br />
To make soap solution, mix together equal amounts of<br />
liquid detergent and water.<br />
3. Soap bubbles will appear if there is a leak.<br />
4. Tighten the connection to make proper seal. And recheck for<br />
soap bubbles.<br />
Lighting Your <strong>Grill</strong><br />
ALWAYS OPEN GRILL BEFORE LIGHTING THE BURNER.<br />
DO NOT LEAN OVER AN OPEN GRILL. KEEP YOUR<br />
HEAD AND BODY AT LEAST ONE FOOT AWAY WHEN<br />
LIGHTING THE GRILL.<br />
IF BURNER DOES NOT LIGHT, IMMEDIATELY TURN<br />
BURNER CONTROL KNOBS TO OFF. WAIT FIVE MIN-<br />
UTES TO LET GAS CLEAR BEFORE YOU TRY LIGHTING<br />
AGAIN.<br />
LIGHTING<br />
1. Open Lid. Examine the interior to be sure it appears normal.<br />
2. Turn burner control knobs to OFF position.<br />
3. Turn gas ON at LP tank or supply. Wait 5 seconds for regulator<br />
to set itself.<br />
4. Turn either burner control knob to HIGH, press and hold the<br />
ignitor button until one half of the burner lights. Turn the other<br />
burner control knob to HIGH and the other half of the burner<br />
will light automatically.<br />
5. Check that the burner is lit by looking through the match light<br />
hole on the lower right hand side. The burner flame should be a<br />
hard blue cone with a minimum amount of yellow flame, although<br />
some yellow dust flicks may occur.<br />
Burner Flame<br />
GOOD FLAME<br />
YELLOW<br />
BLUE<br />
BAD FLAME<br />
YELLOW<br />
BLUE<br />
6. Close the grill lid and pre-heat the grill for five to ten minutes<br />
before cooking.<br />
WARNING: If burner fails to light, turn control knobs OFF and<br />
wait five minutes for gas to clear and try lighting procedure<br />
again.<br />
To light burner manually, use a paper book match or other hand<br />
held ignitor. Insert match through lower right side match hole. Turn<br />
on the RIGHT burner control knob to the high setting. Light burner.<br />
If you cannot stop a gas leak by tightening, turn gas<br />
supply off. Take leaking joint apart, clean it, reconnect<br />
and test again. If leak persists, contact the<br />
dealer or gas utility.<br />
A gas system MUST be tested yearly, or whenever<br />
the LP cylinder or any other gas system part is replaced.<br />
To Extinguish your grill: Turn each burner control knob to OFF<br />
position. Turn gas supply OFF at the source.<br />
10
Maintenance<br />
Annual Maintenance<br />
After a period of nonuse or to keep your grill in top<br />
operating condition, you should perform the following maintenance<br />
procedures to keep the grill ready for instant use and for<br />
your safety.<br />
Do not obstruct the flow of combustion and ventilation air.<br />
Clean inside the grill head. Remove the burner/venturi assembly<br />
and cover the valve orifices with a piece of aluminum<br />
foil to keep out dirt. Brush inside bottom and sides with a stiff<br />
wire brush to remove built-up grease and debris. Be careful<br />
not to damage the Ignitor or Collector Box.<br />
Test the Ignitor for a good spark. (See Ignitor System in the<br />
General Maintenance section.)<br />
The stainless steel burner may be brushed lightly with a stiff<br />
laundry brush. Any clogged flame holes may be opened<br />
using a thin wire. Use the supplied venturi cleaning brush or<br />
a bottle brush, pipe cleaner to clean out the venturis. (See<br />
Flashback in General Maintenance.)<br />
Clean the Control Panel, Side Shelf Supports, Lid Handle<br />
Spacers, Lower Cart Frame, Posts with a mild detergent<br />
soap and warm water solution. For the stainless steel components<br />
use a mild detergent soap and water, Windex or a<br />
quality stainless steel cleaner such as MHP’s Stainless Steel<br />
Cleaner (Part #SSC) to clean the column and grill lid facing.<br />
Do Not Use cleaning agents such as bleach, powdered<br />
cleansers, steel wool pads or caustic solutions like oven<br />
cleaners because they will damage the surfaces.<br />
Occasional white oxidation on the exterior of your grill head<br />
and lid may be washed off with mild soap and warm water.<br />
Severe weathering of the grill head and lid can be remedied<br />
by lightly sanding or rubbing with steel wool. Then it can be<br />
recoated with a high quality heat resistant paint similar to<br />
MHP’s BF-1 Paint, available in spray cans from your dealer.<br />
Inspect the hose and gas fittings. Remember to leak check<br />
every time you disconnect and reconnect a gas fitting.<br />
Keep the ventilation openings of the LP cylinder enclosure<br />
free and clear from debris.<br />
Warning: Check the hose before each use of the grill for nicks, cracking,<br />
abrasions or cuts. If the hose is found to be damaged in any way, do not use<br />
the grill. Replace using only <strong>Phoenix</strong> authorized replacement hose.<br />
General Maintenance<br />
Flashback<br />
In some areas of the country, spiders and other insects build<br />
nests, lay eggs and spin webs in the grill’s venturi tube or valve<br />
orifice. This obstructs the full flow of gas to the burner. Some<br />
gas backs up resulting in a “Flashback” - a fire in the venturi<br />
behind the control panel which could cause serious bodily injury<br />
or damage to your grill.<br />
Orifice<br />
Air Shutter<br />
To remove spider webs and/or other obstructions, you must<br />
clean out the venturis. This should be done routinely if the<br />
grill has sat idle for extended periods. Also, if you live in an<br />
area where spiders are plentiful, you should clean the venturis<br />
often, especially in the fall when there is an increase<br />
in egg sack production.<br />
To clean, be sure the grill is cold. Open lid and remove the<br />
cooking grids, the briquettes and the briquette grate.<br />
1. Remove the burner. (See Below)<br />
2. Lift burner and venturi assembly out. With supplied cleaning<br />
brush, a pipe cleaner or a flexible wire, clean out the<br />
venturi tube.<br />
3. Remove hex head orifice with a 3/8" wrench. Clean Orifice<br />
hole and inner part of the valve with a toothpick. Be careful<br />
not to enlarge the orifice hole.<br />
4. Check orifice receptacle in valve body.<br />
When finished cleaning reassemble the complete unit.<br />
Spider Webs<br />
Inside Venturi<br />
Unscrew and<br />
Clean Orifice<br />
Lift Out<br />
Clean Out<br />
Venturi Tube<br />
11
General Maintenance<br />
Maintenance<br />
Ignitor System<br />
If you experience an occasional “No-spark-No light” condition<br />
here’s a check list to troubleshoot the problem.<br />
1. Inspection. WITH GAS OFF, position a mirror in front of the<br />
collector box and press ignitor button. Observe the condition of the<br />
spark. (Low light conditions are the best for seeing the spark.)<br />
SPRING<br />
PUSH<br />
BUTTON<br />
ELECTRONIC IGNITOR<br />
Mirror<br />
Collector Box<br />
AAA BATTERY<br />
+<br />
C. Make sure Ignitor Button module is tight on the control panel. If it<br />
is loose a good ground will not be attained.<br />
A. If there’s a good spark, but the grill<br />
won’t light, gas may not be flowing to<br />
the burner and into the collector box.<br />
The gas orifice or the venturi tube may<br />
be blocked. To clean, follow<br />
“Flashback” instructions.<br />
B. If a weak spark arcs down around<br />
the ceramic insulator, the insulator<br />
should be cleaned. The insulator has a<br />
coating of grease or it is wet. Use an old<br />
tooth brush to break up the conductive<br />
electric path.<br />
2. If there is no spark in the collector box.<br />
A. Check the wire connections<br />
at the ignitor and<br />
electrode under the grill.<br />
B. Check spark. Pull the connector<br />
wire from the collector box .<br />
Bring wire to bottom or top of<br />
control panel, hold about 1/8"<br />
away and operate the ignitor.<br />
Check for spark. If there is no<br />
spark, first replace the battery, if<br />
there still isn’t a spark, replace the<br />
electric ignitor. If there is a spark<br />
the Electric Ignitor is OK, but the<br />
Collector Box/Electrode assembly<br />
should be replaced (the ceramic<br />
insulator could be cracked).<br />
Press Button<br />
Electrode Replacement or Adjustment<br />
The electrode inside the<br />
collector box is pre-set<br />
for optimum spark. The<br />
tip is 1/8" from inside<br />
surface of the collector<br />
box. To replace, remove<br />
the collector box by loosening<br />
the large nut from<br />
the bottom of the grill.<br />
Check the gap of the<br />
new part before installing.<br />
Loosening and<br />
tighten the two jam nuts will move the electrode tip, set at 1/8".<br />
Stainless Steel Cleaning<br />
Before cleaning, determine which way the “grain” of the metal<br />
runs and always clean with the grain. NEVER USE STEEL<br />
WOOL PADS TO CLEAN STAINLESS STEEL.<br />
1. Routine cleaning is done with warm soapy water applied with a<br />
sponge or soft cloth. Always rinse with clean, hot water and wipe<br />
dry with a soft cloth. Glass cleaners like Windex also work well.<br />
2. Stubborn stains can be removed with a mild non-scratching abrasive<br />
household powder. Add a small amount of vinegar to the<br />
scouring powder to increase its potency.<br />
3. Commercial stainless steel cleaners and polishers also work<br />
well, such as MHP’s Stainless Steel Cleaner (Part #SSC). Note:<br />
Over time the stainless steel may turn a mild gold patina from<br />
the grill’s heat. This is normal.<br />
4. We recommend covering your grill with a felt-backed cover. A<br />
cover will prolong the life of the grill and prevent rain water from<br />
draining into the grease bucket, causing it to overflow. A cover can<br />
be purchased through your Dealer.<br />
12
Cooking Tips<br />
COOKING TIPS FOR YOUR<br />
NEW GAS GRILL<br />
Thank you for purchasing a grill by Profire. Your new <strong>Phoenix</strong><br />
eliminates flare-ups because the cooking surface is shielded from<br />
direct flame contact by a drip pan. For best results we recommend<br />
that all preheating, grilling, smoking, baking and steaming<br />
be performed with the lid closed!<br />
Warning: Always light your grill with the lid open.<br />
GETTING STARTED<br />
Before you use your grill for the first time be sure to read and thoroughly<br />
understand all grill safety, lighting, locating, operating and<br />
maintenance procedures found in this book.<br />
We recommend you “break in” your grill by cooking the<br />
first 2 or 3 times at medium or low temperature settings.<br />
This allows the drip pan to “season/break-in”. Please<br />
Note: as long as the grease can flow into the grease<br />
bucket it is not necessary to clean the drip pan after each<br />
use. Clean as needed or approximately every 10 uses.<br />
After each use, we recommend you turn the control<br />
knobs to “HIGH” (with the lid closed) and run the grill for<br />
approximately 10 minutes.<br />
This will allow the accumulated fats and greases to cook<br />
off, and avoid a possible flare up on the next use. HINT:<br />
The fats and greases are cooked off when no more<br />
smoke is flowing from grill vents.<br />
We recommend cleaning the cooking surface (cooking grid) before<br />
each use and before you light the grill. Simply run a wire brush front<br />
to back and side to side across the diamond shaped cooking surface.<br />
This can be performed with the cooking grid in place or you<br />
can remove the cooking grid for cleaning.<br />
The drip pan drain valve should be kept open while your grill is in<br />
use. This allows the grease that drips from your food to continuously<br />
drain into the grease catch bucket. If you are cooking a small quantity<br />
of food or food with very little fat, you may not notice any grease<br />
collecting in the grease bucket. However; If you notice grease accumulating<br />
in the drip pan but it is not running into the grease bucket,<br />
then either your drain valve is not open or the drip pan pipe is<br />
clogged. Don’t attempt to clear the clog while the grill is hot! Wait<br />
until the grill has cooled, remove the cooking grid and run a stick<br />
down the drain pipe until the clog is cleared.<br />
The only time the drip pan drain valve should be closed during grill<br />
use, is when you are steaming or smoking with liquid smoke. See<br />
below for steaming and smoking instructions.<br />
The following grilling, steaming, smoking and baking tips are provided<br />
as helpful guidelines. With experience you will find the cooking<br />
times and temperature control settings that best suit your taste.<br />
Please refer to page 15 for suggested cooking times.<br />
<strong>Grill</strong>ing<br />
Heat your grill with both controls on “HIGH” for 15 minutes. If you<br />
are cooking hamburgers or steaks we recommend that you leave<br />
the temperature controls on the high setting. Remember for best<br />
results, cook all your foods with lid closed. If you are cooking<br />
chicken, turkey, roasts, hot dogs or sausages we recommend that<br />
after preheating your grill on high, turn both controls on the medium<br />
settings (half way between the high and low setting). To keep food<br />
warm, or to further slow the cooking process, you may try running<br />
only one side of the grill and warming or cooking on the opposite<br />
side. Or you may try cracking the lid (with a wood spacer) to let out<br />
heat.<br />
Baking<br />
Pre-heat with both controls on high for 10 minutes. Then set your<br />
controls to the following setting that most closely matches the temperature<br />
you want to achieve:<br />
Low Setting<br />
Middle Setting<br />
High Setting<br />
350 Degrees to 400 Degrees<br />
400 Degrees to 450 Degrees<br />
450 Degrees to 500 Degrees<br />
(Hint: the lid thermometer will help to more accurately set your control)<br />
Smoking<br />
Caution: Before you proceed, make sure that your grill is on a solid<br />
level surface. Check to see that your drip pan is relatively clean.<br />
Smoking or steaming with a dirty drip pan can affect the taste of<br />
your food. To clean your drip pan, simply unscrew the drain valve<br />
and lift out the drip pan. Never attempt to clean the drip pan while<br />
the grill is hot or if the grill is in use. A putty knife or scraper works<br />
well for cleaning out the drip pan.<br />
Wood Chip Smoking<br />
Place the desired amount of wood chips in a wood chip container.<br />
You can fabricate your own container(s) by folding heavy gauge<br />
aluminum foil into an open square or purchase a MHP stainless<br />
steel smoker box (part #SDSSST) from your Local Dealer. Place<br />
one or more containers directly on top of the drip pan located under<br />
the cooking grid. Do not place the container in the middle of the drip<br />
pan. For best results place the container halfway between the center<br />
and the edge of the drip pan. Heat the grill on “HIGH” for 30<br />
minutes, or until you detect smoke, before you place your food on<br />
the grill. Cook to desired taste.<br />
13
Liquid Smoking <strong>Grill</strong>ing<br />
Make sure your drip pan is relatively clean, see above for drip pan<br />
removal cleaning. Close the drip pan drain valve and fill the drip<br />
pan with water (be sure not to overfill your drip pan). Add several<br />
ounces of liquid smoke, experience will dictate how much liquid<br />
smoke is required to suit your taste. Heat the grill with both controls<br />
on “HIGH” for 20 to 25 minutes. Keep controls on the high settings<br />
and cook to desired taste. Add more water and liquid smoke if you<br />
are cooking for an extended period of time. Do not attempt to move<br />
your grill with water in the drip pan, and wait until your grill has<br />
cooled before draining out any remaining water.<br />
Cooking Tips<br />
For Complete Smoke Cooking Enjoyment, See These Products On<br />
Page 18<br />
Steaming<br />
Caution: Before you proceed, make sure that your grill is on a solid<br />
surface. Check to see that your drip pan is relatively clean, see<br />
“Smoking” instructions for drip pan removal and cleaning. Close the<br />
drip pan drain valve and fill the drip pan with water (be sure not to<br />
overfill). Heat the grill with both controls on “HIGH” for 20 to 25<br />
minutes. Keep controls on the high setting and cook to desired<br />
taste. Steaming is good for such foods as oysters, clams, lobsters,<br />
and shrimp, etc. Do not attempt to move your grill with water in the<br />
drip pan, and wait until your grill has cooled before draining out any<br />
remaining water.<br />
Stainless Steel Smoker Box<br />
Mesquite/Hickory Chips<br />
Wundersmoke Chips<br />
COOKING TIMES<br />
A Quick Reference<br />
Chicken 3 lb. Whole Chicken 90 Minutes LOW<br />
Chicken Legs or<br />
Thighs<br />
45-60 Minutes LOW<br />
Pork Chops 1 Inch Thick 15 Minutes Each<br />
Side<br />
MEDIUM<br />
Italian Sausage 40 Minutes MEDIUM<br />
Pork Sausage Patty 8 Minutes Each<br />
Side<br />
MEDIUM<br />
Pork Ribs 60 Minutes MEDIUM<br />
Prime Rib<br />
2 1/2 Hours (Use<br />
Meat Thermometer)<br />
MEDIUM<br />
Vegetables All 30 Minutes LOW<br />
Biscuits Canned 7 Minutes Each<br />
Side<br />
Control Setting<br />
LOW<br />
14
Troubleshooting<br />
If you are having difficulty with your grill, follow this guide to solve some common problems.<br />
Problem #1: BURNER(S) WILL NOT LIGHT OR THE GRILL<br />
DOES NOT GET HOT ENOUGH.<br />
PROBABLE CAUSE<br />
SOLUTION<br />
A. Propane Cylinder Almost Empty. Have Propane Cylinder Filled.<br />
B. Propane Cylinder Valve Not On. Turn Valve On. Turn Counter-Clockwise to Open.<br />
C. Kink In The Gas Hose. Reposition The Propane Cylinder To Straighten The Hose.<br />
D. Burner Holes Clogged. Clean With Small Wire or Round Toothpick and Wire<br />
Brush the Entire Burner. See “Care and Maintenance”<br />
Section For Further Instructions.<br />
E. Venturi Blocked. Clean Venturis. Refer to “Venturi Cleaning” Section<br />
F. Venturis Not Sealed. Refer to “Prior to Use” Section<br />
G. Orifices In Valve Outlet Plugged. Clean Orifices (small hole in valve outlet).<br />
H. Regulator And/Or Valve Defective. Take Complete Hose, Valve and Regulator Assembly to a<br />
Servicing LP Gas Dealer for Inspection.<br />
I. Ignitor Not Working. Check For Proper Electrode Gap. Make Sure All Wires Are<br />
Connected and Aren’t Broken. Check Ceramic for Cracks.<br />
Problem #2: FLASHBACK (fire in venture or control panel area).<br />
IF<br />
FLASHBACK SHOULD OCCUR, SHUT CONTROLS OFF, THEN TURN VALVE<br />
OFF<br />
PROBABLE CAUSE<br />
SOLUTION<br />
A. Venturi Blocked Clean Venturis. Refer To “Venturi Cleaning”<br />
Section.<br />
B. Venturis Not Sealed. Refer To “Prior To Use” Section.<br />
C. Valve Out Of Alignment. Adjust Valve So The Valve Outlets Are Pointing<br />
Straight Into The Venturis.<br />
D. Burner Holes Clogged. Clean With Small Wire or Round Toothpick and<br />
Wire Brush the Entire Burner. See “Care and<br />
Maintenance” Section For More Information.<br />
E. Windy Day Shield <strong>Grill</strong> From The Wind.<br />
15
Parts Information<br />
Model PFMGWEP (Propane Gas) and PFMGWCN (Natural Gas)<br />
QUANTITY PART NO. DESCRIPTION<br />
2 GGAWP Axle Wheel Pins<br />
1 GGAXL2 22 1/2” Axle for Cart<br />
1 GGEIB Electronic Ignitor<br />
1 GGEIB AAA Battery for Electronic Ignitor<br />
1 GGERIW Electronic Ignitor Wire<br />
2 GGHC Plastic Hub Caps<br />
1 GGHRC Hose Retaining Clip<br />
1 GGIB Ignitor Assembly Box<br />
1 GGLPP1 Hitch Pin for Burner<br />
1 GGSL2B Short Back Cart Leg<br />
1 GGSL2F Short Front Cart Leg<br />
1 GGTG4 Temperature Gauge<br />
2 GGWL 8” Wheels<br />
1 HHVLV28SD LP Gas Valve (Model PFMGWCP)<br />
1 HHVLV32SD Natural Gas Valve (Model PFMGWCN)<br />
1 HR4B Type 1 W/21” Regulator with Hose (Model PFMGWCP)<br />
1 ASCPL1 12’ Quick Disconnect Hose (Model PFMGWCN)<br />
1 OBS-SD Stainless Steel Burner<br />
2 V34 Venturi Tubes<br />
2 SG Burner Spider Guards<br />
1 SDCG Stainless Steel Cooking Grid<br />
1 SDCP Stainless Steel Control Panel<br />
1 SDCPLBL Control Panel Label<br />
1 SDCV Air Flow Control Vent<br />
1 SDDV Drip Pan Drain Valve<br />
1 SDGB Grease Collector Bucket<br />
2 SDHP Lid Hinge Pins<br />
4 SDLA-BKT Leg Adapter Brackets<br />
2 SDLA-BRC Leg Adapter Braces<br />
1 SDL1A Fire Pit<br />
1 SDLLEC Left Side End Cap (Fire Pit)<br />
1 SDLREC Right Side End Cap (Fire Pit)<br />
1 SDLSA Lower Cart Shelf<br />
2 SDPF80-5 Valve Control Knobs<br />
2 SDSS2 Side Shelves<br />
1 SDSSDT Stainless Steel Drip Pan<br />
1 SDSSH Sta-Kool Lid Handle<br />
1 SDUIA <strong>Grill</strong> Lid<br />
1 SDULEC Left Side End Cap (Lid)<br />
1 SDUREC Right Side End Cap (Lid)<br />
16
ACCESSORIES FOR ADDED<br />
VERSATILITY, CONVENIENCE AND OUTDOOR<br />
COOKING ENJOYMENT.<br />
Stainless Steel Smoker Box<br />
#SDSSST<br />
Stainless steel smoker box with<br />
cover. For use with all grills. Insert<br />
moistened wood chips for your favorite<br />
smoke flavor.<br />
8-3/4" L x 3-1/2" W x 1-1/2" D<br />
SearMagic Cooking Grid<br />
#SDGRIDS<br />
SearMagic, rust free anodized<br />
aluminum grid for searing on your<br />
<strong>New</strong> <strong>Phoenix</strong> <strong>Grill</strong>.<br />
Wundersmoke Chips<br />
#SDBP5 (1 lb. Mesquite)<br />
#SDBP6 (1 lb. Hickory)<br />
#SDBP7 (1 lb. Maple<br />
These unique chips add distinctive<br />
flavoring to your food. All<br />
flavors come with reusable metal<br />
puck.<br />
Fish Spatula<br />
#SDFS1<br />
Stainless steel fish spatula with<br />
genunie rosewood handle.<br />
18-1/2" L x 10" wide spatula<br />
Super Flipper<br />
#SDSF1<br />
Stainless steel super flipper. The<br />
utimate spatula tool, specially<br />
curved for perfect flips every time.<br />
18" overall length.<br />
Stainless Steel Tool Set<br />
#SD14501<br />
3 piece stainless steel Euro<br />
Designed Utensil Set. Includes<br />
spatula, fork and tongs.<br />
Brass Bristle Brush<br />
#WB3B<br />
18” Brass bristle brush/scraper<br />
with oak handle and leather hang<br />
strap.<br />
Drip Pan Scraper<br />
#SDDPS<br />
Stainless steel scraper for <strong>Phoenix</strong><br />
and Holland drip trays.<br />
Stainless Steel Cleaner<br />
#SDSDSCC<br />
Specially formulated for MHP<br />
stainless steel grills.<br />
8 oz. bottle.<br />
17
Heavy Aluminum Griddle<br />
#SDAG<br />
Heavy-duty griddle perfect for<br />
breakfast French toast, eggs,<br />
bacon, etc.<br />
16" L x 12" W<br />
Roast Holder<br />
#SDRR3<br />
Holds roasts, ham, fowl so heat<br />
circulates evenly around meat<br />
for balanced cooking. Made of<br />
nickel-plated steel.<br />
15-1/4" L x 10-1/2" W<br />
Rib/Potato Rack<br />
#SDRR2<br />
Chrome plated. Accommodates 6<br />
racks of ribs and 6 poatatoes.<br />
12" L x 7-1/4" W<br />
Shish Kabob Tray<br />
#SDSK1<br />
Deluxe chrome plated folding<br />
kabob tray and 6-14" skewers.<br />
13-1/2" L x 9-1/2" W<br />
Skewer Set<br />
#SDSR7B<br />
6-piece chrome plated skewers<br />
designed so food does not<br />
rotate.<br />
19-1/2" long<br />
Bamboo Skewers<br />
#SDSK2B<br />
100 natural bamboo skewers,<br />
disposable for easy use.<br />
12" long<br />
Mid-Length Cover<br />
#SDHHCVPREM<br />
Premium quality polyester<br />
lined vinyl with E-Z on/off Velcro<br />
tabs. Fits <strong>Grill</strong> with one (1)<br />
side shelf. Measures 40" left<br />
to right, 20" front to back and<br />
24" top to bottom.<br />
Mid-Length Cover<br />
#SDGGCVPREM<br />
Premium quality polyester lined<br />
vinyl with E-Z on/off Velcro tabs.<br />
Fits <strong>Grill</strong> with two (2) side shelves.<br />
Measures 60" left to right, 20"<br />
front to back and 24" top to<br />
bottom.<br />
18<br />
Full-Length Cover<br />
#SDCV4PREM<br />
Premium quality polyester lined vinyl<br />
with E-Z on/off Velcro tabs. Fits<br />
Scottsdale <strong>Grill</strong> with two (2) side<br />
shelves. Measures 60" left to right,<br />
20" front to back and 42" top to<br />
bottom.
GETTING TO KNOW YOUR PHOENIX GAS GRILL<br />
Some Questions and Answers.<br />
There is really no mystery to gas grill cooking.<br />
The best of two worlds are combined in the use of a gas grill, the flavor of charcoal cooking and the convenience and heat control of your kitchen<br />
oven.<br />
Let’s look at some of the most commonly asked questions about gas grill cooking:<br />
Can I Get That Charcoal Flavor<br />
The fact is that charcoal does not flavor your outdoor meal, but is only a heat source. The delightful backyard taste that comes with barbecue cooking<br />
is caused by meat drippings falling on the heat source where they are vaporized to rise and add outdoor flavor to the food.<br />
What control Settings Should I Use<br />
The greatest cause of gas grill cooking failures is excess heat. Understanding the three basic heat setting along with experience, you will find the<br />
precise heat you need will become easier and easier to achieve.<br />
HIGH-Is used primarily for preheating and cleaning. It may also be used for quick searing of meats, such as steaks and chops.<br />
MEDIUM-For broiling or quick cooking foods. Also use MEDIUM for searing foods that have been cooked at LOW, for more of a smoke flavor.<br />
LOW-Most foods should be cooked at LOW. Even thick steaks, which have been seared on both sides at HIGH, will finish with better texture and<br />
more juices at LOW. All roasts, poultry, rotisserie and smoke cooking should be at LOW.<br />
Do I Cook With The Lid Open Or Closed<br />
Like your kitchen oven, the Phownix Gas <strong>Grill</strong> is designed to cook with the lid closed, except for quick searing. Cooking with the lid closed helps<br />
food retain natural juices, moisture, enhances flavor and keeps annoying flare-us to a minimum. Also, heat is reflected from the lid, and meat cooks<br />
not only from below, but, evenly on all sides from circulating hot air, (similar to convection oven) for faster, more fuel efficient cooking<br />
Can I cook More Than One Thing At A Time<br />
You can prepare entire meals in the MHP Gas <strong>Grill</strong>…and you’ll love it even more. Baked potatoes, corn-on-the-cob, stuffed tomatoes, peppers,<br />
squash, vegetables, garlic bread, baked apples, pies...grill them on the warming rack or alongside the meat for complete menus.<br />
When And How Do I Use A Meat Thermometer<br />
Use a oven-safe meat thermometer when cooking large pieces of meat, poultry and game to determine if cooked adequately. The thermometer<br />
should be inserted into the thickest part of the meat. For accurate temperature reading, the tip of the thermometer should not touch fat layers, bone<br />
or gristle.<br />
What Utensils Should I Use<br />
Always use long handle forks, spatulas or tongs, designed especially for outdoor cooking when testing or turning food in your grill. Keep hot pads<br />
or mitt handy for removing food from cooking grid. For juicer more flavorful meats, use tongs when handling and turning. Piercing the meat with a<br />
fork allows juices to escape.<br />
Can I Use Aluminum Foil<br />
Aluminum foil is probably the most convenient accessory of all. Foil can be used to cook food on or in. Vegetables cook best when wrapped in foil.<br />
Foil holds in natural liquids, and foods cook moist and tender. Delicate foods such as fish fillets and seafood may be cooked on foil placed directly<br />
on the cooking grid. When spit-cooking foods of uneven shape, smaller parts that may cook too fast, may be wrapped in foil. Foil is also great to<br />
use in cleaning the grill. For stubborn grease ore sauce build-up that is not removed during your normal cleaning process. Simply place a sheet of<br />
aluminum foil covering the cooking grid. With the lid open, turn the control to HIGH and ignite, close lid. After about 20 minutes or so the residue<br />
will be reduced to a white powder, which is easily brushed or wiped off after the grill has cooled.<br />
When Should I Use Seasoning and Sauces<br />
Salt, which tends to dry out foods, is best added after cooking. Sauces and marinades add a special taste treat when grilled. Marinades are popular<br />
because they turn less expensive cuts of meat into tasty entrees. Large items such as roasts should be marinated at least 8 hours or overnight.<br />
Fish, poultry and ribs may be marinated successfully in an hour or two. Food in the marinade should be turned occasionally and kept cool under<br />
refrigeration. Sugar-based glazes and sauces will burn faster and should be brushed on during final stages of cooking or used as a table sauce.<br />
Can I Cook Frozen Food<br />
For best results, thaw all meat in the refrigerator. This allows for juicier, more flavorful meats. However, very good results can be obtained by cooking<br />
your steaks while still frozen. Just remember to allow more cooking time. The microwave oven provides an alternative for thawing your meat,<br />
although it is our least recommended method. Fish and vegetables can be successfully grilled frozen.<br />
How Economical Is A Gas <strong>Grill</strong><br />
You will save on your utility bill using a gas grill instead of conventional oven or charcoal cooking. Less energy for air-conditioning, fewer dishes to<br />
wash and no charcoal or starter fluid to buy. Charcoal grilling costs 30 times more than natural gas and 10 times more than propane gas to cook an<br />
average meal.<br />
Handling Food Safely<br />
Always thaw your frozen products in the refrigerator. Never thaw at room temperature. Do not use the same cutting board or platter for raw meats<br />
and cooked meats. Wash hands, utensils, cutting boards and counters that contact raw food. Cook meats to the proper degree of doneness; Never<br />
serve ground meats rare or raw. Do not allow cooked meats to stand at room temperature. Always refrigerate leftovers immediately.<br />
19
Professional Quality Products For Your Backyard<br />
Bring that real outdoor<br />
barbecue flavor indoor<br />
with a ProFire Indoor<br />
Gas <strong>Grill</strong><br />
5565 North 124th Street • Butler, WI 53007<br />
Phone: 262.781.4657 • 888.781.4657<br />
Fax: 262.781.3965 • 888.781.3965<br />
Email: info@profiregrills.com<br />
www.newpheonixgrills.com<br />
One Quality Modern Home Products Leads To Another<br />
<strong>Grill</strong> Accessories and<br />
Replacement Parts<br />
First in Outdoor Gas <strong>Grill</strong>s<br />
Outdoor Lighting<br />
ProFire is a register trademarks of Modern Home Products Corp.<br />
Because of constant program of improvements, ProFire reserves the right to change specifications and prices without notice.<br />
©2009 ProFire LLC 6/2011 Printed in U.S.A.