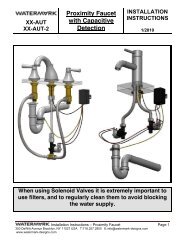
Installation Instructions - Watermark Designs
Installation Instructions - Watermark Designs
Installation Instructions - Watermark Designs

Create successful ePaper yourself
Turn your PDF publications into a flip-book with our unique Google optimized e-Paper software.
<strong>Installation</strong> Guide for SH-35WF<br />
8<br />
9<br />
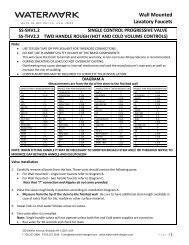
No. Component<br />
1 Mounting Screw<br />
Quantity<br />
2<br />
6<br />
7<br />
2 Shower head (A)<br />
3 Shower head (B)<br />
1<br />
1<br />
4 Mounting Guide<br />
1<br />
5 Mounting Plate<br />
1<br />
6 Lock Nut<br />
2<br />
7 Washer<br />
2<br />
8 Shower Nipple<br />
1<br />
9 Wall Mount / Toggle Screw<br />
2<br />
5<br />
Note: The shower head is approximately 11 lbs<br />
4<br />
3<br />
2<br />
1<br />
350 Dewitt Avenue, Brooklyn, NY 11207 USA T: 718.257.2800 F: 718.257.2144 E: info@watermark-designs.com
WALL<br />
1A. Detach the mounting plate from the backside of the shower head by<br />
unscrewing the two allen screws (mounting screws) located on the<br />
bottom side of shower head B (refer to parts list view)<br />
1B. Connect the shower nipple to the supply line, followed by the<br />
mounting guide.<br />
Shower / Spout Nipple<br />
1/2'' NPT MALE<br />
Mounting Guide<br />
6 3/4'' Center to Center<br />
2A. Align the mounting plate to the wall using the mounting guide and<br />
position it as desired.<br />
(Note: Position of mounting guide will dictate the orientation of the<br />
shower head)<br />
2B. Once the desired orientation is established, mark the points in which<br />
the holes for the wall mount screws will be located<br />
(Note: The wall mount screw hole dimensions shown on the left figure<br />
indicates center to center)<br />
Mounting Plate<br />
Wall mount / Toggle Screws
3A. Drill wall with a hole size of 21/64'' with a maximum<br />
depth of 1 11/32''. This depth will allow the lock nut to fasten<br />
the mounting plate until it braces the wall.<br />
See below for detailed diagram<br />
3B. Once the hole has been drilled, remove the mounting plate<br />
from the wall to insert the wall mount screws into the wall.<br />
3C. Re-attach the mounting plate to the wall with the<br />
wall mount screws and mounting guide properly aligned.<br />
3D. Fasten mounting plate to the wall with the washers<br />
and lock nut.
Wall Mount / Toggle Screw Application<br />
Wall<br />
Mounting Plate<br />
11/32''<br />
Wall Mount Screw<br />
MIN. Depth of Hole 1 11/32''<br />
Washer / Lock Nut<br />
4A. After securing the mounting plate onto<br />
the wall, remove the mounting guide from<br />
the shower head nipple.<br />
4B. Mount the shower head onto the mounting<br />
plate and secure the two parts together with<br />
the mounting screws.<br />
Mounting Screws
6 3/4"<br />
1/2-14 NPT<br />
1/4"<br />
5/8"<br />
3/4"<br />
5 3/8''<br />
9 7/8"<br />
2 3/8"<br />
Approximate Weight: 11 lbs<br />
SH-35WF<br />
Meets the applicable requirements of ASME A112.18.1-2005/CSA B125.1-05, entitled “Plumbing Supply Fittings” 6/19/2013<br />
Lavatory Widespread<br />
350 Dewitt Ave Brooklyn NY 11207 I t: 718-257-2800 I f: 718-257-2144 I e: info@watermark-designs.com I www.watermark-designs.com<br />
REV: 2<br />
SCALE: 2:1