VT/CVT - Teledyne Hastings Instruments
VT/CVT - Teledyne Hastings Instruments
VT/CVT - Teledyne Hastings Instruments

You also want an ePaper? Increase the reach of your titles
YUMPU automatically turns print PDFs into web optimized ePapers that Google loves.
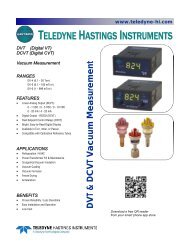
2.0 Installation<br />
2.1. Panel Mount Vacuum Gauge and Controller<br />
Refer to figures 2.1 and 2.2 for outline dimensions of <strong>Hastings</strong> <strong>VT</strong> and C<strong>VT</strong> series units, to<br />
be used when considering mounting locations. Use dimensional drawing (figure 2.3) to cut-out<br />
and drill the gauge/controller mounting panel. Install gauge or controller onto panel using<br />
hardware supplied with your unit.<br />
MODEL<br />
SERIAL<br />
Fig 2.1<br />
<strong>VT</strong> Series<br />
mTorr<br />
Fig 2.2<br />
C<strong>VT</strong> Series<br />
Mounting Dimensions<br />
146-112011_<strong>VT</strong>-C<strong>VT</strong> Page 6 of 14