lisbon cork tiles recommended manufacturer installation - Lumber ...
lisbon cork tiles recommended manufacturer installation - Lumber ...
lisbon cork tiles recommended manufacturer installation - Lumber ...

Create successful ePaper yourself
Turn your PDF publications into a flip-book with our unique Google optimized e-Paper software.
LISBON CORK TILES<br />
RECOMMENDED MANUFACTURER INSTALLATION<br />
READ COMPLETELY BEFORE STARTING INSTALLATION.<br />
All installed <strong>tiles</strong> will be considered as accepted by the installer and/or homeowner. Any<br />
defects should be reported to LUMBER LIQUIDATORS within 30 days from date of purchase for<br />
inspection and/or replacement.<br />
GENERAL PRECAUTIONS:<br />
LISBON CORK TILES must be laid indoors on a clean, stable, flat, smooth and dry surface. Handle<br />
the packages carefully during transport; Installed damaged <strong>tiles</strong> are not covered by the warranty.<br />
Store LISBON CORK TILES flat for 48 hours, in open packaging, at room temperature (15°-30°C /<br />
60°-85°F and a maximum of 75% relative humidity) in the room in which they are to be installed.<br />
ADHESIVE SELECTION:<br />
Use Water based adhesives designed for <strong>cork</strong>. (Do not set <strong>tiles</strong> into wet adhesives) Water based<br />
adhesives must be allowed to flash-off before setting <strong>tiles</strong>. If using 100% Urethane Flooring Adhesives<br />
it is suggested to have it professionally applied. Make sure you read the selected adhesive instructions<br />
for trowel size, handling and use attentively prior to starting your <strong>installation</strong>.<br />
SUB-FLOOR PREPARATION:<br />
CONCRETE<br />
Installation on concrete surfaces, below grade or in a bathroom environment will be adversely<br />
affected by moisture. Even though moisture will not affect the <strong>cork</strong> tile itself, excessive and<br />
continuous moisture presence could adversely affect the tile coating in the long run and will not be<br />
covered by the warranty.<br />
The glue selected for application should be compatible with a high and continuous moisture<br />
environment.<br />
The concrete surface shall be level and free of defects or dust. All indentations, cavities and<br />
changes of level shall be adjusted by use of self leveling cement.<br />
WOOD AND OTHER SURFACES<br />
1) Ensure that your sub-floor is clean, flat, smooth and level. Slopes of more than 5 mm over 2 meters<br />
or 1/4” over 6 feet must be levelled. Correct any changes in slope and ensure that the levelling<br />
compound has dried prior to starting your <strong>installation</strong>.<br />
2) Proceed to instructions on PREPARING TO INSTALL.<br />
REV-5 1<br />
June 2009
Special note:<br />
For floors with radiant heating, make sure to turn down your thermostat to 15°C / 60°F at least 1<br />
week prior to <strong>installation</strong> (do not turn off heating if the temperature outside is below freezing).<br />
Maintain the room temperature below 21°C / 70°F.<br />
PREPARING TO INSTALL:<br />
1) Let the opened packages of tile lie flat on the floor for at least 48 hours prior to <strong>installation</strong>, in<br />
the room in which the <strong>tiles</strong> are to be installed.<br />
2) Make sure to leave a clearance of at least 12.5 mm / 1/2” between the top surface of the <strong>tiles</strong><br />
and the underside of baseboard heaters<br />
3) Check door and doorframe clearances to ensure that doors will move freely without contacting the<br />
<strong>cork</strong> surface.<br />
4) Remove existing moldings and baseboards.<br />
5) Clean and sweep.<br />
6) Although <strong>tiles</strong> can be installed in any direction, as a rule, <strong>tiles</strong> are usually installed perpendicular to<br />
a wall with a window. Installing <strong>tiles</strong> parallel to the longest wall tends to make a room appear larger.<br />
As <strong>tiles</strong> are a natural product they will vary in color and design. You will get better results by laying<br />
two or three rows of <strong>tiles</strong> in advance to get an eye pleasing distribution of the tile colors and<br />
patterns.<br />
TILE INSTALLATION:<br />
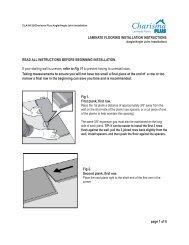
1) For best results lay <strong>tiles</strong> with staggered joint. You will achieve this result by using a full length tile for<br />
the first tile of the first row and a tile cut in half for the first tile of the second row. The pattern will<br />
then be repeated until you reach the opposite wall.<br />
2) Leave a 1/4” space between the <strong>tiles</strong> and the walls all around the room perimeter and around any<br />
cabinet.<br />
3) To avoid gapping or peaking install the <strong>tiles</strong> tightly against each other if you are installing the <strong>tiles</strong><br />
during the humid season; leave a hairline joint for expansion if you are installing the <strong>tiles</strong> during the<br />
dry season.<br />
4) Roll frequently over the installed <strong>tiles</strong> with a 70-100 lb. roller during and after the <strong>installation</strong> until all<br />
<strong>tiles</strong> and tile seams are level.<br />
5) Do not walk or install any furniture on Lisbon Cork <strong>tiles</strong> for 72 hours following <strong>tiles</strong> <strong>installation</strong>.<br />
SEALING:<br />
Our <strong>cork</strong> products have been surfaced-sealed using water based polyurethane. To facilitate<br />
<strong>installation</strong>, the seams are not sealed from the factory. After <strong>installation</strong>, it is <strong>recommended</strong> to re-coat<br />
the entire floor, especially the seams, to protect the joints against dirt accumulation and water spillage.<br />
Apply 2 coats of floor grade water based polyurethane for light residential use or 3 coats for heavy<br />
residential or commercial use. Follow sealant <strong>manufacturer</strong>’s application instructions.<br />
NOTE: Sealant applied must be WATER BASED<br />
REV-5 2<br />
June 2009
MAINTENANCE:<br />
• Sweep or vacuum as often as necessary to remove any loose dirt or grit before it can scratch<br />
the floor.<br />
• When a spill occurs, soak up the bulk liquid promptly.<br />
• In areas of excessive traffic and wear, please make use of runners or area rugs.<br />
• Use felt protectors under heavy pieces of furniture and chairs.<br />
• Use protective mats at all exterior entrances.<br />
• Spiked heels or shoes can severely damage your floor.<br />
• Never wet or damp mop your <strong>cork</strong> floors. Water can cause damage to <strong>cork</strong> flooring.<br />
• Never use oil soaps, wax, liquid or other household products to clean your floor.<br />
• Keep animal nails trimmed.<br />
• Protect your floor when using a dolly for moving furniture or appliances.<br />
• Never slide or roll heavy furniture or appliances across the floor.<br />
• If your floor becomes scratched or dull, repairs can often be made using repair accessories<br />
such as polyurethane finish of matching gloss<br />
• Proper care and maintenance can extend the life of your floor for many years; however, at<br />
some time a recoating may be desirable.<br />
REV-5 3<br />
June 2009