2009 RDX Rear Under Spoiler - Bernardi Acura Parts & Accessories
2009 RDX Rear Under Spoiler - Bernardi Acura Parts & Accessories
2009 RDX Rear Under Spoiler - Bernardi Acura Parts & Accessories

You also want an ePaper? Increase the reach of your titles
YUMPU automatically turns print PDFs into web optimized ePapers that Google loves.
INSTALLATION<br />
INSTRUCTIONS<br />
Accessory Application Publications No.<br />
BII 39539<br />
REAR UNDER SPOILER<br />
<strong>2009</strong> <strong>RDX</strong><br />
Issue Date<br />
MAY 2008<br />
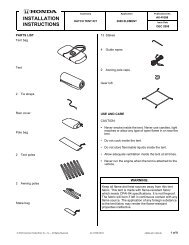
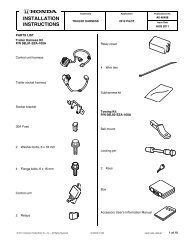
PARTS LIST<br />
<strong>Rear</strong> diffuser<br />
INSTALLATION<br />
Client Information: The information in this<br />
installation instruction is intended for use only by<br />
skilled technicians who have the proper tools,<br />
equipment, and training to correctly and safely add<br />
equipment to your vehicle. These procedures should<br />
not be attempted by “do-it-yourselfers.”<br />
NOTE: Be careful not to damage the rear bumper<br />
and body paint finish.<br />
2 Screws, 6 x 12 mm<br />
6 Self-tapping screws, 5 x 12 mm<br />
If the vehicle is equipped with a trailer hitch, continue<br />
with step 1, otherwise, go to step 4.<br />
1. Inside the rear diffuser, locate the scribe marks,<br />
and using a pushpin, pierce through the rear<br />
diffuser at each scribe mark.<br />
6 Spring nuts<br />
2 Washers, 6 mm<br />
PUSHPIN<br />
DRILL<br />
6 Washers, 5 mm<br />
2 Bumper bolts<br />
2 Flange nuts<br />
DRILL BIT<br />
(3 mm 10 mm)<br />
TOOLS AND SUPPLIES REQUIRED<br />
Phillips screwdriver<br />
Flat-tip screwdriver<br />
File<br />
Drill<br />
3 mm, 6 mm, 8 mm, 10 mm, and 11 mm Drill bits<br />
Clip remover<br />
Pushpin<br />
Eye protection (face shield, safety goggles, etc.)<br />
Blanket<br />
Saw blade<br />
REAR DIFFUSER<br />
6314011Y<br />
2. While wearing eye protection, drill a 10 mm hole at<br />
each pierced mark. First drill with a 3 mm drill bit,<br />
and finish with a 10 mm drill bit.<br />
© 2008 American Honda Motor Co., Inc. - All Rights Reserved. BII 39539 (0805) 08F03-STK-2000-91 1 of 4
3. Using a saw blade, cut out the rear diffuser along<br />
the holes you drilled in step 2.<br />
REAR DIFFUSER<br />
5. Inside the bumper, locate the four scribe marks in<br />
the area shown. Using a pushpin, pierce the cross<br />
sections of each scribe mark.<br />
PUSHPIN<br />
SAW BLADE<br />
Cut out.<br />
6314021Y<br />
REAR<br />
BUMPER<br />
4 SCRIBE<br />
MARKS<br />
4. Remove the rear bumper.<br />
• Remove the rear bumper weatherstrip in the<br />
area shown.<br />
• Remove the four caps and four bolts from the<br />
rear bumper.<br />
5D28010P<br />
6. Inside the bumper, locate the six scribe marks in<br />
the area shown. Using a pushpin, pierce the<br />
cross sections of each scribe mark.<br />
• Remove the four self-tapping screws and four<br />
clips.<br />
• With the help of an assistant, remove the rear<br />
bumper.<br />
• To prevent scratching the bumper, set it on a<br />
blanket.<br />
REAR<br />
BUMPER<br />
6 SCRIBE<br />
MARKS<br />
WEATHERSTRIP<br />
4 SELF-<br />
TAPPING<br />
SCREWS<br />
PUSHPIN<br />
5D28030P<br />
4 CAPS<br />
4 BOLTS<br />
REAR<br />
BUMPER<br />
4 CLIPS<br />
5D27050B<br />
2 of 4 BII 39539 (0805) © 2008 American Honda Motor Co., Inc. - All Rights Reserved.
7. While wearing eye protection, drill a 3 mm hole<br />
through each marked location on the bumper.<br />
Enlarge the inner holes to 11 mm using an 11 mm<br />
drill bit. Enlarge the outer holes to 8 mm using an<br />
8 mm drill bit. Remove any burrs from the edges<br />
of the holes with a file.<br />
DRILL<br />
DRILL BIT<br />
(3 mm 8 mm)<br />
9. Slide the six spring nuts onto the rear diffuser.<br />
6 SPRING NUTS<br />
DRILL<br />
REAR DIFFUSER<br />
REAR<br />
BUMPER<br />
DRILL BIT<br />
(3 mm 11 mm)<br />
5D28050P<br />
REAR<br />
BUMPER<br />
4 SCRIBE<br />
MARKS<br />
5D28021P<br />
8. While wearing eye protection, drill a 3 mm hole<br />
through each marked location from the inside of<br />
the bumper, and finish with a 6 mm drill bit.<br />
Remove any burrs from the edges of the holes<br />
with a file.<br />
10. Install the rear diffuser on the rear bumper using<br />
two 6 x 12 mm screws, two 6 mm washers, two<br />
bumper bolts, and two flange nuts.<br />
6 x 12 mm<br />
SCREW<br />
6 mm<br />
WASHER<br />
FLANGE<br />
NUTS<br />
6 x 12 mm<br />
SCREW<br />
6 mm<br />
WASHER<br />
6 SCRIBE<br />
MARKS<br />
REAR<br />
BUMPER<br />
REAR DIFFUSER<br />
DRILL<br />
DRILL BIT<br />
(3 mm 6 mm)<br />
5D28040P<br />
BUMPER<br />
BOLTS<br />
5D28062P<br />
© 2008 American Honda Motor Co., Inc. - All Rights Reserved. BII 39539 (0805) 3 of 4
11. Secure the rear diffuser to the rear bumper using<br />
six 5 x 12 mm self-tapping screws and six 5 mm<br />
washers.<br />
REAR<br />
BUMPER<br />
6 5 x 12 mm<br />
SELF-TAPPING<br />
SCREWS<br />
6 5 mm<br />
WASHERS<br />
12. Reinstall the rear bumper.<br />
5D28070P<br />
4 of 4 BII 39539 (0805) © 2008 American Honda Motor Co., Inc. - All Rights Reserved.