C - Eureka Smile Center
C - Eureka Smile Center
C - Eureka Smile Center

You also want an ePaper? Increase the reach of your titles
YUMPU automatically turns print PDFs into web optimized ePapers that Google loves.
xxxx_ giomers I<br />
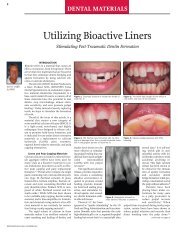
Fig. 19 Fig. 20 Fig. 21<br />
Fig. 22 Fig. 23 Fig. 24<br />
with no obvious pulpal exposure (Fig. 20).<br />
A bioactive liner (TheraCal, Bisco, Schaumburg,<br />
Ill.) was placed in a thin layer to stimulate secondary<br />
dentin formation and to seal deep pulpal dentin. This<br />
material was light cured and kept 2 mm away from<br />
restoration margins (Fig. 21). All facial lesions were<br />
restored using selective etching, a universal bonding<br />
agent and Beautifil Flow Plus as described above.<br />
The matrices used varied. In the anterior, Mylar<br />
strips were used and held in place with a plastic instrument<br />
while the flowable material was light cured.<br />
Where a strip had trouble going through the contact,<br />
a FenderWedge (Garrison Dental, Spring Lake, Mich.)<br />
was used (Fig. 22). Shaping was done with a finish<br />
diamond and flame-shaped finish bur.<br />
In the posterior, the teeth were isolated with a suction,<br />
light, bite-block system (Isolite, Santa Barbara,<br />
Calif.). Conservative preparations were done with a<br />
330 bur and sectional matrices placed with a wedge<br />
and 3-D ring system (Garrison Dental, Spring Lake,<br />
Mich.) to insure tight, broad contacts (Fig. 23).<br />
After etching and bonding, a 0.5 mm layer of the<br />
giomer flowable was placed on the pulpal floor and<br />
cured creating a good polymerized layer protecting<br />
the pulp. A small amount of flowable was added<br />
again, left un-polymerized and the more viscous<br />
Beautifil II forced the flowable into all areas of voids<br />
leaving a dense fill (Fig. 24).<br />
Shaping was done with a #6 round bur and a<br />
football-shaped finish bur leaving excellent margins<br />
and contacts (Fig. 25). All restorations were completed<br />
on the right and then the Isolite was moved<br />
to the left side and restorations done in the same<br />
manor (Fig. 26).<br />
_Final restorative appointment:<br />
maxillary enhancement<br />
Three months after the initial flowable placement<br />
on the maxillary teeth, the patient returned still<br />
showing soft-tissue and hygiene improvement. This<br />
1.5 hour appointment was completed to enhance<br />
the maxillary anterior teeth and complete several<br />
posterior maxillary restorations.<br />
Using a finish diamond with water on a highspeed<br />
handpiece, the surfaces were roughened in an<br />
irregular way to provide depth to the re-surfacing<br />
(Fig. 27). All preparation was done away from the<br />
gingiva about 3 mm and the surface left wavy (Fig.<br />
28). The materials used on the anterior were a universal<br />
bonding agent and etch, and both versions of<br />
the giomer material (Fig. 29).<br />
The surfaces were etched with 37 percent phosphoric<br />
acid for 10 seconds, rinsed well and dried. This<br />
left a roughened, frosty appearance to the Beautifil<br />
Flow (Fig. 31).<br />
The All Bond Universal has a high bond strength<br />
to polymerized composite without an air-inhibited<br />
layer and was applied in several coats and air thinned.<br />
(Fig. 32) Mylar strips were placed and the Beautifl<br />
Flow Plus low flow was placed in the center of the<br />
tooth and left uncured.<br />
This material helps to wet the surface and decrease<br />
void as the more viscous material was applied<br />
directly over it. A1 Beautifil from a compule was<br />
applied to each tooth, sculpted and cured using a<br />
free-handed technique. 29<br />
Most of the less viscous flowable was wiped<br />
away with the plastic instrument. The lighter surface<br />
Fig. 19_The lower quadrants were<br />
done at this appointment starting<br />
with the right side. Facials were done<br />
first, followed by interproximal to<br />
reduce the chance of bleeding.<br />
Fig. 20_After complete caries<br />
removal, pink blush was noticed.<br />
Fig. 21_Before bonding, an apetite<br />
promoting liner was placed to<br />
stimulate dentin bridge formation.<br />
Fig. 22_Various matrices were<br />
used, including mylar strips and a<br />
wedge-sectional combination called<br />
a FenderWedge where contacts were<br />
very tight.<br />
Fig. 23_Isolation in the posterior was<br />
done with an Isolite and the teeth<br />
were prepped. Sectional matrices<br />
were placed along with a 3-D ring.<br />
Fig. 24_Etching, rinsing and flowable<br />
liner were completed followed by<br />
Beautifil II from a compule.<br />
cosmetic<br />
dentistry 1_2012<br />
I 35