2010 - Roof Rack For Cars
2010 - Roof Rack For Cars
2010 - Roof Rack For Cars

Create successful ePaper yourself
Turn your PDF publications into a flip-book with our unique Google optimized e-Paper software.
INSTALLATION<br />
INSTRUCTIONS<br />
Accessory<br />
CROSS BARS<br />
P/N 08L04-SZA-110<br />
Application<br />
<strong>2010</strong> PILOT<br />
Publications No.<br />
AII 41637<br />
Issue Date<br />
MAY 2009<br />
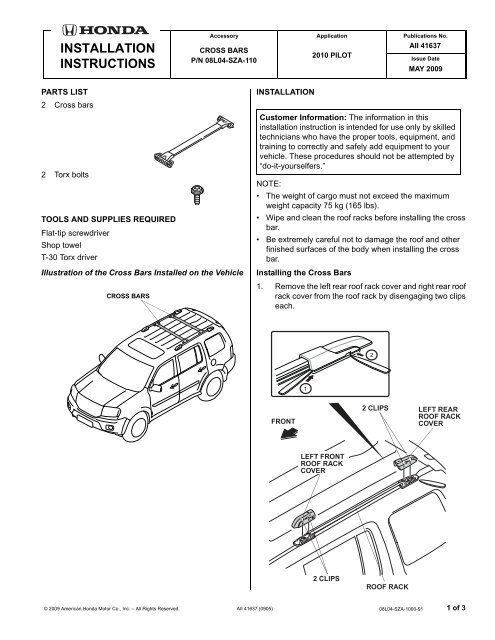
PARTS LIST<br />
2 Cross bars<br />
2 Torx bolts<br />
TOOLS AND SUPPLIES REQUIRED<br />
Flat-tip screwdriver<br />
Shop towel<br />
T-30 Torx driver<br />
Illustration of the Cross Bars Installed on the Vehicle<br />
CROSS BARS<br />
INSTALLATION<br />
Customer Information: The information in this<br />
installation instruction is intended for use only by skilled<br />
technicians who have the proper tools, equipment, and<br />
training to correctly and safely add equipment to your<br />
vehicle. These procedures should not be attempted by<br />
“do-it-yourselfers.”<br />
NOTE:<br />
• The weight of cargo must not exceed the maximum<br />
weight capacity 75 kg (165 lbs).<br />
• Wipe and clean the roof racks before installing the cross<br />
bar.<br />
• Be extremely careful not to damage the roof and other<br />
finished surfaces of the body when installing the cross<br />
bar.<br />
Installing the Cross Bars<br />
1. Remove the left rear roof rack cover and right rear roof<br />
rack cover from the roof rack by disengaging two clips<br />
each.<br />
2<br />
1<br />
FRONT<br />
2 CLIPS<br />
LEFT REAR<br />
ROOF RACK<br />
COVER<br />
7D0401B<br />
LEFT FRONT<br />
ROOF RACK<br />
COVER<br />
2 CLIPS<br />
ROOF RACK<br />
© 2009 American Honda Motor Co., Inc. – All Rights Reserved. AII 41637 (0905) 08L04-SZA-1000-91 1 of 3
2. Slide two cross bars into the roof racks and align the<br />
mark on the cross bars with the mark on the roof<br />
racks as shown. Make sure the cross bars are<br />
inserted in the correct position and direction.<br />
VIEWED FROM THE TOP<br />
3. Tighten eight thumbwheel screws to secure two<br />
cross bars to the roof racks.<br />
2 THUMBWHEEL<br />
SCREWS<br />
ROOF RACK<br />
MARK<br />
ROOF<br />
RACK<br />
MARK<br />
CROSS BAR<br />
CROSS<br />
BAR<br />
Align.<br />
FRONT<br />
FRONT<br />
Slide.<br />
2 CROSS<br />
BARS<br />
2 CROSS BARS<br />
7D0702AY<br />
ADJUSTMENT SCREWS<br />
(On the underside<br />
of the crossbars.)<br />
2 of 3 AII 41637 (0905) © 2009 American Honda Motor Co., Inc. – All Rights Reserved.
4. Install two Torx bolts to the roof racks securely.<br />
ROOF RACK<br />
ROOF RACK<br />
USE AND CARE<br />
• Check the roof rack and cross bar mounting bolts<br />
frequently, and re-tighten if necessary.<br />
• Distribute the weight of the cargo evenly, and do not<br />
exceed the maximum weight capacity of 75 kg (165<br />
lbs).<br />
TORX<br />
BOLT<br />
TORX<br />
BOLT<br />
FRONT<br />
2 TORX<br />
BOLTS<br />
2 ROOF RACKS<br />
7D0703AY<br />
5. Reinstall the roof rack covers. Make sure they are<br />
securely snapped into place.<br />
© 2009 American Honda Motor Co., Inc. – All Rights Reserved. AII 41637 (0905) 3 of 3