1 - Seiko I Infotech Inc.
1 - Seiko I Infotech Inc. 1 - Seiko I Infotech Inc.
3 Remove the waste toner bottle from the main unit. 1 Lift up the waste toner bottle, 2 Remove it by pulling it out from the bottom end toward you. When you have removed the waste toner bottle, the LCD will display the following message. Set Wa s t e Bo t t l e 4 Attach the cap to the waste toner bottle. Attach the cap which you have removed in Cap procedure 1 to the waste toner bottle containing waste toner. Dispose of the waste toner bottle containing waste toner as non-burnable garbage. New bottle Bottle containing waste toner Note ◆Attach the cap securely as it may come off. 2-28
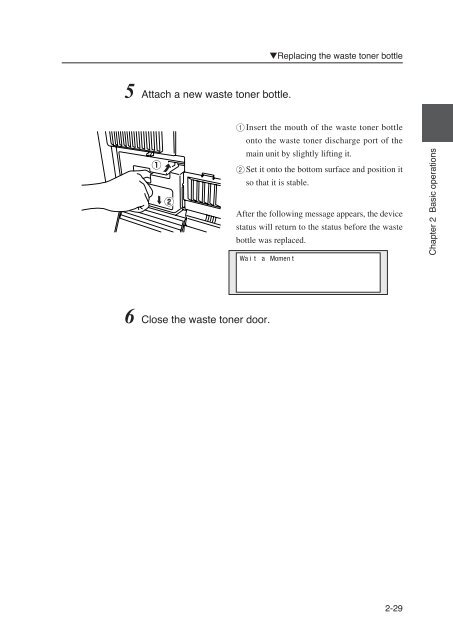
▼Replacing the waste toner bottle 5 Attach a new waste toner bottle. 1 Insert the mouth of the waste toner bottle onto the waste toner discharge port of the main unit by slightly lifting it. 2 Set it onto the bottom surface and position it so that it is stable. After the following message appears, the device status will return to the status before the waste bottle was replaced. Wa i t a Momen t Chapter 2 Basic operations 6 Close the waste toner door. 2-29
- Page 21 and 22: Chapter 10 "RESET" menu 10-1 Reset
- Page 23: When a print error occurs .........
- Page 26 and 27: Features This device is an electrop
- Page 28 and 29: Operating conditions This section c
- Page 30 and 31: Installation space ■Installation/
- Page 32 and 33: The following roll paper of the wid
- Page 34 and 35: Paper storing precautions are as fo
- Page 36 and 37: Right side/rear side 1 Mai
- Page 38 and 39: NON-PROPORTIONAL Control panel The
- Page 40 and 41: 5 This button turns on/off the powe
- Page 42 and 43: How to read the status displays for
- Page 44 and 45: Warming up display Warmi ng up nnn
- Page 46 and 47: Plotting procedures overview Plotti
- Page 48 and 49: Power on 1 Turn on the Main power s
- Page 50 and 51: Power off When turning the power of
- Page 52 and 53: ■Turning on the power Initial izi
- Page 54 and 55: Online and offline The device is
- Page 56 and 57: If an error message about paper sup
- Page 58 and 59: How to detach the paper rolls 1 Pul
- Page 60 and 61: E How to attach the paper roll ◆
- Page 62 and 63: 6 Close the paper roll drawer. Gent
- Page 64 and 65: Precautions on handling Warning Do
- Page 66 and 67: 3 Close the scanner cover. Stopper
- Page 68 and 69: 8 Pull the lever to the right end.
- Page 70 and 71: Replacing the waste toner bottle Wh
- Page 74 and 75: Replacing the process cartridge Whe
- Page 76 and 77: 2 Take out the Process cartridge. P
- Page 78 and 79: 6 Insert the Process cartridge. To
- Page 80 and 81: Manual paper feeding (cut paper) Th
- Page 82 and 83: 9× 12 series fixed form cut paper
- Page 84 and 85: When feeding the cut paper into the
- Page 86 and 87: Cancel printing Press the [STOP] ke
- Page 88 and 89: Web function startup method 1 The f
- Page 90 and 91: Using paper of new standard series
- Page 92 and 93: Using paper of Chinese standard ser
- Page 94 and 95: Limiting rolls to be used When limi
- Page 96 and 97: Channels and ports This device is e
- Page 98 and 99: Jobs The device manages the receive
- Page 100 and 101: (1) Setup menu Change the settings
- Page 102 and 103: PDL menu The various print paramete
- Page 104 and 105: Printing status Me nu Mo de MENU #S
- Page 106 and 107: Device menu “DEVICE” From the d
- Page 108 and 109: Function menu “FUNCTION” Press
- Page 110 and 111: Reset menu “RESET” Press the [
- Page 113 and 114: Chapter 4 Basic Menu Operation Chap
- Page 115 and 116: Offline menu operation Press the [M
- Page 117 and 118: ▼Offline menu operation Setting o
- Page 119 and 120: ▼Offline menu operation ■Numeri
- Page 121 and 122: ▼Offline menu operation ■Execut
▼Replacing the waste toner bottle<br />
5 Attach a new waste toner bottle.<br />
1 Insert the mouth of the waste toner bottle<br />
onto the waste toner discharge port of the<br />
main unit by slightly lifting it.<br />
2 Set it onto the bottom surface and position it<br />
so that it is stable.<br />
After the following message appears, the device<br />
status will return to the status before the waste<br />
bottle was replaced.<br />
Wa i t a Momen t<br />
Chapter 2 Basic operations<br />
6 Close the waste toner door.<br />
2-29


