MN06153 - Measurement Solutions - FMC Technologies
MN06153 - Measurement Solutions - FMC Technologies
MN06153 - Measurement Solutions - FMC Technologies

You also want an ePaper? Increase the reach of your titles
YUMPU automatically turns print PDFs into web optimized ePapers that Google loves.
Issue/Rev. 0.0 (9/06)<br />
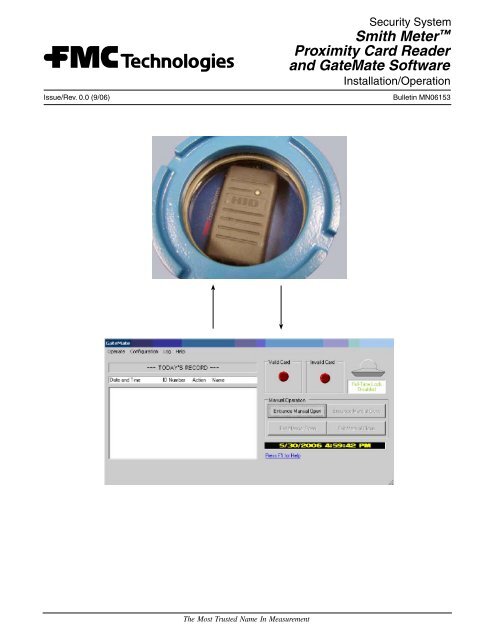
Security System<br />
Smith Meter <br />
Proximity Card Reader<br />
and GateMate Software<br />
Installation/Operation<br />
Bulletin <strong>MN06153</strong><br />
The Most Trusted Name In <strong>Measurement</strong>
Caution<br />
The default configuration may not be suitable for all situations. Please check the settings on the configuration<br />
window before attempting to use the software.<br />
Disclaimer<br />
<strong>FMC</strong> <strong>Technologies</strong> <strong>Measurement</strong> <strong>Solutions</strong>, Inc. hereby disclaims any and all responsibility for damages,<br />
including but not limited to consequential damages, arising out of or related to the inputting of incorrect or<br />
improper program or default settings entered through GateMate.<br />
Warning<br />
If for any reason the GateMate software is allowed to shutdown, the proximity card reader will not be operable<br />
even if there is adequate power supplied to the card reader. A battery backup system for the PC and<br />
the proximity card reader is recommended in order to ensure that the operation of this system will not be<br />
interrupted by a power failure.
Table of Contents<br />
Section I – Introduction........................................................................................................................................ 1<br />
Section II – Installtion........................................................................................................................................... 2<br />
Requirements..................................................................................................................................................... 2<br />
Getting Started................................................................................................................................................... 2<br />
After Installation.................................................................................................................................................. 3<br />
Installation Errors................................................................................................................................................ 3<br />
Section III – Basic Operation................................................................................................................................ 4<br />
Configuration Settings........................................................................................................................................ 5<br />
Special Features................................................................................................................................................. 6<br />
The Database..................................................................................................................................................... 6<br />
Adding to the Database...................................................................................................................................... 6<br />
Saving/Loading Settings..................................................................................................................................... 6<br />
Editing the Database.......................................................................................................................................... 6<br />
Searching the Database..................................................................................................................................... 7<br />
Logs.................................................................................................................................................................... 7<br />
Viewing Previous Logs........................................................................................................................................ 7<br />
On-Premises Report........................................................................................................................................... 8<br />
Today's Record................................................................................................................................................... 8<br />
Keyboard Shortcuts............................................................................................................................................ 8<br />
Connection.......................................................................................................................................................... 8<br />
Section IV – Related Publications....................................................................................................................... 9<br />
i
Section I – Introduction<br />
This manual should be used for the installation of the<br />
Smith Meter TM Card Reader and the GateMate software.<br />
The manual will be divided into four sections: Introduction,<br />
Installation, Operation, and Related Publications.<br />
Section 2, Installation, describes step by step procedures<br />
for installing GateMate.<br />
Section 3, Basic Operation, explains how to use the<br />
GateMate software.<br />
Section 4, Related Publications, lists the literature that<br />
is associated with the Smith Meter TM Proximity Card<br />
Reader.<br />
Receipt of Equipment<br />
When the equipment is received, the package should<br />
be carefully inspected for damage. If damage to the<br />
packaging has occurred, the local carrier should be<br />
contacted regarding this liability.<br />
If the packaging is not damaged, carefully unpack the<br />
contents of the package. Inspect the parts for missing<br />
or damaged pieces. If a part seems to be missing or<br />
damaged then a written report should be submitted to<br />
the following address:<br />
Customer Service Department<br />
<strong>FMC</strong> <strong>Technologies</strong> <strong>Measurement</strong> <strong>Solutions</strong>, Inc.<br />
1602 Wagner Avenue<br />
Erie, Pennsylvania 16510<br />
In order to avoid breakage, the product should be stored<br />
in its original packaging and it should be protected from<br />
abuse and adverse weather conditions.<br />
Issue/Rev. 0.0 (9/06)<br />
<strong>MN06153</strong> • Page
Section II – Installation<br />
This manual will focus primarily on the installation and<br />
operation of the GateMate software. Detailed hardware<br />
information can be found in the Smith Meter TM Proximity<br />
Card Reader installation and operation manual which<br />
can be found on the internet at the following location:<br />
http://info.smithmeter.com/literature/docs/MN06144.<br />
PDF<br />
Requirements<br />
Before installing GateMate, be sure that either the Windows<br />
XP or the Windows 2000 operating system is being<br />
used. Also, be certain that the framework software has<br />
been installed before attempting to install GateMate.<br />
The framework software has the filename dotnetfx.exe<br />
and should be distributed with the GateMate CD. The<br />
framework can also be found online at www.microsoft.<br />
com (search for .net framework) use Version 1.1 Redistributable<br />
Package.<br />
Getting Started<br />
First, insert the GateMate installation CD into the CD-<br />
ROM drive and view the contents of the CD.<br />
Figure 2.0 “Step 2”<br />
During this portion of the installation procedure, the<br />
installation location may be selected. Issues involving<br />
disk space can be checked by clicking the “Disk Cost”<br />
button.<br />
Click “Next” to go to the following window shown in<br />
Figure 3.0.<br />
Double click on the “Setup.exe” file. The setup Wizard<br />
will then begin. The window in Figure 1.0 will be displayed.<br />
Figure 3.0 “Step 3”<br />
Figure 1.0 “Step 1”<br />
Click “Next” to go on to the following step. The window<br />
in Figure 4 should be displayed.<br />
Click “Next” to go to the following window shown in<br />
Figure 2.0.<br />
Page • <strong>MN06153</strong><br />
Issue/Rev. 0.0 (9/06)
Section II – Installation<br />
After Installation<br />
After a successful installation procedure, start GateMate<br />
by clicking the icon on the desktop or by clicking “Start”,<br />
“Programs”, “GateMate”. A default database will be used<br />
initially. However, a new database should be created;<br />
or the default database should be edited in order for<br />
GateMate to suit specific needs.<br />
Installation Errors<br />
Figure 4.0 “Step 4”<br />
Wait until the progress bar has completed and then click<br />
“Next”. The software has been installed successfully.<br />
If any errors occur during the installation of GateMate,<br />
make sure that the framework software was properly<br />
loaded before the installation of GateMate (see Requirements).<br />
Check the CD for scratches, dirt, and<br />
smears. Make sure there is space on the hard drive of<br />
the computer. Try another CD in the CD-ROM to verify<br />
the operation of the CD-ROM.<br />
If the installation error cannot be resolved, contact The<br />
Customer Service Department at <strong>FMC</strong> <strong>Measurement</strong><br />
<strong>Solutions</strong>.<br />
Issue/Rev. 0.0 (9/06)<br />
<strong>MN06153</strong> • Page
Section III – Basic Operation<br />
Basic Operation<br />
A B C D E F G H I J K L M<br />
A<br />
B<br />
C<br />
D<br />
E<br />
F<br />
G<br />
H<br />
I<br />
J<br />
K<br />
L<br />
M<br />
The "Operate" drop down menu on the menu bar<br />
The "Configuration" drop down menu on the menu bar<br />
The "Log" drop down menu on the menu bar<br />
The "Help" drop down menu on the menu bar<br />
The connection status on the status bar<br />
Today's record list box<br />
Help documentation link (or press the F1 key)<br />
Open manually button(s) (Enter and Exit)<br />
Indicator light that shows when a valid card is presented<br />
Date and time provided (**based on Window's date and time)<br />
Indicator light that shows when an invalid card is presented<br />
Close manually button(s) (Enter and Exit)<br />
Full-time lock switch<br />
**The date and time must be set correctly in Windows in order to be set correctly on GateMate. Please make sure that the date and time are<br />
correct in the system tray (lower right corner of the screen). Contact a computer technician if problems with the date and time persist.<br />
Page • <strong>MN06153</strong><br />
Issue/Rev. 0.0 (9/06)
Section III – Basic Operation<br />
Configuration Settings<br />
The configuration settings must be set to correspond<br />
with the settings on the Smith Meter Proximity Card<br />
Reader. Please see page 11 of Section II in the card<br />
reader manual (http://info.smithmeter.com/literature/<br />
docs/MN06144.PDF). Set switch 1 and switch 2 to the<br />
desired settings. Then open GateMate. Click “Configuration”<br />
on the menu bar. In the drop down list, click<br />
“Change Configuration”.<br />
A Window such as the one in Figure 5.0 should be<br />
displayed.<br />
The next setting that must be entered is the location in<br />
which logs will be saved. For every day, a new log is<br />
saved. Logs are a detailed record of who has entered<br />
(or exited) the gate and when the gate was manually<br />
opened or manually closed. If the directory that was<br />
entered does not exist, GateMate will give the option to<br />
create that directory. However, if a directory is deleted<br />
after it has already been set into GateMate, GateMate<br />
will display an error message.<br />
Notice that an exit reader may be used if desired. The<br />
exit reader must be connected to a separate serial port<br />
than the entrance reader. If no exit reader is present,<br />
then be sure to uncheck the exit reader checkbox.<br />
Failure to disable the exit reader option when an exit<br />
reader is not available will result in a communication<br />
problem alarm.<br />
Now the COM port, baud rate, and card reader number<br />
must be set. These are very important settings and must<br />
correspond to the settings on switch 1 and switch 2 of<br />
the card reader. If the card reader number is incorrect,<br />
the card reader will remain connected; however it will<br />
malfunction. For information regarding switch 1 and<br />
switch 2, see the Smith Proximity Card Reader manual<br />
http://info.smithmeter.com/literature/docs/MN06144.<br />
PDF). If the exit reader is enabled, then these settings<br />
must be configured for the exit reader also.<br />
Figure 5.0 “Configuration Window”<br />
Do the following:<br />
1. Select a database or create a new one if a database<br />
does not exist.<br />
2. If a new database has been created, then the<br />
database will be blank. A flashing alarm will be displayed<br />
on the main GateMate interface. This alarm<br />
looks like Figure 6.0.<br />
Figure 6.0 “Blank Database Alarm”<br />
3. Next, present the card that you desire to add to the<br />
database. A window will be displayed showing that<br />
the card was not recognized. Click the “Save” button<br />
on this window. If nothing is clicked on this window,<br />
then the message will automatically disappear after<br />
10 seconds.<br />
4. For more information on the database, see the literature<br />
under the title “The Database”.<br />
WARNING: If the baud rate or COM port are set wrong<br />
(for either the entrance reader or the exit reader), an<br />
alarm will be shown on the main GateMate interface<br />
indicating that communication does not exist between<br />
GateMate and the card reader. If this occurs, the card<br />
reader will not work. If an entrance reader and an exit<br />
reader are being used when a communication alarm is<br />
activated, view the communication details window by<br />
clicking Configuration on the menu bar and click Communication<br />
Details in the drop down list. The Communication<br />
Details Window will indicate which card reader<br />
is not connected.<br />
Saving/Loading Settings<br />
If only one card reader (or an entrance reader and an<br />
exit reader) is being controlled by GateMate, then the<br />
settings will automatically be saved and there is no need<br />
to click the Save Settings button on the configuration<br />
window. Similarly, there is no need to click the Load<br />
Settings button if there is only one gate being controlled.<br />
However, if multiple gates are being controlled, the settings<br />
may need to be saved. In this case simply enter<br />
all of the configuration options for a particular gate and<br />
then click Save Settings. Enter a descriptive name for<br />
the gate. It is recommended that this name be recorded<br />
for future reference. In the future, the gate configuration<br />
settings can be retrieved by simply clicking the Load<br />
Settings button on the Configuration Window.<br />
Issue/Rev. 0.0 (9/06)<br />
<strong>MN06153</strong> • Page
Section III – Basic Operation<br />
Special Features<br />
Notice some of the other special features that are available<br />
in the configuration window. Logging can be turned<br />
on or off and the open delay time can be adjusted or<br />
even disabled. For greater security, the use of passwords<br />
can be enabled. Once the use of passwords is<br />
enabled, the user will be required to enter a password<br />
when:<br />
•<br />
•<br />
•<br />
•<br />
the program loads<br />
accessing the configuration window<br />
manually opening the card reader<br />
saving unrecognized card data to the database.<br />
The Database<br />
The database is perhaps the most important part of<br />
GateMate. The database contains all of the card data of<br />
those cards which are permitted to enter the premises.<br />
Card data that is not contained in the database will be<br />
unrecognized, and therefore the card reader will not<br />
open. GateMate is capable of creating a new database<br />
from the configuration window. If a database does not<br />
exist, go to the configuration window and create a new<br />
database that is located in the desired directory. This<br />
new database will be blank (it will not contain any card<br />
data).<br />
Notice the progress bar located on the window. When<br />
the progress bar completes, the window will automatically<br />
disappear so that the computer does not always have<br />
to be closely monitored. However, if the unrecognized<br />
card data is supposed to be added, the “Save” button<br />
must be clicked before the progress bar completes. If<br />
a first name, a last name, and the pin number shall be<br />
added to the database in addition to the card ID, then<br />
click the “Additional Information” check box. After the<br />
additional information is entered, then click the “Save”<br />
button.<br />
Editing the Database<br />
The second method that may be used to add card data<br />
into the database is to use the “Edit Database” window.<br />
Click “Configuration” on the menu bar of the main screen.<br />
Click “Change Configuration” in the drop down menu.<br />
Click the “Edit” button on the configuration window and<br />
the Edit Database Window will be displayed. Figure 8.0<br />
shows “The Edit Database Window”.<br />
Adding to the Database<br />
Adding card data to the database can be done using<br />
one of two different methods.<br />
The first and easiest method is to obtain the desired card<br />
to be added to the database. Present this card to the<br />
card reader and hear it buzz. The “Invalid” light on the<br />
GateMate interface will be energized and a window will<br />
be displayed with a progress bar and a “Save” button.<br />
Click the “Save” button or the check box which indicates<br />
that the user would like to enter “Additional Information”.<br />
This window is shown in Figure 7.0.<br />
Figure 8.0 “The Edit Database Window”<br />
From this window, card data may be added or deleted.<br />
Enter the card data that should be added and click the<br />
“Add” button. The new card data will then be added to<br />
the list of data located on the left side of the screen. If<br />
the “Add” button is unable to be clicked, then the card<br />
data that you want to enter may already exist.<br />
Card data may also be deleted. To delete card data, just<br />
find the data to be deleted in the list on the left side of<br />
the window and click “Delete” (or hit enter). A message<br />
box will be displayed to make sure that you would like to<br />
permanently delete the data. Click “Yes” or “No”.<br />
Another way to delete data is to enter the card information<br />
on the right side of the window and then click<br />
“Delete”. If the “Delete” button is unable to be clicked,<br />
then the card data that you have entered may not exist.<br />
After clicking the “Delete” button, the deleted card data<br />
will not appear in the list at the left side of the window.<br />
Figure 7.0 “Adding to the Database”<br />
A database can be created and maintained in AccuMate<br />
also. However, due to security measures, new data that<br />
Page • <strong>MN06153</strong><br />
Issue/Rev. 0.0 (9/06)
Section III – Basic Operation<br />
was just added to a database through AccuMate is not<br />
automatically available in GateMate. After saving the<br />
database in AccuMate, the GateMate database information<br />
must be updated by going to the Configuration<br />
Window. On the Configuration Window, click the Update<br />
button located in the “Update Card Access Database”<br />
section. This feature provides added security because<br />
a password is needed to access the configuration window<br />
(if password protection is enabled).<br />
Searching the Database<br />
In the case that only a name is known, a search may be<br />
done in order to find the particular ID number. Simply<br />
type the first name and/or the last name and click the<br />
“Search” button. The search results will be displayed in<br />
the list on the left side of the screen.<br />
The search method is commonly used to delete card<br />
data from a large database. For instance, if the name<br />
of the cardholder to be deleted is known, search for the<br />
name and simply delete from the search results.<br />
Figure 9.0 “Log Window”<br />
If the log for the entered date does not exist, it cannot be<br />
viewed and a message box will be displayed informing<br />
the user of the non-existent log.<br />
Logs<br />
Logs provide a record of every card that was presented<br />
to the card reader. Logs also contain other useful information<br />
such as the time and date, and whether or not<br />
the card was recognized. If the first and last name of the<br />
cardholder is in the database, then that data is also recorded<br />
in the log. The first and last name is not always<br />
entered into the database and therefore the names in<br />
the log will show up as “none”. A new log will be started<br />
every day and will be saved to the file location specified<br />
in the configuration window.<br />
The search method is commonly used to delete card<br />
data from a large database. For instance, if the name<br />
of the cardholder to be deleted is known, search for the<br />
name and simply delete from the search results.<br />
Viewing Previous Logs<br />
Previous logs can be viewed in GateMate. To view a<br />
previous log, click “Log” on the menu bar of the main window<br />
of GateMate. Then click “Open” on the drop down<br />
menu, and click “Previous Log Date” on the side menu.<br />
The Log Window in Figure 9.0 will be displayed.<br />
On-Premises Report<br />
If an exit reader is enabled, then GateMate will provide<br />
an on premises report. This report includes the names<br />
of all of the people who have entered the premises and<br />
have not yet exited. This report includes the card ID<br />
number, the person’s name (if stored in the database),<br />
and the date and time that the person entered. The onpremises<br />
report can be viewed by clicking Log >> Open<br />
>> On-Premises Report. If the option to view this report<br />
is not available, check the configuration options to make<br />
sure that the exit reader is enabled.<br />
Today’s Record<br />
Today’s record is located on the main GateMate window.<br />
This record is identical to the log record since it<br />
displays card IDs that have been presented to the card<br />
reader. Today’s record also displays other details such<br />
as the time and date and whether or not the card was<br />
recognized. If the card was recognized, the first and<br />
last name of the cardholder will be displayed (if known).<br />
Today’s record can be cleared from the list box on the<br />
main window by clicking “Log” on the menu bar, and click<br />
“Clear Today’s Record” on the drop down list. Likewise,<br />
Today’s Record can be loaded to the list box on the main<br />
window by clicking “Log” on the menu bar, and click<br />
“Load Today’s Record” on the drop down list.<br />
Issue/Rev. 0.0 (9/06)<br />
<strong>MN06153</strong> • Page
Section III – Basic Operation<br />
Keyboard Shortcuts<br />
GateMate offers several keyboard shortcuts in order to<br />
create a more user-friendly environment. The shortcuts<br />
also let you execute a task quickly. Listed below in Figure<br />
10.0 are the keyboard shortcuts.<br />
Keystrokes<br />
Ctrl+0<br />
Ctrl+L<br />
Alt+F4<br />
Ctrl+Shift+C<br />
Ctrl+Shift+R<br />
Ctrl+Shift+L<br />
Action<br />
Manual Open<br />
Manual Lock<br />
Exit<br />
Load Configuration Window<br />
CleaR Today's Record<br />
Load Today's Record<br />
Figure 10.0 “Log Window”<br />
Connection<br />
The connection status is located in the lower left corner<br />
of the GateMate window (see page 4). In the case that<br />
the link between the card reader and the GateMate software<br />
is broken, a red flashing indicator will be displayed<br />
along with the message shown in Figure 11.0.<br />
Figure 11.0 “Communication Error”<br />
Once the card reader is reconnected, GateMate must<br />
be given twenty seconds to reconnect.<br />
This same alarm will be activated if the exit reader is<br />
enabled and GateMate cannot communicate with the<br />
exit reader. Sometimes a connection problem can occur<br />
if the baud rate or COM port settings are changed<br />
in the configuration window (see page 5).<br />
Page • <strong>MN06153</strong><br />
Issue/Rev. 0.0 (9/06)
Section IV – Related Publications<br />
The following literature can be obtained from <strong>FMC</strong> <strong>Technologies</strong> <strong>Measurement</strong> <strong>Solutions</strong>, Inc. Literature Fulfillment<br />
at johno@gohrs.com or online at www.fmctechnologies.com/measurementsolutions. When requesting literature<br />
from Literature Fulfillment, please reference the appropriate bulletin number and title.<br />
AccuMate for AccuLoad III<br />
Specifications................................................................................................................................. Bulletin SS06038<br />
Installation/Operation..................................................................................................................... Bulletin MN06136<br />
AccuLoad III-X<br />
Specifications..................................................................................................................................Bulletin SS06036<br />
Installation/Operation..................................................................................................................... Bulletin MN06135<br />
Operator Reference....................................................................................................................... Bulletin MN06129<br />
Communications............................................................................................................................ Bulletin MN06130<br />
AccuLoad II to III Upgrade<br />
Specifications..................................................................................................................................Bulletin SS06043<br />
Installation...................................................................................................................................... Bulletin MN06145<br />
Hardware Worksheet.........................................................................................................................Bulletin AB6051<br />
Proximity Card Reader<br />
Specifications..................................................................................................................................Bulletin SS06044<br />
Installation/Operation..................................................................................................................... Bulletin MN06144<br />
GateMate Software<br />
Installation/Operation..................................................................................................................... Bulletin <strong>MN06153</strong><br />
Page • <strong>MN06153</strong><br />
Issue/Rev. 0.0 (9/06)
The specifications contained herein are subject to change without notice and any user of said specifications should verify from the manufacturer that the specifications are currently<br />
in effect. Otherwise, the manufacturer assumes no responsibility for the use of specifications which may have been changed and are no longer in effect.<br />
Headquarters:<br />
1803 Gears Road, Houston, TX 77067 USA, Phone: 281/260-2190, Fax: 281/260-2191<br />
Gas <strong>Measurement</strong> Products:<br />
Erie, PA USA Phone 814/898-5000<br />
Thetford, England Phone (44) 1842-82-2900<br />
Kongsberg, Norway Phone (47) 32/286-700<br />
Buenos Aires, Argentina Phone 54 (11) 4312-4736<br />
Integrated <strong>Measurement</strong> Systems:<br />
Corpus Christi, TX USA Phone 361/289-3400<br />
Kongsberg, Norway Phone (47) 32/286-700<br />
San Juan, Puerto Rico Phone 787/274-3760<br />
United Arab Emirates, Dubai Phone 971 +4/331-3646<br />
Visit our website at www.fmctechnologies.com<br />
Liquid <strong>Measurement</strong> Products:<br />
Erie, PA USA Phone 814/898-5000<br />
Los Angeles, CA USA Phone 661/702-8660<br />
Slough, England Phone (44) 1753-57-1515<br />
Ellerbek, Germany Phone (49) 4101-3040<br />
Barcelona, Spain Phone (34) 93/201-0989<br />
Moscow, Russia Phone (7) 495/564-8705<br />
Melbourne, Australia Phone (61) 3/9807-2818<br />
Printed in U.S.A. © 5/01 <strong>FMC</strong> <strong>Technologies</strong> <strong>Measurement</strong> <strong>Solutions</strong>, Inc. All rights reserved. <strong>MN06153</strong> Issue/Rev. 0.0 (9/06)<br />
Beijing, China Phone (86) 10/6500-2251<br />
Singapore Phone (65) 6861-3011<br />
Chennai, India Phone (91) 44/450-4400