EASY SET-UP - VDO
EASY SET-UP - VDO EASY SET-UP - VDO
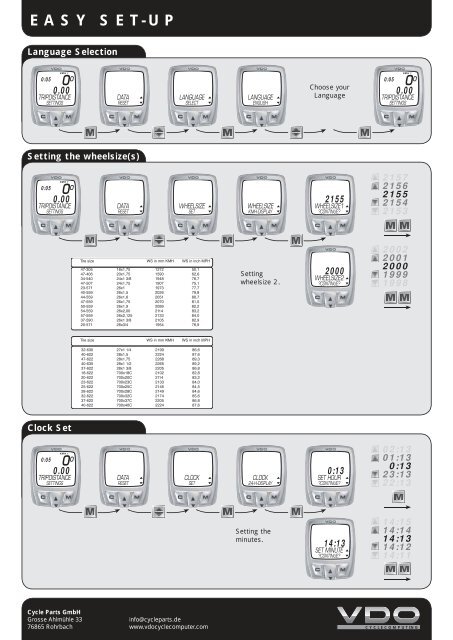
EASY SET-UP Language Selection KMH 1 0:05 0 0 0.00 TRIPDISTANCE SETTINGS 11:38 34 KMH 2 5 14.05 DATA RESET 34 KMH 2 5 11:38 14.05 LANGUAGE SELECT 34 KMH 2 5 11:38 14.05 LANGUAGE ENGLISH Choose your Language KMH 1 0:05 0 0 0.00 TRIPDISTANCE SETTINGS Setting the wheelsize(s) KMH 1 0:05 0 0 0.00 TRIPDISTANCE SETTINGS 11:38 34 KMH 2 5 14.05 DATA RESET 34 KMH 2 5 11:38 14.05 WHEELSIZE SET 34 KMH 2 5 11:38 14.05 WHEELSIZE KMH-DISPLAY 34 KMH 2 5 11:38 2155 WHEELSIZE1 CONTINUE 2157 2156 2155 2154 2153 Setting wheelsize 2. 34 KMH 2 5 11:38 2000 WHEELSIZE2 CONTINUE 2002 2001 2000 1999 1998 Clock Set KMH 1 0:05 0 0 0.00 TRIPDISTANCE SETTINGS 11:38 34 KMH 2 5 14.05 DATA RESET 11:38 34 KMH 2 5 14.05 CLOCK SET 34 KMH 2 5 11:38 14.05 CLOCK 24-H-DISPLAY 11:38 34 KMH 2 5 0:13 SET HOUR CONTINUE 02:13 01:13 0:13 23:13 22:13 Setting the minutes. 34 KMH 2 5 11:38 14:13 SET MINUTE CONTINUE 14:15 14:14 14:13 14:12 14:11 Cycle Parts GmbH Grosse Ahlmühle 33 76865 Rohrbach info@cycleparts.de www.vdocyclecomputer.com CYCLECOMPUTING
- Page 2 and 3: Initial Operations (Serie-C DS Mode
- Page 4 and 5: P01 * * *Watch out: old batteries r
- Page 6 and 7: P03 1-6 mm
- Page 8 and 9: P05 OPEN CLOSE
- Page 10 and 11: P07 1x WS in mm / inch
- Page 12 and 13: 50 GB IMPORTANT! This information w
- Page 14 and 15: GB Contents >>> P01 C1DS C2DS Pleas
- Page 16 and 17: C1DS C2DS C3DS C4DS 54 GB Index par
- Page 18 and 19: C3DS C4DS C4DS GB Index part III 9.
- Page 20 and 21: 58 GB ages are sent after, once the
- Page 22 and 23: 60 GB AVG SPEED average speed Infor
- Page 24 and 25: C1DS C2DS C3DS C4DS 62 GB 2.1 Insta
- Page 26 and 27: GB 2.2 Mounting transmitter and mag
- Page 28 and 29: GB 2.5 The new 4-line VDO display C
- Page 30 and 31: C1DS C2DS C3DS C4DS GB 2.6 The VDO
- Page 32 and 33: GB 2.7.1 Information Menus menu ava
- Page 34 and 35: GB General hint to read the followi
- Page 36 and 37: C1DS C2DS C3DS C4DS C1DS C2DS C3DS
- Page 38 and 39: 76 GB If you have selected the Metr
- Page 40 and 41: C1DS C2DS C3DS C4DS GB 4.3 Setting
- Page 42 and 43: C1DS C2DS C3DS C4DS GB 4.5 Changing
- Page 44 and 45: C1DS C2DS C3DS C4DS 82 GB Following
- Page 46 and 47: C1DS C2DS C3DS C4DS C2DS C3DS 84 GB
- Page 48 and 49: GB Setting the NAVIGATOR a c “NAV
- Page 50 and 51: GB TIMER 2: You can program another
<strong>EASY</strong> <strong>SET</strong>-<strong>UP</strong><br />
Language Selection<br />
KMH 1<br />
0:05<br />
0 0<br />
0.00<br />
TRIPDISTANCE<br />
<strong>SET</strong>TINGS<br />
11:38<br />
34<br />
KMH 2<br />
5<br />
14.05<br />
DATA<br />
RE<strong>SET</strong><br />
34<br />
KMH 2<br />
5<br />
11:38<br />
14.05<br />
LANGUAGE<br />
SELECT<br />
34<br />
KMH 2<br />
5<br />
11:38<br />
14.05<br />
LANGUAGE<br />
ENGLISH<br />
Choose your<br />
Language<br />
KMH 1<br />
0:05<br />
0 0<br />
0.00<br />
TRIPDISTANCE<br />
<strong>SET</strong>TINGS<br />
Setting the wheelsize(s)<br />
KMH 1<br />
0:05<br />
0 0<br />
0.00<br />
TRIPDISTANCE<br />
<strong>SET</strong>TINGS<br />
11:38<br />
34<br />
KMH 2<br />
5<br />
14.05<br />
DATA<br />
RE<strong>SET</strong><br />
34<br />
KMH 2<br />
5<br />
11:38<br />
14.05<br />
WHEELSIZE<br />
<strong>SET</strong><br />
34<br />
KMH 2<br />
5<br />
11:38<br />
14.05<br />
WHEELSIZE<br />
KMH-DISPLAY<br />
34<br />
KMH 2<br />
5<br />
11:38<br />
2155<br />
WHEELSIZE1<br />
CONTINUE<br />
2157<br />
2156<br />
2155<br />
2154<br />
2153<br />
Setting<br />
wheelsize 2.<br />
34<br />
KMH 2<br />
5<br />
11:38<br />
2000<br />
WHEELSIZE2<br />
CONTINUE<br />
2002<br />
2001<br />
2000<br />
1999<br />
1998<br />
Clock Set<br />
KMH 1<br />
0:05<br />
0 0<br />
0.00<br />
TRIPDISTANCE<br />
<strong>SET</strong>TINGS<br />
11:38<br />
34<br />
KMH 2<br />
5<br />
14.05<br />
DATA<br />
RE<strong>SET</strong><br />
11:38<br />
34<br />
KMH 2<br />
5<br />
14.05<br />
CLOCK<br />
<strong>SET</strong><br />
34<br />
KMH 2<br />
5<br />
11:38<br />
14.05<br />
CLOCK<br />
24-H-DISPLAY<br />
11:38<br />
34<br />
KMH 2<br />
5<br />
0:13<br />
<strong>SET</strong> HOUR<br />
CONTINUE<br />
02:13<br />
01:13<br />
0:13<br />
23:13<br />
22:13<br />
Setting the<br />
minutes.<br />
34<br />
KMH 2<br />
5<br />
11:38<br />
14:13<br />
<strong>SET</strong> MINUTE<br />
CONTINUE<br />
14:15<br />
14:14<br />
14:13<br />
14:12<br />
14:11<br />
Cycle Parts GmbH<br />
Grosse Ahlmühle 33<br />
76865 Rohrbach<br />
info@cycleparts.de<br />
www.vdocyclecomputer.com<br />
CYCLECOMPUTING
Initial Operations<br />
(Serie-C DS Modells)<br />
CYCLECOMPUTING<br />
Initial Operation<br />
1. First install the battery in the transmitter<br />
Absolutely stick with this order. Don’t<br />
have another DS transmitter running!<br />
OPEN<br />
CLOSE<br />
2. Install the battery in the computer<br />
OPEN<br />
CLOSE<br />
3. Function Check<br />
26<br />
KMH 1<br />
0<br />
0:17<br />
0.00<br />
TAGESTOUR<br />
EINSTELLMENU<br />
Any speed readout,<br />
= OK<br />
KMH 1<br />
0:17<br />
0 0<br />
0.00<br />
TAGESTOUR<br />
EINSTELLMENU<br />
Zero speed readout<br />
run<br />
DIGI<br />
CONNECT<br />
RE<strong>SET</strong><br />
DIGI CONNECT RE<strong>SET</strong><br />
KMH 1<br />
0:05<br />
0 0<br />
0.00<br />
TRIPDISTANCE<br />
<strong>SET</strong>TINGS<br />
11:38<br />
34<br />
KMH 2<br />
5<br />
14.05<br />
DATA<br />
RE<strong>SET</strong><br />
34<br />
KMH 2<br />
5<br />
11:38<br />
14.05<br />
DIGI CONNECT RE<strong>SET</strong><br />
RE<strong>SET</strong><br />
34<br />
KMH 2<br />
5<br />
11:38<br />
14.05<br />
DIGI CONNECT RE<strong>SET</strong><br />
RE<strong>SET</strong> <br />
34<br />
KMH 2<br />
5<br />
11:38<br />
14.05<br />
DIGI CONNECT RE<strong>SET</strong><br />
RE<strong>SET</strong> <br />
34<br />
KMH 2<br />
5<br />
11:38<br />
14.05<br />
DIGI CONNECT RE<strong>SET</strong><br />
RE<strong>SET</strong> DONE<br />
Cycle Parts GmbH<br />
Grosse Ahlmühle 33<br />
76865 Rohrbach<br />
info@cycleparts.de<br />
www.vdocyclecomputer.com<br />
CYCLECOMPUTING
CYCLECOMPUTING<br />
BEDIENUNGSANLEITUNG<br />
INSTRUCTION MANUAL<br />
MANUEL D´INSTALLATION ET D´UTILISATION<br />
MANUALE D´INSTALLAZIONE E FUNZIONAMENTO<br />
INSTALACION Y OPERACIÓN MANUAL<br />
HANDLEIDING<br />
C1DS C2DS C3DS C4DS
P01<br />
* *<br />
*Watch out: old batteries require special disposal
P02<br />
OPEN<br />
CLOSE<br />
OPEN<br />
CLOSE<br />
Battery
P03<br />
1-6 mm
P04<br />
screw
P05<br />
OPEN<br />
CLOSE
P06<br />
AC-button
P07<br />
1x<br />
WS in mm / inch
P08<br />
Tire size<br />
WS in mm KMH WS in inch MPH<br />
Tire size<br />
WS in mm KMH WS in inch MPH<br />
47-305 16x1,75 1272 50,1<br />
47-406 20x1,75 1590 62,6<br />
34-540 24x1 3/8 1948 76,7<br />
47-507 24x1,75 1907 75,1<br />
23-571 26x1 1973 77,7<br />
40-559 26x1,5 2026 79,8<br />
44-559 26x1,6 2051 80,7<br />
47-559 26x1,75 2070 81,5<br />
50-559 26x1,9 2089 82,2<br />
54-559 26x2,00 2114 83,2<br />
57-559 26x2,125 2133 84,0<br />
37-590 26x1 3/8 2105 82,9<br />
20-571 26x3/4 1954 76,9<br />
32-630 27x1 1/4 2199 86,6<br />
40-622 28x1,5 2224 87,6<br />
47-622 28x1,75 2268 89,3<br />
40-635 28x1 1/2 2265 89,2<br />
37-622 28x1 3/8 2205 86,8<br />
18-622 700x18C 2102 82,8<br />
20-622 700x20C 2114 83,2<br />
23-622 700x23C 2133 84,0<br />
25-622 700x25C 2146 84,5<br />
28-622 700x28C 2149 84,6<br />
32-622 700x32C 2174 85,6<br />
37-622 700x37C 2205 86,8<br />
40-622 700x40C 2224 87,6
50<br />
GB<br />
IMPORTANT!<br />
This information will help you understand how the digital transmission of your<br />
<strong>VDO</strong> computer works. You really must follow the initial set-up steps in the order<br />
described below.<br />
ATTENTION:<br />
At a break during your ride the receiver will be switched off after 30 minutes<br />
(battery consumption). Before continuing your ride you need to switch on the<br />
receiver again = press M-button<br />
IMPORTANT HINT for cell (mobile) phone brackets on the handlebar.<br />
The digital wireless transmission of you <strong>VDO</strong> DS computer is likely<br />
to be disturbed if you are operating a cell (mobile) phone too close<br />
to the computer. We highly recommend not mounting your phone on<br />
the handlebar.
GB<br />
IMPORTANT: General hint to read this manual:<br />
This manual is valid for all <strong>VDO</strong> Series-C models. Some functions and<br />
features are not available with all models. The “flag” icon on the beginning<br />
of a chapter indicates which model this chapter is relevant for.<br />
C1DS<br />
C2DS<br />
C3DS<br />
C4DS<br />
= valid for models C1DS,<br />
C2DS, C3DS & C4DS<br />
C3DS<br />
C4DS<br />
= valid for models<br />
C3DS & C4DS<br />
51
GB<br />
Contents >>> P01<br />
C1DS<br />
C2DS Please check package contents for its completeness:<br />
C3DS<br />
C4DS<br />
1 <strong>VDO</strong> computer<br />
1 <strong>VDO</strong> digital transmitter<br />
2 Battery 3V CR2032 for the computer and transmitter<br />
2 Battery door for the computer and transmitter<br />
1 Handle bar mount<br />
1 Fixing clamp<br />
1 Spoke magnet<br />
4 Cable ties to fix transmitter<br />
52
C1DS<br />
C2DS<br />
C3DS<br />
C4DS<br />
Preface<br />
Congratulations!<br />
With your choice of a <strong>VDO</strong> cycle computer, you have decided to own the most advanced<br />
technology available.<br />
To enjoy the full potential of your computer and benefit from all the technical features, we<br />
recommend you thoroughly study this manual. You will find crucial hints for its operation as<br />
well as many more tips.<br />
We wish you many enjoyable rides and trips on your bike with your <strong>VDO</strong> cycle computer.<br />
CYCLE PARTS GMBH<br />
GB<br />
53
C1DS<br />
C2DS<br />
C3DS<br />
C4DS<br />
54<br />
GB<br />
Index part I<br />
1.0 <strong>VDO</strong> DIGITAL SYTEM<br />
1.1 Welcome to the club: your <strong>VDO</strong>-USER-CARD<br />
1.2 Functions<br />
1.3 Optional features<br />
2. Installation<br />
2.1 Battery installation (computer and transmitter)<br />
2.2 Mounting sensor and magnet<br />
2.3 Mounting cable and <strong>VDO</strong> any-size handlebar mount<br />
2.4 TWIST-CLICK mounting of the computer<br />
2.5 The 4-line <strong>VDO</strong> display<br />
2.6 The <strong>VDO</strong> EMC-operating-system (Easy-Menu-Control)<br />
2.7 Functions / menu structure<br />
Fundamental instructions to read this manual<br />
3. Initial operation, AC-“auto-clear“<br />
3.1 Manual Transmitter Search – DIGI CONNECT RE<strong>SET</strong>
GB<br />
4 Basic settings<br />
4.1 Language selection<br />
4.2 Measuring and setting the wheel size(s)<br />
4.3 Setting the clock<br />
4.4 Setting the odometer<br />
4.5 Changing wheel sizes from bike 1 to bike 2<br />
4.6 Reset functions<br />
5. Service-Interval-Indicator<br />
6. Sleep-Mode<br />
7. Cadence (optional)<br />
C2DS<br />
C3DS<br />
Index part II<br />
8. Stopwatch<br />
Important hint:<br />
„>>> P04“ links at the beginning<br />
of a chapter are related<br />
to the respective picture in the<br />
picture book!<br />
55
C3DS<br />
C4DS<br />
C4DS<br />
GB<br />
Index part III<br />
9. NAVIGATOR functions<br />
Index part IV<br />
10. Timing functions<br />
10.1 Selecting timing functions<br />
10.2 Timer/countdown programming<br />
10.3 Timer/countdown/stop watch start/stop/reset<br />
10.4 Additional countdown functions<br />
C1DS<br />
C2DS<br />
C3DS<br />
C4DS<br />
Index part V<br />
11. Troubleshooting<br />
12. Warranty disclaimer<br />
13. Technical specifications<br />
56
C1DS<br />
C2DS<br />
C3DS<br />
C4DS<br />
1.0 <strong>VDO</strong> DIGITAL SYTEM<br />
Your <strong>VDO</strong> cycle computer operates on digitally coded, wireless transmission. Different from<br />
analogue radio transmission, data is digitally transmitted (data packages step-by-step). With<br />
your actual speed varying, the reading will change stepwise. Individual coding of the signals<br />
ensures that only data coming from your transmitter is processed. No interference with<br />
signals coming from transmitters other than yours. Very rarely, even digital transmission may<br />
be interfered by high-voltage power lines, mobile phone poles, remote controls (car doors<br />
openers, garage door openers).<br />
What happens when digital transmission is interfered with<br />
- speed display will read zero (0)<br />
- trip distance stops counting<br />
- ride timer stops counting<br />
The digital <strong>VDO</strong> transmitter features an internal memory, that stores up to 45 sec of data at a<br />
speed of 20 KMH (12,5 MPH). At a rare interference, no data is lost! The related data pack-<br />
GB<br />
57
58<br />
GB<br />
ages are sent after, once the interference is over.<br />
Following data is immediately updated when the re-send data is received :<br />
- trip distance<br />
- riding time<br />
- average speed<br />
- maximum speed<br />
- odometer<br />
Hence, your current data may change erratically after a interference = Update of your<br />
computer.<br />
After a battery change, a new coding is automatically generated in the transmitter.<br />
The computer must learn this new coding. Therefore, you have to activate the<br />
manual transmitter search DIGI CONNECT RE<strong>SET</strong> (3.1. Manual Transmitter Search<br />
– DIGI CONNECT RE<strong>SET</strong>)
C1DS<br />
C2DS<br />
C3DS<br />
C4DS<br />
C1DS<br />
C2DS<br />
C3DS<br />
C4DS<br />
1.1 The <strong>VDO</strong>-USER-CARD<br />
Welcome to the Club. With the purchase of this product, you have become a member of the<br />
<strong>VDO</strong>-USER Club. The <strong>VDO</strong>-USER-CARD gives you three advantages:<br />
A. The white boxes allow you to write down your personal wheel size settings, if you have<br />
several bikes or if you use different tires.<br />
B. The <strong>VDO</strong>-User-ID allows you access to the restricted <strong>VDO</strong>-User area on the <strong>VDO</strong> Homepage<br />
www.vdocyclecomputer.com.<br />
Here you can find many useful information and additional hints.<br />
C. The quick-reference manual helps you if you have not used your computer for a while and<br />
can’t remember how to use it.<br />
1.2 Functions<br />
Information-Functions C1DS, C2DS, C3DS, C4DS:<br />
TRIPDISTANCE trip distance<br />
ODO BIKE1/2 total odometer for bike 1/2<br />
ODO TOTAL total odometer for bike 1+2<br />
RIDE TIME<br />
trip ride timer<br />
GB<br />
59
60<br />
GB<br />
AVG SPEED<br />
average speed<br />
Information-Functions C2DS, C3DS, C4DS:<br />
MAX SPEED<br />
maximum speed<br />
STOPWATCH stop watch<br />
Information-Functions C3DS, C4DS:<br />
SUM RIDE TM1/2 total ride timer (bike 1 / bike 2)<br />
TOT RIDE TM total ride time for bikes 1 + 2<br />
NAVIGATOR<br />
second, programmable trip counter<br />
Information-Functions C4DS:<br />
TIMER 1/2 Timer 1 / Timer 2<br />
COUNTDOWN countdown timer<br />
FORECAST KM(MI) trip distance prediction (at countdown)<br />
REMAIN KM(MI) trip distance remainder (at countdown)<br />
Additional Functions C1DS, C2DS, C3DS, C4DS:<br />
DIGI CONNECT RE<strong>SET</strong> - Manual Transmitter Search<br />
CLOCK<br />
time display in 12 or 24 h mode
GB<br />
comparison between actual and average speed by indicators<br />
WS1/2 - 2 wheel sizes programmable for bike 1 + bike 2<br />
7 languages selectable, full text display<br />
Service-Interval-Indicator (wrench symbol)<br />
Additional Function C2DS, C3DS, C4DS: Timing Indicator<br />
Additional Function C4DS: Audible signal (beeper) for timing-functions<br />
C1DS<br />
C2DS<br />
C3DS<br />
C4DS<br />
1.3 Optional features<br />
The following genuine <strong>VDO</strong> parts are available at your Bike Shop<br />
- set transmitter/magnet/handlebar mount<br />
- cadence set<br />
- stem mount<br />
61
C1DS<br />
C2DS<br />
C3DS<br />
C4DS<br />
62<br />
GB<br />
2.1 Installing the batteries in the digital transmitter and the computer >>> P02<br />
Both, your <strong>VDO</strong> computer and your <strong>VDO</strong> transmitter are coming with a 3 V battery (type<br />
2032).<br />
A. First install the battery in the digital transmitter<br />
Step 1. Place the battery into the transmitter housing, +pole face-up.<br />
Step 2. Make sure the battery is not edged over.<br />
Step 3. Check if the rubber washer is flatly positioned on the battery door.<br />
Step 4. Place the battery door on the compartment, take a coin and twist it to the right until<br />
detent (approx. 1/3 turn).<br />
B. Install the battery in the computer immediatly after the installation of the battery<br />
in the transmitter.<br />
At the initial putting into operation, the computer is automatically trying to find the transmitter.<br />
By this, the computer also learns the transmitters coding
IMPORTANT: On inserting the battery into the transmitter, the coding of the digital<br />
signals is automatically generated. The computer is only able to find the coded<br />
signal at the initial putting into operation. After a battery change, a new coding is<br />
generated in the transmitter. In this case, the computer won’t find the coded signal<br />
and a manual transmitter search is required (DIGI CONNECT RE<strong>SET</strong>) – see chapter<br />
3.1.<br />
After every start a green LED at the transmitter flashes for 20 sec. only The flashing<br />
LED indicates a working transmitter.<br />
TIP for battery change: <strong>VDO</strong> recommends an annual battery change. Buy a spare battery in<br />
due time to avoid unwanted loss of data. When changing the battery, all basic settings are<br />
reset to default values. Note your individual wheel sizes and accumulated mileages (odometer<br />
WS 1 / odometer WS 2) for both bikes before you remove the battery.<br />
Reprogram this data after the new battery has been installed.<br />
GB<br />
63
GB<br />
2.2 Mounting transmitter and magnet >>> P03<br />
C1DS<br />
C2DS important mounting instructions:<br />
C3DS<br />
C4DS<br />
a) maximum distance transmitter – computer = 150 cm (59 in)<br />
b) distance transmitter - magnet: 3 to max 10 mm (up to 0.04 in)<br />
c) mount the transmitter on the fork leg, same side where you want the computer to be on the<br />
handlebar. (not applicable for stem mounting with optional stem holder).<br />
Step 1 Prefix the transmitter on the fork leg with cable ties (do not tighten yet)<br />
Step 2 Put the magnet around a spoke, do not fix<br />
Step 3 Direct the magnet to the marking on the transmitter at a distance of around 3 mm and<br />
shut the clip-mechanism<br />
Step 4 Align transmitter and magnet and tighten the transmitter’s cable ties. Clip off the cable<br />
tie ends not needed.<br />
64
2.3 Mounting the <strong>VDO</strong> any-size handlebar holder >>> P04<br />
C1DS<br />
C2DS Step 1 Position the holder socket on the handlebar (stem optionally).<br />
C3DS<br />
Step 2 Feed the fixing clamp through the slot below the holder socket, pass the clamp<br />
C4DS<br />
around the handlebar (stem optionally) and tighten it with a little screw driver. Do not<br />
overstress, the plastic screw might be damaged.<br />
GB<br />
2.4 Twist-Click mounting of the computer >>> P05<br />
C1DS The <strong>VDO</strong> Twist-Click-System securely connects the computer with the handlebar holder.<br />
C2DS step 1 Hold the computer in the 10 O’clock position (approx. 45° to the left) and place it into<br />
C3DS<br />
the socket.<br />
C4DS<br />
step 2 turn the computer to the right “twist” until it engages in the socket.<br />
step 3 for removal turn the computer to the left (do not press or yank)<br />
65
GB<br />
2.5 The new 4-line <strong>VDO</strong> display<br />
C1DS Indicator elements (Icons)<br />
C2DS Service Indicator, TIMING Indicator, Indicator Bike 1/Bike 2 and measuring system (km or mi),<br />
C3DS<br />
comparison of actual and average speed, Menu control indicator (flashes for further menu<br />
C4DS<br />
options selectable)<br />
Digit elements<br />
Time (clock), Speed, Chosen display function<br />
Text lines<br />
Upper text line: full text description of the information displayed<br />
or in set-up menu: description of set-up function<br />
Lower text line: indicates the sub-menu to enter by pushing the<br />
M-key or in set-up menu: indicates available set-up menus to be<br />
Entered.<br />
66
GB<br />
Service Indicator<br />
Time (clock)<br />
Variation / difference<br />
actual speed<br />
to average speed<br />
Text line 1<br />
Text line 2<br />
Timing Indicator<br />
C2DS, C3DS, C4DS<br />
Selected measuring unit<br />
Indicator bike 1/2<br />
Actual (current)<br />
speed<br />
Reading of the function<br />
selected in text<br />
element 1<br />
Menu control indicator<br />
67
C1DS<br />
C2DS<br />
C3DS<br />
C4DS<br />
GB<br />
2.6 The <strong>VDO</strong> EMC-operating system<br />
EMC = Easy Menu Control<br />
EMC eases operating the computer by a full text menu control well known from<br />
most cellular phones. 4 keys combined with the 4-line display provide comfortable<br />
and user-friendly operation.<br />
Menu indicators will always show further menu options by flashing.<br />
In fact, you do not need the manual any more form here. Your <strong>VDO</strong> computer leads you step<br />
by step through all the menus.<br />
Enjoy navigating!<br />
68<br />
CYCLECOMPUTING
GB<br />
C1DS<br />
C2DS<br />
C3DS<br />
C4DS<br />
The 4 keys and their functions:<br />
Menu navigation upwards<br />
or in <strong>SET</strong>-mode (number flashes): increase number<br />
Menu navigation downwards<br />
or in <strong>SET</strong>-mode (number flashes): decrease number<br />
choose/accept option displayed (enter next menu level)<br />
(push once) cancel last entry / go back one menu level<br />
(hold) return to main menu<br />
2.7 Functions / menu structure<br />
IMPORTANT: In information menu (IM1 to IM7, see below)<br />
the lower text line indicates the entry to a sub-menu.<br />
Within such a sub-menu the upper text line indicates the<br />
chosen information while the lower text line may offer<br />
available options (START/STOP/RE<strong>SET</strong>).<br />
IM = Information Menu • EM = Set- or sub-menu<br />
69
GB<br />
2.7.1 Information Menus<br />
menu available for models:<br />
all IM1. TRIPDISTANCE/<strong>SET</strong>TINGS<br />
all IM2. ODO TOTAL/MORE<br />
C3/C4 IM3. NAVIGATOR/SELECT<br />
C2/C3/C4 IM4. „TIMING-Function“/START*<br />
C2/C3/C4 IM5. MAX SPEED<br />
all IM6. AVG SPEED/C4: MORE<br />
all IM7. RIDE TIME/C3/C4: MORE<br />
= See Set-up Menu at chapter…..<br />
IM2.1. ODO BIKE 1<br />
IM2.2. ODO BIKE 2<br />
EM2.1. NAVIGATOR/<strong>SET</strong><br />
EM2.2. NAVIGATOR/RE<strong>SET</strong><br />
*Depending on selection in Set-up-Menu<br />
C4: IM6.1.** FORECAST KM<br />
C4: IM6.2.** REMAIN KM<br />
C3/C4: IM7.1. SUM RIDE TM1<br />
C3/C4: IM7.2. SUM RIDE TM2<br />
C3/C4: IM7.3. TOT RID TM<br />
** Only if COUNTDOWN has been selected<br />
70
GB<br />
2.7.2 Set Menus<br />
menu available for models:<br />
all EM1. DATA/RE<strong>SET</strong><br />
all EM2. DIGI CONNECT/RE<strong>SET</strong><br />
all EM3. LANGUAGE/SELECT<br />
all EM4. WHEELSIZE/<strong>SET</strong><br />
all EM5. ODOMETER/<strong>SET</strong><br />
all EM6. CLOCK/<strong>SET</strong><br />
all EM7. WHEELSIZE/SELECT<br />
C4 EM8. TIMING/SELECT<br />
C3/C4 EM9. NAVIGATOR/SELECT<br />
EM1.1. TOUR DATA/RE<strong>SET</strong><br />
EM1.2. ODO TOTAL/RE<strong>SET</strong><br />
C3/C4: EM1.3. TOT RID TM/RE<strong>SET</strong><br />
EM8.1. TIMING/SELECT<br />
EM8.1.1. TIMER 1/SELECT<br />
EM8.1.2. TIMER 2/SELECT<br />
EM8.1.3. TIMER 1+2/SELECT<br />
EM8.1.4. COUNTDOWN/SELECT<br />
EM8.1.4. STOPWATCH/SELECT<br />
EM8.2. TIMING/<strong>SET</strong><br />
EM8.2.1. TIMER1/<strong>SET</strong><br />
EM8.2.2. TIMER2/<strong>SET</strong><br />
EM8.2.3. COUNTDOWN/<strong>SET</strong><br />
EM9.1. NAVIGATOR/<strong>SET</strong><br />
EM9.2. NAVIGATOR/RE<strong>SET</strong><br />
71
GB<br />
General hint to read the following chapters:<br />
In the following you will often see this icon. Whenever you see this<br />
icon, use the <strong>UP</strong>/DOWN keys to find the relevant menu option and<br />
accept it by pushing the M-key.<br />
C1DS<br />
C2DS<br />
C3DS<br />
C4DS<br />
3. Initial operation, AC-(“Auto clear”)-button >>> P06<br />
After installing the battery, your <strong>VDO</strong> computer brings up an English main menu.<br />
Select your language to begin with.<br />
a c “TRIPDISTANCE / <strong>SET</strong>TINGS”<br />
a c “LANGUAGE / SELECT”<br />
a c choose your language<br />
The computer then automatically returns to the main menu TRIPDISTANCE/<strong>SET</strong>TINGS<br />
(in your selected language).<br />
72
C1DS<br />
C2DS<br />
C3DS<br />
C4DS<br />
Should your computer not function properly after installing the battery or you want to reset it to<br />
default values, push the AC-button on the rear of the housing.<br />
3.1 Manual Transmitter Search – DIGI CONNECT RE<strong>SET</strong><br />
After a battery change, a new coding is automatically generated in the transmitter. The<br />
computer must learn this new coding. Therefore, you have to activate the manual transmitter<br />
search DIGI CONNECT RE<strong>SET</strong>:<br />
a c call <strong>SET</strong>TINGS and accept<br />
a c call DIGI CONNECT and accept<br />
RE<strong>SET</strong> appears in display<br />
c accepts<br />
Now, an additional check back secures that you really want to reset the digital coding of your<br />
computer (RE<strong>SET</strong> flashes), c accepts.<br />
If you start riding or turn the front wheel now, the computer automatically learns the<br />
transmitters new coding. This procedure may take a few seconds.<br />
GB<br />
73
C1DS<br />
C2DS<br />
C3DS<br />
C4DS<br />
C1DS<br />
C2DS<br />
C3DS<br />
C4DS<br />
GB<br />
4. Basic settings<br />
Basic settings are settings crucial to data measuring and operating the computer. Such as<br />
language, wheel size(s), clock.<br />
WATCH OUT: Any <strong>SET</strong> procedure must be completed (menu question <strong>SET</strong> OK gets<br />
accepted by pushing c). Should a <strong>SET</strong> procedure not be completed, any data entered is not<br />
stored.<br />
4.1 Language selection<br />
In case you want to change the language at any time, proceed as described under chapter 3.<br />
74
C1DS<br />
C2DS<br />
C3DS<br />
C4DS<br />
4.2 Measuring and setting the wheel size(s) >>>P07<br />
In order for your <strong>VDO</strong> computer to precisely calculate speed and distance, you have to measure<br />
the circumference of your wheels With an incorrect wheel size set, all related values like<br />
speed, trip distance, odometer etc. come out false. To make the use of your <strong>VDO</strong> computers<br />
possible on 2 bikes, i.e. Mountain Bike and Road Bike, you are able to set up 2 different wheel<br />
sizes.<br />
Measuring both wheel circumferences:<br />
step 1 Place the front wheel valve perpendicular to the ground<br />
step 2 Mark this spot on the ground for example with chalk<br />
step 3 Turn the wheel forward for one full circle until the valve is<br />
perpendicular to the ground again<br />
step 4 Also mark this spot.<br />
step 5 Measure the distance between the two spots (markings)<br />
This is your wheel size.<br />
step 6 Set-up your wheel size in your <strong>VDO</strong> computer as<br />
described below.<br />
GB<br />
75
76<br />
GB<br />
If you have selected the Metric system (KM) you have to enter your wheel size/s in millimeters.<br />
If you have selected English system (MI) you have to enter your wheel size/s in inches.<br />
TIP: Write down your wheel sizes on your <strong>VDO</strong>-User-Card for easy reference. The values<br />
listed in the chart >>>P08 are approximate. Depending on the tire brand, it is possible that<br />
these numbers deviate from your real tire circumference since height and tread pattern are<br />
likely to be different.<br />
Setting the wheel sizes :<br />
a c “TRIPDISTANCE/<strong>SET</strong>TINGS”<br />
a c “WHEELSIZE/<strong>SET</strong>”<br />
a c “KMH-DISPLAY” or “ MPH-DISPLAY” to be selected<br />
<br />
a set wheel size 1 in [mm] or [in]<br />
(Press up/down key briefly for 1 mm, keep pressing key for fast forward run)<br />
c “<strong>SET</strong> OK” accept or return by pressing b and correct your entries. “WHEELSIZE 1 /<br />
<strong>SET</strong> DONE” pops up briefly, to indicate data storage.<br />
Your computer now wants you to set wheel size 2.
GB<br />
If applicable, enter wheel size 2 as described above<br />
If you don’t need to enter the second wheel size, hold the b key until the computer returns to<br />
main menu TRIPDISTANCE/<strong>SET</strong>TINGS.<br />
Watch out: Default settings for the wheel sizes are as follows: Bike 1 = 2155 mm and<br />
Bike 2 = 2000 mm. In case you don’t set your individual wheel sizes, the computer<br />
works with default values. Readings for speed therefore are likely to deviate significantly<br />
from the actual values.<br />
77
C1DS<br />
C2DS<br />
C3DS<br />
C4DS<br />
GB<br />
4.3 Setting the clock<br />
a c “TRIPDISTANCE / <strong>SET</strong>TINGS”<br />
a c “CLOCK / <strong>SET</strong>”<br />
a c “CLOCK 24-H-DISPLAY” or “CLOCK 12-H-DISPLAY”<br />
are ready to be set:<br />
a set hours<br />
c “CONTINUE” for minutes<br />
a c set minutes<br />
c “<strong>SET</strong> OK” accept (or b to return and correct entries)<br />
Your <strong>VDO</strong>-Computer automatically returns to main menu TRIPDISTANCE/<strong>SET</strong>TINGS.<br />
78
C1DS<br />
C2DS<br />
C3DS<br />
C4DS<br />
4.4 Setting the odometers<br />
You can set odometers anytime or after a battery change. Note the odometer readings for<br />
bike 1 and 2 before changing the battery<br />
a c “TRIPDISTANCE/<strong>SET</strong>TINGS”<br />
a c “ODOMETER / <strong>SET</strong>”<br />
a c “ODO BIKE 1 / <strong>SET</strong>” or “ODO BIKE 2 / <strong>SET</strong>”<br />
are ready to be set<br />
a set value<br />
c “NEXT DIGIT”<br />
After you have set the last number on the left = first of your value<br />
c “<strong>SET</strong> OK” accept “<strong>SET</strong> DONE”<br />
Your <strong>VDO</strong>-Computer automatically returns to main menu TRIPDISTANCE/<strong>SET</strong>TINGS.<br />
GB<br />
79
C1DS<br />
C2DS<br />
C3DS<br />
C4DS<br />
GB<br />
4.5 Changing wheel sizes from bike 1 to bike 2<br />
If you have programmed 2 wheel sizes for 2 bikes you have to adjust your computer<br />
accordingly prior to your trip.<br />
a c „TRIPDISTANCE/<strong>SET</strong>TINGS“<br />
a c „WHEELSIZE/SELECT“, accepted by c<br />
a c „WHEELSIZE 1“ or „WHEELSIZE 2”<br />
c accept / select<br />
Change of wheel size is confirmed by WHEELSIZE 1-2 DONE.<br />
WATCH OUT: Changing to the other wheel size automatically results in resetting / deleting<br />
all data of your last tour (trip distance, ride time, average and maximum speed) of the<br />
previous wheel size setting.<br />
80
C1DS<br />
C2DS<br />
C3DS<br />
C4DS<br />
4.6 Reset functions<br />
To reset / delete certain or all tour data<br />
a c “TRIPDISTANCE/<strong>SET</strong>TINGS”<br />
a c “DATA / RE<strong>SET</strong>”<br />
a “TOUR DATA / RE<strong>SET</strong>”<br />
or “ODO TOTAL / RE<strong>SET</strong>”<br />
or “TOT RIDE TM / RE<strong>SET</strong>” (only C3DS, C4DS)<br />
c accept / select “RE<strong>SET</strong>”<br />
Safety check back: Are you sure you want to reset<br />
c accepts “RE<strong>SET</strong>” and deletes<br />
NOTE: Accepting the reset by pressing c deletes the respective data. This step can not be<br />
made undone.<br />
“RE<strong>SET</strong> DONE” appears briefly and your <strong>VDO</strong>-Computer automatically returns to main menu<br />
TRIPDISTANCE/<strong>SET</strong>TINGS.<br />
GB<br />
81
C1DS<br />
C2DS<br />
C3DS<br />
C4DS<br />
82<br />
GB<br />
Following data is deleted by these corresponding reset modes:<br />
TOUR DATA RE<strong>SET</strong>: trip distance, ride time, average speed, maximum speed.<br />
ODO TOTAL RE<strong>SET</strong>: odo total, km/mi bike 1, km/mi bike 2<br />
TOT RID TM RE<strong>SET</strong>: total ride time, ride time bike 1, ride time bike 2 (C3DS, C4DS)<br />
5. Service-Interval-Indicator<br />
Your <strong>VDO</strong> computer features a Service-Interval-Indicator for bike 1 and bike 2. Like the<br />
indicator in some cars, the Service-Interval-Indicator reminds you to have your bike checked<br />
and serviced in a shop.<br />
When you reach 750 km/mi on one bike:<br />
- The Service-Interval symbol (wrench) flashes in the display<br />
- The information line displays “BIKE CHECK“<br />
Now it is suggested to either service your bike yourself or take it to a pro shop of your choice<br />
to have it checked.<br />
Press any key. The text “BIKE CHECK“ will disappear again
C1DS<br />
C2DS<br />
C3DS<br />
C4DS<br />
After further 50 km/mi the Service-Interval-Indicator symbol (wrench) will also disappear.<br />
6. Sleep-Mode<br />
Your <strong>VDO</strong>-Computer features a sleep mode function to save battery power. During Sleep<br />
Mode the major portion of your display is shut down to save battery power. Only the clock,<br />
the Service-Interval-Indicator (if applicable) and the TIMER symbol (if activated) are displayed.<br />
a. The computer will go into Sleep-Mode when no speed impulses have been processed for 5<br />
minutes and no key has been pressed during that time.<br />
b. Sleep-Mode is cancelled once speed impulses are processed (you start riding) or any key<br />
is pressed.<br />
ATTENTION:<br />
At a break during your ride the receiver will be switched off after 30 minutes<br />
(battery consumption). Before continuing your ride you need to switch on the Computer<br />
again = press c-button<br />
GB<br />
83
C1DS<br />
C2DS<br />
C3DS<br />
C4DS<br />
C2DS<br />
C3DS<br />
84<br />
GB<br />
7. Cadence (optional)<br />
Your <strong>VDO</strong> computer is prepared for cadence measuring. To make use of these functions,<br />
you need to purchase the optional CADENCE KIT (Articlecode: 4402) at your Bike-Dealer.<br />
Operating instructions for cadence functions are described in detail in the CADENCE<br />
KIT’s extra manual.<br />
Contents of the optional kit “CADENCE” (Articlecode: 4402):<br />
Cadence transmitter and mounting parts, cadence-magnet, mounting parts<br />
8. Stopwatch<br />
Manual stop watch to measure riding time of certain trip sections.<br />
Starting Stopwatch<br />
Select STOPWATCH in your information display:<br />
a<br />
c<br />
“STOPWATCH /START”<br />
“START” / “STOP”
GB<br />
C3DS<br />
C4DS<br />
Indicator Symbol ><br />
Resetting Stopwatch:<br />
a STOPWATCH select the appropriate menu.<br />
c Hold for 3 seconds<br />
After 3 seconds the STOPWATCH is reset to zero.<br />
9. NAVIGATOR functions<br />
Your <strong>VDO</strong> computer features a NAVIGATOR function that makes it possible to follow route<br />
(Road-Book) instructions. Road-books are trip maps outlining mileage values based on<br />
certain landmarks.<br />
Your <strong>VDO</strong>-Navigator is a further independent trip counter, it either counts forward or backwards.<br />
Mileage can be set at any point of the trip. You might as well get in on a trip or adjust<br />
your mileage in case you have gotten lost.<br />
85
GB<br />
Setting the NAVIGATOR<br />
a c “NAVIGATOR / SELECT”<br />
a c “NAVIGATOR / <strong>SET</strong>“<br />
a c “FORWARD” or “BACKWARD“ to be selected<br />
are ready to be set:<br />
a enter / set<br />
c “NEXT DIGIT” accept or return by b<br />
continue with next digit or correct previous entry b<br />
At the end of the set procedure you will be asked<br />
c “<strong>SET</strong> OK” accept<br />
“<strong>SET</strong> DONE” appears briefly and your <strong>VDO</strong>-Computer automatically returns to main<br />
menu TRIPDISTANCE/<strong>SET</strong>TINGS.<br />
Note: the NAVIGATOR is always counting, even if you don’t set it.<br />
86
Reset NAVIGATOR to zero.<br />
a c “NAVIGATOR / SELECT”<br />
a c “NAVIGATOR / RE<strong>SET</strong>”<br />
Check back: “NAVIGATOR RE<strong>SET</strong>”<br />
c<br />
accept<br />
“RE<strong>SET</strong> DONE” appears briefly and your <strong>VDO</strong>-Computer automatically returns to main menu<br />
TRIPDISTANCE/<strong>SET</strong>TINGS.<br />
10. Timing functions<br />
C4DS Your <strong>VDO</strong>-Computer features 5 individual timing functions. With any of the functions selected<br />
the TIMING indicator > is activated in the upper left part of the display.<br />
Set-/measuring range for all timing functions:<br />
0:00:00 h to 24:00:00 h<br />
TIMER 1: You can program a time window, i.e. for interval training. TIMER 1 counts on from<br />
zero. A single beep indicates the end of TIMER 1.<br />
GB<br />
87
GB<br />
TIMER 2: You can program another time window, i.e. for a break in your interval training<br />
TIMER 2 counts on from zero. A double beep indicates the end of TIMER 2.<br />
TIMER 1+2: With this TIMING-function selected, TIMER 1 and TIMER 2 time windows are<br />
continuously cycled one after the other. A single beep indicates the end of TIMER 1, a double<br />
beep indicates the end of TIMER 2. TIMER 1+2 is activated, until you stop TIMER 1+2 by<br />
pressing the M-key<br />
COUNTDOWN: You can program a time window from which is counted backwards. A single<br />
beep indicates the end of the COUNTDOWN timer. Only with COUNTDOWN selected and<br />
started you have access to additional functions MORE in AVG SPEED menu. See also 10.4.<br />
STOPWATCH: manual stop watch to measure riding time of certain trip sections.<br />
88
C4DS<br />
10.1 Selecting timing functions<br />
a c “TRIPDISTANCE / <strong>SET</strong>TINGS<br />
a c “TIMING / SELECT”<br />
c “TIMING / SELECT”<br />
Note: By accepting “SELECT” either default setting STOPWATCH or last selected timing<br />
function is displayed .<br />
a “STOPWATCH” / “COUNTDOWN” / TIMER 1” / “TIMER 2” or “TIMER 1+2”<br />
c SELECTION to be confirmed / accepted<br />
“DONE” appears briefly and your <strong>VDO</strong>-Computer automatically returns to main menu<br />
TRIPDISTANCE/<strong>SET</strong>TINGS. The TIMER function of your choice is then displayed in your<br />
information menu IM4.<br />
With TIMER or COUNTDOWN selected, you have to program your time window, otherwise<br />
your information menu displays the hint “TIMER ERROR” or “COUNTDOWN ERROR”.<br />
GB<br />
89
C4DS<br />
GB<br />
10.2 TIMER/COUNTDOWN programming<br />
While the STOPWATCH does not need any further presetting, for the TIMER and COUNT-<br />
DOWN functions the time windows have to be programmed in the first place<br />
a c “TRIPDISTANCE / <strong>SET</strong>TINGS<br />
a c “TIMING / SELECT”<br />
a c “TIMING / <strong>SET</strong>”<br />
a “TIMER 1” or “TIMER 2” or „COUNTDOWN“<br />
c accept / select<br />
are ready to be set<br />
a c hours a c minutes a c seconds<br />
c „<strong>SET</strong> OK“ accept<br />
“TIMER1/TIMER2/COUNTDOWN <strong>SET</strong> DONE” appears briefly and your <strong>VDO</strong>-Computer<br />
automatically returns to main menu TRIPDISTANCE/<strong>SET</strong>TINGS.<br />
90
GB<br />
C4DS<br />
10.3 Timer/Countdown/Stopwatch start, stop and reset / Beep<br />
Starting Timer/Countdown/Stopwatch<br />
Select the timing-function of your choice in your information display:<br />
a<br />
c<br />
“TIMER 1 /START” or “TIMER 2/START” or “TIMER1+2/START” or<br />
“COUNTDOWN /START” or “STOPWATCH /START”<br />
“START” / “STOP”<br />
Resetting Timer/Countdown/Stopwatch<br />
Timer and Countdown feature a “fast reset” function:<br />
a TIMER1/TIMER2/TIMER1+2/COUNTDOWN/STOPWATCH select the appropriate menu.<br />
c Hold for 3 seconds<br />
After 3 seconds the TIMER is reset to zero or the COUNTDOWN is reset to the previously<br />
programmed START time.<br />
91
C4DS<br />
92<br />
GB<br />
Check back COUNTDOWN<br />
With COUNTDOWN-time elapsed an automatic check back appears: RE<strong>SET</strong>.<br />
If you accept this by pressing c, the previously programmed COUNTDOWN time is<br />
displayed.<br />
The COUNTDOWN is now ready to be started again.<br />
10.4 Additional Countdown Functions<br />
In COUNTDOWN mode you get to FORECAST KM/MI and REMAIN KM/MI by information<br />
menu AVG SPEED:<br />
a c “AVG SPEED/MORE”<br />
a “FORECAST KM or MI”<br />
b “REMAIN KM or MI”<br />
Note: The forecasted km/mi reflect your computers projection for the distance you accomplish<br />
at the end of your countdown time. This information is determined by your actual<br />
average speed during the countdown time period. Respective data is updated
C1DS<br />
C2DS<br />
C3DS<br />
C4DS<br />
every 10 seconds. Remaining km/mi is your estiamted distance left in the remaining countdown<br />
time. Here also, respective data is updated every 10 seconds. As long as you have<br />
not reset your COUNTDOWN by RE<strong>SET</strong>, you are able to review the projected FORECAST<br />
KM/MI of your last COUNTDOWN by the “FORECAST KM/MI” menu option.<br />
11. Troubleshooting<br />
Here’s a listing of possible malfunctions, the probable causes and suggested solutions.<br />
Malfunction Probable Cause Remedy / Repair<br />
Partial text segments<br />
in display (i.e. after<br />
battery change<br />
Computer-software is not<br />
running smoothly after battery<br />
change<br />
GB<br />
Reset the software by<br />
pressing the AC-button on<br />
the rear housing<br />
No speed reading in<br />
display<br />
Transmitter and magnet are<br />
too far apart<br />
Readjust position of transmitter<br />
and magnet<br />
93
GB<br />
No speed reading<br />
in display<br />
No speed reading<br />
in display<br />
Transmitter battery has been<br />
changed<br />
Wheel size is not correctly<br />
set up = Wheel size is ZERO<br />
Activate manual transmitter search<br />
(DIGI CONNECT RE<strong>SET</strong>) see<br />
chapter 3.1<br />
Program your wheel size<br />
C1DS<br />
C2DS<br />
C3DS<br />
C4DS<br />
94<br />
Display fades Battery is weak Check battery, and replace<br />
eventually<br />
Display fades Temperatures below 5°<br />
C (41° F) make your LCD<br />
display fade<br />
Higher temperatures will m ake your<br />
display work properly<br />
12. Warranty disclaimer<br />
<strong>VDO</strong> Cycle Parts warrants your <strong>VDO</strong>-Computer for 5 years from date of purchase. This war-
anty covers defects in material and workmanship. Defects on cables, senders, transmitters<br />
and mounting materials resulting from normal wear and tear, improper care, accidents, abuse<br />
or alteration are not covered by our warranty. Opening the computer housing (except for the<br />
battery door) is considered abuse, thus not covered by our 5 year warranty.<br />
Please keep your sales receipt to prove that your computer is covered under the warranty<br />
in case of legitimate complaints.<br />
In case of legitimate complaints you are entitled to have your computer either repaired or<br />
replaced with a comparable model. Due t possible model changes, your model might have<br />
been discontinued.<br />
In the event that you should have a complaint, please first contact the retailer where you purchased<br />
your <strong>VDO</strong> computer. If the retailer is unable to help, you can return your computer to:<br />
Cycle Parts GmbH, Große Ahlmühle 33, D-76865 Rohrbach.<br />
In case of technical queries, please contact our customer-service-hotline: +49-6349-9635-10.<br />
Further technical information is available on our website: http://www.vdocyclecomputer.com<br />
Technical specifications of our computers are subject to change without notice.<br />
GB<br />
95
96<br />
GB<br />
13. Technical Specifications<br />
C1DS Computer: approx. 45 x 52 x 16 mm, weight 45 g<br />
C2DS Handlebar holder: weight 15 g<br />
C3DS Transmitter: weight20 g<br />
C4DS Battery: 3V, Type 2032 (Computer), 3V Type 2032 (Transmitter)<br />
Battery life: 300 hours of use, approx. 6000 km (3940 mi) only speedtransmitter use<br />
250 hours of use, approx. 5000 km (3106 mi) speed plus cadence-transmitter use.<br />
Digital speed transmitter: 600 h<br />
Operating temperature of LCD display: -15 °C to +60 °C (5° F to 140° F)<br />
Speed reading range: at wheel size 2155 mm (84.8 in)<br />
min 2.5 km/h (1.55 mi) / max 120 km/h (74 mi)<br />
Riding Time Measuring Range: up to 23:59:59 HH:MM:SS<br />
Stop Watch Measuring Range (only C2DS, C3DS, C4DS): up to 23:59:59 HH:MM:SS<br />
Trip Distance Counter Measuring Range: up to 999.99 km or mi<br />
NAVIGATOR Measuring Range (only C3DS, C4DS): up to 999.99 km or mi<br />
Total odometer either Bike 1 or 2 Measuring Range: Up to 99.999 km or mi<br />
Total Odometer measuring Range: up to 199.999 km or mi<br />
Wheel size Set Range: 100 mm (3.9 in) minimum / 3999 mm (157.4 in) maximum


