Visio-EBS-WKI-200 Install Inlet Protection.vsd
Visio-EBS-WKI-200 Install Inlet Protection.vsd
Visio-EBS-WKI-200 Install Inlet Protection.vsd

You also want an ePaper? Increase the reach of your titles
YUMPU automatically turns print PDFs into web optimized ePapers that Google loves.
Document Number: <strong>EBS</strong>-<strong>WKI</strong>-<strong>200</strong> Revision Number: 3<br />
Approved By: Kip P. Dernovich<br />
Description of Last Change Added step for taking before and after replacement photos<br />
Document Title:<br />
Equipment and Building Services – <strong>Inlet</strong> <strong>Protection</strong> Systems Monitoring and Maintenance<br />
7.1, 7.5, 8.2.3 and 8.2.4 in ISO 9001:<strong>200</strong>8 & 4.4.6, 4.5.1 in ISO 14001:<strong>200</strong>4, 4.4.6 in OHSAS 18001:<strong>200</strong>7 4.4.6<br />
Effective Date:<br />
05/15/13<br />
<strong>Inlet</strong><br />
Protector<br />
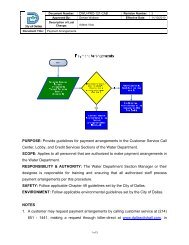
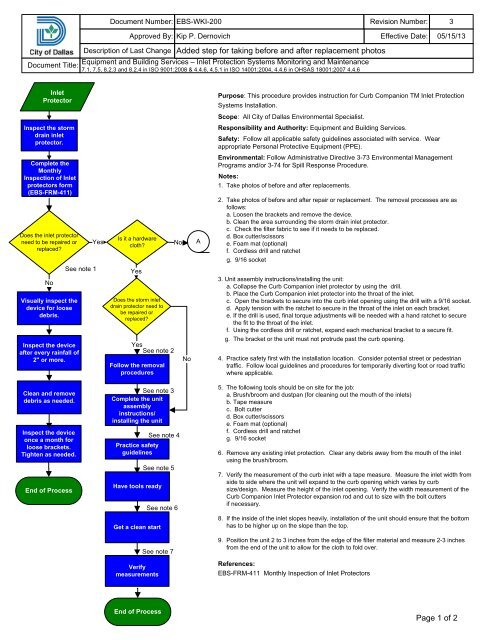
Purpose: This procedure provides instruction for Curb Companion TM <strong>Inlet</strong> <strong>Protection</strong><br />
Systems <strong>Install</strong>ation.<br />
Scope: All City of Dallas Environmental Specialist.<br />
Responsibility and Authority: Equipment and Building Services.<br />
Safety: Follow all applicable safety guidelines associated with service. Wear<br />
appropriate Personal Protective Equipment (PPE).<br />
Environmental: Follow Administrative Directive 3-73 Environmental Management<br />
Programs and/or 3-74 for Spill Response Procedure.<br />
Notes:<br />
1. Take photos of before and after replacements.<br />
Inspect the storm<br />
drain inlet<br />
protector.<br />
Complete the<br />
Monthly<br />
Inspection of <strong>Inlet</strong><br />
protectors form<br />
(<strong>EBS</strong>-FRM-411)<br />
Does the inlet protector<br />
need to be repaired or<br />
replaced<br />
No<br />
Visually inspect the<br />
device for loose<br />
debris.<br />
Inspect the device<br />
after every rainfall of<br />
2" or more.<br />
Yes<br />
See note 1<br />
Is it a hardware<br />
cloth<br />
Yes<br />
Does the storm inlet<br />
drain protector need to<br />
be repaired or<br />
replaced<br />
Yes<br />
See note 2<br />
Follow the removal<br />
procedures<br />
No<br />
No<br />
A<br />
2. Take photos of before and after repair or replacement. The removal processes are as<br />
follows:<br />
a. Loosen the brackets and remove the device.<br />
b. Clean the area surrounding the storm drain inlet protector.<br />
c. Check the filter fabric to see if it needs to be replaced.<br />
d. Box cutter/scissors<br />
e. Foam mat (optional)<br />
f. Cordless drill and ratchet<br />
g. 9/16 socket<br />
3. Unit assembly instructions/installing the unit:<br />
a. Collapse the Curb Companion inlet protector by using the drill.<br />
b. Place the Curb Companion inlet protector into the throat of the inlet.<br />
c. Open the brackets to secure into the curb inlet opening using the drill with a 9/16 socket.<br />
d. Apply tension with the ratchet to secure in the throat of the inlet on each bracket.<br />
e. If the drill is used, final torque adjustments will be needed with a hand ratchet to secure<br />
the fit to the throat of the inlet.<br />
f. Using the cordless drill or ratchet, expand each mechanical bracket to a secure fit.<br />
g. The bracket or the unit must not protrude past the curb opening.<br />
4. Practice safety first with the installation location. Consider potential street or pedestrian<br />
traffic. Follow local guidelines and procedures for temporarily diverting foot or road traffic<br />
where applicable.<br />
Clean and remove<br />
debris as needed.<br />
Inspect the device<br />
once a month for<br />
loose brackets.<br />
Tighten as needed.<br />
End of Process<br />
See note 3<br />
Complete the unit<br />
assembly<br />
instructions/<br />
installing the unit<br />
See note 4<br />
Practice safety<br />
guidelines<br />
See note 5<br />
Have tools ready<br />
See note 6<br />
5. The following tools should be on site for the job:<br />
a. Brush/broom and dustpan (for cleaning out the mouth of the inlets)<br />
b. Tape measure<br />
c. Bolt cutter<br />
d. Box cutter/scissors<br />
e. Foam mat (optional)<br />
f. Cordless drill and ratchet<br />
g. 9/16 socket<br />
6. Remove any existing inlet protection. Clear any debris away from the mouth of the inlet<br />
using the brush/broom.<br />
7. Verify the measurement of the curb inlet with a tape measure. Measure the inlet width from<br />
side to side where the unit will expand to the curb opening which varies by curb<br />
size/design. Measure the height of the inlet opening. Verify the width measurement of the<br />
Curb Companion <strong>Inlet</strong> Protector expansion rod and cut to size with the bolt cutters<br />
if necessary.<br />
Get a clean start<br />
8. If the inside of the inlet slopes heavily, installation of the unit should ensure that the bottom<br />
has to be higher up on the slope than the top.<br />
See note 7<br />
9. Position the unit 2 to 3 inches from the edge of the filter material and measure 2-3 inches<br />
from the end of the unit to allow for the cloth to fold over.<br />
Verify<br />
measurements<br />
References:<br />
<strong>EBS</strong>-FRM-411 Monthly Inspection of <strong>Inlet</strong> Protectors<br />
End of Process<br />
Page 1 of 2
Document Number: <strong>EBS</strong>-<strong>WKI</strong>-<strong>200</strong> Revision Number: 3<br />
Document Title:<br />
A<br />
Description of Last Change<br />
Approved By: Kip P. Dernovich<br />
Added step for before and after replacement photos<br />
Equipment and Building Services – <strong>Inlet</strong> <strong>Protection</strong> Systems Monitoring and Maintenance<br />
7.1, 7.5, 8.2.3 and 8.2.4 in ISO 9001:<strong>200</strong>8 & 4.4.6, 4.5.1 in ISO 14001:<strong>200</strong>4, 4.4.6 in OHSAS 18001:<strong>200</strong>7 4.4.6<br />
Effective Date:<br />
05/15/13<br />
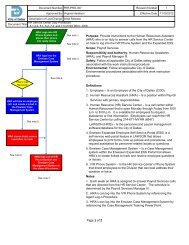
Follow the<br />
landscaping cloth<br />
procedures below.<br />
Prepare to <strong>Install</strong><br />
the unit.<br />
Does the storm drain<br />
inlet protector need to<br />
be replaced<br />
Yes<br />
See note 2<br />
Follow the removal<br />
procedures.<br />
See note 3<br />
Complete the unit<br />
assembly<br />
instructions/<br />
installing the unit.<br />
No<br />
Place foam mat on<br />
the ground in front<br />
of the unit.<br />
Move the unit into<br />
place 2-3" into the<br />
opening of the inlet.<br />
See note 8<br />
Ensure the proper<br />
placement of the<br />
unit.<br />
End of Process<br />
Roll out the cloth<br />
on a flat surface.<br />
Place unit on top of<br />
cloth with<br />
expansion poles<br />
down.<br />
Open the brackets<br />
the measurements<br />
of the height of the<br />
curb inlet opening.<br />
See note 9<br />
Position unit and<br />
measure.<br />
Cut the fabric<br />
barrier cloth with<br />
the box cutter or<br />
scissors.<br />
Remove the rubber<br />
tube from the<br />
expansion poles.<br />
Fold the cloth over<br />
the expansion<br />
poles.<br />
Replace the rubber<br />
tube.<br />
Page 2 of 2