Hammer and gouge mastoidectomy for cholesteatoma - Vula ...
Hammer and gouge mastoidectomy for cholesteatoma - Vula ...
Hammer and gouge mastoidectomy for cholesteatoma - Vula ...

Create successful ePaper yourself
Turn your PDF publications into a flip-book with our unique Google optimized e-Paper software.
OPEN ACCESS ATLAS OF OTOLARYNGOLOGY, HEAD &<br />
NECK OPERATIVE SURGERY<br />
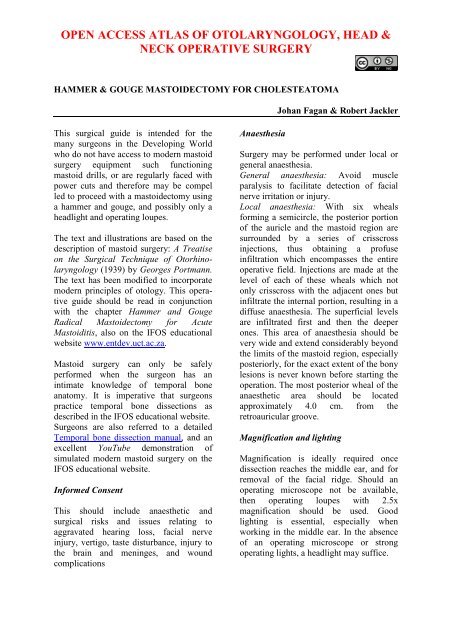
HAMMER & GOUGE MASTOIDECTOMY FOR CHOLESTEATOMA<br />
Johan Fagan & Robert Jackler<br />
This surgical guide is intended <strong>for</strong> the<br />
many surgeons in the Developing World<br />
who do not have access to modern mastoid<br />
surgery equipment such functioning<br />
mastoid drills, or are regularly faced with<br />
power cuts <strong>and</strong> there<strong>for</strong>e may be compel<br />
led to proceed with a <strong>mastoidectomy</strong> using<br />
a hammer <strong>and</strong> <strong>gouge</strong>, <strong>and</strong> possibly only a<br />
headlight <strong>and</strong> operating loupes.<br />
The text <strong>and</strong> illustrations are based on the<br />
description of mastoid surgery: A Treatise<br />
on the Surgical Technique of Otorhinolaryngology<br />
(1939) by Georges Portmann.<br />
The text has been modified to incorporate<br />
modern principles of otology. This operative<br />
guide should be read in conjunction<br />
with the chapter <strong>Hammer</strong> <strong>and</strong> Gouge<br />
Radical Mastoidectomy <strong>for</strong> Acute<br />
Mastoiditis, also on the IFOS educational<br />
website www.entdev.uct.ac.za.<br />
Mastoid surgery can only be safely<br />
per<strong>for</strong>med when the surgeon has an<br />
intimate knowledge of temporal bone<br />
anatomy. It is imperative that surgeons<br />
practice temporal bone dissections as<br />
described in the IFOS educational website.<br />
Surgeons are also referred to a detailed<br />
Temporal bone dissection manual, <strong>and</strong> an<br />
excellent YouTube demonstration of<br />
simulated modern mastoid surgery on the<br />
IFOS educational website.<br />
In<strong>for</strong>med Consent<br />
This should include anaesthetic <strong>and</strong><br />
surgical risks <strong>and</strong> issues relating to<br />
aggravated hearing loss, facial nerve<br />
injury, vertigo, taste disturbance, injury to<br />
the brain <strong>and</strong> meninges, <strong>and</strong> wound<br />
complications<br />
Anaesthesia<br />
Surgery may be per<strong>for</strong>med under local or<br />
general anaesthesia.<br />
General anaesthesia: Avoid muscle<br />
paralysis to facilitate detection of facial<br />
nerve irritation or injury.<br />
Local anaesthesia: With six wheals<br />
<strong>for</strong>ming a semicircle, the posterior portion<br />
of the auricle <strong>and</strong> the mastoid region are<br />
surrounded by a series of crisscross<br />
injections, thus obtaining a profuse<br />
infiltration which encompasses the entire<br />
operative field. Injections are made at the<br />
level of each of these wheals which not<br />
only crisscross with the adjacent ones but<br />
infiltrate the internal portion, resulting in a<br />
diffuse anaesthesia. The superficial levels<br />
are infiltrated first <strong>and</strong> then the deeper<br />
ones. This area of anaesthesia should be<br />
very wide <strong>and</strong> extend considerably beyond<br />
the limits of the mastoid region, especially<br />
posteriorly, <strong>for</strong> the exact extent of the bony<br />
lesions is never known be<strong>for</strong>e starting the<br />
operation. The most posterior wheal of the<br />
anaesthetic area should be located<br />
approximately 4.0 cm. from the<br />
retroauricular groove.<br />
Magnification <strong>and</strong> lighting<br />
Magnification is ideally required once<br />
dissection reaches the middle ear, <strong>and</strong> <strong>for</strong><br />
removal of the facial ridge. Should an<br />
operating microscope not be available,<br />
then operating loupes with 2.5x<br />
magnification should be used. Good<br />
lighting is essential, especially when<br />
working in the middle ear. In the absence<br />
of an operating microscope or strong<br />
operating lights, a headlight may suffice.
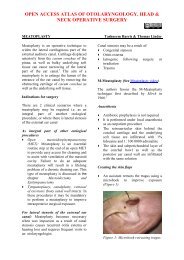
Instrumentation<br />
Gouges <strong>and</strong> chisels should be kept<br />
extremely sharp, so as to ensure controlled<br />
bone resection. Blunt instrumentation<br />
requires undue <strong>for</strong>ce to be applied, <strong>and</strong><br />
<strong>gouge</strong>s/chisels may slip off bone <strong>and</strong><br />
plunge <strong>and</strong> damage critical structures such<br />
as brain, lateral sinus, facial nerve, inner<br />
ear, <strong>and</strong> carotid artery. For the bone work<br />
the surgeon requires the following:<br />
Curved periosteal elevator<br />
Mallet<br />
Three <strong>gouge</strong>s: Large, medium, small<br />
Flat chisel<br />
Curettes<br />
Rongeurs/bone nibblers (small,<br />
medium <strong>and</strong> large)<br />
Retractors (2), ideally self-retracting<br />
Canal elevator/McDonalds dissector<br />
Blunt probe<br />
Microinstruments: Curved needle,<br />
Plester knife, sickle knife, curette<br />
Suction tips<br />
Position of Patient<br />
The patient is laid supine with the head<br />
turned towards the normal ear.<br />
Position of Surgeon <strong>and</strong> Assistants<br />
The surgeon st<strong>and</strong>s on the side of the<br />
affected ear. Two assistants are stationed<br />
on the other side, facing the surgeon. The<br />
1 st assistant is nearest to the head. The 2 nd<br />
assistant is exactly opposite the surgeon.<br />
Operative Field<br />
The mastoid, auricle, <strong>and</strong> preauricular<br />
regions are extensively swabbed with<br />
tincture of iodine. The patient is covered to<br />
the neck with a sterile sheet. The operative<br />
field is isolated by four towels. Over them<br />
is placed a fenestrated sheet, the orifice of<br />
which encircles the auricle <strong>and</strong> mastoid.<br />
Antibiotics<br />
No antibiotics are required <strong>for</strong><br />
<strong>mastoidectomy</strong> <strong>for</strong> uncomplicated<br />
<strong>cholesteatoma</strong>, other than when there is<br />
secondary infection (mastoiditis).<br />
BIPP Paste<br />
BIPP Paste can be prepared <strong>and</strong> used to<br />
impregnate ribbon gauze. This can be used<br />
to pack the mastoid cavity or ear canal, <strong>and</strong><br />
because of its antiseptic properties, may be<br />
left in place <strong>for</strong> a few weeks.<br />
Bismuth subnitrate 20% w/w, iodo<strong>for</strong>m<br />
40% w/w, paraffin liquid 40% w/w (w/w =<br />
weight <strong>for</strong> weight)<br />
Figure 1: Instruments <strong>for</strong> bone work<br />
2
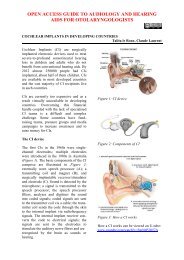
Surgical anatomy <strong>for</strong> Mastoidectomy<br />
Figure 2: Coronal section through middle<br />
ear <strong>and</strong> temporal bone<br />
Brown: Tympanic segment of base of squamous bone;<br />
Green: Antral region; Rose: Subantral region; Red:<br />
Region of tip; Blue: Sinus region; Yellow: Cerebellar<br />
region or region of mastoid vein<br />
Figure 4: Surface boundaries of mastoid<br />
regions<br />
Surgical Steps: Radical Mastoidectomy<br />
First Step: Incision of Superficial Tissues<br />
Figure 3: Axial view of temporal bone<br />
anatomy<br />
Figure 5: Incision of Superficial Tissues<br />
The 1 st assistant retracts the auricle<br />
towards himself, using both h<strong>and</strong>s. The 3 rd<br />
finger of the lower h<strong>and</strong> is pressed strongly<br />
under the mastoid tip in order to compress<br />
the posterior auricular artery. The other<br />
assistant is prepared to sponge/swab with<br />
mastoid sponges/swabs held in angular<br />
3
<strong>for</strong>ceps. The surgeon incises the<br />
retroauricular crease down to bone from<br />
left to right, from the linea temporalis to<br />
the inferior part of the crease, or vice versa<br />
(Figure 5).<br />
Second Step: Periosteal Elevation<br />
After haemostasis <strong>and</strong> ligation of bleeding<br />
vessels, the periosteum of the antral region<br />
posteriorly is detached from the mastoid<br />
bone with the periosteal elevator; this is<br />
firmly retracted using a hooked retractor<br />
(Figure 6). Anteriorly a periosteal elevator<br />
separates the posterior wall of the canal<br />
from the spine of Henlé.<br />
Figure 6: Periosteal elevation<br />
Figure 7: Separate canal skin from bone<br />
Fourth Step: Exploration of Operative<br />
Region<br />
The skin of the posterior canal wall is<br />
transected parallel to the annulus of the<br />
tympanic membrane, thereby entering the<br />
ear canal, <strong>and</strong> exposing the tympanic<br />
membrane. The bony auditory canal is<br />
identified anteriorly <strong>and</strong> the tympanic<br />
cavity medially (Figure 8). Above, the<br />
finger identifies the crest of the linea<br />
temporalis. Above <strong>and</strong> behind the canal is<br />
the spine of Henlé; this is the guiding<br />
l<strong>and</strong>mark to direct the following step.<br />
Third Step: Separation of Canal<br />
A canal elevator is slipped against the<br />
posterior bony wall of the auditory canal<br />
<strong>and</strong> lowered <strong>for</strong>ward in order to free the<br />
membranous canal (Figure 7). A pronged<br />
or self-retaining retractor grasps the<br />
membranous canal <strong>and</strong> auricle <strong>and</strong> retracts<br />
them <strong>for</strong>ward. The elevator is then<br />
removed.<br />
Figure 8: Transected ear canal <strong>and</strong><br />
exposure of spine of Henlé <strong>and</strong> tympanic<br />
membrane<br />
4
Fifth Step: Search <strong>for</strong> Aditus <strong>and</strong> Antrum<br />
The search <strong>for</strong> the antrum begins by<br />
enlarging the auditory canal<br />
posterosuperiorly. In Figure 8 the black<br />
dotted concentric lines indicate the course<br />
to be followed with the <strong>gouge</strong> during<br />
trephination; it is centred at the spine of<br />
Henlé.<br />
Figure 10: Excavation towards antrum<br />
Sixth Step: Enlargement of Antrum<br />
Figure 9: Gouge placed behind spine of<br />
Henlé<br />
A large <strong>gouge</strong> is placed immediately<br />
behind the spine of Henlé, which is<br />
removed (Figure 9). The instrument is held<br />
between the thumb <strong>and</strong> first two fingers of<br />
the left h<strong>and</strong> with the last two fingers<br />
resting on the bony surface, acting as a<br />
buffer to avoid plunging. The first tap of<br />
the <strong>gouge</strong> determines the direction of those<br />
following, which will be eccentric to it but<br />
always in the same direction. The canal is<br />
thus progressively enlarged by successive<br />
bites of the <strong>gouge</strong>, which should not<br />
extend above the linea temporalis (Figure<br />
10). The excavation proceeds deeper until<br />
the <strong>gouge</strong> slips into a cavity: the antrum.<br />
The <strong>gouge</strong> is removed as soon as it<br />
penetrates to the cavity. The angular probe<br />
locates the aditus ad antrum, which<br />
confirms the presence of the antrum.<br />
After ascertaining the presence of the<br />
antrum, the cavity is enlarged with the<br />
<strong>gouge</strong> along its superior, posterior, <strong>and</strong><br />
inferior walls (Figure 11). The objective is<br />
to create a smooth, well rounded, regular<br />
cavity.<br />
Figure 11: Entering the antrum<br />
The <strong>gouge</strong> is held between the thumb <strong>and</strong><br />
first two fingers of the left h<strong>and</strong> with the<br />
last two fingers resting on the adjacent<br />
bony surface <strong>and</strong> acting as a buffer to<br />
avoid mishaps. The <strong>gouge</strong> is successively<br />
5
placed as follows: Superiorly it should not<br />
go beyond the linea temporalis, which<br />
approximately outlines the separation<br />
between the mastoid <strong>and</strong> middle cranial<br />
fossa dura, so as not to uncover the dura<br />
mater superiorly. Posteriorly it is h<strong>and</strong>led<br />
very carefully <strong>and</strong> directed obliquely to<br />
avoid rupturing the lateral sinus, which<br />
may be prominent.<br />
Seventh Step: Opening of Tympanomastoid<br />
Canal<br />
After extensively widening the antrum<br />
with a <strong>gouge</strong>, the surgeon reduces the<br />
thickness of the bony bridge, which <strong>for</strong>ms<br />
the external wall of the aditus, <strong>and</strong> which<br />
separates the antrum from the tympanic<br />
cavity. Removal of this bridge is required<br />
to create a free communication via the<br />
tympanomastoid canal between the<br />
tympanic <strong>and</strong> mastoid cavities. The width<br />
of the bridge is determined by placing a<br />
curved probe in the aditus so that the tip is<br />
visible in the tympanic cavity (Figure 12).<br />
Figure 13: Removing bony bridge<br />
Figure 14: Removing bony bridge<br />
Figure 12: Probing the aditus to determine<br />
width of bony bridge<br />
When the bony bridge has been<br />
sufficiently reduced in size, its superior<br />
portion is removed with a <strong>gouge</strong> (Figures<br />
13, 14 & 15).<br />
Figure 15: Removing bony bridge<br />
6
The instrument is held perpendicularly<br />
between the thumb <strong>and</strong> first two fingers of<br />
the left h<strong>and</strong>, the other two fingers resting<br />
on the adjacent bone. The concavity of the<br />
<strong>gouge</strong> always faces inferiorly. At this point<br />
the operator should avoid injury to the<br />
facial nerve which is found much lower<br />
<strong>and</strong> also the lateral semicircular canal,<br />
which is internal to <strong>and</strong> below the line of<br />
section. Light taps of the <strong>gouge</strong> are applied<br />
horizontally at the superior end of the bony<br />
bridge where there is no danger of injuring<br />
the facial nerve, <strong>and</strong> should extend<br />
upwards <strong>and</strong> <strong>for</strong>wards over the wall of the<br />
attic. The tympanomastoid canal is reached<br />
by light taps of the hammer <strong>and</strong> is thus<br />
opened.<br />
The wall of the middle ear is then<br />
completely smoothed with the <strong>gouge</strong>,<br />
which is always held in the same direction,<br />
in order to bring the roof of the antrum, the<br />
tympanic cavity, <strong>and</strong> the aditus to the same<br />
level. No bony ridges or irregularities are<br />
left.<br />
Eighth Step: Removal of Facial Ridge<br />
The middle ear <strong>and</strong> the antrum thus<br />
constitute a common bean-shaped cavity.<br />
They communicate widely superiorly but<br />
are separated inferiorly by the inferior<br />
margin of the aditus. A rounded elevation<br />
is present inferiorly in the antrum; this is<br />
the bony shell of the lateral semicircular<br />
canal. It serves as a useful marker <strong>for</strong> the<br />
location of the 2 nd genu of the facial nerve,<br />
which is located anteroinferiorly to the<br />
lateral semicircular canal. The inferior<br />
aspect of the aditus is particularly thick<br />
<strong>and</strong> contains the 2 nd genu of the facial<br />
nerve giving rise to the vertical limb of the<br />
Fallopian canal (Figure 16).<br />
Figure 16: Anatomical relations of facial<br />
nerve<br />
Removal <strong>and</strong> lowering of the facial ridge is<br />
a very delicate but necessary procedure <strong>for</strong><br />
a good operative result. A small gauze<br />
pledget is placed in the tympanic cavity to<br />
catch the bony debris which otherwise<br />
would remain in the cavity. Removal of the<br />
facial ridge is accomplished with light taps<br />
of the mallet on the chisel. They are<br />
directed obliquely upwards from the base<br />
(inferiorly) to the summit (superiorly), the<br />
top of which overhangs the aditus (Figure<br />
17).<br />
Figure 17: Removal of facial ridge<br />
Since the inferior portion is very thick,<br />
there is not much danger of injury to the<br />
facial nerve. However, the summit is<br />
7
adjacent to the 2 nd genu. The operator<br />
proceeds very cautiously, chipping off<br />
smaller <strong>and</strong> smaller pieces of bone as the<br />
aditus is approached.<br />
The anaesthetist is advised not to paralyze<br />
the patient, <strong>and</strong> is asked to focus his<br />
attention on the patient’s face to observe<br />
muscular contractions in the area of<br />
distribution of the facial nerve, <strong>and</strong> to<br />
immediately advise the surgeon of any<br />
contractions which are indicative of trauma<br />
in the vicinity of the nerve. The surgeon<br />
stops at the slightest warning from the<br />
anaesthetist. Generally the procedure is<br />
straight<strong>for</strong>ward. Sometimes, however, the<br />
bone may bleed. This indicates proximity<br />
to the stylomastoid artery, which is<br />
external/superficial to the facial nerve.<br />
This is an important sign of proximity to<br />
the nerve.<br />
All irregularities are removed, leaving a<br />
bony cavity with rounded contours <strong>and</strong> a<br />
smooth surface. The summit is continuous<br />
with the floor of the aditus. A rounded<br />
elevation appears on the internal slope of<br />
the facial ridge towards the antrum; this is<br />
the bony shell of the lateral semicircular<br />
canal.<br />
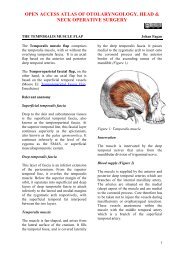
Ninth step: Curettage of Tympanic Cavity<br />
The small pledget in the tympanic cavity is<br />
removed. The tympanic cavity is often<br />
filled with <strong>cholesteatoma</strong>tous shreds <strong>and</strong><br />
inflammatory granulations. All that<br />
remains to be done is curettage of this<br />
cavity. During this operative step, the<br />
anaesthetist continues to watch the<br />
patient’s face <strong>and</strong> to warn the surgeon of<br />
any injury to the facial nerve. A small,<br />
middle ear curette is used. First to be<br />
removed are the malleus <strong>and</strong> incus, whose<br />
necrotic fragments are identified. The<br />
stapes is left undisturbed (Figure 18).<br />
Figure 18: Curettage of middle ear, <strong>and</strong><br />
removal of incus <strong>and</strong> malleus<br />
The walls are curetted systematically. The<br />
danger of dehiscence of the bone or of<br />
accidentally breaking through the bone<br />
with the curette should be constantly kept<br />
in mind. Curettage should there<strong>for</strong>e be<br />
very carefully per<strong>for</strong>med. The superior<br />
wall (tegmen tympani) is very thin <strong>and</strong> is<br />
adjacent to the temporal meninges. The<br />
floor is slightly resistant <strong>and</strong> immediately<br />
above the jugular bulb. The medial wall<br />
contains the oval window with the stapes<br />
superstructure <strong>and</strong> round window, <strong>and</strong> the<br />
facial nerve which is often dehiscent <strong>and</strong><br />
exposed by osteitis (Figure 19).<br />
Figure 19: Anatomy of following radical<br />
<strong>mastoidectomy</strong> <strong>and</strong> removal of malleus<br />
<strong>and</strong> incus<br />
8
It is necessary to see clearly, sponge or<br />
suction often, use small pledgets of<br />
adrenalin, <strong>and</strong> utilize magnification e.g.<br />
magnifying loupes, an endoscope or a<br />
microscope. The operation is terminated<br />
with curettage of the anterior wall. This<br />
wall contains the orifice of the Eustachian<br />
tube, the medial edge of which is adjacent<br />
to the carotid canal. The cutting edge of<br />
the curette should there<strong>for</strong>e be turned<br />
outwards as the lateral wall offers no<br />
dangers.<br />
The scalpel is introduced into the canal<br />
from below, passing up through the<br />
operative gap. The blade is turned toward<br />
the auricle <strong>and</strong> follows the transverse<br />
incision backwards to the centre of the<br />
concha (Figure 20).<br />
Tenth Step: Cleaning <strong>and</strong> Exploring<br />
Operative Cavity<br />
The entire cavity is sponged/suctioned <strong>and</strong><br />
irrigated with saline. Bony debris is<br />
meticulously removed; the slightest<br />
unevenness is smoothed with the <strong>gouge</strong> or<br />
curette. The blunt probe is used to<br />
determine that neither the dura mater nor<br />
the lateral sinus has been exposed in the<br />
tympanic cavity or antrum/mastoid.<br />
Carefully examine, with magnification, the<br />
lateral semicircular canal to rule out a<br />
labyrinthine fistula. This appears as a<br />
grayish dot where the probe reveals a loss<br />
of bony substance.<br />
Figure 20: Initial meatoplasty incision<br />
The scalpel is removed <strong>and</strong> a “T” incision<br />
is made in the concha at right angles to the<br />
original incision (Figure 21). In this<br />
manner two triangular flaps are obtained,<br />
one superiorly <strong>and</strong> one inferiorly.<br />
Eleventh Step: Meatoplasty<br />
The next procedure is to adapt the auditory<br />
canal <strong>and</strong> auricle to the new cavity. A<br />
piece of gauze is placed in the tympanic<br />
cavity <strong>and</strong> antrum. The assistant retracts<br />
the pinna <strong>for</strong>ward <strong>and</strong> introduces a <strong>gouge</strong><br />
into the membranous canal with its<br />
concavity directed against the concha. The<br />
pinna <strong>and</strong> <strong>gouge</strong> are then angled <strong>for</strong>ward<br />
towards the cheek. The surgeon incises the<br />
posterior wall of the membranous canal<br />
over the <strong>gouge</strong> from front to back. The<br />
<strong>gouge</strong> protects the underlying tissues as it<br />
guides the scalpel. The <strong>gouge</strong> is removed<br />
<strong>and</strong> the pinna, held by the assistant with<br />
both h<strong>and</strong>s, is returned to its normal<br />
position.<br />
Figure 21: “T” incision in concha<br />
The flaps are very thick <strong>and</strong> consist of the<br />
skin of the concha <strong>and</strong> canal as well as the<br />
lining cartilage <strong>and</strong> adipose tissue. Only<br />
the skin should be preserved in order to<br />
obtain a pliable flap that will con<strong>for</strong>m to<br />
the cavity. The pinna is again drawn<br />
9
<strong>for</strong>ward <strong>and</strong> the tips of the flaps are<br />
successively grasped with tissue <strong>for</strong>ceps.<br />
Using the scalpel, the cartilage is then<br />
separated <strong>and</strong> excised from its adherent<br />
tissues. This excision causes minor<br />
haemorrhage <strong>and</strong> necessitates cautery or a<br />
few ligatures. The two flaps are then ready<br />
to be stitched into place. The surgeon now<br />
turns his attention to the posterior edge of<br />
the concha <strong>and</strong> here, too, excises the<br />
cartilage. The skin is grasped with tissue<br />
<strong>for</strong>ceps <strong>and</strong> the scalpel separates the<br />
cartilage, of which 2.0 or 3.0 mm. is<br />
resected (Figure 22).<br />
stitches (Figure 25). The meatoplasty is<br />
completed. The pinna remains mobile<br />
since at no point is it fastened to the<br />
mastoid.<br />
Figure 23: Suturing inferior flap<br />
Figure 22: Thinning of flaps<br />
The concha, thus prepared <strong>for</strong> the<br />
meatoplasty, consists of two flaps <strong>and</strong> the<br />
posterior edge of the vertical incision.<br />
These two thin cutaneous flaps are the<br />
primary source of epithelialization of the<br />
bony cavity. They are everted <strong>and</strong><br />
successively stitched to the adjacent tissues<br />
of the pinna so that they are well placed in<br />
relation to the contours of the antrum. The<br />
inferior flap, held with the tissue <strong>for</strong>ceps,<br />
is transfixed. It is lightly turned back <strong>and</strong><br />
the needle grasps the cellular tissue of the<br />
pinna beneath the flap. The flap is stitched<br />
with catgut/vicryl so that its everted free<br />
edge lies on the inferior part of the antrum<br />
(Figure 23). The same manoeuvre is<br />
executed with the superior flap which<br />
corresponds to the edge of the superior<br />
antral wall (Figure 24). The posterior lip of<br />
the conduit is then everted by two or three<br />
Figure 24: Suturing superior flap<br />
Figure 25: Suturing posterior lip<br />
10
After removing the temporary packing in<br />
the operative cavity, the pinna is returned<br />
to its original position. The surgeon should<br />
carefully inspect the meatoplasty to<br />
ascertain that there is no retraction of the<br />
skin of the pinna <strong>and</strong> that the orifice in the<br />
concha gives adequate access to the antrum<br />
<strong>and</strong> tympanic cavity <strong>for</strong> subsequent<br />
inspection <strong>and</strong> cleansing (Figure 26).<br />
cavity. The concha is filled with the ribbon<br />
gauze which is tightly packed here since its<br />
object is to serve as support <strong>for</strong> the<br />
meatoplasty flaps. The interposed gauze<br />
sponge/swab prevents the latter packing<br />
from creating pressure on the dressings of<br />
the bony cavities.<br />
Figure 26: Final meatoplasty<br />
Twelfth Step: Packing of Cavity<br />
Figure 27: Ribbon gauze has been pulled<br />
through meatoplasty to pack mastoid<br />
cavity<br />
The operative cavity is packed with BIPP<br />
impregnated ribbon gauze mounted on a<br />
haemostat. The assistant retracts the pinna<br />
slightly <strong>for</strong>ward. The end of the gauze<br />
passes through the orifice of the concha<br />
<strong>and</strong> exits into the retroauricular wound.<br />
The surgeon then pulls several centimetres<br />
of ribbon gauze towards himself; with it he<br />
packs the bony cavity (Figure 27).<br />
Packing is done in the following manner<br />
(Figures 27 & 28): The end of the ribbon<br />
gauze is held in a <strong>for</strong>ceps <strong>and</strong> is folded<br />
upon itself. It is inserted first in the<br />
tympanic cavity, which is filled without<br />
being tightly packed. The ribbon is next<br />
placed in the aditus <strong>and</strong> then the antrum.<br />
After packing the cavities, the surgeon<br />
packs the concha with the remainder of the<br />
ribbon. A gauze sponge/swab is placed in<br />
the retroauricular groove, isolating the<br />
pinna from the antrum <strong>and</strong> tympanic<br />
Figure 28: Interposed gauze prevents<br />
pressure on dressings of bony cavities<br />
during packing of meatus<br />
11
which is held in place by a b<strong>and</strong>age<br />
wrapped around the head.<br />
Postoperative Care<br />
The surgeon assesses the facial nerve<br />
function. Patients are generally discharged<br />
the day following surgery. The mastoid<br />
dressings are removed 1-2 weeks<br />
following surgery. The mastoid cavity<br />
generally requires regular toilette lifelong<br />
at variable intervals.<br />
Figure 29: Packing the meatus<br />
Thirteenth Step: Retroauricular Suture<br />
<strong>and</strong> Dressing<br />
The skin is carefully approximated <strong>and</strong><br />
closed with three or four sutures.<br />
Special Problems<br />
Difficulty Finding Antrum<br />
Locating the antrum is one of the main<br />
difficulties during the course of radical<br />
<strong>mastoidectomy</strong>. The bone is frequently<br />
sclerotic <strong>and</strong> the antrum small. The<br />
technique described always leads to the<br />
aditus, which the operator should be<br />
particularly anxious to locate. Should<br />
he/she fail to find the antrum, a blunt<br />
probe, carefully directed <strong>and</strong> inserted into<br />
the tympanic cavity is used to locate the<br />
course of the tympanomastoid canal, <strong>and</strong><br />
the location of the aditus ad antrum.<br />
Figure 3029: Sutured wound<br />
A small ball of absorbent cotton is placed<br />
at the entrance of the concha against the<br />
ribbon gauze so the latter will not adhere to<br />
the gauze dressing. A gauze sponge/swab<br />
is placed in the retroauricular groove; two<br />
or three other gauze sponges/swabs are<br />
placed on the pinna. The entire area is<br />
covered with sterile absorbent cotton<br />
Exposure of Lateral Sinus or Temporal<br />
Meninges<br />
The lateral sinus is sometimes<br />
inadvertently uncovered with the first taps<br />
of the <strong>gouge</strong>. The temporal meninges are<br />
covered by the thin bony tegmen tympani<br />
<strong>and</strong> may be exposed by osteitis of the roof<br />
of the tympanic cavity or by curettage. It is<br />
prudent to use a blunt probe quite often to<br />
explore the superior wall of the tympanic<br />
cavity, the aditus, or the antrum be<strong>for</strong>e<br />
curetting or when trauma with an<br />
12
instrument is feared. Extreme caution is<br />
always required. However exposure of the<br />
above structures does not generally present<br />
any serious danger. No special measures<br />
are required. In the postoperative course a<br />
close watch is kept <strong>for</strong> the possible<br />
appearance of intracranial complications.<br />
Auto<strong>mastoidectomy</strong><br />
A <strong>cholesteatoma</strong> which has been present<br />
<strong>for</strong> a period of years may erode the bone to<br />
such an extent that it result in an<br />
autoradical <strong>mastoidectomy</strong>. The aditus<br />
may be deeply excavated <strong>and</strong> the antrum<br />
vast. Oftentimes the medial cortex is also<br />
destroyed. The task of the surgeon in such<br />
cases is much simpler <strong>and</strong> the bony surface<br />
is white <strong>and</strong> smooth. The only necessary<br />
procedure required is to complete the<br />
opening of the aditus <strong>and</strong> remove the facial<br />
ridge.<br />
Labyrinthine Fistula<br />
An unsuspected labyrinthine fistula,<br />
generally of the lateral semicircular canal,<br />
may be discovered during the course of the<br />
operation by careful inspection with<br />
magnification, probing, or the presence of<br />
a nystagmus noticed by the anaesthetist; or<br />
by vertigo in the awake patient. The fistula<br />
should not be disturbed but simply covered<br />
with a patch of temporalis fascia.<br />
Facial Nerve<br />
The facial nerve may be affected<br />
preoperatively to various degrees. Some<br />
spontaneous contractions of the muscles of<br />
the face may have been noticed. Paresis or<br />
paralysis may be present. Whenever the<br />
facial nerve has been affected all<br />
manoeuvres in the tympanic cavity <strong>and</strong><br />
aditus should be done very cautiously.<br />
Facial nerve paralysis also raises the<br />
possibility of tuberculous mastoiditis.<br />
Tuberculous mastoiditis requires a lesser<br />
operation than <strong>for</strong> acute mastoiditis, the<br />
object being only to remove bony<br />
sequestra, <strong>and</strong> to obtain tissue <strong>for</strong><br />
histological <strong>and</strong> bacteriologic diagnosis.<br />
Complete paralysis as an un<strong>for</strong>tunate result<br />
of the operative procedure, is uncommon.<br />
Await resolution of local anaesthetic, as it<br />
might be responsible <strong>for</strong> the paralysis. The<br />
mastoid packing should be loosened as it<br />
may be pressing on a dehiscent nerve. If<br />
there is a suspicion of the nerve having<br />
been transected or compressed by a spicule<br />
of bone, the ear should be urgently<br />
explored <strong>and</strong> the nerve decompressed,<br />
repaired, or grafted with a segment of<br />
greater auricular nerve.<br />
Intracranial Complications<br />
Meningitis <strong>and</strong>, less frequently,<br />
thrombophlebitis of the lateral/sigmoid<br />
sinus are serious complications during the<br />
first few postoperative days in patients<br />
with mastoiditis.<br />
Labyrinthine Complications<br />
During the immediate postoperative period<br />
of a radical <strong>mastoidectomy</strong>, the patient<br />
may experience dizziness <strong>and</strong> have<br />
nystagmus. These may be perilabyrinthine<br />
phenomena produced by mild irritation in<br />
the neighbourhood of an unrevealed<br />
fistula, or may be due to a labyrinthine<br />
fistula, or dislocation of the stapes.<br />
13
Author & Editor<br />
Johan Fagan MBChB, FCORL, MMed<br />
Professor <strong>and</strong> Chairman<br />
Division of Otolaryngology<br />
University of Cape Town<br />
Cape Town<br />
South Africa<br />
johannes.fagan@uct.ac.za<br />
Author<br />
Robert Jackler MD<br />
Sewall Professor <strong>and</strong> Chair<br />
Department of Otolaryngology-Head &<br />
Neck Surgery<br />
Associate Dean, Postgraduate Medical<br />
Education<br />
Stan<strong>for</strong>d University School of Medicine<br />
Stan<strong>for</strong>d, CA 94305-5101, USA<br />
The Open Access Atlas of Otolaryngology, Head &<br />
Neck Operative Surgery by Johan Fagan (Editor)<br />
johannes.fagan@uct.ac.za is licensed under a Creative<br />
Commons Attribution - Non-Commercial 3.0 Unported<br />
License<br />
14