Gutter Installation Instructions - Intex Millwork Solutions
Gutter Installation Instructions - Intex Millwork Solutions
Gutter Installation Instructions - Intex Millwork Solutions

Create successful ePaper yourself
Turn your PDF publications into a flip-book with our unique Google optimized e-Paper software.
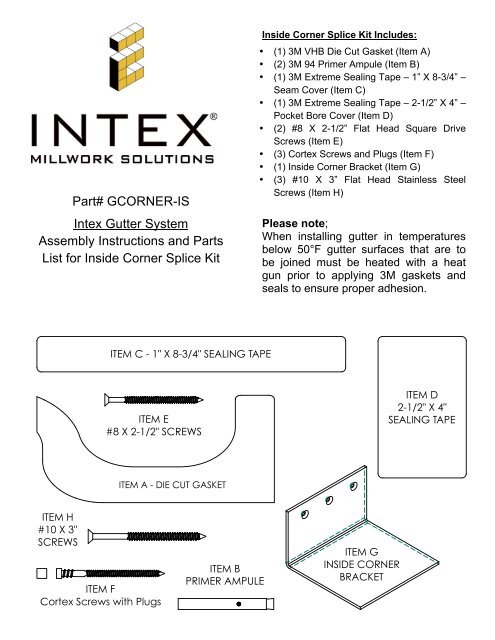
Part# GCORNER-IS<br />
<strong>Intex</strong> <strong>Gutter</strong> System<br />
Assembly <strong>Instructions</strong> and Parts<br />
List for Inside Corner Splice Kit<br />
Inside Corner Splice Kit Includes:<br />
• (1) 3M VHB Die Cut Gasket (Item A)<br />
• (2) 3M 94 Primer Ampule (Item B)<br />
• (1) 3M Extreme Sealing Tape – 1” X 8-3/4” –<br />
Seam Cover (Item C)<br />
• (1) 3M Extreme Sealing Tape – 2-1/2” X 4” –<br />
Pocket Bore Cover (Item D)<br />
• (2) #8 X 2-1/2” Flat Head Square Drive<br />
Screws (Item E)<br />
• (3) Cortex Screws and Plugs (Item F)<br />
• (1) Inside Corner Bracket (Item G)<br />
• (3) #10 X 3” Flat Head Stainless Steel<br />
Screws (Item H)<br />
Please note;<br />
When installing gutter in temperatures<br />
below 50°F gutter surfaces that are to<br />
be joined must be heated with a heat<br />
gun prior to applying 3M gaskets and<br />
seals to ensure proper adhesion.
Preparation<br />
1. Cut both sections of gutter to be joined to the appropriate<br />
length and angle.<br />
2. Pocket Bore Joint – Drill (3) 1/8 diameter pilot holes and, using<br />
a pocket bore jig, or use the <strong>Intex</strong> <strong>Gutter</strong> Pocket Bore Fixture<br />
(sold separately) drill (2) pocket bored holes as shown in<br />
Figure C.<br />
3. Prime Surfaces – Prime <strong>Gutter</strong> surfaces to be joined using ,<br />
Primer Ampule Item B. Area must be clean of debris and dry.<br />
Squeeze black dot on side of Ampule. Using soft tip of<br />
applicator apply product to surfaces to be joined and allow to<br />
dry for 5 minutes.<br />
4. Apply Gasket – Apply Die Cut Gasket Item A, to end of the<br />
<strong>Gutter</strong> by removing backer from Gasket and applying as shown<br />
in Figure A. Profile of Gasket should line up with inside edge<br />
of <strong>Gutter</strong> leaving a 1/8“ reveal along outside edge of <strong>Gutter</strong> as<br />
shown in Figure B. Proper alignment is a critical step due to<br />
strength of the adhesive. Once in place rub your thumb over<br />
entire Gasket to insure a tight seal.<br />
5. Hang Shelf Bracket – Hang the Inside Corner Bracket Item G,<br />
using three #10 X 3” flat head screws, Item H, as shown in<br />
Figure D. Vertical position of the Bracket is determined by<br />
<strong>Gutter</strong>’s pitch established when installing the Hanger<br />
Brackets.<br />
Assembly<br />
1. Install <strong>Gutter</strong> Hanger Bracket (supplied separately) and hang<br />
two <strong>Gutter</strong> sections as described in the Hanger Bracket<br />
<strong>Installation</strong> <strong>Instructions</strong> leaving space between two sections<br />
being joined.<br />
2. Connect <strong>Gutter</strong> Sections – Remove second backer from the<br />
Die Cut Gasket Item A. Align sections of gutter very carefully<br />
to ensure proper alignment. Slide sections of <strong>Gutter</strong> together<br />
and press firmly to join. Please note that once gasket surface<br />
touches gutter surface it will adhere immediately and<br />
readjustment will be difficult.<br />
3. Install Screws - Install (1) #8 X 2-1/2” flat head square drive<br />
screw, Item E, into each pocket bore hole. Using the Cortex<br />
Driver Bit, install (1) Cortex Screw, Item F, into (3) 1/8”<br />
diameter pilot holes. Once all of the Cortex Screws are<br />
installed, plug each hole with (1) white plug. See Figure C.<br />
4. Fill Openings – Once both pocket screws are installed, fill each<br />
pocket with acrylic latex caulk, Extreme PVC Trimwelder Fast<br />
Cure or equivalent product. Next fill the 1/16” seam along the<br />
front face and bottom of gutter (see Figure F), be sure to wipe<br />
away excess material from the surfaces before it fully cures.<br />
Follow adhesive manufactures cure time instructions and wait<br />
for adhesive to fully cure before proceeding to step 5.<br />
5. Apply Sealing Tape – Before applying Sealing Tape clean and<br />
prime the highlighted area on inside edge of <strong>Gutter</strong> in Figure<br />
E. Apply Primer Item B, by squeezing black dot on side of<br />
Ampule. Using soft tip of applicator, apply product to<br />
highlighted area and allow to dry for five minutes. Once dry,<br />
remove backers from Sealing Tape Item C and Item D and<br />
apply as shown in Figure E. Rub firmly over Sealing Tape to<br />
ensure a seal. The pieces of Sealing Tape should not overlap.