INSTRUCTION MANUAL FOR SEWING MACHINE - Singer - This Wiki
INSTRUCTION MANUAL FOR SEWING MACHINE - Singer - This Wiki INSTRUCTION MANUAL FOR SEWING MACHINE - Singer - This Wiki
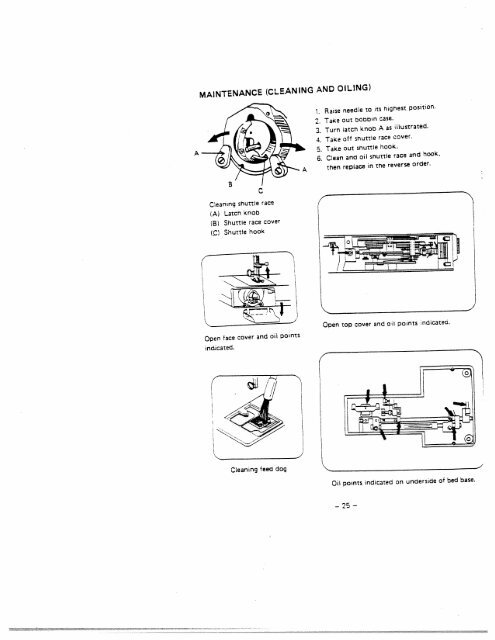
— 25 C • 3. Turn latch knob A as illustrated. 2. TaKe OUt bOOOi case. o 1. Raise needle to its highest position. Open face cover and oil points MAINTENANCE (CLEANING AND OILING) indicated. Cleaning shuttle race (A Latcn knob (B) Shuttle race cover 4. Take off sriuttle race cover. A 5. Take out snuttle hook. (C) Shuttle hook 0 6. Clean anc oil snuttle race and hook. Nt Cleaning feed dog 4. then replace in the reverse order. Open top cover and oil points indicatec. Oil points indicated on underside of bed base. —
Machine Stitch - - - - Incorrect - Needle - Tight . Needle . Nicks - Raise - ghbei * Fit - Correct Re-thread Ioosen Fit Replace - - - - CHECKING PERFORMANCE PROBLEMS WHAT TO DO PROBLEM PROBABLE CAUSE CORRECTION Fabric not - moving - Feed dog down. not moving. length dial no positicn. Light pressure on presser loot. feed dog. etop mollon. oving dial to 1-4. Increase pressure on presser toot. Breaking Needle setting of needle. Reset needle. bent. . Pulling fabric. Incorrect use of needle, thread - new needle. Do not pull fabric. or fabric. or fabric. use of needle, thread Breaking Bobbin - Thread Improper threading. - upper thread tension. . bent. . or burrs on shuttle. - machine. upper thread tension. new needle. shuttle, or polish oil burrs completely. Machine Jamming No oil. Knocking Noise Dust and thread in shuttle. [leeds oiling Glean stmutlle. Tension too tight. -Reset. Adlust sewing loot pmessure Puckering Sewing toot pressure too strong Incorrect use of fabric, and thread, thread. Use correct fabric, needle and
- Page 1 and 2: i H SEWING MACHINE INSTRUCTION MANU
- Page 3 and 4: CONTENTS Names of Parts............
- Page 5 and 6: Hand wheel Motion knob Stop clamp B
- Page 7 and 8: BEFORE SEWING 1. Fit plug into the
- Page 9 and 10: I WINDING ThE BOBBIN 1 .elease stop
- Page 11 and 12: —8— latch onto centre pin in sh
- Page 13 and 14: needle qoes down and slcwiy towards
- Page 15 and 16: ADJUSTING THREAD TENSION Corec Weak
- Page 17 and 18: Needle clamp screw CHANGiNG NEEDLE
- Page 19 and 20: — !i5 — after stopping sewing.
- Page 21 and 22: 2 The zig-zag presser foot can be u
- Page 23 and 24: Select stralgnt stItch. ZIPPER SEWI
- Page 25 and 26: I ThVIN NEEDLE Note: Twin needle ca
- Page 27: — 24 — 4 it (4) FIGURE (4). UND
— 25<br />
C<br />
• 3. Turn latch knob A as illustrated.<br />
2. TaKe OUt bOOOi case.<br />
o 1. Raise needle to its highest position.<br />
Open face cover and oil points<br />
MAINTENANCE (CLEANING AND OILING)<br />
indicated.<br />
Cleaning shuttle race<br />
(A Latcn knob<br />
(B) Shuttle race cover<br />
4. Take off sriuttle race cover.<br />
A 5. Take out snuttle hook.<br />
(C) Shuttle hook<br />
0 6. Clean anc oil snuttle race and hook.<br />
Nt<br />
Cleaning feed dog<br />
4. then replace in the reverse order.<br />
Open top cover and oil points indicatec.<br />
Oil points indicated on underside of bed base.<br />
—


