Spreadsheet Server for use with BPCS - Global Software, Inc.
Spreadsheet Server for use with BPCS - Global Software, Inc.
Spreadsheet Server for use with BPCS - Global Software, Inc.

You also want an ePaper? Increase the reach of your titles
YUMPU automatically turns print PDFs into web optimized ePapers that Google loves.
39<br />
<strong>Spreadsheet</strong> <strong>Server</strong> <strong>for</strong> <strong>use</strong> <strong>with</strong> <strong>BPCS</strong> - Release V12 R4 M11<br />
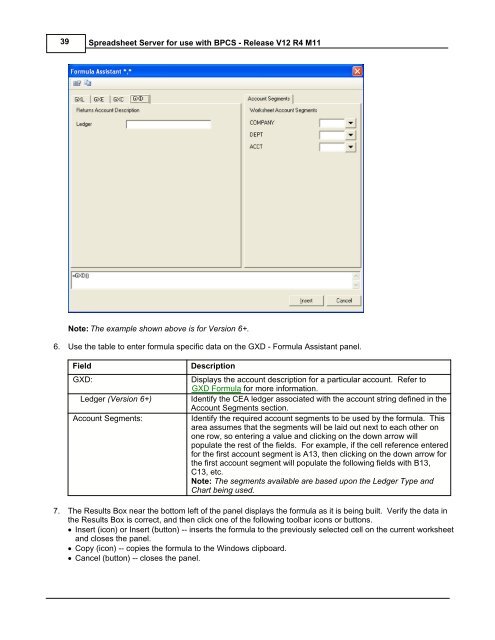
Note: The example shown above is <strong>for</strong> Version 6+.<br />
6. Use the table to enter <strong>for</strong>mula specific data on the GXD - Formula Assistant panel.<br />
Field<br />
GXD:<br />
Ledger (Version 6+)<br />
Account Segments:<br />
Description<br />
Displays the account description <strong>for</strong> a particular account. Refer to<br />
GXD Formula <strong>for</strong> more in<strong>for</strong>mation.<br />
Identify the CEA ledger associated <strong>with</strong> the account string defined in the<br />
Account Segments section.<br />
Identify the required account segments to be <strong>use</strong>d by the <strong>for</strong>mula. This<br />
area assumes that the segments will be laid out next to each other on<br />
one row, so entering a value and clicking on the down arrow will<br />
populate the rest of the fields. For example, if the cell reference entered<br />
<strong>for</strong> the first account segment is A13, then clicking on the down arrow <strong>for</strong><br />
the first account segment will populate the following fields <strong>with</strong> B13,<br />
C13, etc.<br />
Note: The segments available are based upon the Ledger Type and<br />
Chart being <strong>use</strong>d.<br />
7. The Results Box near the bottom left of the panel displays the <strong>for</strong>mula as it is being built. Verify the data in<br />
the Results Box is correct, and then click one of the following toolbar icons or buttons.<br />
· Insert (icon) or Insert (button) -- inserts the <strong>for</strong>mula to the previously selected cell on the current worksheet<br />
and closes the panel.<br />
· Copy (icon) -- copies the <strong>for</strong>mula to the Windows clipboard.<br />
· Cancel (button) -- closes the panel.