Routing a Perfect Tenon - Woodsmith Woodworking Seminars
Routing a Perfect Tenon - Woodsmith Woodworking Seminars
Routing a Perfect Tenon - Woodsmith Woodworking Seminars

Create successful ePaper yourself
Turn your PDF publications into a flip-book with our unique Google optimized e-Paper software.
HANDS-ON<br />
Technique<br />
routing a<br />
<strong>Perfect</strong> <strong>Tenon</strong><br />
A handy, shop-made jig makes it easy to cut<br />
a smooth, clean tenon with a hand-held router.<br />
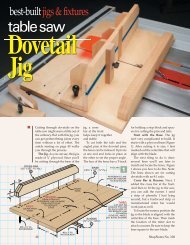
SPACING BETWEEN STOP<br />
AND FENCE DEFINES THE<br />
ROUTING PATH AND<br />
DETERMINES THE LENGTH<br />
OF THE TENON<br />
FENCE KEEPS<br />
ROUTER BIT AT<br />
SHOULDER LINE<br />
WORKPIECE<br />
LENGTH OF SIDE<br />
IS LENGTH OF<br />
OPENING PLUS<br />
WIDTH OF STOP<br />
AND FENCE<br />
SECOND:<br />
CUT FIRST SHOULDER<br />
BY ROTATING WORKPIECE<br />
ONE QUARTER TURN<br />
!/2" SPIRAL<br />
DOWNCUT BIT<br />
WASTE<br />
STOP<br />
ROUTER<br />
BASE<br />
NOTE:<br />
ALL PARTS<br />
MADE FROM<br />
#/4" PLYWOOD<br />
FIRST: ROUT<br />
CHEEK WORKING<br />
TOWARD FAR SIDE<br />
IN A BACK AND<br />
FORTH MOTION<br />
WITH THE GRAIN<br />
THIRD AND<br />
FOURTH:<br />
REPEAT PROCESS<br />
FOR LAST CHEEK<br />
AND SHOULDER<br />
For most projects, I like to cut tenons on a table saw.<br />
But there are times when that’s not the best option.<br />
For example, cutting a tenon on a long workpiece can<br />
be difficult on a table saw. That’s because balancing<br />
a long piece off the side of the saw can cause it to tip<br />
and the tenon ends up being inaccurate.<br />
So, when I need to cut a tenon on a long workpiece,<br />
I turn to a hand-held router and a simple jig, like you<br />
see above. This method works great for table aprons,<br />
bed rails, or any long workpiece.<br />
Benefits. Using this technique has several advantages.<br />
Clamping the workpiece to a workbench keeps it<br />
stable. And moving a small router across the workpiece<br />
is much easier than trying to balance and move a large<br />
workpiece on a small saw table. Plus, the router forms<br />
smooth cheeks and sharp shoulders (inset photo).<br />
MAKING THE JIG<br />
To keep things simple, I build the jig to suit the project<br />
at hand. If you look at the drawing at left, you’ll<br />
34 ShopNotes No. 97
TOP VIEW<br />
SMALL BITES<br />
WITH THE GRAIN<br />
REDUCES STRESS<br />
ON ROUTER<br />
ROUTER<br />
BASE<br />
A <strong>Perfect</strong> <strong>Tenon</strong>:<br />
Step-by-Step<br />
WORKPIECE<br />
FENCE<br />
STOP<br />
SIDE<br />
SIDE VIEW<br />
(CROSS SECTION)<br />
WORKPIECE<br />
FENCE STOPS<br />
ROUTER BIT<br />
AT SHOULDER<br />
SPIRAL DOWNCUT<br />
BIT REDUCES<br />
TEAROUT<br />
STOP<br />
{ Secure Clamping. After clamping the workpiece<br />
to the workbench, securely clamp the jig<br />
to the workpiece to keep it in position.<br />
see it’s just a fence, stop, and two<br />
sides made from 3 ⁄ 4 " plywood. The<br />
jig is assembled to fit snug around<br />
the workpiece to make routing the<br />
tenon more accurate.<br />
Sizing the Jig. There are several<br />
things to keep in mind as you size<br />
the jig. Of course, the length of the<br />
tenon is key. But the size of the<br />
baseplate on your router and the<br />
size of the router bit you’re using<br />
are also factors. And speaking of<br />
the bit, I use a 1 ⁄ 2 " spiral downcut<br />
bit. It cuts clean shoulders on the<br />
tenon without tearout.<br />
Fence. To locate the fence, measure<br />
the distance from the outside<br />
edge of the router bit to the edge of<br />
the baseplate. Then add that measurement<br />
to the length of the tenon.<br />
This will be the distance between<br />
the fence and stop.<br />
Sides. With this measurement<br />
in mind, you can add that to the<br />
width of the fence and stop to<br />
determine the length of the sides.<br />
Stop. The stop is attached to the<br />
end of the jig so it registers against<br />
the end of the workpiece. So after<br />
gluing up the two layers, you can<br />
attach it to the sides. Finally, you<br />
can fasten the fence in place.<br />
USING THE JIG<br />
Once the jig is built, cutting the<br />
tenon is easy. The box at right<br />
helps you through the process.<br />
But before you start, clamp the<br />
workpiece securely to the bench.<br />
Then clamp the jig to the face of<br />
the workpiece, as shown in the<br />
top photo at right. Set your router<br />
against the fence of the jig and verify<br />
the inside edge of the bit lines<br />
up with the shoulder mark of the<br />
tenon before you start routing.<br />
First Cheek. You’ll start by routing<br />
one cheek of the tenon. For the<br />
best results, you’ll want to rout in<br />
several shallow passes. Each cut<br />
should be about 1 ⁄ 4 " deep. If you’re<br />
using a fixed-base router, you’ll<br />
rout all four sides of the tenon<br />
before adjusting the depth. This<br />
makes it easy to sneak up on the<br />
final size of the tenon.<br />
Shoulder Cut. With one tenon<br />
cheek routed, turn the workpiece a<br />
quarter turn to work on the shoulder.<br />
You’ll need to clamp the jig in<br />
place once again, but there’s one<br />
thing to note. In order to support<br />
the cut to minimize tearout, clamp<br />
the jig so the router bit cuts into<br />
the side of the jig at the back of the<br />
cut. You can see what I mean in the<br />
bottom photo at right.<br />
Opposite Cheek. Now you can<br />
rotate the workpiece another quarter<br />
turn to rout the opposite cheek.<br />
Finally, you can rotate the workpiece<br />
once more and cut the last<br />
shoulder to complete the tenon.<br />
This technique is surprisingly<br />
simple, and the jig is easy to build.<br />
I think you’ll find it will save time<br />
when you’re working with large<br />
workpieces in the shop.<br />
{ Rout With the Grain. To start the cut, route<br />
down one side of the tenon. Then continue<br />
removing the waste, routing with the grain.<br />
{ Shoulder Pass. Rout back and forth with<br />
the grain until you reach the fence. Then make<br />
a final pass along the fence.<br />
{ Completing the <strong>Tenon</strong>. For each additional<br />
edge, rotate the workpiece and clamp the jig in<br />
place to prevent tearout at the end of the cut.<br />
www.ShopNotes.com 35