Corel Paintshop Pro X4 User Guide - Corel Corporation
Corel Paintshop Pro X4 User Guide - Corel Corporation
Corel Paintshop Pro X4 User Guide - Corel Corporation

Create successful ePaper yourself
Turn your PDF publications into a flip-book with our unique Google optimized e-Paper software.
Contents<br />
Welcome to <strong>Corel</strong> PaintShop <strong>Pro</strong> <strong>X4</strong> . . . . . . . . . . . . . . . . 1<br />
What’s in this user guide? . . . . . . . . . . . . . . . . . . . . . . . . . . . . . 1<br />
What’s new in <strong>Corel</strong> PaintShop <strong>Pro</strong> <strong>X4</strong> . . . . . . . . . . . . . . . . . . . 2<br />
Installing and uninstalling <strong>Corel</strong> programs . . . . . . . . . . . . . . . . . 5<br />
Starting and exiting the program. . . . . . . . . . . . . . . . . . . . . . . . 6<br />
Registering <strong>Corel</strong> products. . . . . . . . . . . . . . . . . . . . . . . . . . . . . 6<br />
Updating the program . . . . . . . . . . . . . . . . . . . . . . . . . . . . . . . 7<br />
<strong>Corel</strong> Support Services. . . . . . . . . . . . . . . . . . . . . . . . . . . . . . . . 7<br />
About <strong>Corel</strong> . . . . . . . . . . . . . . . . . . . . . . . . . . . . . . . . . . . . . . . 7<br />
The digital workflow . . . . . . . . . . . . . . . . . . . . . . . . . . . . 9<br />
Learning how to use <strong>Corel</strong> PaintShop <strong>Pro</strong> . . . . . . . . . . . 15<br />
Documentation conventions . . . . . . . . . . . . . . . . . . . . . . . . . . 15<br />
Using the Help system. . . . . . . . . . . . . . . . . . . . . . . . . . . . . . . 17<br />
Using the Learning Center palette . . . . . . . . . . . . . . . . . . . . . . 18<br />
Using the <strong>Corel</strong> <strong>Guide</strong> . . . . . . . . . . . . . . . . . . . . . . . . . . . . . . . 19<br />
Using Web-based resources. . . . . . . . . . . . . . . . . . . . . . . . . . . 20<br />
Workspace tour. . . . . . . . . . . . . . . . . . . . . . . . . . . . . . . 21<br />
Exploring the workspaces . . . . . . . . . . . . . . . . . . . . . . . . . . . . 21<br />
Switching between workspaces . . . . . . . . . . . . . . . . . . . . . . . . 26<br />
Using palettes . . . . . . . . . . . . . . . . . . . . . . . . . . . . . . . . . . . . . 26<br />
Using toolbars. . . . . . . . . . . . . . . . . . . . . . . . . . . . . . . . . . . . . 29<br />
Using tools . . . . . . . . . . . . . . . . . . . . . . . . . . . . . . . . . . . . . . . 30<br />
Getting started . . . . . . . . . . . . . . . . . . . . . . . . . . . . . . . 35<br />
Getting photos into <strong>Corel</strong> PaintShop <strong>Pro</strong> . . . . . . . . . . . . . . . . . 35<br />
Contents i
Opening and closing images . . . . . . . . . . . . . . . . . . . . . . . . . . 36<br />
Saving images. . . . . . . . . . . . . . . . . . . . . . . . . . . . . . . . . . . . . 38<br />
Deleting images . . . . . . . . . . . . . . . . . . . . . . . . . . . . . . . . . . . 40<br />
Reviewing, organizing, and finding photos . . . . . . . . . . 41<br />
Setting up the Manage workspace . . . . . . . . . . . . . . . . . . . . . 41<br />
Browsing folders for photos . . . . . . . . . . . . . . . . . . . . . . . . . . 44<br />
Finding images on your computer . . . . . . . . . . . . . . . . . . . . . . 45<br />
Working with saved searches. . . . . . . . . . . . . . . . . . . . . . . . . . 47<br />
Adding keyword tags to images . . . . . . . . . . . . . . . . . . . . . . . 47<br />
Viewing photos by tags. . . . . . . . . . . . . . . . . . . . . . . . . . . . . . 49<br />
Using the calendar to find images . . . . . . . . . . . . . . . . . . . . . . 50<br />
Working with thumbnails in the Manage workspace . . . . . . . . 51<br />
Capturing and applying edits to multiple photos . . . . . . . . . . . 54<br />
Displaying and editing photo information . . . . . . . . . . . . . . . . 56<br />
E-mailing and sharing photos from the Manage workspace. . . 58<br />
Using Quick Review to review photos . . . . . . . . . . . . . . . . . . . 59<br />
Working with trays . . . . . . . . . . . . . . . . . . . . . . . . . . . . . . . . . 60<br />
Working with camera RAW photos. . . . . . . . . . . . . . . . . 61<br />
Supported RAW file formats . . . . . . . . . . . . . . . . . . . . . . . . . . 61<br />
Using the Camera RAW Lab . . . . . . . . . . . . . . . . . . . . . . . . . . 62<br />
Applying edits to multiple RAW photos . . . . . . . . . . . . . . . . . . 64<br />
Converting RAW photos to another file format . . . . . . . . . . . . 64<br />
Adjusting images . . . . . . . . . . . . . . . . . . . . . . . . . . . . . . 65<br />
Rotating images . . . . . . . . . . . . . . . . . . . . . . . . . . . . . . . . . . . 66<br />
Cropping images. . . . . . . . . . . . . . . . . . . . . . . . . . . . . . . . . . . 67<br />
Straightening images . . . . . . . . . . . . . . . . . . . . . . . . . . . . . . . 70<br />
Correcting photographic perspective . . . . . . . . . . . . . . . . . . . . 71<br />
Making basic photo corrections automatically . . . . . . . . . . . . . 73<br />
Removing digital noise . . . . . . . . . . . . . . . . . . . . . . . . . . . . . . 76<br />
ii <strong>Corel</strong> PaintShop <strong>Pro</strong> <strong>X4</strong> <strong>User</strong> <strong>Guide</strong>
Adjusting color balance. . . . . . . . . . . . . . . . . . . . . . . . . . . . . . 77<br />
Adjusting brightness, contrast, and clarity . . . . . . . . . . . . . . . . 79<br />
Controlling depth of field . . . . . . . . . . . . . . . . . . . . . . . . . . . . 81<br />
Retouching and restoring images . . . . . . . . . . . . . . . . . 83<br />
Removing red-eye . . . . . . . . . . . . . . . . . . . . . . . . . . . . . . . . . . 84<br />
Applying cosmetic changes . . . . . . . . . . . . . . . . . . . . . . . . . . . 85<br />
Removing scratches. . . . . . . . . . . . . . . . . . . . . . . . . . . . . . . . . 89<br />
Removing flaws and objects . . . . . . . . . . . . . . . . . . . . . . . . . . 91<br />
Erasing image areas . . . . . . . . . . . . . . . . . . . . . . . . . . . . . . . . 94<br />
Cutting out image areas . . . . . . . . . . . . . . . . . . . . . . . . . . . . . 96<br />
Recoloring image areas for a realistic effect . . . . . . . . . . . . . . . 99<br />
Adding borders . . . . . . . . . . . . . . . . . . . . . . . . . . . . . . . . . . . 102<br />
Scaling photos by using Smart Carver . . . . . . . . . . . . . . . . . . 103<br />
Merging exposures and content . . . . . . . . . . . . . . . . . 107<br />
Understanding HDR . . . . . . . . . . . . . . . . . . . . . . . . . . . . . . . 107<br />
Taking photos for HDR processing . . . . . . . . . . . . . . . . . . . . . 108<br />
Combining photos by using HDR Exposure Merge . . . . . . . . . 109<br />
Merging batches of photos into HDR images. . . . . . . . . . . . . 116<br />
Combining photos with Photo Blend . . . . . . . . . . . . . . . . . . . 118<br />
Working with colors and materials . . . . . . . . . . . . . . . 121<br />
Using the Materials palette . . . . . . . . . . . . . . . . . . . . . . . . . . 121<br />
Choosing colors by using the Color Picker . . . . . . . . . . . . . . . 124<br />
Choosing colors from an image or the desktop . . . . . . . . . . . 127<br />
Applying effects . . . . . . . . . . . . . . . . . . . . . . . . . . . . . 129<br />
Choosing effects . . . . . . . . . . . . . . . . . . . . . . . . . . . . . . . . . . 129<br />
Applying Photo Effects . . . . . . . . . . . . . . . . . . . . . . . . . . . . . 133<br />
Creating vintage-style photos with the Time Machine . . . . . . 139<br />
Applying film and filter effects to photos . . . . . . . . . . . . . . . . 139<br />
Contents iii
Adding picture frames to images. . . . . . . . . . . . . . . . . . . . . . 141<br />
Using the Picture Tube tool . . . . . . . . . . . . . . . . . . . . . . . . . . 143<br />
Warping images . . . . . . . . . . . . . . . . . . . . . . . . . . . . . . . . . . 144<br />
Working with layers . . . . . . . . . . . . . . . . . . . . . . . . . . . 147<br />
Understanding layers. . . . . . . . . . . . . . . . . . . . . . . . . . . . . . . 147<br />
Using the Layers palette . . . . . . . . . . . . . . . . . . . . . . . . . . . . 150<br />
Creating layers . . . . . . . . . . . . . . . . . . . . . . . . . . . . . . . . . . . 152<br />
Renaming layers . . . . . . . . . . . . . . . . . . . . . . . . . . . . . . . . . . 153<br />
Viewing layers. . . . . . . . . . . . . . . . . . . . . . . . . . . . . . . . . . . . 154<br />
Changing the order of layers in an image . . . . . . . . . . . . . . . 155<br />
Setting layer opacity . . . . . . . . . . . . . . . . . . . . . . . . . . . . . . . 155<br />
Working with selections . . . . . . . . . . . . . . . . . . . . . . . . 157<br />
Creating selections . . . . . . . . . . . . . . . . . . . . . . . . . . . . . . . . 157<br />
Modifying selections . . . . . . . . . . . . . . . . . . . . . . . . . . . . . . . 162<br />
Inverting and clearing selections . . . . . . . . . . . . . . . . . . . . . . 163<br />
Working with text. . . . . . . . . . . . . . . . . . . . . . . . . . . . . 165<br />
Applying text . . . . . . . . . . . . . . . . . . . . . . . . . . . . . . . . . . . . 165<br />
Formatting text . . . . . . . . . . . . . . . . . . . . . . . . . . . . . . . . . . . 167<br />
E-mailing and sharing photos. . . . . . . . . . . . . . . . . . . . 169<br />
E-mailing photos. . . . . . . . . . . . . . . . . . . . . . . . . . . . . . . . . . 169<br />
Uploading photos to a sharing site . . . . . . . . . . . . . . . . . . . . 170<br />
Printing. . . . . . . . . . . . . . . . . . . . . . . . . . . . . . . . . . . . . 171<br />
Printing images . . . . . . . . . . . . . . . . . . . . . . . . . . . . . . . . . . . 171<br />
Index. . . . . . . . . . . . . . . . . . . . . . . . . . . . . . . . . . . . . . . 175<br />
iv <strong>Corel</strong> PaintShop <strong>Pro</strong> <strong>X4</strong> <strong>User</strong> <strong>Guide</strong>
Welcome to <strong>Corel</strong> PaintShop <strong>Pro</strong> <strong>X4</strong><br />
<strong>Corel</strong>® PaintShop <strong>Pro</strong> sets the standard for affordable, professional<br />
image editing. You can manage, adjust, and edit photos, work with<br />
RAW image files, apply effects, and more — all with a set of easy-touse<br />
workspaces.<br />
This section presents the following topics:<br />
• What’s in this user guide?<br />
• What’s new in <strong>Corel</strong> PaintShop <strong>Pro</strong> <strong>X4</strong><br />
• Installing and uninstalling <strong>Corel</strong> programs<br />
• Starting and exiting the program<br />
• Registering <strong>Corel</strong> products<br />
• Updating the program<br />
• <strong>Corel</strong> Support Services<br />
• About <strong>Corel</strong><br />
What’s in this user guide?<br />
This user guide contains the information that you need to become<br />
familiar with the <strong>Corel</strong> PaintShop <strong>Pro</strong> workspaces and to get started<br />
with basic tasks and creative possibilities. It is designed to accompany<br />
the more comprehensive Help, which is available from within the<br />
program, as well as other learning resources. For more information<br />
about additional learning resources, see “Learning how to use<br />
<strong>Corel</strong> PaintShop <strong>Pro</strong>” on page 15.<br />
Welcome to <strong>Corel</strong> PaintShop <strong>Pro</strong> <strong>X4</strong> 1
What’s new in <strong>Corel</strong> PaintShop <strong>Pro</strong> <strong>X4</strong><br />
<strong>Corel</strong> PaintShop <strong>Pro</strong> <strong>X4</strong> combines speed and performance<br />
improvements with a range of new pro-level tools and features that let<br />
you explore your passion for photography. We’ve been listening to<br />
your suggestions and following the latest photography trends so we<br />
can bring you an application that does what you want, and helps you<br />
discover something new. There is something for everyone — whether<br />
you’re pushing the creative boundaries with your DSLR camera or<br />
quickly fixing and sharing images from your mobile phone or pocket<br />
camera.<br />
New! HDR tools<br />
The HDR (high dynamic range) tools have been completely redesigned<br />
to give you more control over your results and help you take full<br />
advantage of photos taken with auto-bracketing features on DSLRs.<br />
• Exposure Merge lets you combine photos taken with different<br />
exposure settings to create stunning, perfectly exposed images.<br />
For high-contrast backlit scenes, such as sunsets and interior<br />
window shots, you can bring out color and detail in the<br />
foreground, midground, and background areas. For more<br />
information, see “Combining photos by using HDR Exposure<br />
Merge” on page 109.<br />
• Batch Merge lets you merge multiple bracketed sets of photos. If<br />
you use an auto-bracketing feature often, you’ll find this to be an<br />
invaluable tool for processing HDR sets quickly. For more<br />
information, see “Merging batches of photos into HDR images”<br />
on page 116.<br />
New! Photo Blend<br />
Combine photos of the same scene to remove, swap, or add details in<br />
the final image. For example, remove cars and people from a street<br />
2 <strong>Corel</strong> PaintShop <strong>Pro</strong> <strong>X4</strong> <strong>User</strong> <strong>Guide</strong>
scene, swap in the best smiles from a series of group photos, or include<br />
multiple poses of the same person in one image. For more information,<br />
see “Combining photos with Photo Blend” on page 118.<br />
New! Selective Focus effect<br />
Selective Focus lets you create a miniature effect (also called a tilt-shift<br />
effect), transforming a real scene into a toy-like miniature model. You<br />
can also use Selective Focus to bring attention to important parts of<br />
your images — it's perfect for blurring out busy details around your<br />
subjects. For more information, see “To apply a miniature effect by<br />
using Selective Focus” on page 136.<br />
New! Vignette effect<br />
Vignette is a classic effect that lets you bring attention to the most<br />
important part of your photo by applying a soft outer border that fades<br />
to white or black. For more information, see “To apply a Vignette<br />
effect” on page 138.<br />
New! Fill Light/Clarity filter<br />
Fill Light brightens shadow areas of photos without affecting other<br />
areas of the photo. Clarity enhances subtle yet important details. For<br />
more information, see “To brighten dark areas and adjust clarity” on<br />
page 80.<br />
New & Enhanced! Built-in sharing to Facebook® and Flickr®<br />
Share to Facebook® or Flickr® with the click of a button. For more<br />
information, see “Uploading photos to a sharing site” on page 170.<br />
Enhanced! Camera RAW Lab<br />
The Camera RAW Lab now has a larger preview area and an improved<br />
histogram that makes it easier to assess your adjustments. New<br />
highlight recovery options can help reconstruct detail in overexposed<br />
Welcome to <strong>Corel</strong> PaintShop <strong>Pro</strong> <strong>X4</strong> 3
areas. For more information, see “Working with camera RAW photos”<br />
on page 61.<br />
Enhanced! Tabbed workspaces<br />
The application has been redesigned so you can move easily between<br />
photo workflows. Click the tabs at the top of the <strong>Corel</strong> PaintShop <strong>Pro</strong><br />
window to switch workspaces. The Manage workspace gives you all<br />
the power to review and organize your photos. It also lets you access<br />
multi-photo processing options. The Adjust workspace puts<br />
commonly-used editing tools at your fingertips. Finally, the Edit<br />
workspace provides you with a full range of professional-level editing<br />
tools. No matter which workspace you’re in, the Organizer palette is<br />
always there — no need to go to a separate workspace or application<br />
to find more photos. For more information, see “Workspace tour” on<br />
page 21.<br />
Enhanced! Performance<br />
With new performance updates, including GPU optimizations,<br />
<strong>Corel</strong> PaintShop <strong>Pro</strong> is even faster than previous versions. Effects, such<br />
as Noise Reduction, Vibrancy and Tone Mapping, can now be applied<br />
and adjusted in real time.<br />
Enhanced! Full-screen review<br />
Quick Review lets you review your photos in a full-screen window. The<br />
feature now focuses on speed and simplicity. You can quickly view,<br />
delete, rotate, and rate your photos. For more information, see “Using<br />
Quick Review to review photos” on page 59.<br />
4 <strong>Corel</strong> PaintShop <strong>Pro</strong> <strong>X4</strong> <strong>User</strong> <strong>Guide</strong>
Installing and uninstalling <strong>Corel</strong> programs<br />
The Installer makes it easy to install <strong>Corel</strong>® programs and components.<br />
Before installing<br />
• Close all open programs. Note that antivirus software and firewall<br />
applications may affect installation.<br />
• Ensure that you are logged in to your computer as Administrator<br />
or as a user with local administrative rights.<br />
To install <strong>Corel</strong> PaintShop <strong>Pro</strong><br />
1 Close any open applications.<br />
2 Insert the DVD in the DVD drive.<br />
If the setup does not start automatically, navigate to the DVD drive<br />
on your computer, and double-click Setup.exe.<br />
3 Follow the instructions on your screen.<br />
To uninstall <strong>Corel</strong> PaintShop <strong>Pro</strong><br />
1 Open the Windows® Control Panel.<br />
2 In the <strong>Pro</strong>grams category, click the Uninstall a program link.<br />
3 In the <strong>Pro</strong>grams and Features window, click<br />
<strong>Corel</strong> PaintShop <strong>Pro</strong> <strong>X4</strong> in the list of applications.<br />
4 Click Uninstall/Change.<br />
5 Follow the instructions on your screen.<br />
Welcome to <strong>Corel</strong> PaintShop <strong>Pro</strong> <strong>X4</strong> 5
Starting and exiting the program<br />
You can start <strong>Corel</strong> PaintShop <strong>Pro</strong> from the Windows taskbar or your<br />
desktop icon, and exit the program from the File menu.<br />
To start <strong>Corel</strong> PaintShop <strong>Pro</strong><br />
• On the Windows taskbar, click Start � All <strong>Pro</strong>grams �<br />
<strong>Corel</strong> PaintShop <strong>Pro</strong> <strong>X4</strong> � <strong>Corel</strong> PaintShop <strong>Pro</strong> <strong>X4</strong>.<br />
If you associate specific file formats, such as JPEG and TIFF, with<br />
<strong>Corel</strong> PaintShop <strong>Pro</strong>, you can double-click the associated file to<br />
start the program. For information about setting file format<br />
associations, see “Setting file format associations” in the Help.<br />
To exit <strong>Corel</strong> PaintShop <strong>Pro</strong><br />
• Choose File � Exit.<br />
Registering <strong>Corel</strong> products<br />
Registering <strong>Corel</strong> products is important to ensure that you receive<br />
timely access to the latest product updates, as well as valuable<br />
information about product releases. Registration also gives you access<br />
to free downloads, articles, tips and tricks, and special offers.<br />
You can register the program immediately after you install it, or you<br />
can register at a later date.<br />
You can register the program in one of the following ways:<br />
• online — If you are connected to the Internet when you are<br />
prompted to register, you can launch the online registration. If no<br />
Internet connection is detected, you are presented with a list of<br />
options.<br />
6 <strong>Corel</strong> PaintShop <strong>Pro</strong> <strong>X4</strong> <strong>User</strong> <strong>Guide</strong>
• by phone — You can call the <strong>Corel</strong> Customer Service Center<br />
nearest you.<br />
For more information about registering a <strong>Corel</strong> product, visit<br />
www.corel.com/support/register.<br />
Updating the program<br />
You can check for product updates. Updates notify you of important<br />
new information about your program.<br />
To update your program<br />
• Choose Help � Check for Updates.<br />
You can turn automatic program updates on or off by clicking<br />
Help � <strong>Corel</strong> <strong>Guide</strong>. In the <strong>Corel</strong> <strong>Guide</strong>, click the <strong>Pro</strong>duct<br />
information and preferences button , and choose Message<br />
preferences. Mark the options that you want.<br />
<strong>Corel</strong> Support Services<br />
<strong>Corel</strong>® Support Services can provide you with prompt and accurate<br />
information about product features, specifications, pricing, availability,<br />
services, and technical support. For the most current information on<br />
available support and professional services for your <strong>Corel</strong> product,<br />
please visit www.corel.com/support.<br />
About <strong>Corel</strong><br />
<strong>Corel</strong> is one of the world's top software companies with more than 100<br />
million active users in over 75 countries. We develop software that<br />
helps people express their ideas and share their stories in more exciting,<br />
creative and persuasive ways. Through the years, we've built a<br />
Welcome to <strong>Corel</strong> PaintShop <strong>Pro</strong> <strong>X4</strong> 7
eputation for delivering innovative, trusted products that are easy to<br />
learn and use, helping people achieve new levels of productivity. The<br />
industry has responded with hundreds of awards for software<br />
innovation, design and value.<br />
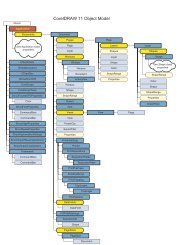
Our award-winning product portfolio includes some of the world's<br />
most widely recognized and popular software brands, including<br />
<strong>Corel</strong>DRAW® Graphics Suite, <strong>Corel</strong>® Painter, <strong>Corel</strong> DESIGNER®<br />
Technical Suite, <strong>Corel</strong>® PaintShop <strong>Pro</strong>, <strong>Corel</strong>® VideoStudio®,<br />
<strong>Corel</strong>® WinDVD®, <strong>Corel</strong>® WordPerfect® Office, WinZip® and <strong>Corel</strong>®<br />
Digital Studio.<br />
8 <strong>Corel</strong> PaintShop <strong>Pro</strong> <strong>X4</strong> <strong>User</strong> <strong>Guide</strong>
The digital workflow<br />
The digital workflow outlined below can help you understand how to<br />
best use <strong>Corel</strong> PaintShop <strong>Pro</strong>. It suggests a sequence for working with<br />
your digital images. Whether you want to organize, retouch, print or<br />
share, you can use the workflow described below as a guide.<br />
Bring photos into <strong>Corel</strong> PaintShop <strong>Pro</strong><br />
Bringing photos into <strong>Corel</strong> PaintShop <strong>Pro</strong> is as simple as opening the<br />
application in the Manage workspace and navigating to your favorite<br />
photo folders on your computer. The application automatically<br />
catalogs the folders that you navigate to, essentially “importing” them<br />
into the application, without duplicating any files.<br />
The digital workflow 9
For more information, see “Getting photos into <strong>Corel</strong> PaintShop <strong>Pro</strong>”<br />
on page 35.<br />
Manage your photos<br />
Digital photography gives you the freedom to experiment. The result is<br />
a large number of digital files, so photographers understand the need<br />
to manage those files by reviewing, culling, and identifying photos as<br />
early in the process as possible.<br />
The Manage workspace lets you access all the tools you need to cull,<br />
rate, tag, and prepare photos for editing or sharing. Double-clicking a<br />
thumbnail opens a full-screen review mode called Quick Review. Search<br />
options and collections make it easy to find and work with the photos<br />
that you currently store on your computer.<br />
Quick Review is a full-screen review mode that opens when<br />
you double-click a thumbnail in the Manage workspace. You<br />
can use arrow keys to zoom and navigate.<br />
10 <strong>Corel</strong> PaintShop <strong>Pro</strong> <strong>X4</strong> <strong>User</strong> <strong>Guide</strong>
For more information, see “Reviewing, organizing, and finding<br />
photos” on page 41.<br />
Adjust photos quickly<br />
The challenge for many<br />
photographers is finding the time<br />
to edit photos, so the Adjust<br />
workspace lets you move from<br />
photo to photo quickly and puts<br />
commonly-used editing tools at<br />
your finger tips. In some cases, this<br />
will be all the editing your photos<br />
will need.<br />
After you edit photos, you can<br />
return to the Manage workspace to<br />
take advantage of multi-photo<br />
editing features such as Capture<br />
editing and Apply editing. Capture<br />
and Apply editing lets you copy<br />
edits made to a single photo and<br />
apply the edits to multiple photos.<br />
Images photographed under<br />
similar conditions can be fixed with<br />
amazing speed — no scripting<br />
required.<br />
For more information, see the<br />
following topics:<br />
The Adjust pane in the Adjust<br />
workspace gives you quick access to<br />
commonly-used editing options.<br />
• “The Adjust workspace” on page 23<br />
• “Capturing and applying edits to multiple photos” on page 54<br />
The digital workflow 11
Advanced editing and RAW files<br />
<strong>Pro</strong>fessional-level tools and features are available in the Edit<br />
workspace. For example, you can apply effects, add text, and use<br />
custom painting tools. You can also use layers to create highly editable<br />
composite images, isolate image areas with selections and masks, and<br />
access tone curves, histograms, and other advanced adjustment tools.<br />
If you like the full control of working with RAW files, you can use the<br />
Camera RAW Lab to process your photos.<br />
For more information, explore the following topics:<br />
• “Adjusting images” on page 65<br />
• “Retouching and restoring images” on page 83<br />
• “Working with selections” on page 157<br />
• “Working with layers” on page 147<br />
• “Applying effects” on page 129<br />
12 <strong>Corel</strong> PaintShop <strong>Pro</strong> <strong>X4</strong> <strong>User</strong> <strong>Guide</strong>
• “Working with text” on page 165<br />
• “Working with camera RAW photos” on page 61<br />
Share photos<br />
After you adjust and enhance your photos, you’ll want to share them.<br />
Along with printing, layout, and e-mailing options, there are sharing<br />
options that let you post to Facebook and Flickr directly from the<br />
application.<br />
For more information, see the following topics:<br />
• “Printing” on page 171<br />
• “E-mailing and sharing photos” on page 169<br />
Expanded creative options for DSLR photography<br />
Many DSLR (digital single-lens reflex) camera owners are expanding<br />
their knowledge and looking for creative options. HDR (high dynamic<br />
range) features in <strong>Corel</strong> PaintShop <strong>Pro</strong> help you take advantage of<br />
bracketing features on your camera. You can also combine multiple<br />
photos with Photo Blend.<br />
The digital workflow 13
For more information, see the following topics:<br />
• “Taking photos for HDR processing” on page 108<br />
• “Combining photos by using HDR Exposure Merge” on page 109<br />
• “Merging batches of photos into HDR images” on page 116<br />
• “Combining photos with Photo Blend” on page 118<br />
14 <strong>Corel</strong> PaintShop <strong>Pro</strong> <strong>X4</strong> <strong>User</strong> <strong>Guide</strong>
Learning how to use<br />
<strong>Corel</strong> PaintShop <strong>Pro</strong><br />
You can learn how to use <strong>Corel</strong> PaintShop <strong>Pro</strong> in various ways: by<br />
accessing the Help and videos, by using the Learning Center palette,<br />
or by exploring the <strong>Corel</strong> <strong>Guide</strong> and by visiting the <strong>Corel</strong> website<br />
(www.corel.com), where you can access tips, tutorials, and<br />
information about training.<br />
This section presents the following topics:<br />
• Documentation conventions<br />
• Using the Help system<br />
• Using the Learning Center palette<br />
• Using the <strong>Corel</strong> <strong>Guide</strong><br />
• Using Web-based resources<br />
Documentation conventions<br />
The following table describes important conventions used in the Help.<br />
Convention Description Example<br />
Menu �<br />
Menu<br />
command<br />
A menu item followed by a<br />
menu command<br />
drop-list A list of options that drops<br />
down when a user clicks a<br />
down arrow button<br />
Choose File � Open.<br />
Choose an option from<br />
the Selection Type droplist<br />
on the Tool Options<br />
palette.<br />
Learning how to use <strong>Corel</strong> PaintShop <strong>Pro</strong> 15
Convention Description Example<br />
palette A window containing<br />
available commands and<br />
settings relevant to a<br />
specific tool or task<br />
mark and<br />
unmark<br />
Terms that refer to enabling<br />
or disabling check boxes by<br />
clicking them<br />
Enter The Enter key on your<br />
keyboard<br />
A tip related to<br />
photography<br />
Double-click the name of<br />
the group on the Layers<br />
palette.<br />
To preserve the current<br />
print size, mark the<br />
Maintain original print<br />
size check box.<br />
To save this gradient as a<br />
swatch that you can<br />
access later, click the Add<br />
to swatches button, type<br />
a name, and press Enter.<br />
For best results, use a<br />
tripod when taking<br />
photos for HDR<br />
processing.<br />
A video is available Watch a video: Smart<br />
Carver.<br />
A note containing<br />
information that is<br />
important to the preceding<br />
steps. It may describe<br />
conditions under which the<br />
procedure can be<br />
performed.<br />
A tip containing<br />
suggestions for performing<br />
the preceding steps. It may<br />
present alternatives to the<br />
steps, or other benefits and<br />
uses of the procedure.<br />
Although you can apply<br />
the Texture Preserving<br />
Smooth command to the<br />
entire image, the<br />
command works best<br />
when you select the<br />
problem area.<br />
You can also right-click in<br />
the image to set the<br />
source point for the Clone<br />
tool.<br />
16 <strong>Corel</strong> PaintShop <strong>Pro</strong> <strong>X4</strong> <strong>User</strong> <strong>Guide</strong>
Using the Help system<br />
The Help that is available from within the program is the most<br />
comprehensive source of information for <strong>Corel</strong> PaintShop <strong>Pro</strong>. The<br />
Help system provides two ways to find information. You can choose a<br />
topic from the Contents page, or use the Search page to search for<br />
specific words and phrases. You can also print topics from the Help.<br />
If you are connected to the Internet, the application displays the Webbased<br />
Help. If no Internet connection is available, the application<br />
searches the local Help system.<br />
To use the Help system<br />
1 Do one of the following:<br />
• Click Help � Help topics.<br />
2 In the Help window, click one of the following tabs:<br />
• Contents — lets you browse through topics in the Help<br />
• Search — lets you search the full text of the Help for a particular<br />
word or phrase (no quotation marks required). For example, if<br />
you are looking for information about a specific tool or<br />
command, you can type the name of the tool or command,<br />
such as Backlighting, to display a list of relevant topics.<br />
You can also<br />
Print a specific Help topic Open a Help topic, and from the<br />
Internet Explorer® menu, choose<br />
File � Print.<br />
View Help for a dialog box Click Help at the bottom of the<br />
dialog box.<br />
Learning how to use <strong>Corel</strong> PaintShop <strong>Pro</strong> 17
Using the Learning Center palette<br />
The Learning Center palette contains helpful information about<br />
<strong>Corel</strong> PaintShop <strong>Pro</strong> tasks, commands, and tools to help first-time<br />
users as well as experienced users get their work done faster. The Home<br />
page of the Learning Center palette provides a task-based workflow,<br />
which begins with getting your photos into the program. From there,<br />
the workflow takes you through tasks such as organizing your photos,<br />
adjusting and retouching photos, using layers and selections, adding<br />
text, graphics, and effects, and printing and sharing your creations.<br />
Back button<br />
From the Learning Center Home page, click a<br />
task, and then click a topic.<br />
Home button<br />
18 <strong>Corel</strong> PaintShop <strong>Pro</strong> <strong>X4</strong> <strong>User</strong> <strong>Guide</strong>
To display or hide the Learning Center palette<br />
Edit workspace<br />
• Choose View � Palettes � Learning Center.<br />
The Learning Center palette is displayed by default. It appears<br />
along the right side of the Edit workspace.<br />
To use the Learning Center palette<br />
Edit workspace<br />
1 From the Home page, click a task.<br />
The topics related to the task appear.<br />
2 Click a topic.<br />
The procedure related to the topic appears.<br />
• For topics describing a tool, the tool becomes active. The Tool<br />
Options palette and any other relevant palettes appear.<br />
• For topics describing a command associated with a dialog box,<br />
the dialog box appears.<br />
3 Read the procedure for using the tool or command.<br />
Some tasks and commands are not available unless an image is<br />
open.<br />
Using the <strong>Corel</strong> <strong>Guide</strong><br />
The <strong>Corel</strong> <strong>Guide</strong> provides the most up-to-date information and content<br />
for your program. You can find tips and tricks, download new content<br />
for your projects, explore new ways to share your photos, and access<br />
the latest updates for your program.<br />
To access the <strong>Corel</strong> <strong>Guide</strong><br />
• Choose Help � <strong>Corel</strong> <strong>Guide</strong>.<br />
Learning how to use <strong>Corel</strong> PaintShop <strong>Pro</strong> 19
Using Web-based resources<br />
From the <strong>Corel</strong> PaintShop <strong>Pro</strong> Help menu and the <strong>Corel</strong> website, you<br />
can access a number of Web pages dedicated to customer support and<br />
communities. You can find resources such as downloads, tutorials,<br />
tips, newsletters, newsgroups, and other online resources<br />
To access Web-based resources<br />
• From the Help menu, select one of the following website links:<br />
• Contact Information — this link takes you to a Customer<br />
Support page listing customer service and technical support<br />
contact information<br />
• Online Support and Resources — lets you access the <strong>Corel</strong><br />
Support Services page to search for answers in the <strong>Corel</strong><br />
Knowledgebase and newsgroups, submit questions to Technical<br />
Support, provide feedback, or look for software updates<br />
• Check for Updates — checks the <strong>Corel</strong> Update Service to see if<br />
there are updates to your copy of <strong>Corel</strong> PaintShop <strong>Pro</strong><br />
You can also visit www.corel.com, and click the Support link to<br />
access the Support page.<br />
To access <strong>Corel</strong> community sites<br />
• Use your Internet browser to go to www.corel.com, click the<br />
Resources link, and click Community Sites.<br />
20 <strong>Corel</strong> PaintShop <strong>Pro</strong> <strong>X4</strong> <strong>User</strong> <strong>Guide</strong>
Workspace tour<br />
<strong>Corel</strong> PaintShop <strong>Pro</strong> includes three main workspaces that let you<br />
organize and edit your images: Manage, Adjust, and Edit.<br />
This section presents the following topics:<br />
• Exploring the workspaces<br />
• Switching between workspaces<br />
• Using palettes<br />
• Using toolbars<br />
• Using tools<br />
Exploring the workspaces<br />
<strong>Corel</strong> PaintShop <strong>Pro</strong> consists of three workspaces:<br />
• Manage<br />
• Adjust<br />
• Edit<br />
Each workspace contains specific tools and controls to help you<br />
accomplish the task at hand quickly and efficiently.<br />
You can save the workspaces, including all open images and their<br />
magnifications and screen positions, as well as positions and<br />
preferences of palettes, toolbars, dialog boxes, and windows. For<br />
information about using custom workspaces, see “Using custom<br />
workspaces” in the Help.<br />
Workspace tour 21
The Manage workspace<br />
When you open <strong>Corel</strong> PaintShop <strong>Pro</strong>, the Manage workspace appears<br />
as your default workspace.<br />
Navigation palette<br />
Organizer palette<br />
Preview area<br />
Organizer toolbar Thumbnails<br />
The Manage workspace in Preview mode<br />
Info palette<br />
The Manage workspace consists of the following components:<br />
• Navigation palette — helps you find and organize photos. You can<br />
use the Search box or click the Collection tab or Computer tab to<br />
display the folders on your computer or you can sort photos by<br />
collection, tags, or ratings.<br />
• Preview area — lets you choose between two views — a large<br />
single-image view or a multi-thumbnail view (expanded Organizer<br />
palette)<br />
22 <strong>Corel</strong> PaintShop <strong>Pro</strong> <strong>X4</strong> <strong>User</strong> <strong>Guide</strong>
• Info palette — displays information about the selected image. It<br />
consists of a camera-style display of the settings used to take the<br />
photo and a tabbed area that lets you add information, such as<br />
tags and ratings, and access a full list of EXIF or IPTC data.<br />
• Organizer palette — Available in all three workspaces, this palette<br />
lets you select photos (as thumbnails) and includes a toolbar with<br />
a range of commands and options for managing photos.<br />
For more information about the Manage workspace, see “Reviewing,<br />
organizing, and finding photos” on page 41.<br />
The Adjust workspace<br />
Adjust is your workspace for quick edits. It lets you fix and enhance<br />
your photos by offering a set of the most commonly-used tools.<br />
Adjust palette<br />
Preview area<br />
Toolbar<br />
Status bar<br />
Organizer palette Set rating Thumbnails<br />
A photo displayed in the Adjust workspace<br />
Workspace tour 23
The Adjust workspace includes the following components:<br />
• Preview area — displays the photo selected in the Organizer<br />
palette<br />
• Organizer palette — lets you select photos. It includes a toolbar<br />
with a range of commands and options for managing photos.<br />
• Set Rating control — lets you assign ratings to each photo, so that<br />
you can quickly find your favorites<br />
• Toolbar — displays buttons for accessing common saving and<br />
viewing commands<br />
• Adjust palette — displays tools and controls for adjusting photos<br />
• Status bar — displays information about the selected tool<br />
For more information about the Adjust workspace, see “Using the<br />
Adjust workspace” in the Help.<br />
The Edit workspace<br />
The Edit workspace lets you access in-depth editing features. It<br />
includes menus, tools, and palettes that you can use to create and edit<br />
images. In addition to photo editing, it lets you perform painting and<br />
drawing tasks.<br />
24 <strong>Corel</strong> PaintShop <strong>Pro</strong> <strong>X4</strong> <strong>User</strong> <strong>Guide</strong>
Menu bar<br />
Standard toolbar<br />
Tools toolbar Status bar<br />
Tool Options palette<br />
A photo displayed in the Edit workspace<br />
Image window<br />
Learning Center palette<br />
The Edit workspace includes the following components:<br />
• Menu bar — displays commands for performing tasks. For<br />
example, the Effects menu contains commands for applying<br />
effects to images.<br />
• Toolbars — display buttons for common commands. For more<br />
information, see “Using toolbars” on page 29.<br />
• Palettes — display image information and help you select tools,<br />
modify options, manage layers, select colors, and perform other<br />
editing tasks. For more information, see “Using palettes” on<br />
page 26.<br />
Workspace tour 25
• Status bar — displays information about the selected tool or<br />
menu command, as well as information about image dimensions,<br />
color depth, and pointer position. The status bar appears at the<br />
bottom of the workspace, and unlike other toolbars, it cannot be<br />
customized or moved. For more information about viewing image<br />
information, see “Displaying and editing photo information” on<br />
page 56.<br />
Switching between workspaces<br />
<strong>Corel</strong> PaintShop <strong>Pro</strong> lets you switch between different workspaces<br />
quickly and easily so that you can accomplish your photo managing<br />
and editing tasks in the most efficient manner.<br />
To switch between workplaces<br />
• At the top of the application window, click one of the following<br />
tabs:<br />
• Manage<br />
• Adjust<br />
• Edit<br />
Using palettes<br />
<strong>Corel</strong> PaintShop <strong>Pro</strong> contains many palettes that organize information<br />
and commands to help you edit your images. Some palettes appear<br />
automatically, others appear when you activate certain tools, and some<br />
palettes appear only when you choose to open them. You can easily<br />
turn a palette on and off by choosing View � Palettes. Some palettes<br />
are available only in specific workspaces.<br />
Palettes display information and may contain both controls and<br />
command buttons. Like toolbars, palettes can be moved from their<br />
default docked position.<br />
26 <strong>Corel</strong> PaintShop <strong>Pro</strong> <strong>X4</strong> <strong>User</strong> <strong>Guide</strong>
Palette Description<br />
Navigation palette Lets you find and organize photos<br />
Info palette Displays information about the selected image. It<br />
consists of a camera-style display of the settings<br />
used to take the photo and a tabbed area that lets<br />
you add General information, such as tags and<br />
ratings, and access a full list of EXIF or IPTC data.<br />
Learning Center Displays information about workflow, tools, and<br />
commands to help you complete common tasks<br />
quickly and efficiently<br />
Organizer Lets you gather display photos from various folders<br />
so that you can select, edit, e-mail, or print them.<br />
You can add, remove, and rename custom trays<br />
within the palette to match your workflow.<br />
Tool Options Displays settings and controls for the active tool<br />
Materials Lets you choose colors and materials for painting,<br />
drawing, filling, and retouching<br />
Layers Lets you view, organize, and adjust settings for<br />
image layers<br />
Overview Displays a thumbnail of the active image; lets you<br />
set a zoom level, and displays image information<br />
History Lists the actions taken on the active image; lets you<br />
undo and redo adjacent or nonadjacent actions;<br />
and lets you create a Quickscript that can be<br />
instantly applied to other open images<br />
Histogram Displays a graph of the distribution of red, green,<br />
blue, grayscale, hue, saturation, and lightness<br />
values in an image. You can analyze the distribution<br />
of detail in the shadows, midtones, and highlights<br />
to help you decide how to make corrections.<br />
Workspace tour 27
Palette Description<br />
Brush Variance Lets you set additional brush options when you use<br />
a paint brush or any other raster painting tool. This<br />
palette is particularly useful when you use a<br />
pressure-sensitive tablet or a four-dimensional<br />
mouse. For example, you can vary the opacity of a<br />
brushstroke by applying pressure with the stylus.<br />
Some options also work well with a mouse.<br />
Mixer Lets you place and mix pigments to use with the<br />
Oil Brush tool and the Palette Knife tool, allowing<br />
you to create realistic strokes with oil paints on<br />
Art Media layers<br />
Script Output Displays a list of your actions and results when you<br />
run scripts<br />
To display or hide a palette<br />
Edit workspace<br />
• Choose View � Palettes, and click the palette name.<br />
Palettes that are currently displayed are denoted with a check<br />
mark .<br />
To resize a palette<br />
Edit workspace<br />
• Drag the corner or edge of a palette.<br />
You can also resize a docked palette by clicking the Minimize<br />
palette or Maximize palette button in the upper-right<br />
corner of the palette’s title bar.<br />
28 <strong>Corel</strong> PaintShop <strong>Pro</strong> <strong>X4</strong> <strong>User</strong> <strong>Guide</strong>
Using toolbars<br />
All three workspaces contain toolbars with buttons that are useful for<br />
performing common tasks. When you position the pointer over a<br />
button, its name appears in a tooltip, and the status bar displays<br />
additional information about the command. In addition, in the<br />
Edit workspace, the Learning Center provides advice on using the tool.<br />
The Edit workspace is the main access point for the following toolbars:<br />
• Effects — displays commands for applying effects to your images<br />
• Photo — displays commands for enhancing photos<br />
• Script — displays commands for creating and running scripts<br />
• Standard — appears by default toward the top of the workspace<br />
and displays the most common file-management commands,<br />
such as saving images, undoing a command, and cutting and<br />
pasting items<br />
• Status — appears by default at the bottom of the workspace and<br />
displays information about the selected tool<br />
• Tools — contains tools for painting, drawing, cropping, typing<br />
text, and performing other image-editing tasks<br />
• Web — displays commands for creating and saving images for the<br />
Web<br />
To display or hide a toolbar<br />
Edit workspace<br />
• Choose View � Toolbars, and choose the toolbar that you want to<br />
display or hide.<br />
A check mark beside the toolbar name in the menu indicates that<br />
the toolbar is displayed.<br />
Workspace tour 29
To hide a specific toolbar, click the Close button on its<br />
title bar.<br />
Using tools<br />
You can use the tools to perform a variety of image editing and creative<br />
tasks. When you hold the pointer over a tool, a tooltip displays the tool<br />
name and shortcut key, and the status bar displays hints for using the<br />
tool.<br />
While the Adjust workspace contains a limited number of tools for<br />
quickly touching up your images, the Edit workspace contains a wide<br />
selection of tools for advanced image creation and editing. In the<br />
Edit workspace, some of these tools, such as the Crop, Move, and Text<br />
tools, reside in their own space on the Tools toolbar. Most tools,<br />
however, are grouped with other tools that perform similar tasks. A<br />
group of tools is denoted by a small flyout arrow on the right side of<br />
the active tool.<br />
Flyout arrow<br />
Some tools are grouped together in flyouts. You can access all<br />
tools in a flyout by clicking the flyout arrow beside the active tool.<br />
For information about moving, hiding, and displaying the Tools toolbar<br />
in the Edit workspace, see “Using toolbars” on page 29.<br />
The following table briefly describes each tool on the Tools toolbar of<br />
the Edit workspace. Some of these tools are also available in the Adjust<br />
workspace.<br />
30 <strong>Corel</strong> PaintShop <strong>Pro</strong> <strong>X4</strong> <strong>User</strong> <strong>Guide</strong>
Tool Description<br />
Pan<br />
Zoom<br />
Pick<br />
Move<br />
Selection<br />
Freehand<br />
Selection<br />
Magic Wand<br />
Dropper<br />
Crop<br />
Straighten<br />
Perspective<br />
Correction<br />
Red Eye<br />
Makeover<br />
Lets you control which part of the image is<br />
visible in the image window<br />
Zooms in when you click, or zooms out when<br />
you right-click. You can drag to define an area<br />
for zooming.<br />
Moves, rotates, and reshapes raster layers, and<br />
selects and modifies vector objects<br />
Moves a raster layer or a vector layer on the<br />
canvas<br />
Creates a geometrically shaped selection, such as<br />
a rectangle, ellipse, or triangle<br />
Creates an irregularly shaped selection<br />
Makes a selection based on pixel values within a<br />
specified tolerance level<br />
Lets you choose the foreground/stroke color by<br />
clicking or the background/fill color by rightclicking<br />
Trims or eliminates unwanted edges<br />
Rotates a crooked photo to straighten it<br />
Squares the perspective of buildings or other<br />
objects that appear to be leaning<br />
Quickly corrects the red-eye effect commonly<br />
seen in photos<br />
<strong>Pro</strong>vides five modes — Blemish Fixer, Toothbrush,<br />
Eye Drop, Suntan, and Thinify — which let you<br />
apply cosmetic fixes to subjects in your photos<br />
Workspace tour 31
Tool Description<br />
Clone<br />
Scratch Remover<br />
Object Remover<br />
Paint Brush<br />
Airbrush<br />
Lighten/Darken<br />
Dodge<br />
Burn<br />
Smudge<br />
Push<br />
Soften<br />
Sharpen<br />
Emboss<br />
Removes flaws and objects by painting over<br />
them with another part of the image<br />
Removes wrinkles, wires, and similar linear flaws<br />
from digital photos, and removes scratches from<br />
scanned photos<br />
Covers unwanted elements of a photo with a<br />
neighboring texture in the same photo<br />
Lets you paint on your image with colors,<br />
textures, or gradients<br />
Simulates painting with an airbrush or spray can<br />
Lightens areas as you drag, or darkens areas as<br />
you drag with the right mouse button. This<br />
effect is stronger than the effects produced by<br />
the Dodge and Burn tools.<br />
Lets you lighten areas of a photo by clicking or<br />
darken areas by right-clicking<br />
Lets you darken areas of a photo by clicking, or<br />
lighten areas by right-clicking<br />
Smears pixels by picking up new colors as you<br />
drag, or pushes pixels by not picking up new<br />
colors as you drag with the right mouse button<br />
Pushes pixels by not picking up new colors as<br />
you drag, or smears pixels by picking up new<br />
colors as you drag with the right mouse button<br />
Softens pixels as you drag, or sharpens pixels as<br />
you drag with the right mouse button<br />
Sharpens pixels as you drag, or softens pixels as<br />
you drag with the right mouse button<br />
Creates an embossed effect by suppressing color<br />
and tracing edges as you drag<br />
32 <strong>Corel</strong> PaintShop <strong>Pro</strong> <strong>X4</strong> <strong>User</strong> <strong>Guide</strong>
Tool Description<br />
Saturation Up/<br />
Down<br />
Hue Up/Down<br />
Change to Target<br />
Color Replacer<br />
Eraser<br />
Background Eraser<br />
Flood Fill<br />
Color Changer<br />
Picture Tube<br />
Text<br />
Preset Shape<br />
Rectangle<br />
Ellipse<br />
Makes colors more vivid as you drag, or less vivid<br />
as you drag with the right mouse button<br />
Shifts pixel hue values up as you drag, or shifts<br />
them down as you drag with the right mouse<br />
button<br />
Recolors pixels while retaining detail<br />
Replaces the background/fill color with the<br />
foreground/stroke color when you click and<br />
drag, or replaces the foreground/stroke color<br />
with the background/fill color when you rightclick<br />
and drag<br />
Erases raster layer pixels to transparency<br />
Erases around the edges of the areas you want<br />
to keep in a photo<br />
Fills pixels of a similar tolerance level with the<br />
current foreground/stroke material when you<br />
click, or with the current background/fill material<br />
when you right-click<br />
Changes the color of an object while preserving<br />
the shading and luminosity of the original color<br />
Places picture tubes, theme-based artistic<br />
elements, in your image<br />
Places text on your image<br />
Adds predefined shapes (such as callouts,<br />
arrows, and starbursts) to your image<br />
Creates a rectangle or square<br />
Creates an ellipse or circle<br />
Workspace tour 33
Tool Description<br />
Symmetric Shape<br />
Pen<br />
Warp Brush<br />
Mesh Warp<br />
Oil Brush<br />
Chalk<br />
Pastel<br />
Crayon<br />
Colored Pencil<br />
Marker<br />
Palette Knife<br />
Smear<br />
Art Eraser<br />
Creates symmetric or star-shaped objects<br />
Creates connected or unconnected lines,<br />
freehand curves, and Bézier curve segments<br />
Shrinks, grows, twists, or distorts pixels<br />
Distorts a photo by dragging points along an<br />
overlay grid<br />
Simulates oil brushstrokes on an Art Media layer<br />
Simulates drawing with chalk on an Art Media<br />
layer<br />
Simulates drawing with pastels on an Art Media<br />
layer<br />
Simulates drawing with crayon on an Art Media<br />
layer<br />
Simulates drawing with colored pencil on an Art<br />
Media layer<br />
Simulates drawing with an ink marker on an Art<br />
Media layer<br />
Simulates applying oil paint with a knife (instead<br />
of a brush) on an Art Media layer<br />
Smears whatever pigment you’ve applied to an<br />
Art Media layer<br />
Erases whatever pigment you’ve applied to an<br />
Art Media layer<br />
34 <strong>Corel</strong> PaintShop <strong>Pro</strong> <strong>X4</strong> <strong>User</strong> <strong>Guide</strong>
Getting started<br />
You can bring your images into <strong>Corel</strong> PaintShop <strong>Pro</strong> in various ways:<br />
you can import photos that you have transferred to your computer,<br />
scan images directly into the application, capture images from the<br />
computer screen; or you can create an image.<br />
After you bring your images into the application, you can access many<br />
basic commands that help you view images and image information.<br />
You can perform basic actions such as cut, copy, undo, and repeat.<br />
For more information about performing basic actions, see “Getting<br />
Started with <strong>Corel</strong> PaintShop <strong>Pro</strong>” in the Help.<br />
This section presents the following topics:<br />
• Getting photos into <strong>Corel</strong> PaintShop <strong>Pro</strong><br />
• Opening and closing images<br />
• Saving images<br />
• Deleting images<br />
Getting photos into <strong>Corel</strong> PaintShop <strong>Pro</strong><br />
After you transfer your photos to your computer (by using Windows or<br />
the software for your camera), you can import your photos into<br />
<strong>Corel</strong> PaintShop <strong>Pro</strong>. You import photos by browsing to folders. The<br />
photos in the folders are then cataloged automatically in a database.<br />
This makes it easy to find, edit, and update the information for your<br />
photos.<br />
Getting started 35
Although you can browse to folders from any workspace, the Manage<br />
workspace is designed to make it easy to review and manage multiple<br />
photos.<br />
To import your photos into <strong>Corel</strong> PaintShop <strong>Pro</strong><br />
Manage workspace<br />
1 In the Navigation palette, click the Collections tab, and click<br />
Browse More Folders.<br />
2 In the Browse For Folder dialog box, navigate to the folder you<br />
want.<br />
3 Click OK.<br />
The folder is added to the folder list and all the images are<br />
cataloged in the application database.<br />
You can open the Navigation palette from any workspace by<br />
clicking the Show/Hide Navigation button on the Organizer<br />
palette.<br />
Opening and closing images<br />
You can open most image formats in <strong>Corel</strong> PaintShop <strong>Pro</strong>. You can<br />
open the images by using the menu bar or by using the<br />
Manage workspace. You can associate specific file formats with<br />
<strong>Corel</strong> PaintShop <strong>Pro</strong>, such as JPEG, TIF, or PNG, so that these files will<br />
open in <strong>Corel</strong> PaintShop <strong>Pro</strong> when you double-click them. For more<br />
information about setting file format associations and supported file<br />
types, see “Setting file format associations” and “Files supported by<br />
<strong>Corel</strong> PaintShop <strong>Pro</strong>” in the Help. For information on RAW files, see<br />
“Supported RAW file formats” on page 61.<br />
36 <strong>Corel</strong> PaintShop <strong>Pro</strong> <strong>X4</strong> <strong>User</strong> <strong>Guide</strong>
To open an image<br />
Edit workspace<br />
1 Choose File � Open.<br />
2 In the Look in drop-list, choose the folder where the file is stored.<br />
3 Click the name of the file that you want to open.<br />
If you want to open multiple files, hold down Ctrl, and click the<br />
filenames.<br />
4 Click Open.<br />
You can also<br />
View information about an image In the Open dialog box, click the<br />
filename, and click Details.<br />
View a thumbnail in the preview<br />
area<br />
To open an image from the Manage workspace<br />
Manage workspace<br />
• Click a thumbnail to select the file.<br />
To view thumbnails from another folder, click Browse More Folders<br />
on the Navigation palette, and from the Browse For Folder dialog<br />
box that appears, choose the folder you want. The folder appears<br />
in the Folders list.<br />
You can work with the file in the Manage workspace, or click the<br />
Adjust tab or Edit tab to edit the file in another workspace.<br />
To open a RAW photo image<br />
Edit workspace<br />
• Do one of the following:<br />
• Choose File � Open.<br />
• Double-click on a RAW image thumbnail.<br />
In the Open dialog box, mark the<br />
Show preview check box.<br />
Getting started 37
• Hold down Ctrl, and click the filenames or thumbnails to open<br />
multiple files.<br />
The Camera RAW Lab dialog box opens. This dialog box lets you<br />
adjust the settings that are stored with the RAW photo file.<br />
To close an image<br />
• Choose File � Close.<br />
In the Edit workspace, you can also close an image by clicking<br />
the Close button above the image.<br />
Saving images<br />
Before you save an image, you need to consider the file format in<br />
which you want to save it, and you must ensure that you don’t<br />
overwrite an original image that you may need in the future.<br />
The PspImage file format of <strong>Corel</strong> PaintShop <strong>Pro</strong> supports layers, alpha<br />
channels, and other features used in creating images. It is<br />
recommended that you save and edit your images as PspImage files.<br />
You can then save the files to common file formats. You can also use<br />
the Save for Office command if you want to optimize your images for<br />
placement in another application, such as a page layout, e-mail, or<br />
Web page design application.<br />
For more information about options available when saving images, see<br />
“Saving images” in the Help.<br />
Important! The Auto-Preserve Original preference setting can help<br />
you avoid overwriting original images. By default, this feature is on.<br />
For more information on this preference setting, see “Setting Auto-<br />
Preserve preferences” in the Help.<br />
38 <strong>Corel</strong> PaintShop <strong>Pro</strong> <strong>X4</strong> <strong>User</strong> <strong>Guide</strong>
To save a new image<br />
Edit workspace<br />
1 Choose File � Save.<br />
The Save As dialog box appears.<br />
2 From the Save in drop-list, choose the folder in which you want to<br />
save the file.<br />
3 In the File name field, type a name for the file.<br />
4 In the Save as type drop-list, choose a file format. The most<br />
commonly used formats are listed first.<br />
If you want to change the default settings for the file format (for<br />
example compression or color profile), click Options, and choose<br />
the settings you want.<br />
5 Click Save.<br />
You can also save your work by clicking the Save As button<br />
on the Standard toolbar to avoid overwriting your current file.<br />
You can save in the last-used file format by choosing File �<br />
Preferences � General <strong>Pro</strong>gram Preferences, and clicking Display<br />
and Caching from the list on the left side. In the Presentation<br />
group box, mark the Re-use last type in the file save-as dialog<br />
check box.<br />
To save your work<br />
Edit workspace<br />
• Choose File � Save.<br />
If the Auto-Preserve Originals preference setting is enabled, and<br />
this is the first time you’ve attempted to save changes to this<br />
image, you are prompted to save a copy of the original unedited<br />
image. If Auto-Preserve Originals is not enabled, the original<br />
image is overwritten by the modified image.<br />
Getting started 39
You can avoid overwriting the current file by using the Save As<br />
command.<br />
You can also save your work by clicking the Save button on<br />
the Standard toolbar.<br />
Deleting images<br />
You can delete image files by using the Organizer palette.<br />
To delete an image<br />
Edit workspace<br />
• Right-click a thumbnail in the Organizer palette, and choose<br />
Delete from the context menu.<br />
40 <strong>Corel</strong> PaintShop <strong>Pro</strong> <strong>X4</strong> <strong>User</strong> <strong>Guide</strong>
Reviewing, organizing,<br />
and finding photos<br />
The Manage workspace is a multifaceted digital image management<br />
feature that lets you preview, organize, and streamline your photoediting<br />
workflow.<br />
This section presents the following topics:<br />
• Setting up the Manage workspace<br />
• Finding images on your computer<br />
• Working with saved searches<br />
• Adding keyword tags to images<br />
• Viewing photos by tags<br />
• Using the calendar to find images<br />
• Working with thumbnails in the Manage workspace<br />
• Capturing and applying edits to multiple photos<br />
• Displaying and editing photo information<br />
• E-mailing and sharing photos from the Manage workspace<br />
• Using Quick Review to review photos<br />
• Working with trays<br />
Setting up the Manage workspace<br />
When you start up <strong>Corel</strong> PaintShop <strong>Pro</strong> for the first time, the<br />
Manage workspace appears as your main workspace with the<br />
following four components: Navigation palette, Preview area,<br />
Reviewing, organizing, and finding photos 41
Organizer palette, and the Info palette. For information about each of<br />
these palettes, see “The Manage workspace” on page 22.<br />
Depending on your specific needs, you can customize the<br />
Manage workspace by choosing the Preview or Thumbnail mode,<br />
resizing, moving, or hiding the palettes, and selecting display and file<br />
preferences. For more information, see “Setting Manage workspace<br />
preferences” in the Help.<br />
Navigation palette<br />
Organizer palette<br />
Preview area<br />
Organizer toolbar Thumbnails<br />
Manage workspace in Preview mode<br />
Info palette<br />
42 <strong>Corel</strong> PaintShop <strong>Pro</strong> <strong>X4</strong> <strong>User</strong> <strong>Guide</strong>
Navigation<br />
palette<br />
Thumbnails<br />
Organizer<br />
toolbar<br />
Manage workspace in Thumbnail mode<br />
To switch between preview and thumbnail modes<br />
Preview<br />
area<br />
Info palette<br />
• In the top-right corner of the Manage workspace, click one of the<br />
following buttons:<br />
• Preview mode — displays a large preview area of a single<br />
image<br />
• Thumbnail mode — expands and locks the Organizer<br />
palette content in the preview area<br />
To hide or show the Navigation palette and Info palette<br />
Manage workspace<br />
• In the Organizer palette, click any of the following buttons on the<br />
Organizer toolbar:<br />
Reviewing, organizing, and finding photos 43
• Show/Hide Navigation — shows or hides the Navigation<br />
palette<br />
• Show/Hide Info — shows or hides the Info palette<br />
A convenient way to minimize the Organizer palette (or any<br />
palette) is to click the Auto Hide button on the palette title<br />
bar. For more information, see “To roll up a toolbar or palette”<br />
in the Help.<br />
Browsing folders for photos<br />
You can browse for photos on your computer by using the Collections<br />
and Computer tabs in the Navigation palette:<br />
• The Collections tab is your library of virtual and physical folders. It<br />
offers an easy way to find and search for favorite photos.<br />
• The Computer tab displays a complete list of all folders on your<br />
hard drive and desktop.<br />
When you select a folder in the Navigation palette, the photos in this<br />
folder appear as thumbnails in the Organizer palette. When you<br />
browse to a folder, you are essentially importing the content of the<br />
folder into <strong>Corel</strong> PaintShop <strong>Pro</strong>. For more information, see “Getting<br />
photos into <strong>Corel</strong> PaintShop <strong>Pro</strong>” on page 35.<br />
To view the photos in a folder<br />
Manage workspace<br />
1 In the Navigation palette, click one of the following tabs:<br />
• Collections — displays a custom list of cataloged folders and a<br />
list of virtual collections<br />
• Computer — displays a list of all folders and devices on your<br />
computer<br />
44 <strong>Corel</strong> PaintShop <strong>Pro</strong> <strong>X4</strong> <strong>User</strong> <strong>Guide</strong>
2 Double-click a folder to display the subfolders it contains.<br />
3 Click the folder that contains the photos that you want to view.<br />
The thumbnails of all supported photo or video files in the<br />
selected folder appear in the Organizer palette.<br />
You can also hide the list of subfolders in a folder by clicking the<br />
minus sign next to its name.<br />
To add a folder to the Collections page<br />
Manage workspace<br />
1 In the Navigation palette, click the Collections tab.<br />
2 In Folders tree, click the Browse More Folders icon<br />
The Browse for Folder dialog box appears.<br />
.<br />
3 Navigate to the folder containing the images you want to view,<br />
and then click OK.<br />
The folder is added to the Folders list.<br />
You can also create a folder on your computer by clicking the<br />
Make New Folder button in the Browse for Folder dialog box.<br />
To view all cataloged folders<br />
Manage workspace<br />
1 In the Navigation palette, click the Collections tab.<br />
2 In the Smart Collections tree, click the All Photos icon .<br />
Finding images on your computer<br />
When you import photos into <strong>Corel</strong> PaintShop <strong>Pro</strong> by navigating to<br />
them from the Navigation palette, they are cataloged automatically.<br />
Cataloged images can be searched for quickly (real-time filtering) and<br />
easily from the Search box. You can do a simple text-based search, use<br />
Reviewing, organizing, and finding photos 45
more advanced search options, or use a calendar to search for images<br />
associated with a particular date or date range.<br />
When you perform an advanced search, you can save the search rules<br />
and results as a Smart Collection.<br />
To search for images quickly<br />
Manage workspace<br />
• In the Navigation palette, type a search term in the Search box.<br />
The search results appear in the Organizer palette.<br />
Note: Search terms may be filenames (including extensions),<br />
names of folders in which images reside (including letters<br />
designating drives), tags, caption text, or image metadata (EXIF or<br />
IPTC data).<br />
For more information about the tags that you can assign to<br />
images, see “Adding keyword tags to images” on page 47. For<br />
more information about caption text and image metadata, see<br />
“Displaying and editing photo information” on page 56.<br />
To do an advanced search<br />
Manage workspace<br />
1 In the Navigation palette, click the Collections tab.<br />
2 Double-click Smart Collections to open the list, and click Add<br />
Smart Collection.<br />
The Smart Collection dialog box appears.<br />
3 In the Find photos that match drop-list, select one of the<br />
following options:<br />
• All — searches for images that match all of the specified rules<br />
• Any — searches for images that match any of the specified rules<br />
46 <strong>Corel</strong> PaintShop <strong>Pro</strong> <strong>X4</strong> <strong>User</strong> <strong>Guide</strong>
4 From the first drop-list on the left, select a search option.<br />
5 From the next drop-list, select an option to refine the search<br />
further.<br />
The options that appear in the drop-list depend on the search<br />
option that you chose in the previous drop-list.<br />
6 In the text field, type or choose a search term.<br />
7 Click Preview.<br />
The search results appear in the Organizer palette.<br />
Working with saved searches<br />
After you save a custom set of search criteria as a Smart Collection, you<br />
can run the search again simply by clicking it on the Collections tab.<br />
You can also edit, rename, or delete a saved search.<br />
To run a saved search<br />
Manage workspace<br />
1 In the Navigation palette, click the Collections tab.<br />
2 Double-click Smart Collections to open the list.<br />
3 Click the Smart Collection you want to use for your search.<br />
Adding keyword tags to images<br />
Keyword tags let you assign descriptive, natural-language terms to<br />
images. By creating tags such as “family,” “children,” or “birthday,”<br />
you can identify specific photos, and then simply click a tag from the<br />
list to view thumbnails of photos associated with the tag. You can<br />
create and assign as many tags as you like to an image. The<br />
Manage workspace provides several ways to create and assign tags.<br />
Reviewing, organizing, and finding photos 47
To add a keyword tag to the tags catalog<br />
Manage workspace<br />
1 In the Navigation palette, click the Collections tab.<br />
2 Double-click Tags to open the list.<br />
3 In the Tags list, click the Add Tags button .<br />
The Add Tag dialog box appears.<br />
4 Type the tag text, and click OK.<br />
The new tag appears in the Tags list.<br />
To delete a keyword tag from the tags catalog<br />
Manage workspace<br />
1 In the Navigation palette, click the Collections tab.<br />
2 Double-click Tags to open the list.<br />
3 Right-click a tag, and click Delete.<br />
To assign a keyword tag to one or more images<br />
Manage workspace<br />
1 In the Navigation palette, click the Collections tab.<br />
2 Double-click Tags to open the list.<br />
3 In the Organizer palette, select one or more thumbnails of the<br />
images that you want to tag.<br />
4 Drag the thumbnails onto a tag in the Tags list.<br />
You can also assign one or more tags to the selected<br />
thumbnails by typing the text in the Tags box on the General<br />
page of the Info palette, and clicking the Add Tag button to<br />
the right of the text field.<br />
48 <strong>Corel</strong> PaintShop <strong>Pro</strong> <strong>X4</strong> <strong>User</strong> <strong>Guide</strong>
To remove keyword tags from one or more images<br />
Manage workspace<br />
1 In the Organizer palette, select one or more thumbnails.<br />
2 In the Info palette, click the General tab to view the tag<br />
information.<br />
3 In the list that appears below the Tags box, click one or more tags<br />
that you want to remove, and click the Delete Tag button that<br />
appears to the right of the tag name.<br />
If the General info panel is not displayed, select the thumbnails,<br />
and then click the Image information button on the<br />
Organizer toolbar.<br />
Viewing photos by tags<br />
After you assign a tag to an image, you can find the image simply by<br />
clicking on the tag.<br />
To display photos by tags<br />
Manage workspace<br />
1 In the Navigation palette, click the Collections tab.<br />
2 Double-click Tags to open the list.<br />
3 Click a tag.<br />
Photos associated with the tag display as thumbnails in the<br />
Organizer palette.<br />
You can also type a tag name into the Search box at the top of<br />
the Navigation palette.<br />
You can also display photos that have no tags by clicking the<br />
No Tags button in the Tags list.<br />
Reviewing, organizing, and finding photos 49
Using the calendar to find images<br />
The Calendar Search lets you find photos according to the date they<br />
were taken. You can search by a specific date or select a date range.<br />
The image creation dates are highlighted on the calendar.<br />
Note: When you edit and save a photo, the modification date is also<br />
captured in the Calendar Search.<br />
To find images by using the calendar<br />
Manage workspace<br />
1 In the Navigation palette, click the Collections tab.<br />
2 Click the Calendar button .<br />
3<br />
The Calendar Search dialog box appears. Dates shown in red<br />
indicate images created on that date.<br />
Choose one of the following options:<br />
• For photos taken today, click the Today button .<br />
• For a specific date and month, click the Previous (Year/Month)<br />
and Next (Month/Year) buttons, and select a date.<br />
4<br />
• For a date range, use the Previous and Next buttons to select the<br />
month and year, hold down Shift, click the first date in the<br />
range, and then click the last date in the range.<br />
• For multiple dates not in sequence, use the Previous and Next<br />
buttons to select the month and year, hold down Ctrl, and click<br />
the dates.<br />
When you click a date or a range, the Organizer palette displays<br />
thumbnails of the photos that match the date criteria.<br />
Click Close to close the Calendar Search dialog box.<br />
50 <strong>Corel</strong> PaintShop <strong>Pro</strong> <strong>X4</strong> <strong>User</strong> <strong>Guide</strong>
Working with thumbnails in the Manage workspace<br />
The Manage workspace makes it easy for you to preview and organize<br />
photos by using thumbnails.<br />
For a larger view of photos, use Preview mode, zoom in and out on<br />
thumbnails, or use Quick Review to view photos in full-screen mode.<br />
You can also sort and rotate photos by using thumbnails, or delete and<br />
rename the files.<br />
Thumbnails let you edit multiple photos by using Capture editing and<br />
Apply editing. For more information, see “Capturing and applying edits<br />
to multiple photos” on page 54.<br />
In addition, you can select one or more RAW file thumbnails to convert<br />
the files to another format. For more information, see “Converting<br />
RAW photos to another file format” on page 64.<br />
To preview an image in the Manage workspace<br />
• In the Organizer palette, click a thumbnail.<br />
If you are not in Preview mode, click the Preview mode button<br />
in the top-right corner of the application window.<br />
The photo displays in the Preview area.<br />
You can also<br />
Display the previous or the next<br />
image in the Preview area by<br />
using the keyboard<br />
Preview an image in full-screen<br />
mode<br />
Press the Left arrow or the Right<br />
arrow keys.<br />
Click View � Full Screen Preview,<br />
or double-click a thumbnail to<br />
open Quick Review.<br />
Reviewing, organizing, and finding photos 51
To zoom in or out on thumbnails<br />
1 If the Manage workspace is not in Thumbnail mode, click the<br />
Thumbnail mode button in the top-right corner of the<br />
Manage workspace.<br />
2 On the Organizer toolbar, move the Zoom slider to the left to<br />
zoom out, or to the right to zoom in.<br />
The Zoom slider is not available when the Manage workspace<br />
is in Preview mode.<br />
To sort thumbnails<br />
Manage workspace<br />
1 On the Organizer toolbar, click the Sort by drop-list.<br />
2 Choose a sorting option.<br />
To select more than one thumbnail<br />
Manage workspace<br />
• Do one of the following:<br />
• To select adjacent thumbnails, hold down Shift, and click the<br />
first and the last thumbnail in the sequence of thumbnails.<br />
• To select nonadjacent thumbnails, hold down Ctrl, and click the<br />
thumbnails.<br />
To play a video from a thumbnail<br />
Manage workspace<br />
1 If the Manage workspace is not in Preview mode, click the Preview<br />
mode button in the top-right corner of the<br />
Manage workspace.<br />
2 In the Organizer palette, click a video thumbnail.<br />
3 Click the Play button below the Preview area.<br />
52 <strong>Corel</strong> PaintShop <strong>Pro</strong> <strong>X4</strong> <strong>User</strong> <strong>Guide</strong>
Example of a video thumbnail<br />
You can extract a frame from a video and save it as an image<br />
by clicking the Pause button to stop the video on the frame that<br />
you want to save, and clicking the Capture button .<br />
To rotate one or more images in the Organizer palette<br />
Manage workspace<br />
1 Select one or more thumbnails.<br />
2 On the Organizer toolbar, click one of the following buttons:<br />
• Rotate Right — rotates thumbnails 90 degrees clockwise<br />
• Rotate Left — rotates thumbnails 90 degrees<br />
counterclockwise<br />
You can also right-click a thumbnail and choose Rotate Right or<br />
Rotate Left from the context menu.<br />
To delete one or more photos in the Manage workspace<br />
1 Select one or more thumbnails, and press Delete.<br />
The Delete File dialog box or Delete Multiple Items dialog box<br />
appear.<br />
2 Click Yes to send the images to the Recycle Bin.<br />
You can also right-click selected thumbnails, and choose Delete<br />
in the context menu.<br />
Reviewing, organizing, and finding photos 53
To rename a file in the Manage workspace<br />
1 Right-click the thumbnail that you want to rename and choose<br />
Rename.<br />
2 In the Rename dialog box, type the new file name, and click OK.<br />
Capturing and applying edits to multiple photos<br />
In the Manage workspace, you can copy the edits you make to one<br />
photo and apply them to as many photos as you want. For example,<br />
you can easily apply a lighting correction to multiple photos, or apply<br />
the same border and resizing options to a set of photos that you’re<br />
preparing for a website.<br />
After you edit a photo in the Adjust or Edit workspace, a small editing<br />
icon appears on the photo’s thumbnail. When you return to the<br />
Manage workspace, you can access the Capture editing and Apply<br />
editing commands to copy the changes to other photos.<br />
Capture Editing and<br />
Apply Editing buttons<br />
An icon in the bottom-left corner of a thumbnail indicates that the<br />
edits to the photo can be copied and applied to other photos.<br />
You can capture and apply edits to most file types, but edits to RAW<br />
files can be applied only to other RAW files. You can undo the edits you<br />
apply to one or more photos.<br />
54 <strong>Corel</strong> PaintShop <strong>Pro</strong> <strong>X4</strong> <strong>User</strong> <strong>Guide</strong>
To capture edits<br />
Manage workspace<br />
1 After editing an image in the Adjust workspace or Edit workspace,<br />
or the Camera RAW Lab, save the changes, and return to the<br />
Manage workspace.<br />
2 Select the thumbnail of the photo that you edited.<br />
A pencil icon or RAW icon appears in the bottom-left corner of<br />
thumbnails to indicate that the image has been edited.<br />
3 Click the Capture Editing button on the Organizer toolbar.<br />
You can capture the edits of both open or closed files for the<br />
current session only. When you close the program, all captured<br />
edits are automatically deleted.<br />
You can also capture the edits by right-clicking the selected<br />
thumbnail and choosing Capture Editing.<br />
To apply captured edits<br />
Manage workspace<br />
1 In the Organizer palette, select one or more thumbnails.<br />
2 Click the Apply Editing button on the Organizer toolbar.<br />
3 Click OK in the Batch <strong>Pro</strong>cess dialog box.<br />
For RAW files, the saved settings from the Camera RAW Lab dialog<br />
box are applied.<br />
When you close the program, all captured edits are<br />
automatically cleared.<br />
You can also apply the captured edits by right-clicking the<br />
selected thumbnails and choosing Apply Editing.<br />
Reviewing, organizing, and finding photos 55
To undo Apply Editing<br />
1 In the Organizer palette, select one or more thumbnails.<br />
2 Right-click a selected thumbnail, and choose Revert Current<br />
Editing from the context menu.<br />
You can also undo the editing to multiple photos by selecting<br />
the thumbnails of the edited photos, right-clicking a selected<br />
thumbnail, and choosing Revert All Editing from the context<br />
menu.<br />
Displaying and editing photo information<br />
The Info palette in the Manage workspace lets you view, add, and edit<br />
information about your photos, such as the filename, size, and<br />
creation date, as well as EXIF and IPTC metadata. You can also add<br />
tags, captions, and apply star ratings to photos. For more information<br />
about adding tags, see “Adding keyword tags to images” on page 47.<br />
Adding and updating photo information makes it easier to organize<br />
and search for your photos. For example, you can search by caption<br />
text.<br />
At the top of the Info palette there is a camera-style display that helps<br />
you quickly review the camera settings were used for the selected<br />
photo.<br />
56 <strong>Corel</strong> PaintShop <strong>Pro</strong> <strong>X4</strong> <strong>User</strong> <strong>Guide</strong>
White Balance Symbols<br />
Custom Flash<br />
Daylight Overcast<br />
Fluorescent Shade<br />
Tungsten Partial metering<br />
Auto-white balance<br />
Metering Symbols<br />
Custom metering Spot metering<br />
Averaged metering Multi-spot metering<br />
Center-weighted metering Pattern metering<br />
To assign a rating to one or more images<br />
Manage workspace<br />
1 Select one or more thumbnails.<br />
2 In the Info palette, click a star, starting from left to right, to set a<br />
Rating. For example, if you want to assign a five-star rating, click<br />
the right-most star and all stars will be selected.<br />
You can also<br />
Assign a rating by using the<br />
context menu<br />
Assign a rating by using keyboard<br />
shortcuts<br />
Right-click one or more thumbnails,<br />
click Set Rating, and then click the<br />
number of stars you want to assign.<br />
Select one or more thumbnails, and<br />
press Ctrl + the number of stars you<br />
want to assign. For example, if you<br />
want to assign one star, press<br />
Ctrl+1.<br />
Reviewing, organizing, and finding photos 57
To remove the rating of an image<br />
Manage workspace<br />
• Right-click a thumbnail, choose Rating, and the number of stars<br />
that are currently assigned to the image. For example, to remove<br />
the rating of a three-star image, you would choose Rating � * * *.<br />
To add a caption to one or more images<br />
Manage workspace<br />
1 Select a thumbnail.<br />
2 In the Info palette, click the General tab, and type text in the<br />
Caption box.<br />
To delete a caption from one or more images<br />
Manage workspace<br />
1 Select on or more thumbnails that have the same caption text.<br />
2 In the Info palette, click the General tab.<br />
3 Highlight the text you want to delete in the Caption box.<br />
4 Press Delete.<br />
To view advanced image information<br />
Manage workspace<br />
• In the Info palette, click the EXIF or IPTC tab.<br />
Note: You can edit only the EXIF or IPTC data that have entry<br />
fields.<br />
E-mailing and sharing photos from the<br />
Manage workspace<br />
You can e-mail and share your photos from the Manage workspace, or<br />
any other workspace, by accessing the Share menu on the Organizer<br />
toolbar. For more information, see “E-mailing photos” on page 169<br />
and “Uploading photos to a sharing site” on page 170.<br />
58 <strong>Corel</strong> PaintShop <strong>Pro</strong> <strong>X4</strong> <strong>User</strong> <strong>Guide</strong>
Using Quick Review to review photos<br />
You can use Quick Review to review images in full-screen mode. For<br />
example, after downloading photos from your camera, you can use<br />
Quick Review to quickly review all photos, delete the ones you don’t<br />
want, rotate photos, and apply star ratings.<br />
To review images in full-screen mode<br />
Manage workspace<br />
1 In the Organizer palette, double-click a thumbnail in the folder or<br />
tray that you want to review.<br />
The Quick Review window opens.<br />
2 Perform a task from the following table.<br />
To Do the following<br />
View the next photo Click the Next button .<br />
View the previous photo Click the Previous button .<br />
Apply a star rating Click a star below the photo,<br />
starting from left to right, to set a<br />
rating.<br />
Change the Zoom level Drag the Zoom slider, click the Zoom<br />
In or Zoom Out buttons, or<br />
click the Zoom to 100% button<br />
or the Zoom to Fit button .<br />
Delete a photo Click the Delete button .<br />
Rotate a photo Click the Rotate Right button or<br />
Rotate Left button .<br />
Exit Quick Review Click the Exit button or press<br />
Esc.<br />
Reviewing, organizing, and finding photos 59
Working with trays<br />
You can use trays to gather images from various folders. The images<br />
remain in their original location, but are referenced in the tray and can<br />
be accessed by clicking a thumbnail.<br />
You can add, remove, and rename trays to suit your workflow. For<br />
instance, you can create a tray for images you want to edit, use for a<br />
project, print, or e-mail. Trays are created in the Organizer palette.<br />
The default tray automatically displays the photos from the folder or<br />
collection that is currently selected in the Navigation palette. A custom<br />
tray, called My Tray, is a blank tray that is created automatically. For<br />
more information about trays, see “Working with trays” in the Help.<br />
To add a tray<br />
Manage workspace<br />
1 In the Organizer palette, click the More Options button<br />
Organizer toolbar, and click Add Tray.<br />
on the<br />
2 Type a name for the new tray in the Name field, and click OK.<br />
To remove a tray<br />
Manage workspace<br />
1 In the Organizer palette, select the tray that you want to remove.<br />
Note: Removing a tray does not delete the photos in the tray.<br />
2 Click the More Options button on the Organizer toolbar, and<br />
click Remove Tray.<br />
The custom tray, “My Tray”, cannot be removed.<br />
60 <strong>Corel</strong> PaintShop <strong>Pro</strong> <strong>X4</strong> <strong>User</strong> <strong>Guide</strong>
Working with camera RAW photos<br />
Most DSLR cameras give you the option to take photos in RAW mode.<br />
RAW mode records more image data than a typical JPEG. A RAW<br />
photo is a 12-bit or 14-bit image and comprises of up to 16,384 levels<br />
of brightness. The camera records information, such as ISO, color<br />
temperature, and saturation settings, but stores this information in a<br />
header. The RAW image data itself remains uncompromised and<br />
uncompressed, making it similar to a photo negative that you can print<br />
as you like. Compare this to an 8-bit JPEG photo which contains 256<br />
brightness levels, and which has already had some irreversible<br />
processing applied by the camera. The Camera RAW Lab in<br />
<strong>Corel</strong> PaintShop <strong>Pro</strong> acts like a digital darkroom and lets you apply a<br />
personal touch to your RAW files.<br />
After processing a RAW image, you can leave it as a read-only RAW file,<br />
or export it to a JPEG, GIF, or PNG file so you can edit it.<br />
This section presents the following topics:<br />
• Supported RAW file formats<br />
• Using the Camera RAW Lab<br />
• Applying edits to multiple RAW photos<br />
• Converting RAW photos to another file format<br />
Supported RAW file formats<br />
Camera RAW Lab works with common RAW formats from the major<br />
camera manufacturers. You can find an updated list at<br />
www.corel.com.<br />
Working with camera RAW photos 61
To find supported RAW file formats<br />
1 Go to www.corel.com.<br />
2 On the corel.com Web page, click Support.<br />
3 On the Support page, click Knowledgebase.<br />
4 In the Search Text box, type PaintShop RAW support list.<br />
A list of related Knowledgebase articles is displayed.<br />
Using the Camera RAW Lab<br />
The Camera RAW<br />
Lab lets you develop<br />
a RAW image by<br />
saving a variety of<br />
processing settings.<br />
After processing a<br />
RAW image, you can<br />
leave it as a read-only<br />
RAW file, or open it<br />
in the Edit workspace<br />
and save it to a<br />
different file format,<br />
such as JPEG, GIF, or<br />
PNG.<br />
To launch the Camera RAW Lab<br />
• Do one of the following:<br />
• In the Manage workspace, select File � Open � Filename.<br />
• In the Edit workspace, drag a thumbnail from the Organizer<br />
palette to the image window, or double-click the thumbnail.<br />
The Camera RAW Lab dialog box opens with the image.<br />
62 <strong>Corel</strong> PaintShop <strong>Pro</strong> <strong>X4</strong> <strong>User</strong> <strong>Guide</strong>
To adjust settings for a RAW photo<br />
1 In the Camera RAW Lab dialog box, do any of the following:<br />
• Drag the Brightness, Saturation, or Shadow sliders for a quick<br />
overall image adjustment.<br />
• In the White balance area, adjust color by clicking a preset<br />
lighting option from the Scenario drop-list, or by clicking the<br />
preview area to set the white point with the Dropper tool. You<br />
can also adjust or fine-tune color with the Temperature and Tint<br />
sliders.<br />
• In the Highlight recovery area, click an option in the drop-list.<br />
Highlight recovery works particularly well on images that are<br />
overexposed — it can help restore detail in blown-out areas.<br />
• Drag the Threshold slider in the Reduce noise area to smooth<br />
digital noise.<br />
You can preview the changes to the photo in the Preview area.<br />
If you want to keep the settings for future use, check the Save<br />
image settings checkbox.<br />
2 Click one of the following:<br />
• Reset — resets the settings to their original values<br />
• Edit — applies the settings and opens the photo in the Edit<br />
workspace. When you edit a RAW photo, you must save it to a<br />
JPEG, TIFF, or another writable file format.<br />
• Apply — applies the settings, and exits the Camera RAW Lab<br />
• Cancel — exits the Camera RAW Lab without adjusting the<br />
photo’s settings<br />
Image settings for RAW images are saved to a database.<br />
Changes to the file name or file location can be tracked in the<br />
database only if you make the changes in <strong>Corel</strong> PaintShop <strong>Pro</strong>.<br />
Working with camera RAW photos 63
Applying edits to multiple RAW photos<br />
With <strong>Corel</strong> PaintShop <strong>Pro</strong>, you can copy the edits you made to a photo<br />
in the Camera RAW Lab, and quickly apply the same edits to a batch<br />
of photos. For more information about applying edits to multiple<br />
photos, see “Capturing and applying edits to multiple photos” on<br />
page 54.<br />
Converting RAW photos to another file format<br />
The RAW file format is read-only and the settings for a RAW file are<br />
stored as a separate header. It is these settings that you can adjust in<br />
the Camera RAW Lab. However, to use the editing features in the<br />
Adjust and Edit workspaces, you need save the RAW file to a different<br />
file format, such as JPEG, TIFF, or the native format, .pspimage. To<br />
quickly convert the file, you can use Convert RAW.<br />
To convert a RAW file to another file type<br />
Manage workspace<br />
1 In the Organizer palette, select one or more RAW file thumbnails.<br />
2 Right-click a selected thumbnail, and click Convert RAW.<br />
3 In the Batch <strong>Pro</strong>cess dialog box, choose a file format from the Type<br />
drop-list.<br />
If you want to change the default conversion settings, click<br />
Options, and adjust the settings.<br />
4 Click Browse and choose a folder in which the converted file will<br />
be saved.<br />
5 Click Start.<br />
You can rename converted files by clicking Modify, choosing an<br />
option from the Rename Options list, and clicking Add.<br />
64 <strong>Corel</strong> PaintShop <strong>Pro</strong> <strong>X4</strong> <strong>User</strong> <strong>Guide</strong>
Adjusting images<br />
When you view your photos in <strong>Corel</strong> PaintShop <strong>Pro</strong>, you may notice<br />
problems that you want to correct. In some photos, the problems are<br />
obvious, such as when the subject is too dark. In other photos, you<br />
may sense the need for improvement but not know what to fix. With<br />
<strong>Corel</strong> PaintShop <strong>Pro</strong>, you can correct specific aspects of a photo or<br />
allow the program to make basic photo adjustments.<br />
This section presents the following topics:<br />
• Rotating images<br />
• Cropping images<br />
• Straightening images<br />
• Correcting photographic perspective<br />
• Making basic photo corrections automatically<br />
• Removing digital noise<br />
• Adjusting color balance<br />
• Adjusting brightness, contrast, and clarity<br />
• Controlling depth of field<br />
For more information about adjusting images, including correcting<br />
light and lens distortions, controlling noise, adding blur, or sharpening<br />
images, see “Adjusting images” in the Help.<br />
Adjusting images 65
Rotating images<br />
You can rotate an image by 90 degrees to change its orientation to<br />
landscape (horizontal) or portrait (vertical). If your camera contains<br />
sensors that tag photos taken in portrait orientation, your photos are<br />
automatically rotated to the correct orientation.<br />
You can rotate an image in <strong>Corel</strong> PaintShop <strong>Pro</strong>.<br />
You can also rotate an image to any angle by specifying a degree of<br />
rotation or by rotating it interactively on the canvas. For information<br />
about rotating an image to straighten it according to reference points<br />
within the image, such as the horizon, see “Straightening images” on<br />
page 70.<br />
You can also use the Manage workspace to apply lossless rotation to<br />
JPEG images while retaining all of the original image data.<br />
To rotate an image<br />
Edit workspace<br />
• Select an image, and perform a task from the following table.<br />
To Do the following<br />
Rotate an image 90 degrees<br />
clockwise or counterclockwise<br />
Choose Image � Rotate Right, or<br />
choose Image � Rotate Left.<br />
66 <strong>Corel</strong> PaintShop <strong>Pro</strong> <strong>X4</strong> <strong>User</strong> <strong>Guide</strong>
To Do the following<br />
Rotate an image to a specific<br />
angle<br />
You can also rotate an image by clicking the Rotate Right or<br />
Rotate Left button on the Standard toolbar.<br />
If you want to change the center of rotation before you<br />
interactively rotate the image, hold down Ctrl, and drag the<br />
rotation pivot point (the circle at the center of the image) to a<br />
new position.<br />
Cropping images<br />
Choose Image � Free Rotate. In<br />
the Free Rotate dialog box,<br />
choose either the Right option or<br />
the Left option to set the direction<br />
of rotation. In the Degrees group<br />
box, choose the Free option, and<br />
type or set a value in the control.<br />
Rotate an image interactively On the Tools toolbar, choose the<br />
Pick tool . Rotate the image by<br />
dragging the rotation handle (the<br />
square connected by a line to the<br />
rotation pivot point). The cursor<br />
changes to two curved arrows<br />
when it is positioned over the<br />
rotation handle.<br />
You can remove unwanted portions of an image to create stronger<br />
compositions or to draw attention to another area of the image.<br />
<strong>Corel</strong> PaintShop <strong>Pro</strong> helps you crop by providing presets to common<br />
image sizes, such as 4 × 6 inches or 10 × 15 centimeters.<br />
Cropping reduces the amount of hard drive memory required for<br />
storing the image. In addition, cropping can improve color corrections<br />
Adjusting images 67
y eliminating extraneous areas of color. If a photograph requires both<br />
cropping and color correction, you should crop the image first and<br />
then apply the color correction.<br />
Important! Cropping permanently removes the image<br />
area outside the crop rectangle. To preserve the original<br />
photo, use the Save As command, and save the<br />
cropped version of your image to a new filename.<br />
To crop an image<br />
Edit workspace<br />
Floating toolbar for the Crop tool<br />
1 On the Tools toolbar, choose the Crop tool .<br />
2<br />
By default, the crop rectangle appears on the image, and the area<br />
outside the crop rectangle is shaded.<br />
Adjust the crop area size by dragging any of the handles or edges.<br />
To reposition the crop rectangle, place the cursor inside and drag.<br />
You can use a preset crop size by choosing an option from the<br />
Presets drop-list on the floating toolbar for the Crop tool, or from<br />
the drop-list on the Tool Options palette.<br />
3 When you’re ready to crop the image, click the Apply button<br />
on the Tool Options palette or on the floating toolbar for the Crop<br />
tool.<br />
68 <strong>Corel</strong> PaintShop <strong>Pro</strong> <strong>X4</strong> <strong>User</strong> <strong>Guide</strong>
You can also<br />
Apply the crop by using your<br />
mouse or keyboard<br />
Set the size of the crop rectangle<br />
on the Tool Options palette<br />
Constrain the crop area to its<br />
current proportions<br />
Rotate the crop rectangle by<br />
90 degrees<br />
To crop an image for printing<br />
Edit workspace<br />
Double-click inside the crop<br />
rectangle, or press Enter.<br />
Specify the values in the Width,<br />
Height, and Units controls.<br />
Mark the Maintain aspect ratio<br />
check box on the Tool Options<br />
palette. This option is available<br />
only for custom-defined crop<br />
rectangles.<br />
Click the Rotate Crop Rectangle<br />
button on the floating<br />
toolbar.<br />
Freely rotate the crop rectangle Drag the square end of the<br />
rotation handle. This feature can<br />
be helpful when, for example, you<br />
want to straighten and then crop<br />
a crookedly scanned photo.<br />
Clear the crop area Click the Clear button on the<br />
floating toolbar for the Crop tool.<br />
1 On the Tools toolbar, choose the Crop tool .<br />
2 Define the crop area by dragging within the image.<br />
3 On the Tool Options palette, mark the Specify Print Size check box.<br />
Note: If the Specify Print Size check box is marked, the image<br />
resolution changes when you change values in the Height and<br />
Width controls. The current resolution appears to the right of the<br />
Units drop-list.<br />
4 In the Units drop-list, select Inches or Centimeters.<br />
Adjusting images 69
Note: The Pixels option is unavailable for this method of<br />
cropping.<br />
5 Type or set position values in the Top, Bottom, Left, and Right<br />
controls.<br />
6 Type or set the dimension values in the Height and Width controls.<br />
The final crop area is sized as specified, and the image resolution<br />
is reduced or increased as needed.<br />
7 Click the Apply button on the Tool Options palette, or on the<br />
floating toolbar for the Crop tool.<br />
Straightening images<br />
You can easily straighten crooked images by aligning a straightening<br />
bar with an image feature. <strong>Corel</strong> PaintShop <strong>Pro</strong> rotates the image so<br />
that this straightening bar is perfectly horizontal and vertical. This<br />
feature is especially useful when an image has a strong vertical or<br />
horizontal feature, such as a building or horizon.<br />
The Straighten tool lets you position a straightening bar<br />
within an image.<br />
To straighten an image<br />
Edit workspace<br />
1 On the Tools toolbar, choose the Straighten tool .<br />
70 <strong>Corel</strong> PaintShop <strong>Pro</strong> <strong>X4</strong> <strong>User</strong> <strong>Guide</strong>
A straightening bar with end handles appears on the image.<br />
2 Drag each handle of the straightening bar to align it with the part<br />
of the image that you want to straighten.<br />
3 On the Tool Options palette, choose one of the following options<br />
from the Mode drop-list:<br />
• Auto — automatically straightens the image based on the<br />
position of the straightening bar<br />
• Make vertical — rotates the image to make the straightening<br />
bar vertical<br />
• Make horizontal — rotates the image to make the straightening<br />
bar horizontal<br />
4 Click the Apply button .<br />
You can also<br />
Choose a specific angle for the<br />
straightening bar<br />
Crop the edges of the image to<br />
make it rectangular after<br />
straightening<br />
Fill the edge areas of your image<br />
with the background color<br />
You can also double-click the image to apply the command.<br />
Correcting photographic perspective<br />
Type or set a value in the Angle<br />
control on the Tools Options palette.<br />
Mark the Crop image check box on<br />
the Tools Options palette.<br />
Unmark the Crop image check box<br />
on the Tools Options palette.<br />
When you take pictures of tall or wide objects, the resulting<br />
photographs may have perspective distortion — that is, the objects<br />
may seem to be leaning or angled. This distortion occurs when the<br />
camera is at an angle to the subject.<br />
Adjusting images 71
By using the Perspective Correction tool, you can fix perspective<br />
distortion, such as the angled sides of a building. You can also fix<br />
photographic perspective in an entire layer by using the Pick tool.<br />
Using the Perspective Correction tool changes the angle of the building.<br />
To correct perspective in a photo<br />
Edit workspace<br />
1 On the Tools toolbar, choose the Perspective Correction tool<br />
A bounding box with corner handles appears on the image.<br />
.<br />
2 On the Tool Options palette, choose settings for the following<br />
controls:<br />
• Grid lines — lets you type or set the number of gridlines to<br />
display<br />
3<br />
• Crop image — recrops the image to a rectangular shape after<br />
the perspective is applied<br />
Note: Marking the Crop image check box deletes the areas of the<br />
image that fall outside the rectangle.<br />
Drag each handle to the corner of the object that should be<br />
rectangular.<br />
4 Click the Apply button .<br />
You can also apply the command by double-clicking the image.<br />
72 <strong>Corel</strong> PaintShop <strong>Pro</strong> <strong>X4</strong> <strong>User</strong> <strong>Guide</strong>
To reset the perspective correction box to the original rectangle,<br />
click Cancel on the Tool Options palette.<br />
Making basic photo corrections automatically<br />
If you are not sure what adjustments to make to a photo, you can<br />
apply either the One Step Photo Fix command or the Smart Photo Fix<br />
command and see if you like the results. The One Step Photo Fix<br />
command automatically applies a predetermined set of color<br />
balancing and sharpening corrections to your photo — all you need to<br />
do is select the command. If you want the option of fine-tuning the<br />
same corrections before applying them, you can use the Smart Photo<br />
Fix command.<br />
You can use the One Step Photo Fix command to improve the<br />
exposure and color balance of images quickly and easily.<br />
Adjusting images 73
The Smart Photo Fix feature gives you control over the<br />
amount and type of corrections applied to an image.<br />
The advanced options of the Smart Photo Fix feature let you adjust<br />
color balance by identifying the neutral areas in the photo (black, gray,<br />
and white), which are used as sampling points. The advanced options<br />
also let you modify the darkest and lightest pixels of the photo without<br />
affecting the photo’s color balance. For information about advanced<br />
options, see “To use advanced options of Smart Photo Fix” in the Help.<br />
To apply basic corrections with One Step Photo Fix<br />
Edit workspace<br />
• Choose Adjust � One Step Photo Fix.<br />
After a brief pause, several basic corrections are applied to your<br />
photo.<br />
74 <strong>Corel</strong> PaintShop <strong>Pro</strong> <strong>X4</strong> <strong>User</strong> <strong>Guide</strong>
The corrections applied are identical to what would be applied<br />
by accepting the suggested settings of the Smart Photo Fix<br />
feature.<br />
If you are not satisfied with the changes made to your<br />
photo, choose Edit � Undo. Then, choose Adjust � Smart<br />
Photo Fix, and adjust the available settings. You can also<br />
try using other Adjust menu commands, such as<br />
Brightness and Contrast � Curves or Brightness and Contrast �<br />
Levels.<br />
To fine-tune basic corrections with Smart Photo Fix<br />
Edit workspace<br />
1 Choose Adjust � Smart Photo Fix.<br />
The Smart Photo Fix dialog box appears. In the upper portion of<br />
the dialog box, the Before pane shows the original photo. The<br />
After pane shows how the photo would appear after applying the<br />
suggested set of basic adjustments.<br />
2 Perform one or more tasks from the following table, and click OK.<br />
To Do the following<br />
Brighten or darken the photo In the Brightness group box, type<br />
or set a value in the Overall,<br />
Shadows, and Highlights controls,<br />
or adjust their corresponding<br />
sliders.<br />
Note: Positive settings brighten<br />
the photo, and negative settings<br />
darken the photo.<br />
Adjusting images 75
To Do the following<br />
Increase or decrease saturation Type or set a value in the<br />
Saturation control, or adjust the<br />
slider.<br />
Note: Positive settings make<br />
colors more vibrant; negative<br />
settings make colors less vibrant.<br />
Sharpen the edges of the photo Type or set a value in the Focus<br />
control, or adjust the slider.<br />
You can reset all settings to their initial values by clicking<br />
Suggest Settings, or to null settings by clicking the Reset to<br />
Default button .<br />
To use advanced settings of the Smart Photo Fix feature, mark<br />
the Advanced Options check box.<br />
Removing digital noise<br />
The term “noise” as it relates to photos refers to small specks of color<br />
that interfere with image clarity. These specks are usually caused by<br />
poor lighting conditions or the limitations of the sensor in your digital<br />
camera. For example, when you zoom in on a photo of a clear blue sky,<br />
you may see tiny specks of orange, red, purple, green, or other colors.<br />
<strong>Corel</strong> PaintShop <strong>Pro</strong> gives you two fast, powerful commands for<br />
removing noise from your photos: One Step Noise Removal and Digital<br />
Noise Removal. When you use a noise removal command, the program<br />
analyzes your photo, identifies the noise artifacts, and applies<br />
corrections based on these identified areas, while preserving the<br />
important edge details of your photo.<br />
76 <strong>Corel</strong> PaintShop <strong>Pro</strong> <strong>X4</strong> <strong>User</strong> <strong>Guide</strong>
The image on the left looks grainy because of digital camera<br />
noise. The image on the right appears smoother and less<br />
grainy after the noise has been removed.<br />
You can automatically apply noise correction to your photo with the<br />
One Step Noise Removal command. You can also control more<br />
precisely how the same corrections are applied by using the more<br />
comprehensive Digital Noise Removal command. For more information<br />
about this command, see “Removing digital noise” in the Help.<br />
To remove digital noise quickly<br />
Edit workspace<br />
• Choose Adjust � One Step Noise Removal.<br />
After a brief pause, the noise is automatically removed.<br />
Adjusting color balance<br />
You can often improve a photo dramatically by adjusting the colors.<br />
Different types of lighting, cameras, and the processing that occurs<br />
inside the camera can cause incorrect coloring in photos. Scanned<br />
images may have unnatural color casts.<br />
To adjust color balance<br />
Edit workspace<br />
1 Choose Adjust � Color Balance.<br />
The Color Balance dialog box appears.<br />
Adjusting images 77
2 Mark the Smart White Balance check box.<br />
This allows <strong>Corel</strong> PaintShop <strong>Pro</strong> to evaluate and make minor<br />
corrections to the image automatically.<br />
3 Drag the temperature slider to the left for cooler colors (more<br />
blue), or to the right for warmer colors (more orange).<br />
4 Click OK.<br />
If you know what color temperature the photo should be, you<br />
can set precise tonal balance values by marking the Advanced<br />
Options check box and typing or setting the temperature values<br />
in the Temperature and Tint controls in the White Balance<br />
group box. You can tweak the colors by adjusting values in the<br />
Temperature and Tint controls in the Enhance Color Balance<br />
group box.<br />
To correct faded colors<br />
Edit workspace<br />
1 Choose Adjust � Color � Fade Correction.<br />
Drag in the Before pane to center an important part of the image<br />
(such as a face).<br />
2 Adjust the value in the Amount of correction control until the<br />
image looks the most natural.<br />
The default value is 45.<br />
Note: Use the minimum value that produces a good correction. If<br />
you apply too much correction, highlight and shadow areas may<br />
lose detail, and objects may blend together.<br />
3 Click OK.<br />
To change color cast<br />
Edit workspace<br />
1 Choose Adjust � Color � Red/Green/Blue.<br />
The Red/Green/Blue dialog box appears.<br />
78 <strong>Corel</strong> PaintShop <strong>Pro</strong> <strong>X4</strong> <strong>User</strong> <strong>Guide</strong>
2 In the Red, Green, and Blue controls, type or set a value to change<br />
the percentage for each color.<br />
A value of 0% preserves the original value. To add more of a color,<br />
use a positive number. To remove some of a color, use a negative<br />
number.<br />
Note: Reducing the amount of blue adds a yellow cast to the<br />
image, reducing the amount of green adds a magenta cast to the<br />
image, and reducing the amount of red adds a cyan cast to the<br />
image.<br />
3 Click OK.<br />
Adjusting brightness, contrast, and clarity<br />
<strong>Corel</strong> PaintShop <strong>Pro</strong> lets you adjust the brightness, contrast, and clarity<br />
in your photos. Contrast is the difference between the photo’s lightest<br />
and darkest pixels. Clarity lets you adjust the level of detail in the image<br />
by analyzing contrast within localized areas.<br />
For more information about adjustment filters in the Brightness/<br />
Contrast group, including Curves, Levels, and Histogram Adjustment,<br />
see “Adjusting brightness, clarity, and contrast” in the Help.<br />
To change brightness or contrast<br />
Edit workspace<br />
1 Choose Adjust � Brightness and Contrast � Brightness/Contrast.<br />
The Brightness/Contrast dialog box appears.<br />
2 Type or set a value in the Brightness control.<br />
A positive number lightens the photo; a negative number darkens<br />
the photo. A value of zero preserves the original setting.<br />
3 Type or set a value in the Contrast control.<br />
A positive number increases contrast; a negative number<br />
decreases contrast. A value of zero preserves the original setting.<br />
Adjusting images 79
4 Click OK.<br />
You can use the zoom control in the dialog box to set your view<br />
of the image in the Before and After panes.<br />
To brighten dark areas and adjust clarity<br />
Edit workspace<br />
1 Choose Adjust � Brightness and Contrast � Fill Light/Clarity.<br />
The Fill Light/Clarity dialog box appears.<br />
2 Type or set a value in the Fill Light control.<br />
A positive number lightens the darkest areas of the photo; a<br />
negative number darkens the light areas of the photo. A value of<br />
zero preserves the original setting.<br />
3 Type or set a value in the Clarity control.<br />
A positive number increases detail; a negative number decreases<br />
detail and focus. A value of zero preserves the original setting.<br />
4 Click OK.<br />
To enhance depth and clarity<br />
Edit workspace<br />
1 Choose Adjust � Brightness and Contrast � Local Tone Mapping.<br />
The Local Tone Mapping dialog box appears.<br />
2 Type or set a value in the Strength control.<br />
Use the smallest value that produces a satisfying result. Values<br />
that are too high cause unwanted artifacts to appear in the photo.<br />
3 Click OK.<br />
You can use the zoom control in the dialog box to set your view<br />
of the image in the Before and After panes.<br />
80 <strong>Corel</strong> PaintShop <strong>Pro</strong> <strong>X4</strong> <strong>User</strong> <strong>Guide</strong>
Controlling depth of field<br />
You can control the depth of field to create an area of focus that draws<br />
attention to the subject in your photo. For example, in a photo of a<br />
person surrounded by a field of flowers, you can defocus (blur) the<br />
surrounding flowers while retaining a clear focus on the person.<br />
You can apply the Depth of Field effect to draw attention to<br />
the subject in your photo.<br />
To create an area of focus by using the Depth of Field effect<br />
Edit workspace<br />
1 In the Edit workspace, select the area that you want to keep in<br />
focus.<br />
For information about selecting image areas, see “Creating<br />
selections” on page 157.<br />
2 Click Adjust � Depth of Field.<br />
The Depth of Field dialog box appears.<br />
3 Move the Blur slider to adjust the amount of blur applied to the<br />
out-of-focus area.<br />
Adjusting images 81
You can also<br />
Invert the selected area Mark the Invert check box.<br />
Control the aperture shape for the<br />
blurred area<br />
Adjust the transition between the<br />
area in focus and the blurred area<br />
Fine-tune the size of the area in<br />
focus<br />
Click one of the following<br />
buttons:<br />
• Circular Aperture Shape<br />
• Hexagonal Aperture Shape<br />
Move the Feather edge slider.<br />
Moving the slider to the right<br />
increases the feathering; moving the<br />
slider to the left decreases the<br />
feathering. Note that a setting of 0<br />
produces a hard, undefined edge,<br />
which is probably not what you<br />
want. In general, do not set this<br />
slider to less than 2 or 3.<br />
Move the Focus range slider to the<br />
left to shrink the area in focus. Move<br />
the slider to the right to expand the<br />
area in focus to the edge of the<br />
selection.<br />
If you don’t have a pre-existing selection, you can select an area<br />
of focus using any of the selection tools in the Depth of Field<br />
dialog box: Circular , Freehand , Rectangular , or<br />
Raster Selection .<br />
Make your selection slightly larger than the area you want to<br />
keep in focus, and then fine-tune the edge of the selection by<br />
using the Focus range slider.<br />
82 <strong>Corel</strong> PaintShop <strong>Pro</strong> <strong>X4</strong> <strong>User</strong> <strong>Guide</strong>
Retouching and restoring images<br />
<strong>Corel</strong> PaintShop <strong>Pro</strong> provides you with many ways to retouch your<br />
images. Whether you want to remove a small scratch, erase the entire<br />
background, or simply correct red-eye, you’ll find the tools you need.<br />
This section presents the following topics:<br />
• Removing red-eye<br />
• Applying cosmetic changes<br />
• Removing scratches<br />
• Removing flaws and objects<br />
• Erasing image areas<br />
• Cutting out image areas<br />
• Recoloring image areas for a realistic effect<br />
• Adding borders<br />
• Scaling photos by using Smart Carver<br />
For more topics related to retouching images, such as dodging and<br />
burning, filling image areas (with colors, gradients, or patterns),<br />
flipping, scaling, or transforming images, see “Retouching and<br />
restoring images” in the Help.<br />
Retouching and restoring images 83
Removing red-eye<br />
Red-eye in photos is a common problem. When light from the<br />
camera’s flash reflects off the retina of a photo subject, a red-eye effect<br />
is captured in the photo. <strong>Corel</strong> PaintShop <strong>Pro</strong> has two methods of<br />
removing red-eye from a color photo.<br />
The fastest method of removal is to use the Red Eye tool. A more<br />
powerful method is to use the advanced Red Eye Removal command,<br />
which lets you change the eye color. For more information about the<br />
advanced red-eye removal method, see “To use advanced options for<br />
red-eye removal” in the Help.<br />
The Red Eye tool replaces the red color in the subject’s<br />
pupil with a dark gray color, restoring a natural look.<br />
To remove red-eye quickly<br />
Edit workspace<br />
1 On the Tools toolbar, choose the Red Eye tool .<br />
2 On the Tool Options palette, adjust the Size of Red-Eye control so<br />
that the pointer is about twice the size of the red area needing<br />
correction.<br />
3 Position the pointer directly over the eye, and click.<br />
You can zoom in on the photo, if necessary, for better control<br />
of the Red Eye tool.<br />
You can size the pointer interactively by holding down Alt while<br />
dragging the Red Eye tool over the eye area.<br />
84 <strong>Corel</strong> PaintShop <strong>Pro</strong> <strong>X4</strong> <strong>User</strong> <strong>Guide</strong>
Applying cosmetic changes<br />
You can quickly improve the appearance of the subjects in your photos<br />
by performing the following cosmetic changes:<br />
• removing blemishes — by using the Blemish Fixer mode of the<br />
Makeover tool<br />
• whitening teeth — by using the Toothbrush mode of the<br />
Makeover tool<br />
• fixing bloodshot eyes — by using the Eye Drop mode of the<br />
Makeover tool<br />
• adding a suntan — by using the Suntan mode of the Makeover<br />
tool<br />
• thinning a photo subject — by using the Thinify mode of the<br />
Makeover tool<br />
• removing wrinkles — by using the Scratch Remover tool<br />
• smoothing skin tone quickly — by using the Skin Smoothing<br />
command in the Adjust menu<br />
You can remove blemishes, whiten teeth, and apply a suntan.<br />
Retouching and restoring images 85
To remove facial blemishes<br />
Edit workspace<br />
1 On the Tools toolbar, choose the Makeover tool .<br />
2 On the Tool Options palette, choose the Blemish Fixer mode.<br />
The pointer changes to concentric circles.<br />
3 On the Tool Options palette, adjust the Size control to the smallest<br />
size that allows the inner circle to enclose the blemish.<br />
The outer circle is for the material used to cover the blemish.<br />
4 On the Tool Options palette, adjust the Strength control.<br />
Values range from 1 to 100. Higher values apply more of the<br />
source material (enclosed in the outer circle) to the blemish area<br />
(enclosed in the inner circle).<br />
5 Click directly over the blemish.<br />
You can zoom in on the photo for better control of the<br />
Makeover tool.<br />
To whiten teeth<br />
Edit workspace<br />
1 On the Tools toolbar, choose the Makeover tool .<br />
2 On the Tool Options palette, choose the Toothbrush mode.<br />
3 On the Tool Options palette, adjust the Strength control as<br />
desired.<br />
Higher settings produce more intense whitening but may also<br />
produce an unnatural appearance.<br />
4 Click directly over the teeth.<br />
If the teeth are separated or partially obscured, you may need to<br />
apply this tool to each tooth individually.<br />
86 <strong>Corel</strong> PaintShop <strong>Pro</strong> <strong>X4</strong> <strong>User</strong> <strong>Guide</strong>
The Toothbrush mode of the Makeover tool works only with<br />
color photos.<br />
To apply whitening eye drops<br />
Edit workspace<br />
1 On the Tools toolbar, choose the Makeover tool .<br />
2 On the Tool Options palette, choose the Eye Drop mode.<br />
3 Type or set a value in the Strength control.<br />
Higher values whiten more of the eye area but may spread the<br />
whitening beyond the affected area of the eye.<br />
4 Zoom in as necessary, and then carefully click over the bloodshot<br />
portion of the eye.<br />
To apply a suntan<br />
Edit workspace<br />
1 On the Tools toolbar, choose the Makeover tool .<br />
2 On the Tool Options palette, choose the Suntan mode.<br />
3 Type or set a value in the Size control.<br />
4 Type or set a value in the Strength control.<br />
Higher values produce a darker tan.<br />
5 Carefully drag over the skin of the photo subject.<br />
To apply a thinning effect<br />
Edit workspace<br />
1 On the Tools toolbar, choose the Makeover tool .<br />
2 On the Tool Options palette, choose the Thinify mode.<br />
3 Type or set a value in the Strength control.<br />
4<br />
Higher values compress more pixels in the horizontal axis.<br />
Click the middle of the photo subject.<br />
Retouching and restoring images 87
The pixels compress on either side of the point you click. You can<br />
continue clicking to enhance the thinning effect.<br />
To remove facial wrinkles<br />
Edit workspace<br />
1 On the Tools toolbar, choose the Scratch Remover tool .<br />
2 On the Tool Options palette, choose either the square edge or<br />
the beveled edge selection box.<br />
3 Type or set a value in the Width control so that the wrinkle fits<br />
inside the inner portion of the selection box you drag.<br />
4 Position the pointer just outside the wrinkle, and carefully drag<br />
over the wrinkle so that the wrinkle is enclosed in the inner<br />
rectangle.<br />
The wrinkle is covered by the surrounding skin texture.<br />
If you need to start again, you can undo the correction, adjust<br />
the Width control, and redrag.<br />
For wrinkle lines that are not straight, correct just one portion<br />
at a time.<br />
To smooth skin tone<br />
Edit workspace<br />
1 Choose Adjust � Skin Smoothing.<br />
2 In the Skin Smoothing dialog box, adjust the Amount slider.<br />
Moving the slider to the right applies more smoothing; moving<br />
the slider to the left applies less smoothing.<br />
88 <strong>Corel</strong> PaintShop <strong>Pro</strong> <strong>X4</strong> <strong>User</strong> <strong>Guide</strong>
The Skin Smoothing command smooths skin tones and diminishes<br />
the appearance of wrinkles and blemishes quickly.<br />
The Skin Smoothing command automatically detects and<br />
smooths skin tones without affecting eyes or lips. However, if<br />
other areas in your photo are affected because they are similar<br />
in color to the skin tone, you can use a selection to isolate the<br />
area you want to smooth. For more information about<br />
selections, see “Creating selections” on page 157.<br />
Removing scratches<br />
The Scratch Remover tool lets you remove scratches, cracks, and other<br />
unwanted image areas from photos.<br />
You can repair individual scratches by using the Scratch Remover tool.<br />
Retouching and restoring images 89
You can use the tool to enclose the flawed area and fill it with the<br />
surrounding content that you want to keep. If the background is<br />
relatively smooth, the result is usually satisfying. Scratches on a<br />
textured or more complex background may be more effectively<br />
removed with the Clone Brush tool. For information about the Clone<br />
Brush tool, see “Removing flaws and objects” on page 91.<br />
For images containing many small scratches, you can use the<br />
Automatic Small Scratch Remover command. For more information,<br />
see “To remove scratches automatically” in the Help.<br />
To remove scratches<br />
Edit workspace<br />
1 On the Layers palette, select the layer that contains the area you<br />
want to remove.<br />
2 On the Tools toolbar, choose the Scratch Remover tool .<br />
3 On the Tool Options palette, choose one of the following options<br />
to define the shape of the Scratch Remover tool:<br />
• square edge — corrects scratches that are perpendicular to<br />
object edges, in an open area, or of uniform color<br />
• beveled edge — corrects scratches that are at an angle to<br />
object edges<br />
4 Position the pointer just outside the scratch on one end, hold<br />
down the left mouse button, and drag to set a selection box over<br />
the scratch.<br />
5 Release the mouse button.<br />
The enclosed area is replaced with the surrounding pixels.<br />
You can also<br />
Move the selection box starting<br />
point in 1-pixel increments<br />
Before releasing the mouse<br />
button, press an Arrow key.<br />
90 <strong>Corel</strong> PaintShop <strong>Pro</strong> <strong>X4</strong> <strong>User</strong> <strong>Guide</strong>
You can also<br />
Increase or decrease the width of<br />
the selection box in 1-pixel<br />
increments<br />
Use surrounding pixels to fill the<br />
area perpendicular to the edge of<br />
the selection box<br />
To avoid removing important details from areas surrounding<br />
the scratch, you can limit the correction by creating a selection.<br />
For information about creating selections, see “Creating<br />
selections” on page 157.<br />
If you are not satisfied with the result, click the Undo button<br />
, reselect the scratch, and try varying the width of the tool.<br />
If the scratch extends over several different backgrounds, you<br />
can try removing the scratch one section at a time.<br />
Removing flaws and objects<br />
Before releasing the mouse<br />
button, press Page up or Page<br />
down.<br />
Before releasing the mouse<br />
button, press Shift.<br />
This technique is ideal for photos<br />
in which the background contains<br />
areas with defined borders and<br />
lines, such as a brick wall.<br />
You can remove flaws and objects in your images by using the Clone<br />
Brush tool or the Object Remover tool. The Clone Brush tool lets you<br />
remove flaws and objects by painting over them with another part of<br />
the image. The paint source can be a part of the same layer, another<br />
layer in the image, a merged image, or a layer from another image.<br />
Retouching and restoring images 91
The Clone Brush tool was used to remove the garbage bag from<br />
the photo on the left.<br />
The Object Remover tool lets you remove objects when the<br />
surrounding area is fairly uniform in color and texture. This tool is<br />
similar to the Clone Brush tool in that it lets you identify the area to<br />
remove and then choose a background for covering that area.<br />
The Object Remover tool was used to remove one boat from the water.<br />
To clone a part of an image<br />
Edit workspace<br />
1 On the Tools toolbar, choose the Clone Brush tool .<br />
2 On the Tool Options palette, choose the brush tip, size, opacity,<br />
and other settings.<br />
If you want the Clone Brush tool to reset the source point each<br />
time you resume painting, mark the Aligned mode check box. You<br />
92 <strong>Corel</strong> PaintShop <strong>Pro</strong> <strong>X4</strong> <strong>User</strong> <strong>Guide</strong>
can continue dragging over the target area to fill in the source<br />
image. Unmark the check box if you want every stroke to copy the<br />
same data from the original source point.<br />
If you want to clone data from all layers merged together, mark<br />
the Use all layers check box. If you want to clone data from the<br />
current layer only, unmark the check box.<br />
3 On the source image, right-click the center point of the source<br />
area.<br />
If the image has more than one layer, click the name of the layer<br />
on the Layers palette before you define the source area.<br />
4 Drag in the image where you want to paint the cloned area.<br />
When you clone an image area, you must select a source area<br />
with data.<br />
If your image contains a selection, you must right-click within<br />
the selection to set your clone source. If you are using a pen<br />
tablet, you can achieve the same result by holding down Shift.<br />
You can also hold down Shift and click the image to set the<br />
source point.<br />
You can resize the brush interactively by pressing Alt while<br />
dragging in the image window.<br />
To remove objects from a photo<br />
Edit workspace<br />
1 On the Tools toolbar, choose the Object Remover tool .<br />
2 On the Tool Options palette, choose the Selection Mode<br />
button .<br />
3 Drag around the object that you want to remove.<br />
4 On the Tool Options palette, choose the Source Mode button .<br />
Retouching and restoring images 93
A rectangle is displayed in the image window.<br />
5 Position the rectangle over the area that will replace the previous<br />
selection.<br />
6 Drag the handles on the rectangle to resize it, or drag the rotation<br />
handle on the rectangle to rotate it.<br />
It is recommended that you make the rectangle as large as, or<br />
slightly larger than, the area you are removing.<br />
7 On the Tool Options palette, click the Apply button .<br />
8 Choose Selections � Select None to deselect the selection.<br />
You can also create a selection by using any of the selection<br />
tools before you activate the Object Remover tool.<br />
You can deselect the selection by pressing Ctrl + D.<br />
Erasing image areas<br />
You can use the Eraser tool to erase areas of a layer to transparency.<br />
When you use the Eraser tool on a raster layer, all pixels in the tool’s<br />
path become transparent. A gray-and-white checkerboard pattern<br />
indicates transparent areas.<br />
You can quickly remove the background from<br />
an image by using the Background Eraser tool.<br />
94 <strong>Corel</strong> PaintShop <strong>Pro</strong> <strong>X4</strong> <strong>User</strong> <strong>Guide</strong>
You can use the Background Eraser tool to erase pixels selectively. For<br />
example, in a photo of a mountain range, you can erase the sky, or you<br />
can isolate an object from the surrounding image area.<br />
For information about the settings available for the Background Eraser<br />
tool, see “Erasing image areas” in the Help.<br />
To erase an image area<br />
Edit workspace<br />
1 On the Tools toolbar, choose the Eraser tool .<br />
2 On the Tool Options palette, choose the brush options you want.<br />
3 Drag in the image to erase.<br />
You can also<br />
Restore erased pixels Hold down the right mouse<br />
button, and drag over the erased<br />
area.<br />
Erase a straight line Click at the beginning of the line,<br />
hold down Shift, and click the end<br />
of the line. To continue erasing<br />
the line, move to the next point,<br />
hold down Shift, and click again.<br />
If you erase the background layer, the Eraser tool erases to<br />
transparency, and the layer is automatically promoted to a<br />
raster layer.<br />
To erase the background area of an image<br />
Edit workspace<br />
1 On the Layers palette, click the layer that contains the image<br />
element that you want to isolate.<br />
2 On the Tools toolbar, choose the Background Eraser tool .<br />
Retouching and restoring images 95
3 On the Tool Options palette, choose the brush options you want.<br />
4 Drag around the edges of the image area that you want to isolate.<br />
Slow, careful strokes give you the best results. Keep the center of<br />
the brush on regions you want to erase, while keeping the edges<br />
of the brush on regions you want to preserve.<br />
You can also<br />
Restore erased pixels Right-click and drag.<br />
Erase a straight line Click once at the beginning point,<br />
hold down Shift, and click the<br />
endpoint. To continue erasing the<br />
line, move to the next point, hold<br />
down Shift, and click again.<br />
Switch to the Eraser tool Hold down the Backspace key<br />
while you drag the mouse.<br />
The background layer is automatically promoted to a raster<br />
layer when you work on it with the Background Eraser tool.<br />
Cutting out image areas<br />
You can use the Object Extractor to cut out an image area from the<br />
surrounding background. You can then edit the cutout separately from<br />
the background, display it against a different background, or combine<br />
it with other images.<br />
96 <strong>Corel</strong> PaintShop <strong>Pro</strong> <strong>X4</strong> <strong>User</strong> <strong>Guide</strong>
1<br />
4 5<br />
Object Extractor workflow: (1) Outline the edges of the image area; (2) add<br />
a fill; (3) preview the cutout, and touch it up if necessary; (4) bring the<br />
cutout into the image window; (5) place the cutout against a different<br />
background image (optional).<br />
To cut out an image area<br />
Edit workspace<br />
2 3<br />
1 On the Layers palette, click the layer that contains the image area<br />
that you want to cut out.<br />
2 Choose Image � Object Extractor.<br />
The Object Extractor dialog box appears, with the Brush tool<br />
activated by default.<br />
3 Adjust the brush size by moving the Brush size slider.<br />
4 In the preview area, draw a line along the edges of the image area<br />
that you want to cut out.<br />
Ensure that the selection outline slightly overlaps the surrounding<br />
background and completely surrounds the area in a closed ring.<br />
Retouching and restoring images 97
5 Choose the Fill tool<br />
out.<br />
, and click inside the area you want to cut<br />
An overlay covers the image area that you clicked.<br />
Note: If the selection outline is not closed, the fill covers the entire<br />
image. If this is the case, click the Eraser tool to clear the fill,<br />
6<br />
and then complete the selection outline with the Brush tool.<br />
Click <strong>Pro</strong>cess to preview the result.<br />
If you are not happy with the result, click Edit Mask to return to<br />
the previous view and touch up the cutout.<br />
You can also<br />
Erase parts of the selection outline<br />
Refine the edge detail in the final<br />
result<br />
Choose the Eraser tool and<br />
drag over the selection marquee<br />
that you want to delete.<br />
Move the Accuracy slider to a<br />
higher value if the object has an<br />
intricate or complex outline.<br />
The Accuracy slider is available<br />
only after you click <strong>Pro</strong>cess.<br />
Revert to the original image Click Reset. The Reset button is<br />
available only before you click<br />
<strong>Pro</strong>cess and clears both the fill<br />
and the selection outline.<br />
Hide the fill overlay and the edge<br />
outline<br />
Specify an exact size for the brush<br />
or eraser nib<br />
Mark the Hide Mask check box.<br />
Type or set a value in the Brush<br />
size box.<br />
Zoom in and out Type or set a value in the Zoom<br />
box.<br />
Display an image at its actual size Click the Zoom Image to 100%<br />
button .<br />
98 <strong>Corel</strong> PaintShop <strong>Pro</strong> <strong>X4</strong> <strong>User</strong> <strong>Guide</strong>
You can also<br />
Display an image in the entire<br />
preview area<br />
Click the Fit Image to Window<br />
button .<br />
Pan to another area of the image Using the Pan tool drag the<br />
image until the area you want to<br />
see is visible.<br />
The background layer is automatically promoted to a raster<br />
layer when you use the Object Extractor command.<br />
You can switch from the Brush tool to the Eraser tool by rightclicking<br />
and dragging in the preview area.<br />
Recoloring image areas for a realistic effect<br />
You can use the Color Changer tool to realistically recolor an object or<br />
a region in an image. What sets the Color Changer tool apart from<br />
other tools and commands (such as the Flood Fill tool, some of the<br />
retouching brushes, or the Colorize, Hue/Saturation/Lightness, or Hue<br />
Map commands) is that it takes into account the shading of the<br />
specified color. The Color Changer tool detects and analyzes variations<br />
in image brightness and applies the recoloring based on that<br />
illumination.<br />
It lets you adjust Tool Options palette settings for Tolerance and Edge<br />
Softness, and it updates the current recoloring as you modify settings<br />
on the Tool Options palette or modify the color in the Materials palette.<br />
The Color Changer tool works best on matte objects such as clothing,<br />
carpet, and painted objects that are a solid color. It may not work as<br />
well on shiny or reflective objects and is not designed to work with<br />
gradients or patterns.<br />
Retouching and restoring images 99
One click can change the color of the girl’s dress.<br />
To recolor by using the Color Changer tool<br />
Edit workspace<br />
1 On the Tools toolbar, choose the Color Changer tool .<br />
The Color Changer tool is grouped with the Flood Fill tool.<br />
2 On the Materials palette, click the Color button on the Style<br />
drop-list, and choose a solid color.<br />
If the Materials palette is not displayed, choose View � Palettes �<br />
Materials.<br />
For realistic-looking colors, set the Saturation value (in the<br />
Material <strong>Pro</strong>perties dialog box) closer to 100 than to 255 (full<br />
saturation).<br />
3 Position the Color Changer pointer over the color you want to<br />
change in the image, and then click to recolor with the<br />
Foreground/Stroke color, or right-click to recolor with the current<br />
Background/Fill color.<br />
4 Click Apply to set the color change on the object.<br />
100 <strong>Corel</strong> PaintShop <strong>Pro</strong> <strong>X4</strong> <strong>User</strong> <strong>Guide</strong>
You can also<br />
Use a color from the current<br />
image<br />
Instantly change the color you<br />
want to apply<br />
Choose the Dropper tool click the<br />
color you want in the image, and then<br />
choose the Color Changer tool to<br />
reactivate it.<br />
Before clicking Apply, click a color on<br />
the Materials palette.<br />
Adjust the color application Before clicking Apply, adjust any of the<br />
following controls on the Tool Options<br />
palette:<br />
• Tolerance — determines how<br />
closely the current color needs to<br />
match similar colors for recoloring<br />
to be applied. Higher settings<br />
cause more pixels to be recolored.<br />
• Edge Softness — determines how<br />
pixels that border the recolored<br />
pixels are affected. Higher settings<br />
cause more “bleeding” of the<br />
recoloring.<br />
While using the Color Changer tool, you can undo and redo<br />
actions such as adjusting colors or adjusting settings on the<br />
Tool Options palette.<br />
To isolate the area you want to recolor, you can create a<br />
selection. For more information about creating selections, see<br />
“Creating selections” on page 157.<br />
To prevent the Color Changer from affecting areas of the photo<br />
that you do not want to change, you can duplicate the layer on<br />
which the photo resides, apply the Color Changer to the new<br />
layer, and use the Eraser tool to erase the areas of changed<br />
color that you want to restore. You can then merge the layers.<br />
Retouching and restoring images 101
Adding borders<br />
You can add a colored frame or border around an image. When you<br />
add a border to an image, the dimensions of the image are expanded<br />
to the border.<br />
For multilayer images, <strong>Corel</strong> PaintShop <strong>Pro</strong> prompts you to flatten the<br />
image before adding the border; however, you can also add a border<br />
without flattening the image by changing the canvas size. For more<br />
information, see “Resizing the canvas” in the Help.<br />
To add a border to an image<br />
Edit workspace<br />
It’s easy to add a border around your image.<br />
1 Choose Image � Add Borders.<br />
The Add Borders dialog box appears.<br />
2 Do one of the following:<br />
• To create an equal-width border on all sides, mark the<br />
Symmetric check box.<br />
• To create borders of varying widths, unmark the Symmetric<br />
check box, and set border width values in the controls in the<br />
Size In Pixels group box.<br />
102 <strong>Corel</strong> PaintShop <strong>Pro</strong> <strong>X4</strong> <strong>User</strong> <strong>Guide</strong>
3 Click the Color box to choose a color for the border.<br />
4 Click OK.<br />
You can change the units of measurement for the border by<br />
choosing an option from the drop-list in the Original<br />
Dimensions group box.<br />
Scaling photos by using Smart Carver<br />
Smart Carver lets you make a photo narrower, wider, shorter, or longer<br />
without distorting the content. By automatically detecting and<br />
removing zones in the picture that have little structural detail, this<br />
feature lets you change the aspect ratio without noticeably changing<br />
the image. You can also target a specific zone to remove from the<br />
photo, regardless of its level of detail, or preserve specific objects or<br />
image areas.<br />
Smart Carver lets you selectively remove or protect areas when<br />
you scale an image.<br />
Retouching and restoring images 103
To remove or preserve an object by using Smart Carver<br />
Edit workspace<br />
1 Choose Image � Smart Carver.<br />
The Smart Carver dialog box opens.<br />
2 To remove or preserve an object or area from a photo, do one or<br />
both of the following:<br />
• Click the Remove button and apply the Remove brush to the<br />
areas of the photo that you want to remove.<br />
• Click the Preserve button and apply the Preserve brush to the<br />
area of the photo that you want to protect.<br />
In the Object Removal area, you can move the Brush Size slider to<br />
the left to decrease the size of the brush, or to the right to<br />
increase the size of the brush.<br />
3 Scale the photo by applying one or more of the Smart Carving<br />
options.<br />
.<br />
You can also<br />
Delete brushstrokes Click the Eraser button , and<br />
apply it to the brushstrokes that<br />
you want to erase.<br />
Zoom in or out In the Zoom box, enter a<br />
magnification level, or use the<br />
slider or the arrows to adjust the<br />
zoom level.<br />
Pan to view hidden areas of the<br />
photo<br />
Hide the brushstrokes in the<br />
preview area<br />
Reset the photo to its original<br />
state<br />
Click the Pan button and drag<br />
in the preview area.<br />
Mark the Hide Mask check box.<br />
Click Reset.<br />
104 <strong>Corel</strong> PaintShop <strong>Pro</strong> <strong>X4</strong> <strong>User</strong> <strong>Guide</strong>
To scale a photo by using Smart Carver<br />
Edit workspace<br />
1 Choose Image � Smart Carver.<br />
The Smart Carver dialog box opens.<br />
2 In the Smart Carving area, perform one or more tasks from the<br />
following table, and click OK.<br />
You can view the scaling results in the preview area.<br />
To Do the following<br />
Set a photo width Type or set a value in the Width<br />
box.<br />
Note: The maximum width is<br />
double the width of the original<br />
photo.<br />
Set a photo height Type or set a value in the Height<br />
box.<br />
Note: The maximum height is<br />
double the height of the original<br />
photo.<br />
Reduce the photo width by<br />
1-pixel increments<br />
Reduce the phot height by 1-pixel<br />
increments<br />
Increase the photo width by<br />
1-pixel increments<br />
Increase the photo height by<br />
1-pixel increments<br />
Click the Contract the image<br />
horizontally button until the<br />
image is the desired width.<br />
Click the Contract the image<br />
vertically button until the<br />
image is the desired height.<br />
Click the Expand the image<br />
horizontally button until the<br />
image is the desired width.<br />
Click the Expand the image<br />
vertically button until the<br />
image is the desired height.<br />
Retouching and restoring images 105
To Do the following<br />
Reduce the photo width by<br />
automatically removing the areas<br />
to which you have applied the<br />
Remove brush<br />
Reduce the photo height by<br />
automatically removing the areas<br />
to which you have applied the<br />
Remove brush<br />
Click the Auto-contract<br />
horizontally button to remove<br />
red-painted areas.<br />
Click the Auto-contract vertically<br />
button to remove red-painted<br />
areas.<br />
106 <strong>Corel</strong> PaintShop <strong>Pro</strong> <strong>X4</strong> <strong>User</strong> <strong>Guide</strong>
Merging exposures and content<br />
When you combine two or more photos, you can achieve some<br />
impressive results. What can you do?<br />
• Use HDR (high dynamic range) Exposure Merge to create a<br />
perfectly exposed image.<br />
• Seamlessly replace unwanted areas (cars, people, birds that flew<br />
into your frame) with the correct background.<br />
• Creatively combine elements from multiple photos into one<br />
image.<br />
If you have a DSLR camera, you likely have features that can help you<br />
take multiple photos of the same scene.<br />
This section presents the following topics:<br />
• Understanding HDR<br />
• Taking photos for HDR processing<br />
• Combining photos by using HDR Exposure Merge<br />
• Merging batches of photos into HDR images<br />
• Combining photos with Photo Blend<br />
Understanding HDR<br />
In photography, HDR refers to high dynamic range. “Dynamic range”<br />
is the range of luminance that can be captured in a photo, from the<br />
darkest shadows to the brightest highlights.<br />
Merging exposures and content 107
Unlike the human eye, digital camera sensors (or film in traditional<br />
cameras), can only capture a limited dynamic range when<br />
photographing scenes with both very bright and very dark areas, such<br />
as an interior with a large window. HDR processing creates a 32-bit<br />
image which has twice as much information, and therefore many more<br />
steps between tones, than an ordinary JPG. This HDR image is then<br />
evenly exposed, resolving details in the darkest areas, without losing<br />
definition in the brightest areas. And when pushed beyond the<br />
“corrective” boundaries, HDR can produce an unreal, plastic, or even<br />
“hyper-real” tone, and as such has become a creative technique in<br />
itself. Typically, an HDR file needs to be converted back to a 16-bit<br />
image format for final output.<br />
The photos along the top were taken with different<br />
exposure levels, then they were combined to create a<br />
single beautifully exposed image.<br />
Taking photos for HDR processing<br />
If you are new to HDR processing, the information below can help you<br />
get started.<br />
108 <strong>Corel</strong> PaintShop <strong>Pro</strong> <strong>X4</strong> <strong>User</strong> <strong>Guide</strong>
What camera features work well with HDR?<br />
You can use automatic exposure bracketing if your camera offers it or<br />
use the aperture priority mode and adjust the shutter speed to achieve<br />
different exposures. Avoid aperture changes because the depth of field<br />
may shift enough to cause blurring in some of the photos. Review the<br />
user manual for your camera for information about bracketing options<br />
and aperture priority mode.<br />
How many photos should I take for my HDR set?<br />
Usually, three photos is a good base (minimum is two), but to capture<br />
a very high contrast scene, take five or more (up to a maximum of<br />
nine).<br />
What exposure settings should I use?<br />
Try an initial setting of 2.0 exposure value (EV) between photos. If you<br />
are taking a greater number of photos, you can set the exposure at<br />
lower increments, but make sure that the number of shots is enough<br />
to cover a wide range of exposure. If you’re using auto-bracketing,<br />
your camera might limit the EV interval (sometimes to a maximum of<br />
+/- 1.0).<br />
Should I use a tripod?<br />
Yes, it’s best to use a tripod, but at the very least, you need to ensure<br />
that you have a steady hand (for example, stabilized against a wall).<br />
Using a tripod means that you are less likely to have alignment issues<br />
with the photos when you use HDR processing.<br />
Combining photos by using HDR Exposure Merge<br />
You can use Exposure Merge to combine two or more photos by using<br />
HDR (high dynamic range) processing.<br />
Merging exposures and content 109
Exposure Merge (Step 1 window)<br />
For more information about taking photos that work well with<br />
Exposure Merge, see “Taking photos for HDR processing” on<br />
page 108.<br />
Exposure Merge uses a three-step process:<br />
• Merge — Choose your merge settings, and if required, apply<br />
custom editing.<br />
• HDR Adjustments — After merging your photos, you can adjust<br />
them and save the results to an editable HDR file before finalizing<br />
the merge and fine-tuning.<br />
• Fine-Tune — Refine your image with noise-reduction, sharpening<br />
options, and other familiar tools from the Adjust workspace.<br />
When you’re done, you can save to a standard file format and<br />
close Exposure Merge.<br />
110 <strong>Corel</strong> PaintShop <strong>Pro</strong> <strong>X4</strong> <strong>User</strong> <strong>Guide</strong>
Please see the topics below for more detailed information about each<br />
step.<br />
Step 1: Merge<br />
Merge settings include:<br />
• Camera response curve profile — applies a curve adjustment to<br />
the image, based on the known characteristics of the sensor in<br />
your camera<br />
• Alignment — Choose between Feature-based (detects features in<br />
the photos) or Edge-based (detects edges within the photos).<br />
• Custom editing — Choose which areas you want to keep (Brush<br />
in) or remove (Brush out) from each photo. Often, custom editing<br />
is applied to remove “ghosting” — the semitransparent effect<br />
caused by merging photos that captured moving objects.<br />
Step 2: HDR Adjustments<br />
After you merge your photos, you can adjust the resulting HDR image<br />
by applying a preset, customizing a preset, or by creating the look you<br />
want from scratch. The key is to experiment. You can save your custom<br />
settings as a new preset. You can manage your presets by saving,<br />
loading, deleting or resetting them.<br />
All the adjustment options in the HDR Adjustments window let you<br />
work on an HDR, 32-bit file. You can save the HDR file with all settings,<br />
so you can reopen and modify it again in the future. When you are<br />
finished with Step 2 and move to Step 3, the final step, the application<br />
prepares the image for output by saving it to a 16-bit image.<br />
Step 3: Fine-Tune<br />
The final step is fine-tuning the merged image before you exit Exposure<br />
Merge. The controls in the Fine-Tune window are based on the controls<br />
in the Adjust workspace.<br />
Merging exposures and content 111
Some fine-tuning tips:<br />
• Digital Noise Removal is a great tool for cleaning up noise that can<br />
result from merging photos.<br />
• High Pass Sharpen can help reduce blurred areas that may result<br />
from movement between photos.<br />
• Smart Photo Fix and Color Balance let you tweak the colors.<br />
• To brighten the entire image, try adjusting Brightness/Contrast. To<br />
brighten only the dark areas, try Fill Light/Clarity.<br />
• Local Tone Mapping and Fill Light/Clarity can be used to further<br />
enhance details in the image.<br />
To choose merge options for Exposure Merge (Step 1)<br />
1 In the Manage workspace, select the thumbnails for the photos<br />
that you want to merge.<br />
An orange outline appears around the thumbnails of selected<br />
photos.<br />
2 Click File � HDR � Exposure Merge.<br />
3 In the Step 1: Merge pane, choose a profile from the Camera<br />
response curve profile drop-list.<br />
If you are not sure what to choose, select Auto Generate.<br />
If the EV interval slider displays, set the exposure value that you<br />
used between photos.<br />
4 In the Alignment area, choose an alignment type from the<br />
Method drop-list.<br />
If you want to crop any edges that don’t overlap, mark the Auto<br />
crop check box.<br />
5 Click Align.<br />
You will not see the alignment in the preview area immediately.<br />
112 <strong>Corel</strong> PaintShop <strong>Pro</strong> <strong>X4</strong> <strong>User</strong> <strong>Guide</strong>
To check the alignment of photos taken without a tripod, click the<br />
<strong>Pro</strong>cess button, review the alignment, and click Back to return to<br />
the Step 1 pane. To try a different alignment option, in the<br />
Alignment area, click the Reset button, and choose an alignment<br />
method.<br />
6 If you want to keep or remove specific areas from individual<br />
photos, use the controls in the Custom editing area. See “To brush<br />
in or brush out artifacts in Exposure Merge” on page 113.<br />
7 Click <strong>Pro</strong>cess.<br />
The merge settings are applied and the Step 2: HDR Adjustments<br />
window appears.<br />
Review the results in the preview area for alignment issues and<br />
ghosting issues. If you want to tweak your merge settings, click<br />
Back to return to the Step 1 window.<br />
HDR Exposure Merge and Photo Blend are part of the same<br />
merge utility and therefore cannot be opened simultaneously.<br />
If your photos were not taken with a tripod or steady rest, there<br />
is likely some misalignment between shots. If the misalignment<br />
is significant, you may not be able to use the photos for HDR.<br />
You can also add photos to or remove photos from the merge<br />
tray by clicking the Add Photo button , or Remove Photo<br />
button in the tray at the bottom of the Exposure Merge<br />
window.<br />
To brush in or brush out artifacts in Exposure Merge<br />
1 In the tray that appears below the Step 1: Merge preview area,<br />
click a thumbnail.<br />
2 In the Custom editing area, do any of the following:<br />
Merging exposures and content 113
• Click Brush in, and in the preview area, drag over the area that<br />
you want to preserve. You don't need to be exact.<br />
• Click Brush out, and in the preview area, and drag over the area<br />
that you want to remove.<br />
• Click Auto brush if you want the application to auto-detect and<br />
remove ghosting. Auto brush works well for removing ghosting<br />
along feature edges in photos taken without a tripod. It is not<br />
recommended for larger ghost objects, such as cars and people.<br />
3 Repeat the process for each of the photos that you want to edit.<br />
You can also<br />
Change the brush size Drag the Brush size slider.<br />
Refine or erase brushstrokes Click Eraser, and drag across a<br />
brushstroke in the preview area.<br />
Remove all brushstrokes Click Clear.<br />
Change the color of brushstrokes Click the arrow beside the Brush<br />
in or Brush out color swatch and<br />
click a new color.<br />
Hide or display brushstrokes in Mark or unmark the Show<br />
the preview area<br />
brushstrokes check box.<br />
To adjust HDR images in Exposure Merge (Step 2)<br />
1 In the Step 2: HDR Adjustments window, do any of the following<br />
to achieve the look you want.<br />
• In the Presets area, click a preset thumbnail.<br />
• Mark the White Balance check box, and click Auto or click the<br />
Dropper tool and click the image to set the white point. Drag<br />
the Temperature slider to warm or cool the colors in the image.<br />
• Drag Contrast, Highlights, Midtones, and Shadows sliders to<br />
adjust the overall tone and contrast.<br />
114 <strong>Corel</strong> PaintShop <strong>Pro</strong> <strong>X4</strong> <strong>User</strong> <strong>Guide</strong>
• Drag the Vibrancy slider to saturate or desaturate the colors.<br />
• From the Detail drop-list, choose Natural detail or Creative<br />
detail, and drag the respective sliders to adjust the amount of<br />
local detail.<br />
2 To save your HDR image for further editing, click Create HDR file,<br />
navigate to the folder you want, type a file name, and click Save.<br />
3 Click <strong>Pro</strong>cess.<br />
The settings are applied to the image and it is saved as a 16-bit file<br />
in preparation for the final output. The Step 3: Fine-Tune window<br />
appears.<br />
To manage presets in Exposure Merge<br />
• In the Presets area of the Step 2: HDR Adjustments window,<br />
perform a task from the following table.<br />
To Do the following<br />
Save your adjustments as a preset Click the Save Preset button<br />
and type a name in the Save<br />
Preset dialog box. A thumbnail is<br />
added to the preset area.<br />
Import a preset file Click the preset menu icon ,<br />
click Load, and navigate to the<br />
file.<br />
Delete a preset Click the thumbnail for the<br />
preset, click the preset menu<br />
icon, and click Delete.<br />
Restore the default presets list Click the preset menu icon, click<br />
Reset. Click OK in the<br />
confirmation dialog box. All<br />
customized presets are deleted.<br />
Hide or display presets Click the arrow on the Presets<br />
bar.<br />
Merging exposures and content 115
To fine-tune and save an HDR-processed image (Step 3)<br />
1 In the Step 3: Fine-Tune window, apply any of the tools or<br />
adjustment options to adjust the final image.<br />
2 Click Save and close.<br />
3 In the Save As dialog box, navigate to the folder that you want,<br />
type a file name, and choose a file type from the Save as type<br />
drop-list.<br />
The file is saved to a standard, 16-bit file and the Exposure Merge<br />
window closes.<br />
When the size of a zoomed-in image exceeds that of the<br />
preview area, you can click the Pan tool and move the<br />
rectangle to choose a preview area.<br />
Merging batches of photos into HDR images<br />
If you use auto-bracketing on a regular basis, you may accumulate<br />
many sets of photos that can be processed as HDR (high dynamic<br />
range) images. You can use the Batch Merge feature to quickly merge<br />
each of your bracketed sets into HDR images. You can then evaluate<br />
which sets make good candidates for the more powerful HDR tools in<br />
the Exposure Merge feature. In some cases, Batch Merge might be the<br />
only HDR processing you need to do.<br />
Batch Merge organizes photos into sets, based on the time between<br />
photos (within a defined timeframe) or a defined number of photos<br />
per set.<br />
To merge batches of photos into HDR images<br />
1 In the Manage workspace, click File � HDR � Batch Merge.<br />
116 <strong>Corel</strong> PaintShop <strong>Pro</strong> <strong>X4</strong> <strong>User</strong> <strong>Guide</strong>
2 Click Add files, navigate to the folder you want, select the files,<br />
and click Open.<br />
The photos are sorted into groups of three by default.<br />
3 Click the folder icon beside the Save processed files in box, and<br />
browse to the folder where you want to save the processed files.<br />
4 Choose a file type from the Save as drop-list.<br />
5 Drag the JPEG quality slider to set the file size and quality for the<br />
processed images.<br />
If you want to save .hdr versions of the processed files (so you can<br />
edit them in Exposure Merge), mark the Save .hdr file check box.<br />
6 In the Group photos by drop-list, choose one of the following:<br />
• Sets — lets you choose a number in the Photos per set box. This<br />
option works well if you consistently shoot bracketed photos in<br />
predetermined batches.<br />
• Time — lets you choose a time interval in the Seconds per group<br />
box. This option works well if you vary the number of photos in<br />
a bracketed set.<br />
7 If the photos were taken without a tripod, enable the Auto-align<br />
check box and choose an alignment option form the Method<br />
drop-list.<br />
If you want to crop unaligned edges along the borders of the<br />
photos, mark Auto crop.<br />
8 Click <strong>Pro</strong>cess.<br />
<strong>Pro</strong>cessing might take a few moments, depending on the size and<br />
number of photos.<br />
You can now navigate to the location where you saved your<br />
process files and evaluate them.<br />
Merging exposures and content 117
Combining photos with Photo Blend<br />
Photo Blend lets you combine two or more photos of the same scene<br />
and choose exactly what you want to keep and remove from the scene.<br />
Here are some examples:<br />
• Remove moving objects, such as people or cars, from a photo —<br />
you can create an empty street in a busy city.<br />
• Fix a group shot where one person blinks or looks away — simply<br />
swap in a better pose from another photo.<br />
• Get creative by showing the same person multiple times in a single<br />
photo.<br />
Photo Blend can be used to create perfect group shots.<br />
How do I take photos that work with Photo Blend?<br />
From a tripod or with a steady rest, shoot two or more photos a few<br />
seconds apart. Use the same camera settings for all the photos.<br />
Photo Tip: Use the manual setting on your camera, so you can<br />
ensure that the photos have the same size, aperture, shutter<br />
speed, and ISO.<br />
118 <strong>Corel</strong> PaintShop <strong>Pro</strong> <strong>X4</strong> <strong>User</strong> <strong>Guide</strong>
To use Photo Blend<br />
1 In the Manage workspace, select the set of photos that you want<br />
to blend.<br />
2 Click File � Photo Blend.<br />
3 In the Alignment area, click Align.<br />
If you want to crop unaligned edges along the borders of the<br />
photos, mark Auto crop.<br />
4 Click a thumbnail in the tray.<br />
The corresponding photo displays in the preview area.<br />
5 In the Custom editing area, do any of the following:<br />
• Click Brush in, and in the preview area, drag over the area that<br />
you want to preserve. You don't need to be exact.<br />
• Click Brush out, and in the preview area, and drag over the area<br />
that you want to remove.<br />
• Click Auto brush if you want the application to auto-detect the<br />
differences between the images. Leave the brushmarks as they<br />
are to remove ghosting and other differences, or use it as a<br />
starting point for custom brushstrokes.<br />
6 Repeat the editing process for other photos by clicking thumbnails<br />
in the tray and applying brushstrokes.<br />
7 Click <strong>Pro</strong>cess.<br />
Review the results in the preview area. If you want to adjust your<br />
settings or continue editing, click Back.<br />
8 In the Step 2: Fine-Tune panel, use any of the tools or adjustment<br />
controls to fine-tune the image.<br />
9 Click Save and close.<br />
10 In the Save As dialog box, navigate to the folder you want, type a<br />
file name, and choose a file type from the Save as type drop-list.<br />
Merging exposures and content 119
You can also<br />
Change the brush size Drag the Brush size slider.<br />
Refine or erase brushstrokes Click Eraser, and drag across a<br />
brushstroke in the preview area.<br />
Remove all brushstrokes Click Clear.<br />
Change the color of brushstrokes Click the arrow beside the Brush<br />
in or Brush out color swatch and<br />
click a new color.<br />
Hide or display brushstrokes in<br />
the preview area<br />
Mark or unmark the Show<br />
brushstrokes check box.<br />
For best results, in the tray of the Step 1 window, click the<br />
thumbnail of the image that will change the least, and click the<br />
lock button to use the selected image as background. To<br />
unlock the background, click the lock button again.<br />
120 <strong>Corel</strong> PaintShop <strong>Pro</strong> <strong>X4</strong> <strong>User</strong> <strong>Guide</strong>
Working with colors and materials<br />
Whether you are applying color to an image or adjusting<br />
photographic colors, it’s important to understand how<br />
<strong>Corel</strong> PaintShop <strong>Pro</strong> works with color. This section describes how to<br />
choose colors and materials that you can use in your images for<br />
painting, drawing, and filling.<br />
This section presents the following topics:<br />
• Using the Materials palette<br />
• Choosing colors by using the Color Picker<br />
• Choosing colors from an image or the desktop<br />
For more information about working with colors and materials,<br />
including using gradients, pattern, and textures, see “Working with<br />
colors and materials” in the Help.<br />
Using the Materials palette<br />
<strong>Corel</strong> PaintShop <strong>Pro</strong> lets you paint, draw, and fill with a variety of styles<br />
and materials.<br />
• A style is a color, gradient, or pattern.<br />
• A material is the style plus an optional texture.<br />
Both styles and materials can be selected from the Materials palette.<br />
You can display the Materials palette at any time. You can leave it open<br />
while you work, or you can display it only when you need it.<br />
Working with colors and materials 121
You can also reverse the foreground and background colors or<br />
materials.<br />
8<br />
12<br />
11<br />
10<br />
9<br />
1<br />
2 3<br />
7<br />
6<br />
The Materials palette<br />
1 Frame tab<br />
2 Rainbow<br />
3 Swatches tab<br />
4 Foreground and<br />
Background color boxes<br />
5 Swap Colors button<br />
6 Transparent option<br />
7 Texture button<br />
8 Style — Color,<br />
4<br />
9<br />
Gradient, Pattern<br />
Set to Black and White<br />
5 button<br />
10 Swap Materials<br />
11 Background and Fill<br />
<strong>Pro</strong>perties<br />
12 Foreground and Stroke<br />
<strong>Pro</strong>perties<br />
Main components of the Materials palette<br />
• Frame tab — displays an outer Hue rectangle and an inner<br />
Saturation rectangle, as well as a strip containing white, three<br />
shades of gray, and black. You can drag the vertical slider to adjust<br />
lightness, and drag the horizontal slider to adjust saturation.<br />
• Rainbow tab — displays the Available Colors panel, where you can<br />
click to select a color. At the bottom of the tab you can click to<br />
select white, black, or three shades of gray.<br />
• Swatches tab — displays swatches, which are materials you can<br />
save to use again.<br />
• Foreground and Stroke and Background and Fill <strong>Pro</strong>perties boxes<br />
— display the current foreground and background materials,<br />
122 <strong>Corel</strong> PaintShop <strong>Pro</strong> <strong>X4</strong> <strong>User</strong> <strong>Guide</strong>
•<br />
which consist of the style (color, gradient, or pattern) and optional<br />
texture. You can click either box to display the Material <strong>Pro</strong>perties<br />
dialog box, in which you can set material options.<br />
Foreground and Background Color boxes — display the current<br />
foreground and background color and let you set colors<br />
regardless of current material<br />
• Style button — shows which style is currently selected: color<br />
, gradient , or pattern . To change between the most<br />
recently selected color, gradient, and pattern, you can click the<br />
Style button and select a new style from the drop-list.<br />
• Texture button — turns the current texture on or off<br />
• Set to Black and White button — sets the foreground to black<br />
and the background to white. This is helpful when you use the<br />
Edit Selection command.<br />
• Transparent button — specifies whether the foreground or<br />
•<br />
background material is transparent. You use a transparent<br />
material primarily with vector objects and text. A transparent<br />
foreground has no outline (only the objects or letters are filled),<br />
and a transparent background has no fill (only the objects or<br />
letters are outlined).<br />
All tools check box — specifies whether the selected foreground<br />
and background materials apply to all tools. If the check box is<br />
unmarked, the selected materials apply only to the active tool.<br />
To display or hide the Materials palette<br />
Edit workspace<br />
• Choose View � Palettes � Materials.<br />
To swap the foreground and background colors or materials<br />
Edit workspace<br />
• From the Materials palette, click the Swap Colors button or<br />
click the Swap Materials button .<br />
Working with colors and materials 123
Choosing colors by using the Color Picker<br />
When you edit images in <strong>Corel</strong> PaintShop <strong>Pro</strong>, you often need to<br />
choose a color before painting, drawing, or filling, making manual<br />
color corrections, or choosing a background for a new raster image.<br />
The Color Picker is the most versatile tool for choosing colors.<br />
The Color Picker appears when you click the Foreground/Stroke<br />
<strong>Pro</strong>perties box, the Background/Fill <strong>Pro</strong>perties box, or one of the two<br />
smaller Color boxes. It also appears when you click a Color box found<br />
in other dialog boxes.<br />
Hue wheel<br />
Saturation and<br />
Lightness box<br />
Basic Colors<br />
panel<br />
RGB values HSL values<br />
Link colors<br />
check box<br />
The Color Picker<br />
HTML color code<br />
The appearance of the Color Picker depends on the color depth of the<br />
active image (16 bits/channel, 8 bits/channel, 256 colors, 16 colors, or<br />
2 colors).<br />
124 <strong>Corel</strong> PaintShop <strong>Pro</strong> <strong>X4</strong> <strong>User</strong> <strong>Guide</strong>
The Color Picker offers many ways to select colors:<br />
• The Color (hue) wheel and Saturation and Lightness box let you<br />
select and preview a color.<br />
• The Basic Colors panel displays commonly used colors.<br />
• RGB or HSL values let you choose a color based on its red, green,<br />
and blue values or its hue, saturation, and lightness values.<br />
• HTML color code lets you enter HTML color values.<br />
• The Color Picker lets you select a color from the active image.<br />
By default, <strong>Corel</strong> PaintShop <strong>Pro</strong> displays decimal (base 10) numbers in<br />
the Color Picker. You can also display hexadecimal (base 16) numbers<br />
— the format of HTML color codes.<br />
To choose a color by using the Color Picker<br />
Edit workspace<br />
1 On the Materials palette, do one of the following:<br />
• To choose a foreground color, click the Foreground and Stroke<br />
<strong>Pro</strong>perties box or the Foreground Color box.<br />
• To choose a background color, click the Background and Fill<br />
<strong>Pro</strong>perties box or the Background Color box.<br />
The Material <strong>Pro</strong>perties dialog box or the Color dialog box<br />
appears.<br />
If the Materials <strong>Pro</strong>perty dialog box appears, click the Color tab.<br />
2 Click or drag the hue wheel to select the approximate color.<br />
3 Click or drag inside the Saturation/Lightness box to set saturation<br />
and lightness for the color you have selected.<br />
Move from left to right to adjust the saturation; move from top to<br />
bottom to adjust the lightness.<br />
Working with colors and materials 125
You can also<br />
Choose a basic color by clicking a<br />
color swatch<br />
Choose a color by specifying its<br />
Red, Green, and Blue (RGB) values<br />
Choose a color by specifying its<br />
Hue, Saturation, and Lightness<br />
(HSL) values<br />
Specify a color by using its HTML<br />
code<br />
View each individual RGB or HSL<br />
color value separately or in<br />
combination with the other color<br />
values<br />
Click a color swatch in the Basic<br />
Colors panel that appears under<br />
the color wheel.<br />
Type values in the R, G, and B<br />
boxes.<br />
Type values in the H, S, and L<br />
boxes.<br />
Type an HTML color code in the<br />
HTML box.<br />
Unmark the Link Colors check box<br />
to display the selected color in the<br />
drop-down slider for each RGB or<br />
HSL value (for example, the Red<br />
slider displays only degrees of red,<br />
from 0 to 255). Mark the Link<br />
Colors check box to display the<br />
current color in combination with<br />
the other two colors.<br />
You can also choose a color directly on the Frames tab or the<br />
Rainbow tab of the Materials palette. The Frames tab contains<br />
a more compact, rectangular version of the color wheel and its<br />
controls. The Rainbow tab presents every available color. Click<br />
to choose the foreground color, or right-click to choose the<br />
background color.<br />
You can access recently used colors by right-clicking the Color<br />
box on the Materials palette. In the Recent Colors dialog box,<br />
click Other to display the Material <strong>Pro</strong>perties dialog box.<br />
126 <strong>Corel</strong> PaintShop <strong>Pro</strong> <strong>X4</strong> <strong>User</strong> <strong>Guide</strong>
To use the current colors with all tools, mark the All tools check<br />
box on the Materials palette. If you unmark this check box, the<br />
current materials are used by the active tool only.<br />
Choosing colors from an image or the desktop<br />
You can choose a foreground or background color from any open<br />
image, or from any color within <strong>Corel</strong> PaintShop <strong>Pro</strong> (such as a color<br />
on a toolbar). This feature is useful when you want to use the color of<br />
a specific icon, or when you want to match the Windows desktop<br />
colors. If you have Windows 2000 or a later version of Windows, you<br />
can choose a color from other applications (such as a color displayed<br />
in a word processor).<br />
To choose a color from the active image<br />
Edit workspace<br />
1 On the Tools toolbar, choose the Dropper tool .<br />
2 On the Tool Options palette, set the options you want:<br />
• Sample Size drop-list — specifies the pixel area for sampling<br />
• Use all layers check box — mark this check box to sample from<br />
all image layers<br />
3 Click a color in the image to make it the foreground color, or<br />
right-click to make it the background color.<br />
You can also choose a color from the image while using brush<br />
tools, such as the Paint Brush or the Eraser tool, by holding<br />
down Ctrl and clicking in the image to choose a foreground<br />
color or right-clicking to choose a background color.<br />
When the Color Picker is open, you can choose a color from any<br />
open image regardless of the currently selected tool.<br />
Working with colors and materials 127
To choose a color from the desktop<br />
Edit workspace<br />
1 Make sure that the color you want is displayed on the screen.<br />
2 Position your pointer over a color or properties box on the<br />
Materials palette or in a dialog box.<br />
3 Hold down Ctrl, and position your pointer over the area of the<br />
desktop that has the color you want.<br />
4 Click to select the color.<br />
The selected color appears in the color or properties box that you<br />
chose.<br />
If you want to change the color selection, continue to hold down<br />
Ctrl, and click a different part of the desktop.<br />
When positioned over areas that can be sampled, a small<br />
window follows the pointer and indicates the RGB value of the<br />
color you are sampling.<br />
128 <strong>Corel</strong> PaintShop <strong>Pro</strong> <strong>X4</strong> <strong>User</strong> <strong>Guide</strong>
Applying effects<br />
<strong>Corel</strong> PaintShop <strong>Pro</strong> has many special effects that you can apply to<br />
your images, including 3D, artistic, illumination, reflection, and<br />
photographic effects. You can also add frames to your images, paint<br />
with images, or warp image areas to create unique effects.<br />
This section presents the following topics:<br />
• Choosing effects<br />
• Applying Photo Effects<br />
• Creating vintage-style photos with the Time Machine<br />
• Applying film and filter effects to photos<br />
• Adding picture frames to images<br />
• Using the Picture Tube tool<br />
• Warping images<br />
For a complete list of the effects available in <strong>Corel</strong> PaintShop <strong>Pro</strong>, see<br />
“Applying effects” in the Help.<br />
Choosing effects<br />
You can choose effects by using the Effects menus or the Effect<br />
Browser.<br />
You can customize most effects by adjusting their settings in dialog<br />
boxes. The dialog boxes for applying effects contain several common<br />
features:<br />
Applying effects 129
• The Before pane shows the original image, and the After pane lets<br />
you preview the image with the current settings applied.<br />
• The Load Preset drop-list is set by default to Last Used. Presets let<br />
you apply the same settings to multiple images.<br />
Show/Hide<br />
Preview<br />
button<br />
Zoom control<br />
for preview<br />
panes<br />
Load Preset<br />
drop-list<br />
Color box<br />
Using the Effect Browser<br />
An example of a dialog box for an effect.<br />
Preview on<br />
Image check<br />
box<br />
Randomize<br />
Parameters<br />
button<br />
Reset to Default<br />
button<br />
Resize handle<br />
You can use the Effect Browser when you want to preview multiple<br />
effects before applying them to your image. The Effect Browser<br />
displays the presets that come with <strong>Corel</strong> PaintShop <strong>Pro</strong> as well as any<br />
that you create.<br />
To display the thumbnail previews that you see in the Effect Browser,<br />
<strong>Corel</strong> PaintShop <strong>Pro</strong> applies an effect’s default preset and any presets<br />
130 <strong>Corel</strong> PaintShop <strong>Pro</strong> <strong>X4</strong> <strong>User</strong> <strong>Guide</strong>
that you saved to the image. The preset is saved as a script in the file<br />
format for <strong>Corel</strong> PaintShop <strong>Pro</strong> (PspScript).<br />
The Effect Browser displays thumbnails that let you<br />
preview and choose effects.<br />
To choose an effect from the Effects menu<br />
Edit workspace<br />
1 From the Effects menu, choose an effect category, and choose an<br />
effect. (For example, choose Effects � Distortion Effects � Twirl.)<br />
For most effects, a dialog box appears.<br />
2 Specify the desired settings, or choose a preset from the Load<br />
Preset drop-list.<br />
You can preview the effect in the After pane.<br />
Note: Presets are not available for all effects.<br />
3 Click OK.<br />
Applying effects 131
You can also<br />
Save settings for reuse Click the Save Preset button<br />
type a name in the Preset name<br />
box, and click OK.<br />
Reset settings to default values From the Load Preset drop-list,<br />
choose Default.<br />
Limit an effect to a specific area Make a selection before choosing<br />
the effect.<br />
For information about creating<br />
selections, see “Creating<br />
selections” on page 157.<br />
To choose an effect from the Effect Browser<br />
Edit workspace<br />
1 Choose Effects � Effect Browser.<br />
The Effect Browser appears.<br />
2 From the hierarchical list in the left pane, do one of the following:<br />
• To preview all effects applied to the image, click the Presets<br />
folder.<br />
• To preview an effect category, click a subfolder of the Effects<br />
folder (for example, 3D Effects, Artistic Effects, or Photo Effects).<br />
<strong>Corel</strong> PaintShop <strong>Pro</strong> scans the selected folder and creates<br />
thumbnails of the image with each effect applied to it.<br />
3 Click a thumbnail image to choose an effect preset.<br />
4 Click Apply.<br />
132 <strong>Corel</strong> PaintShop <strong>Pro</strong> <strong>X4</strong> <strong>User</strong> <strong>Guide</strong>
You can also<br />
Modify the selected preset Click Modify, and adjust the<br />
settings in the dialog box for the<br />
effect.<br />
Note: This button is unavailable<br />
for effects that cannot be<br />
adjusted.<br />
Resize the thumbnail preview Choose File � Preferences �<br />
General <strong>Pro</strong>gram Preferences, and<br />
click Display and Caching along<br />
the left side. In the Effect browser<br />
thumbnails group box, set a value<br />
in the Size (Pixels) control.<br />
Limit an effect to a specific area Make a selection before choosing<br />
the effect.<br />
For information about creating<br />
selections, see “Creating<br />
selections” on page 157.<br />
Applying Photo Effects<br />
You can apply different Photo Effects to your images to simulate some<br />
traditional photo techniques and processes.<br />
Time Machine<br />
The Time Machine lets you recreate some popular photographic styles<br />
from the past. It lets you choose from seven styles, which range from<br />
the year 1839 to the 1980s. For information about the Time Machine,<br />
see “Creating vintage-style photos with the Time Machine” on<br />
page 139.<br />
Applying effects 133
Film and Filters<br />
<strong>Corel</strong> PaintShop <strong>Pro</strong> lets you experiment with effects that are inspired<br />
by different types of camera film and filters. For information about<br />
applying film and filter effects, see “Applying film and filter effects to<br />
photos” on page 139.<br />
Black and White Film<br />
You can simulate taking a photo with black-and-white film. To modify<br />
the effect, you can apply a wide range of RGB values as well as adjust<br />
image brightness and clarity.<br />
Sepia Toning<br />
Filter color adjustments in the Black and White Film dialog box<br />
can create very different results from the original photo (leftmost<br />
image in top tow).<br />
You can simulate the look created when you take a photo with sepia<br />
film. Sepia-toned images are similar to black-and-white photos (also<br />
known as grayscale photos), except the tones are brown instead of<br />
gray.<br />
134 <strong>Corel</strong> PaintShop <strong>Pro</strong> <strong>X4</strong> <strong>User</strong> <strong>Guide</strong>
Selective Focus<br />
You can create a quick miniature effect (also known as a tilt-shift effect)<br />
so that the scene in a photo resembles a miniature model or toy. The<br />
illusion is created by adjusting the depth of field, usually across a<br />
specified horizon line, and increasing the saturation of the photo.<br />
An urban scene (left) appears to be transformed into<br />
a miniature model (right).<br />
You can also use Selective Focus to apply a quick depth of field effect<br />
to any photo. For general information about depth of field, see<br />
“Controlling depth of field” on page 81.<br />
Photo tip: Photos taken from high vantage points usually make the<br />
best candidates for a miniature effect.<br />
Vignette<br />
You can fade the edges of a photo to create a vignette effect. You can<br />
control the appearance of the edges by choosing a shape and color<br />
(light or dark), and adjusting the amount of blur, glow, and feathering.<br />
Applying effects 135
To apply the Black and White Film effect<br />
Edit workspace<br />
1 Choose Effects � Photo Effects � Black and White Film.<br />
The Black and White Film dialog box appears.<br />
2 Modify the settings you want and click OK.<br />
To apply the Sepia Toning effect<br />
Edit workspace<br />
1 Choose Effects � Photo Effects � Sepia Toning.<br />
The Sepia Toning dialog box appears.<br />
2 Type or set a value in the Amount to age control to determine the<br />
strength of the effect.<br />
To apply a miniature effect by using Selective Focus<br />
Edit workspace<br />
1 Choose Effects � Photo Effects � Selective Focus.<br />
136 <strong>Corel</strong> PaintShop <strong>Pro</strong> <strong>X4</strong> <strong>User</strong> <strong>Guide</strong>
The Selective Focus dialog box appears. You can maximize the<br />
dialog box to increase the size of the Before and After panes of<br />
the preview area.<br />
2 In the Area of focus, click one of the following tools:<br />
• Planar Selection Tool — the default tool for setting a linear<br />
area of focus. It is effective at setting an area of focus along a<br />
road, bridge, or other linear element that isn’t along the edge of<br />
your photo.<br />
• Half Planar Selection Tool — lets you set a linear area of<br />
focus along the edge of a photo<br />
• Radial Selection Tool — lets you set a circular area of focus<br />
3 In the Before pane of the preview area, when your pointer displays<br />
the move cursor , drag the area of focus to the position you<br />
want.<br />
4 Drag the rotation handle (the box at the end of the short line) to<br />
rotate the area of focus.<br />
5 Drag a sizing handle (on the solid lines) to set the edges for the<br />
area of focus.<br />
6 Fine-tune the results by dragging any of the following sliders:<br />
• Blur amount — determines the amount of blur outside the area<br />
of focus<br />
• Feather edge — determines the softness of the transition<br />
between the area in focus and the blurred areas. You can also<br />
adjust feathering interactively by dragging a feathering handle<br />
(on the dotted lines) in the Before pane.<br />
• Saturation — determines the intensity of the colors in the<br />
photo. Increasing saturation can help simulate the vivid paint<br />
colors used for models and toys.<br />
Applying effects 137
Interactive elements in the Before pane: (1) Center<br />
line (for Planar Selection Tool), (2) Rotation handle,<br />
(3) Sizing handle, (4) Feathering handle<br />
You can use the Selective Focus effect to apply a quick depth of<br />
field effect. Adjust the settings to achieve a natural look.<br />
To apply a Vignette effect<br />
Edit workspace<br />
1 Click Effects � Photo Effects � Vignette.<br />
2 In the Area of focus, choose a selection tool and drag in the<br />
Before pane to set the edge for the effect.<br />
3 Drag the Dark/Light slider to set an edge color.<br />
4 Fine-tune the results by dragging any of the following sliders:<br />
• Blur amount — determines the amount of blur outside the area<br />
of focus<br />
• Diffuse glow — adds a luminescent brightening effect and<br />
softens details in the entire photo<br />
• Feather edge — determines the softness of the transition<br />
between the area in focus and the edge effect<br />
138 <strong>Corel</strong> PaintShop <strong>Pro</strong> <strong>X4</strong> <strong>User</strong> <strong>Guide</strong>
Creating vintage-style photos with the Time Machine<br />
The Time Machine lets you recreate some vintage photographic styles.<br />
It lets you choose from seven styles, which range from the year 1839<br />
to the 1980s.<br />
The photo on the left is the original photo, and the photo on the right<br />
has the Time Machine’s Daguerreotype style applied to it.<br />
To create vintage-style photos with the Time Machine<br />
Edit workspace<br />
1 Choose Effects � Photo Effects � Time Machine.<br />
2 Click one of the thumbnails above the timeline to choose an<br />
effect.<br />
3 Move the Intensity slider to adjust the appearance of the effect.<br />
You can add or remove edge effects for photos. Unmark the<br />
Photo Edges check box below the Intensity slider to remove the<br />
edges, or mark the check box to apply the edges.<br />
Applying film and filter effects to photos<br />
Whether you are a novice or an experienced photographer, you can<br />
experiment in <strong>Corel</strong> PaintShop <strong>Pro</strong> with effects that are inspired by<br />
different types of camera film and filters.<br />
Applying effects 139
Film Looks<br />
Film Looks are inspired by the effects achieved when you use different<br />
types of film in a traditional camera. Unlike the Creative Filters, which<br />
apply a color to the entire photo, Film Looks can change what is<br />
emphasized in a photo by making some colors more dramatic or more<br />
subtle. Some Film Looks also change the contrast or softness of<br />
photos.<br />
Creative Filters<br />
The Vibrant Foliage Film Look enhances blues and greens.<br />
Creative Filters simulate the effect achieved when you use color filters<br />
on the lens of your camera. Although the color is applied across the<br />
entire photo, <strong>Corel</strong> PaintShop <strong>Pro</strong> maintains the luminance of the<br />
image, to achieve a color toning effect. You can use a preset color or<br />
choose a custom color.<br />
The Sunset filter adds a warm orange tone to your photos.<br />
140 <strong>Corel</strong> PaintShop <strong>Pro</strong> <strong>X4</strong> <strong>User</strong> <strong>Guide</strong>
To apply film and filter effects to a photo<br />
Edit workspace<br />
1 Choose Effects � Photo Effects � Film and Filters.<br />
2 In the Film and Filters dialog box, perform one or more tasks from<br />
the following table, and click OK.<br />
To Do the following<br />
Apply a Film Look Choose a style from the Film looks drop-list.<br />
Apply a filter Choose a filter from the Creative filters drop-list.<br />
Choose a custom<br />
filter color<br />
Change the<br />
amount of color<br />
applied by a filter<br />
Adding picture frames to images<br />
Click the Filter color swatch, and choose a color<br />
from the Color dialog box.<br />
Type a value in the Density box. Higher numbers<br />
increase the amount of color; lower numbers<br />
decrease the amount of color.<br />
You can add picture frames to your images to provide an eye-catching<br />
final touch. You can choose square or oval frames, modern or classic<br />
frames, mats or photo edges, or a variety of other styles.The frame is<br />
applied on a separate layer, which can be edited like any other layer.<br />
You can add a frame around your image.<br />
Applying effects 141
To add a picture frame to an image<br />
Edit workspace<br />
1 Choose Image � Picture Frame.<br />
The Picture Frame dialog box appears.<br />
2 In the Picture Frame group box, choose a frame from the drop-list.<br />
3 In the Orientation group box, choose one of the following<br />
options:<br />
• Frame canvas — sizes the frame to the canvas. The frame layer is<br />
named “Picture Frame” on the Layers palette. Successive frames<br />
reside on layers named “Picture Frame 1,” “Picture Frame 2,”<br />
and so on.<br />
• Frame current layer — sizes the frame to the current layer<br />
(which may have a different size than the canvas). For example,<br />
if you are creating a collage of photos for a scrapbook and each<br />
photo is on a separate layer, you can frame each photo by<br />
choosing this option. The frame layer is named after the original<br />
layer with the words “Picture Frame” appended to the name.<br />
4 Choose one of the following options:<br />
• Frame inside of the image — resizes the frame to fit within the<br />
image canvas<br />
• Frame outside of the image — increases the canvas size to<br />
accommodate the frame. The added canvas uses the current<br />
background color if the frame is applied to the Background<br />
layer. If the frame is applied to any other layer, the extra canvas<br />
is transparent.<br />
5 Mark any of the following check boxes:<br />
• Flip frame — reverses the frame along its horizontal axis<br />
• Mirror frame — reverses the frame along its vertical axis<br />
• Rotate frame right — lets you rotate the frame clockwise when<br />
the image is taller than it is wide<br />
6 Click OK.<br />
142 <strong>Corel</strong> PaintShop <strong>Pro</strong> <strong>X4</strong> <strong>User</strong> <strong>Guide</strong>
Using the Picture Tube tool<br />
You can use the Picture Tube tool to paint with a collection of objects.<br />
For example, you can add butterflies and beetles to a picnic setting or<br />
frame a picture with flowers. You can use one of the picture tubes<br />
included with <strong>Corel</strong> PaintShop <strong>Pro</strong> or create your own.<br />
The Picture Tube tool lets you apply various preset images to<br />
your photos to create unique effects.<br />
Picture tubes are PspTube files. Each picture tube file is made up of a<br />
series of images arranged in rows and columns, called cells. Picture<br />
tubes may have any number of cells. As you paint with the Picture Tube<br />
tool, <strong>Corel</strong> PaintShop <strong>Pro</strong> paints one image from the picture tube after<br />
another. Many picture tubes create discrete images (such as zoo<br />
animals), and others create the effect of a continuous image (such as<br />
grass).<br />
Each picture tube file contains a series of images.<br />
Applying effects 143
To make picture tube elements easier to edit, it is helpful to paint them<br />
on a separate layer.<br />
Important! You cannot use the Picture Tube tool on vector layers.<br />
For more information about picture tubes, see “Using the Picture Tube<br />
tool” in the Help.<br />
To paint with a picture tube<br />
Edit workspace<br />
1 On the Tools toolbar, choose the Picture Tube tool .<br />
2 On the Tool Options palette, select a picture tube from the Picture<br />
Tube drop-list.<br />
Note: Most picture tube previews show the first image rather<br />
than all images in the picture tube. To view all images, select the<br />
desired picture tube and then paint with it, or open the .PspTube<br />
file in <strong>Corel</strong> PaintShop <strong>Pro</strong>.<br />
3 If necessary, adjust the settings on the Tool Options palette, such<br />
as Scale and Step.<br />
4 In the image window, click to paint with one picture tube image,<br />
or drag to paint with multiple picture tube images.<br />
You can make further changes to the behavior of the current<br />
picture tube by clicking the Settings button on the Tool<br />
Options palette and adjusting settings in the Picture Tube<br />
Settings dialog box.<br />
Warping images<br />
You can distort image areas by using the warp brushes on image pixels<br />
to produce a warping effect. You can twirl areas of images, contract or<br />
expand parts of images, and create many interesting effects. The effect<br />
of the Warp Brush is often time-dependent, which means that the<br />
144 <strong>Corel</strong> PaintShop <strong>Pro</strong> <strong>X4</strong> <strong>User</strong> <strong>Guide</strong>
longer you hold the brush over an area, the more the brush produces<br />
the effect.<br />
The Warp Brush tool can be used to create caricatures.<br />
You can also warp images by using a grid. When you use the Mesh<br />
Warp tool, a grid or mesh is placed on the image. The grid intersections<br />
have mesh points, or nodes, that you drag to create deformations.<br />
For more information about warping by using a grid, see “To warp<br />
image areas by using a grid” in the Help.<br />
To warp image areas by using a brush<br />
Edit workspace<br />
1 On the Tools toolbar, choose the Warp Brush tool .<br />
2 On the Tool Options palette, choose the type of warp in the Warp<br />
Modes group box:<br />
• Push — pushes pixels in the direction of the stroke for an<br />
effect similar to smearing paint. This warp mode is timeindependent.<br />
• Expand — pushes pixels away from the center of the brush<br />
• Contract — pulls pixels into the center of the brush<br />
• Right Twirl — rotates pixels clockwise around the center of<br />
the brush<br />
Applying effects 145
• Left Twirl — rotates pixels counterclockwise around the<br />
center of the brush<br />
• Noise — causes random movements of pixels under the<br />
brush<br />
• Iron Out — removes unapplied warps. This warp mode is<br />
time-independent.<br />
• Unwarp — removes unapplied warps<br />
3 Specify the brush options, such as size and hardness.<br />
Note: Unlike other brushes, the size of the Warp Brush tool can<br />
be adjusted only by using the control on the Tool Options palette,<br />
not by using the keyboard.<br />
4 Type or set a value in the Strength control to determine the<br />
strength of the warping effect.<br />
Full strength is 100%; minimum strength is 1%.<br />
5 Choose settings for the Edge mode, Draft quality, and Final apply<br />
controls.<br />
6 Drag in the image.<br />
146 <strong>Corel</strong> PaintShop <strong>Pro</strong> <strong>X4</strong> <strong>User</strong> <strong>Guide</strong>
Working with layers<br />
When you work with layers in <strong>Corel</strong> PaintShop <strong>Pro</strong>, you can add<br />
elements to your images, create artistic effects and illustrations, and<br />
edit your images more easily. You can add or delete layers, rearrange<br />
the order in which they are stacked, and blend their pixels in various<br />
ways. Unless you merge the layers, you can edit each one<br />
independently of the others.<br />
This section presents the following topics:<br />
• Understanding layers<br />
• Using the Layers palette<br />
• Creating layers<br />
• Renaming layers<br />
• Viewing layers<br />
• Changing the order of layers in an image<br />
• Setting layer opacity<br />
For more information about layers, including promoting, duplicating,<br />
grouping, linking, and blending layers, as well as information about<br />
using adjustment layers, see “Working with layers” in the Help.<br />
Understanding layers<br />
When you create or import an image in <strong>Corel</strong> PaintShop <strong>Pro</strong>, the image<br />
has a single layer. Depending on the type of image you create or<br />
import, the single layer is labeled as Background, Raster, Vector, or Art<br />
Working with layers 147
Media. When you open a photo, scan, or screen capture, the single<br />
layer is labeled as Background on the Layers palette.<br />
For most simple corrections and retouching, you do not have to add<br />
layers to an image. However, it is a good practice to duplicate the<br />
single layer before making image corrections, so that you preserve the<br />
original image on its own layer. If you intend to do more complex work<br />
— such as adding elements to the image, creating photo<br />
compositions, adding text, or applying other effects — the use of<br />
layers is highly recommended.<br />
Layers are like separate sheets that you combine to create<br />
a final composition.<br />
The following table provides examples.<br />
To Do the following<br />
Preserve the original<br />
image before making<br />
changes<br />
Make color and tonal<br />
corrections<br />
Make a duplicate of the background layer by<br />
choosing Layers � Duplicate. To work on the<br />
duplicate layer, make it the active layer by<br />
clicking it on the Layers palette.<br />
Use adjustment layers instead of changing<br />
the image directly. For more information<br />
about using adjustment layers, see ”Using<br />
adjustment layers” in the Help.<br />
148 <strong>Corel</strong> PaintShop <strong>Pro</strong> <strong>X4</strong> <strong>User</strong> <strong>Guide</strong>
To Do the following<br />
Add text or graphics Create text and graphics, such as lines and<br />
shapes, on vector layers to make them easier<br />
to edit. For more information about adding<br />
text, see “Working with text” on page 165.<br />
For more information about vector graphics,<br />
see “Drawing and editing vector objects” in<br />
the Help.<br />
Create effects Duplicate the background layer, apply an<br />
effect to the duplicate, and then blend the<br />
two layers by changing the opacity or blend<br />
modes of the layers.<br />
Create a painting Choose an Art Media tool from the Tools<br />
toolbar and mark the Trace check box on the<br />
Tool Options palette (an Art Media layer is<br />
created automatically). Use the Art Media<br />
brushes to create impressionistic effects.<br />
Combine photos to<br />
create a photo collage<br />
Open the photos that you want to combine<br />
and decide which image to use as your base<br />
image. Copy the other images into the base<br />
image by clicking an image, choosing<br />
Edit � Copy, clicking the base image, and<br />
choosing Edit � Paste As New Layer. Position<br />
each layer with the Move tool .<br />
Use the opacity setting and blend mode to<br />
control how much of each layer shows<br />
through. Use a mask layer to hide parts of a<br />
layer or to create soft edges around it.<br />
Working with layers 149
To Do the following<br />
Create a panoramic<br />
photo<br />
Using the Layers palette<br />
Take a series of photos with overlapping<br />
subject matter.<br />
Create an image with a canvas large enough<br />
to display a panorama, and then copy each<br />
photo onto a separate layer. Decrease the<br />
opacity of one layer so that you can see<br />
through it, and use the Move tool to<br />
match up the edges of the next layer. After all<br />
layers have been positioned, return their<br />
settings to 100 percent opacity.<br />
The Layers palette lists all layers in an image. The order of layers on the<br />
palette is the order of layers in the image. The top layer is listed first,<br />
and the bottom layer is listed last. You can change the stacking order<br />
of layers on the Layers palette, depending on the layer types.<br />
Active layer settings<br />
Layer type<br />
indicator<br />
Layer visibility<br />
toggle<br />
Layer thumbnail<br />
New layer drop-list<br />
The Layers palette<br />
Layer name<br />
(customizable)<br />
150 <strong>Corel</strong> PaintShop <strong>Pro</strong> <strong>X4</strong> <strong>User</strong> <strong>Guide</strong>
You can create layer groups to organize the Layers palette. You can also<br />
link layers or groups so that they move together when you use the<br />
Move tool in the image.<br />
By default, a thumbnail view of the layer’s contents appears to the left<br />
of the layer name. You can set the size of the thumbnail or turn the<br />
thumbnail off. By default, the settings of the active layer appear above<br />
the topmost thumbnail preview, but you can modify the appearance<br />
of these settings.<br />
If an image has more than one layer, you must select the layer that you<br />
want to work on. Changes to the image affect only the selected layer<br />
(also called the active layer). You can select only one layer at a time.<br />
For more information about layer types, see “Understanding layers” in<br />
the Help.<br />
To display or hide the Layers palette<br />
Edit workspace<br />
• Choose View � Palettes � Layers.<br />
This command toggles the display of the Layers palette on and off.<br />
To select a layer<br />
Edit workspace<br />
• On the Layers palette, click the name of a layer.<br />
To expand or collapse a vector layer or layer group<br />
Edit workspace<br />
• Perform a task from the following table.<br />
To Do the following<br />
Expand the group On the Layers palette, click the<br />
plus sign in front of the layer<br />
or layer group name.<br />
Working with layers 151
To Do the following<br />
Collapse the group On the Layers palette, click the<br />
minus sign in front of the layer<br />
or layer group name.<br />
Creating layers<br />
You can create a layer from the Layers palette. When you create a layer,<br />
you can specify properties such as the layer type, opacity, or blend<br />
mode. These properties can be modified as you work with the layer.<br />
You can also create layers from selections, vector objects, or other<br />
images. For more information, see “Creating layers” in the Help.<br />
Layers are created automatically when you use the Text tool, Art Media<br />
tools, or vector drawing tools, such the Pen tool or the Preset Shape<br />
tool.<br />
To create a layer from the Layers palette<br />
Edit workspace<br />
1 On the Layers palette, click the layer above which you want create<br />
a layer.<br />
2 From the drop-list on the toolbar of the Layers palette, choose a<br />
layer type:<br />
• New Raster Layer<br />
• New Vector Layer<br />
• New Art Media Layer<br />
• New Layer Group<br />
• New Mask Layer<br />
• New Adjustment Layer<br />
3 Adjust the available controls for the layer properties.<br />
152 <strong>Corel</strong> PaintShop <strong>Pro</strong> <strong>X4</strong> <strong>User</strong> <strong>Guide</strong>
4 Click OK.<br />
The new layer is added above the active layer. It is named with the<br />
layer type and a number, such as “Vector 1.”<br />
For more information about renaming layers, see “Renaming<br />
layers” on page 153.<br />
Only grayscale and 16 million–color images can have multiple<br />
raster-based layers (Vector layers are the only non raster-based<br />
layers). When you add a new raster-based layer to an image of<br />
another color depth, such as a 256-color indexed image,<br />
<strong>Corel</strong> PaintShop <strong>Pro</strong> automatically converts it to 16 million<br />
colors.<br />
Renaming layers<br />
As you add layers to an image, you may find it convenient to rename<br />
them so that they are easy to identify on the Layers palette.<br />
To rename a layer<br />
Edit workspace<br />
1 On the Layers palette, click the layer you want to rename, pause a<br />
moment, and click again.<br />
The name appears highlighted in a box.<br />
2 Type the new name in the box, and press Enter.<br />
You can also rename a layer by double-clicking the layer to<br />
display the Layer <strong>Pro</strong>perties dialog box and typing a new name<br />
in the Name box.<br />
Working with layers 153
Viewing layers<br />
You can make layers, layer groups, or vector objects visible or invisible<br />
in the image. The invisible layers remain in the image but are hidden<br />
from view.<br />
To display or hide a layer<br />
Edit workspace<br />
• Click the Visibility Toggle button for the layer that you want to<br />
display or hide.<br />
— Visibility Toggle button when the layer is displayed<br />
— Visibility Toggle button when the layer is hidden<br />
Hiding a layer group hides all layers within that group.<br />
To show one layer only, right-click the layer, and choose View<br />
� Current Only.<br />
To show or hide all layers<br />
Edit workspace<br />
• Perform a task from the following table.<br />
To Do the following<br />
View all layers Choose Layers � View � All.<br />
Hide all layers Choose Layers � View � None.<br />
You can also show all layers by right-clicking a layer and<br />
choosing View � All or hide all layers by right-clicking a layer<br />
and choosing View � None.<br />
154 <strong>Corel</strong> PaintShop <strong>Pro</strong> <strong>X4</strong> <strong>User</strong> <strong>Guide</strong>
Changing the order of layers in an image<br />
The order of layers within an image is critical to the appearance of the<br />
image. To rearrange layers in the image, you can easily change the<br />
stacking order of layers in the Layers palette. If a layer or a layer group<br />
has components, such as vector objects or grouped layers, all of the<br />
components move with the layer or layer group when its position in<br />
the stacking order is changed.<br />
To move a layer or layer group<br />
Edit workspace<br />
• On the Layers palette, select the layer or layer group, and drag it<br />
to a new position in the stack.<br />
A gray line shows the layer’s position as you drag.<br />
When you drag a layer, the cursor changes to a hand. A cursor<br />
displaying a null symbol indicates that the selected item<br />
cannot be moved to a particular position.<br />
You can also move a layer or layer group by choosing Layers �<br />
Arrange and then choosing an option.<br />
Setting layer opacity<br />
To create interesting effects, you can vary the opacity of a layer from<br />
the default of 100 percent (fully opaque) down to 0 percent (fully<br />
transparent). When a layer is partially transparent, the underlying<br />
layers show through.<br />
You can also change the opacity of a layer group.<br />
The Opacity setting on the Layers palette determines the opacity of<br />
each layer. The overall opacity of a layer and the opacity of individual<br />
Working with layers 155
pixels are independent of each other. For example, if a pixel starts at<br />
50 percent opacity and the layer is set to 50 percent opacity, the pixel<br />
appears as 25 percent opaque. If the layer is in a layer group that is set<br />
to 50 percent opacity, then the pixel appears as 12.5 percent opaque.<br />
To set the opacity of a layer<br />
Edit workspace<br />
1 On the Layers palette, select the layer or layer group.<br />
2 Drag the Opacity slider to the desired percentage.<br />
You can also set layer opacity by double-clicking the layer,<br />
changing the Opacity setting in the Layer <strong>Pro</strong>perties dialog box,<br />
and clicking OK.<br />
156 <strong>Corel</strong> PaintShop <strong>Pro</strong> <strong>X4</strong> <strong>User</strong> <strong>Guide</strong>
Working with selections<br />
Selecting the parts of images to edit is an important step in your<br />
workflow. By creating a selection, you can edit an area while leaving<br />
the rest of the image unchanged. You can use drawing or painting<br />
tools to modify selected areas of your image. You can also apply<br />
commands to flip, copy, crop, or perform other actions on the<br />
selected areas.<br />
The border of a selection is identified by a selection marquee, which is<br />
a series of black and white dashes that outlines the selection.<br />
This section presents the following topics<br />
• Creating selections<br />
• Modifying selections<br />
• Inverting and clearing selections<br />
For more topics about selections, including moving and modifying<br />
selections, and using feathering and anti-aliasing, see “Working with<br />
selections” in the Help.<br />
Creating selections<br />
You can create a selection when you want to isolate part of an image.<br />
For example, you can use a selection to adjust or retouch one area of<br />
a photo, or to copy a portion of a photo and paste it into another<br />
photo. The way you make a selection depends on whether you are<br />
Working with selections 157
working on a raster layer or a vector layer. For more information about<br />
raster and vector layers, see “Understanding layers” in the Help.<br />
You can create a selection by using a Selection tool shape (left),<br />
by creating a freehand selection (center), or by using the Magic<br />
Wand tool to select specific areas of color or opacity (right).<br />
The following selection tools can be used to create raster selections:<br />
• Selection tool — lets you create a selection of a specific shape,<br />
such as a rectangle, square, ellipse, circle, or star<br />
• Freehand Selection tool — lets you create a selection around<br />
the edges of an object, such as petals of a flower or fingers on a<br />
hand. You can make four types of selections with the Freehand<br />
tool:<br />
• Edge Seeker — finds the edges between two areas with color<br />
differences when you click on the edges of irregularly shaped<br />
areas<br />
• Freehand — lets you quickly select an area by dragging<br />
• Point to Point — lets you draw straight lines between points to<br />
create a selection with straight edges<br />
• Smart Edge — automatically finds the edges of irregularly<br />
shaped areas when you click along the edges<br />
158 <strong>Corel</strong> PaintShop <strong>Pro</strong> <strong>X4</strong> <strong>User</strong> <strong>Guide</strong>
• Magic Wand tool — makes a selection based on the color,<br />
hue, brightness, or opacity of an object. This tool is designed to<br />
select an area that has distinctly different pixels than those in<br />
other areas of an image — for example, a pink rose surrounded by<br />
green leaves.<br />
You can make a selection with one tool and then switch to another tool<br />
to add to or subtract from the selection. For more information, see<br />
“Modifying selections” on page 162.<br />
To create a selection by using the Selection tool<br />
Edit workspace<br />
1 On the Tools toolbar, choose the Selection tool .<br />
2 Check the settings of the following controls on the Tool Options<br />
palette, and modify them if necessary:<br />
• Selection Type — specifies the shape of the selection area<br />
• Mode — specifies whether to replace, add, or remove an<br />
existing selection. Replace is the default setting.<br />
• Feather — softens the edges of a selection by specifying a fade<br />
width (0 to 200 pixels)<br />
• Anti-alias — applies a smooth edge to a selection by making the<br />
pixels along its edges semitransparent<br />
3 Drag to make the selection.<br />
As you drag, a border indicates the selection. When you finish<br />
dragging, the selection’s border becomes a selection marquee.<br />
After you create a selection, changes to the settings on the Tool<br />
Options palette apply to the next action, not to the current<br />
selection. You can modify the options for the current selection<br />
by choosing Selections � Modify and choosing a command<br />
from the menu.<br />
Working with selections 159
To create a selection by using the Freehand Selection tool<br />
Edit workspace<br />
1 On the Tools toolbar, choose the Freehand Selection tool .<br />
2 On the Tool Options palette, choose one of the following from the<br />
Selection Type drop-list:<br />
• Edge Seeker<br />
• Freehand<br />
• Point to Point<br />
• Smart Edge<br />
3 Check the settings of the following controls on the Tool Options<br />
palette, and modify them if necessary:<br />
• Feather — softens the edges of a selection by specifying a fade<br />
width (0 to 200 pixels)<br />
• Smoothing — specifies the amount of smoothing to apply to<br />
the selection border<br />
• Anti-alias — applies a smooth edge to a selection by making<br />
pixels semitransparent<br />
• Use all layers — searches for an edge in all layers of the selected<br />
area. This option is available when you use the Edge Seeker or<br />
the Smart Edge selection type on multilayer images.<br />
4 Depending on the selection type you chose, perform a task from<br />
the following table.<br />
To Do the following<br />
Make a Freehand selection Drag to select an image area.<br />
Make an Edge Seeker selection Click precisely along the edge of the<br />
area you want to select, and doubleclick<br />
or right-click to complete the<br />
selection.<br />
160 <strong>Corel</strong> PaintShop <strong>Pro</strong> <strong>X4</strong> <strong>User</strong> <strong>Guide</strong>
To Do the following<br />
Make a Smart Edge selection Click along the edge of the area that<br />
you want to select, ensuring that the<br />
rectangular cursor encloses the<br />
edge. Double-click or right-click to<br />
complete the selection.<br />
Make a Point to Point selection Click around the area you want to<br />
select, and double-click or right-click<br />
to complete the selection.<br />
When making an Edge Seeker selection, you can set the<br />
distance used to search for an edge by typing a value in the<br />
Range control on the Tool Options palette.<br />
You can increase the accuracy of Edge Seeker and Smart Edge<br />
selections by clicking more frequently along the edge you are<br />
following.<br />
You can delete a previous point by pressing Delete.<br />
To create a selection by using the Magic Wand tool<br />
Edit workspace<br />
1 On the Tools toolbar, choose the Magic Wand tool .<br />
2 On the Tool Options palette, choose a Match mode option.Check<br />
the settings of the following controls on the Tool Options palette,<br />
and modify them if necessary:<br />
• Tolerance — controls how closely the selected pixels match the<br />
pixel you click in the image. At low settings, only similar pixels<br />
are chosen; at high settings, a wider range of pixels is selected.<br />
• Feather — softens the edges of a selection by specifying a fade<br />
width (0 to 200 pixels)<br />
• Use all layers — searches for matching pixels across all layers in<br />
the image<br />
Working with selections 161
• Contiguous — selects only pixels that connect to the pixel you<br />
click<br />
• Anti-alias — produces a smooth-edged selection by partially<br />
filling in pixels along the edge, making them semitransparent.<br />
You can use this option inside or outside the selection marquee.<br />
3 Click the image area that contains the pixels you want to match.<br />
The selection marquee surrounds all matching pixels.<br />
You can change the number of pixels you select by undoing the<br />
selection, adjusting the Tolerance setting, and making a new<br />
selection.<br />
Modifying selections<br />
Selections can be modified in various ways. You can modify a selection<br />
by adding image content to it or by subtracting image content from it.<br />
For example, in a picture of a person carrying a large sign, you can<br />
select the sign by using the rectangular Selection tool and then add the<br />
person to the selection by using the Freehand Selection tool.<br />
After you create a selection, you can add to it.<br />
For more information about modifying color-based selections and<br />
removing specs and holes, see “Modifying selections” in the Help.<br />
162 <strong>Corel</strong> PaintShop <strong>Pro</strong> <strong>X4</strong> <strong>User</strong> <strong>Guide</strong>
To add to or subtract from a selection<br />
Edit workspace<br />
1 On the Tools toolbar, choose a selection tool (Selection ,<br />
Freehand , or Magic Wand tool).<br />
2 Choose settings for the tool on the Tool Options palette.<br />
3 Perform a task from the following table.<br />
To Do the following<br />
Add to a selection From the Mode drop-list, choose<br />
Add, and select the image areas that<br />
you want to add to the selection.<br />
The areas do not need to be<br />
adjacent.<br />
Subtract from a selection From the Mode drop-list, choose<br />
Remove, and select the image areas<br />
that you want to remove from the<br />
selection.<br />
You can also add to a selection by holding down Shift while<br />
clicking the image areas that you want to add, or subtract from<br />
a selection by holding down Ctrl while clicking the image areas<br />
that you want to remove.<br />
Inverting and clearing selections<br />
Sometimes, the easiest way to make a complicated selection is to select<br />
the part of the image that you don’t want and then invert the<br />
selection. For example, in a picture of a person against a solid-color<br />
background, you can select the background and then invert the<br />
selection, so that the person is selected instead of the background.<br />
Working with selections 163
By selecting a solid background (left) and inverting the selection,<br />
you can isolate a complex, multicolored foreground (right).<br />
You can also clear a selection, which removes the selection marquee<br />
and integrates the selection back into the image. After clearing the<br />
selection, you can resume your editing of the entire image.<br />
To invert a selection<br />
Edit workspace<br />
• Choose Selections � Invert.<br />
The selection marquee now encloses the previously unselected<br />
image area and excludes the previously selected image area.<br />
To clear a selection<br />
Edit workspace<br />
• Choose Selections � Select None.<br />
You can also clear a selection by right-clicking in the image<br />
outside the selection marquee or by pressing Ctrl + D.<br />
164 <strong>Corel</strong> PaintShop <strong>Pro</strong> <strong>X4</strong> <strong>User</strong> <strong>Guide</strong>
Working with text<br />
<strong>Corel</strong> PaintShop <strong>Pro</strong> lets you add text to images and create interesting<br />
text effects.<br />
This section presents the following topics:<br />
• Applying text<br />
• Formatting text<br />
Applying text<br />
<strong>Corel</strong> PaintShop <strong>Pro</strong> lets you apply different types of text to your<br />
images. You can apply vector text, raster text, and text as a selection.<br />
The type of text you apply depends on the effect you want to create.<br />
Vector text, which is used in most instances, is the most versatile type<br />
of text because you can edit the text characters at any time. For more<br />
information about different types of text, see “Applying text” in the<br />
Help.<br />
You can add text to your photos.<br />
You can delete vector, raster, or selection-based text at any time.<br />
Working with text 165
To create text<br />
Edit workspace<br />
1 On the Tools toolbar, choose the Text tool .<br />
2 On the Materials palette, click the Foreground and Stroke<br />
<strong>Pro</strong>perties box, and choose a color for the text outline.<br />
If the Materials palette is not displayed, choose View � Palettes �<br />
Materials.<br />
If you want to create text with no outline, click the Transparent<br />
button below the Foreground and Stroke <strong>Pro</strong>perties box.<br />
3 On the Materials palette, click the Background and Stroke<br />
<strong>Pro</strong>perties box, and choose a color for the text fill.<br />
If you want to create hollow text, click the Transparent button<br />
below the Background and Fill <strong>Pro</strong>perties box, and on the Tool<br />
Options palette, set the Stroke width control to 1.0 or greater.<br />
4 On the Tool Options palette, choose one of the following text<br />
types from the Create As drop-list:<br />
• Vector — creates fully editable text that resides on a vector layer.<br />
This text type is the default and is used in most instances.<br />
• Selection — creates a selection marquee in the shape of the text<br />
characters. The marquee is filled with the underlying layer.<br />
• Floating — creates raster text as a floating selection. The<br />
selection can be moved, but the text characters cannot be<br />
edited.<br />
5 On the Tool Options palette, choose a font, font size, units, and<br />
font style.<br />
Note: The Units drop-list offers two options — Points (for print<br />
output) and Pixels (for Web output).<br />
6 In the image window, click where you want the text to appear,<br />
type the text, and click the Apply button on the Tool Options<br />
palette.<br />
166 <strong>Corel</strong> PaintShop <strong>Pro</strong> <strong>X4</strong> <strong>User</strong> <strong>Guide</strong>
A bounding box appears around the text.<br />
7 Do any of the following to adjust the text position:<br />
• Position the pointer in the centre of the bounding box until the<br />
pointer changes its shape to a four-way arrow, and drag the text<br />
to the desired location.<br />
• Position the pointer over a corner of the bounding box until the<br />
pointer changes its shape to a two-way arrow, and drag up and<br />
down to rotate the text.<br />
For information about using the Materials palette to choose<br />
colors for the text outline and fill, see “Using the Materials<br />
palette” on page 121.<br />
You can also apply the text after you have typed it by doubleclicking<br />
the area outside the text object.<br />
To delete text<br />
Edit workspace<br />
1 On the Tools toolbar, choose the Pick tool .<br />
2 Click the vector text you want to delete to select it.<br />
3 Press Delete.<br />
You can also use the following text selection methods: doubleclick<br />
a word to select it, triple-click a line to select it, and<br />
quadruple-click in the text or press Ctrl + A to select the entire<br />
text.<br />
Formatting text<br />
The text formatting options in <strong>Corel</strong> PaintShop <strong>Pro</strong> let you control the<br />
appearance of text. You can set these options when you create vector,<br />
Working with text 167
aster, or selection text. If you create vector text, you can reformat the<br />
text at any time by changing your text formatting settings. You cannot<br />
change the characters or formatting of raster text. You can modify<br />
raster text only by using the Pick tool.<br />
For more information about formatting options, see “Formatting text”<br />
in the Help.<br />
To change font attributes<br />
Edit workspace<br />
1 On the Tools toolbar, choose the Text tool .<br />
2 Select the vector text characters you want to change by dragging<br />
over them.<br />
Note: You can also select the entire text by pressing Ctrl + A.<br />
3 On the Tool Options palette, perform a task from the following<br />
table, and click the Apply button .<br />
To Do the following<br />
Change the font Choose an option from the Font<br />
drop-list.<br />
Change the font size Choose an option from the Size<br />
drop-list.<br />
Change the units of measurement<br />
for the font<br />
From the Units drop-list, choose<br />
Points for print output or Pixels for<br />
Web output.<br />
Apply bold formatting to text Click the Bold button .<br />
Apply italic formatting to text Click the Italic button .<br />
Underline the text Click the Underline button .<br />
Apply a line through text Click the Strikethrough button .<br />
168 <strong>Corel</strong> PaintShop <strong>Pro</strong> <strong>X4</strong> <strong>User</strong> <strong>Guide</strong>
E-mailing and sharing photos<br />
<strong>Corel</strong> PaintShop <strong>Pro</strong> gives you options for e-mailing your photos or<br />
sharing them on a sharing site.<br />
This section presents the following topics:<br />
• E-mailing photos<br />
• Uploading photos to a sharing site<br />
E-mailing photos<br />
You can e-mail photos directly from any <strong>Corel</strong> PaintShop <strong>Pro</strong><br />
workspace.<br />
To e-mail photos<br />
Edit workspace<br />
1 Choose File � E-mail, and choose one of the following options:<br />
• Active image — lets you send the photo that is currently active<br />
in the image window<br />
• All open images — lets you send all the photos that are open in<br />
the image window<br />
• All selected items — lets you send all the photos that you<br />
currently have selected<br />
2 In the E-mail dialog box, choose one of the following options:<br />
• Embedded photos — displays photos in the body of your e-mail<br />
message<br />
• Attachments (original file format) — sends photos as individual<br />
file attachments. This option preserves the original file formats.<br />
E-mailing and sharing photos 169
3 Choose a size setting from the Maximum photo size drop-list. The<br />
total size of your e-mail is displayed beside the preview.<br />
You can review the items you are sending by clicking the<br />
playback arrows that appear under the Preview thumbnail.<br />
You can also e-mail photos from the Organizer palette by<br />
selecting the photo thumbnails, clicking the Share button<br />
on the Organizer toolbar, and choosing E-mail.<br />
Uploading photos to a sharing site<br />
You can upload your photos to sharing sites, such as Facebook and<br />
Flickr, directly from the application when you are connected to the<br />
Internet.<br />
To upload photos to a sharing site<br />
1 In the Organizer palette (available from any workspace), select the<br />
photos that you want to share.<br />
If the Organizer palette is not displayed, click View � Palettes �<br />
Organizer, or press Shift + F9.<br />
2 Click the Share button<br />
• Facebook<br />
• Flickr<br />
, and click one of the following:<br />
3 Follow the instructions to upload the photos to your account.<br />
If you are unable to log in to the sharing site, make sure that<br />
you have entered the correct e-mail address or username and<br />
password.<br />
If you are unable to log in from a corporate network, you may<br />
need to modify the <strong>Pro</strong>xy Server settings on your computer.<br />
Check with your Network Administrator to get the <strong>Pro</strong>xy Server<br />
information for your corporate network.<br />
170 <strong>Corel</strong> PaintShop <strong>Pro</strong> <strong>X4</strong> <strong>User</strong> <strong>Guide</strong>
Printing<br />
<strong>Corel</strong> PaintShop <strong>Pro</strong> provides extensive options for printing your work.<br />
This section covers basic printing topics. For more information about<br />
working with layouts and preparing files for professional printing, see<br />
“Printing” in the Help.<br />
Printing images<br />
<strong>Corel</strong> PaintShop <strong>Pro</strong> offers many ways to print images. You can print<br />
from the Manage workspace, Edit workspace, or Adjust workspace.<br />
You can use a template, or use a custom layout to meet specific size<br />
and layout requirements.<br />
You can print contact sheets (left), print to standard photo<br />
sizes (center), or create custom print layouts (right).<br />
Templates help you simplify image placement and sizing. You can use<br />
templates to lay out and print images in standard sizes, including 4 ×<br />
6 inches, 5 × 7 inches, and 10 × 15 centimeters. You can use a<br />
Printing 171
<strong>Corel</strong> PaintShop <strong>Pro</strong> template, or you can create your own custom<br />
template from a page layout that you create.<br />
Creating your own layouts gives you the flexibility to print images to<br />
any size and lets you create a custom page for projects such as<br />
scrapbooks. For more information about creating layouts, see<br />
“Creating layouts” in the Help.<br />
To print the active image<br />
Edit workspace<br />
1 Choose File � Print.<br />
2 In the Printer group box, click Printer.<br />
The Print dialog box appears.<br />
3 Choose a printer from the Name drop-list, and click OK.<br />
4 Click the Placement tab, and type or set a value in the Number of<br />
copies control.<br />
5 In the Orientation group box, choose one of the following<br />
options:<br />
• Portrait<br />
• Landscape<br />
6 In the Size and Position group box, set any of the following<br />
controls:<br />
• Width and Height — lets you specify width and height values to<br />
set the image size<br />
• Scale — lets you resize the image by entering a percentage<br />
• Fit to page — fits the image to the printed page<br />
• Center on page — centers the image on the printed page<br />
• Upper left of page — positions the image in the upper-left<br />
corner of the printed page<br />
172 <strong>Corel</strong> PaintShop <strong>Pro</strong> <strong>X4</strong> <strong>User</strong> <strong>Guide</strong>
• Custom offset — lets you enter values in the Left offset and Top<br />
offset boxes<br />
7 Click the Options tab.<br />
8 In the Print Output group box, choose one of the following<br />
options:<br />
• Color<br />
• Greyscale<br />
• CMYK separations<br />
If you choose the CMYK separations option, you can print CMYK<br />
labels on each color plate or page by marking the CMYK plate<br />
labels check box in the Print Marks group box.<br />
9 Click Print.<br />
To print a contact sheet<br />
Manage workspace<br />
1 In the Organizer palette, select the files that you want to print.<br />
2 On the Organizer toolbar, click the Organizer menu button<br />
and choose Print Contact Sheet.<br />
3 Specify the settings you want in the Print Contact Sheet dialog<br />
box.<br />
4 Click Print.<br />
For more information about printing options, see<br />
“Understanding printing” in the Help.<br />
To print images by using a template<br />
1 In the Manage or Edit workspace, select thumbnails in the<br />
Organizer palette.<br />
2 Choose File � Print Layout.<br />
Printing 173
The Print Layout window appears.<br />
3 Click File � Open Template.<br />
The Templates dialog box appears.<br />
4 In the Category group box, choose a category from the list.<br />
Thumbnails of the templates in each category appear in the<br />
window on the right. Custom templates that you saved appear<br />
under the <strong>User</strong> Defined category. If the custom template was<br />
saved with images, the cells are filled with color.<br />
5 Select a template, and click OK.<br />
Note: If you previously saved images with the template, the<br />
images appear in the template cells and in the thumbnail list. Cells<br />
are grayed in the template thumbnail for templates with missing<br />
images.<br />
6 Drag images into the template cells.<br />
If you want to fill the template with copies of the same image,<br />
click a thumbnail and click the Fill Template with Image<br />
button .<br />
7 Click File � Print.<br />
You can remove an image from a template by selecting the<br />
image and pressing Delete.<br />
You can also open images by choosing File � Open Image.<br />
174 <strong>Corel</strong> PaintShop <strong>Pro</strong> <strong>X4</strong> <strong>User</strong> <strong>Guide</strong>
Index<br />
A<br />
Adjust workspace 11, 23<br />
adjusting images 65<br />
automatically 73<br />
in one step 74<br />
with Smart Photo Fix 75<br />
Airbrush tool 32<br />
angles, straightening 71<br />
attaching<br />
photos to e-mails 169<br />
automating<br />
basic photo corrections 73<br />
B<br />
background<br />
erasing areas from 95, 97<br />
erasing straight lines from 96<br />
filling cropped edges with 71<br />
restoring erased pixels 96, 98<br />
swapping with foreground 123<br />
Background Eraser tool 33<br />
switching to 96, 98<br />
Batch Merge, HDR 116<br />
Black and White Film effect 136<br />
blemishes, removing 86<br />
bold text formatting 168<br />
borders, adding to images 102<br />
bracketing 109, 116<br />
brightening shadows 80<br />
brightness and contrast<br />
adjusting 79<br />
Brush Variance palette 28<br />
Burn tool 32<br />
Index 175<br />
C<br />
Calendar, finding images 50<br />
Camera RAW Lab 62<br />
and RAW photo settings 63<br />
changing preferences 64<br />
captions<br />
adding 58<br />
deleting 58<br />
Chalk tool 34<br />
Change to Target tool 33<br />
clarity 79, 80<br />
Clone tool 32<br />
cloning images 91
closing<br />
images 36<br />
collages, photo 149<br />
collapsing layer groups 151<br />
Color Changer tool 33, 100<br />
Color Picker 124, 125<br />
Color Replacer tool 33<br />
Colored Pencil tool 34<br />
colors<br />
adjusting balance 77<br />
adjusting cast 78<br />
changing 99<br />
choosing 126, 127<br />
correcting 148<br />
correcting faded 78<br />
displaying values 126<br />
from desktop 127<br />
from HSL values 126<br />
from HTML codes 126<br />
from images 127<br />
from RGB values 126<br />
swapping foreground and<br />
background 123<br />
using the Color Picker 124<br />
combining<br />
batches of HDR photos 116<br />
images 149<br />
photo content 118<br />
photos with Exposure Merge<br />
109<br />
community sites 20<br />
compressing<br />
images 38<br />
constraining<br />
crop areas 69<br />
contact sheets, printing 171,<br />
173<br />
contrast, adjusting 79<br />
converting<br />
photos to black and white 136<br />
RAW files 64<br />
<strong>Corel</strong> Knowledgebase 20<br />
<strong>Corel</strong> products, updating 7<br />
<strong>Corel</strong> Support Services 7, 20<br />
correcting<br />
color cast 78<br />
colors 148<br />
faded colors 78<br />
images cosmetically 85<br />
photographic perspective 71<br />
scratches 89<br />
tone 148<br />
Crayon tool 34<br />
Crop tool 31<br />
cropping 67<br />
straightened images 71<br />
customer support 7, 20<br />
cutting<br />
objects from background 97<br />
176 <strong>Corel</strong> PaintShop <strong>Pro</strong> <strong>X4</strong> <strong>User</strong> <strong>Guide</strong>
D<br />
darkening<br />
photos automatically 75<br />
deleting images 40, 53<br />
details, adjusting Clarity 80<br />
dialog boxes<br />
displaying Help for 17<br />
digital photos<br />
getting 35<br />
removing noise 76<br />
digital workflow 9<br />
documentation conventions 15<br />
Dodge tool 32<br />
Dropper tool 31<br />
DSLR features 13<br />
E<br />
Edge Seeker selections 160<br />
edges<br />
adding borders 102<br />
filling with background 71<br />
sharpening 76<br />
Edit workspace 24<br />
editing<br />
applying captured editing 55<br />
capturing image editing 55<br />
images. See adjusting images<br />
Effect Browser 130<br />
effects<br />
applying 129<br />
browsing 132<br />
choosing from Effects<br />
menu 131<br />
choosing in Effect Browser 132<br />
creating 149<br />
modifying preset 133<br />
Photo 133<br />
resetting values 132<br />
saving settings 132<br />
types of. See name of specific<br />
effect<br />
Ellipse tool 33<br />
e-mailing photos 169<br />
embedding<br />
photos in e-mail 169<br />
Emboss tool 32<br />
enhancing 80<br />
Eraser tool 33<br />
switching to 96, 98<br />
erasing<br />
background areas 95, 97<br />
image areas 94, 96, 103<br />
lines from backgrounds 96<br />
straight lines from images 95<br />
EV settings for bracketing 109<br />
EXIF information<br />
editing 58<br />
expanding<br />
layer groups 151<br />
Index 177
Exposure Merge 109<br />
extracting, objects from<br />
background 97<br />
Eye Drop mode 87<br />
eye drops<br />
applying 87<br />
F<br />
Facebook, uploading to 170<br />
facial blemishes<br />
removing 86<br />
facial wrinkles<br />
removing 88<br />
features<br />
new 2<br />
file formats<br />
choosing 38<br />
files<br />
compressing 38<br />
opening from the Manage<br />
workspace 37<br />
Fill Light/Clarity 80<br />
filling<br />
cropped edges 71<br />
properties for 121<br />
film effects<br />
applying 134, 139<br />
Film Looks<br />
applying 141<br />
filter effects<br />
applying 139<br />
filters<br />
applying effect 134<br />
Creative 140<br />
Film 141<br />
finding images 45<br />
by tag 49<br />
Smart Collections 47<br />
using Calendar 50<br />
fixing<br />
images in one step 74<br />
images with Smart Photo Fix 75<br />
flaws, removing 91<br />
Flickr, uploading to 170<br />
Flood Fill tool 33<br />
focus<br />
sharpening photo edges 76<br />
using depth of field 81<br />
folders<br />
browsing for images 51<br />
viewing all cataloged 45<br />
fonts<br />
changing attributes 167<br />
foreground<br />
swapping with<br />
background 123<br />
formatting<br />
text 167<br />
178 <strong>Corel</strong> PaintShop <strong>Pro</strong> <strong>X4</strong> <strong>User</strong> <strong>Guide</strong>
frames<br />
picture 141<br />
Freehand Selection tool 31<br />
creating selections with 160<br />
Freehand selections 160<br />
Full-screen viewing 10<br />
G<br />
graphics<br />
adding to layers 149<br />
H<br />
HDR (high dynamic range) 107<br />
Batch Merge 116<br />
Exposure Merge 109<br />
taking photos for 108<br />
Help<br />
training videos 15<br />
Web-based resources 20<br />
Help system 17<br />
high dynamic range (HDR),<br />
about 107<br />
Histogram palette 27<br />
History palette 27<br />
HSL color model<br />
choosing colors from values<br />
126<br />
displaying values 126<br />
HTML codes<br />
specifying colors with 126<br />
Hue Up/Down tool 33<br />
Index 179<br />
I<br />
image information 56<br />
advanced 58<br />
captions 58<br />
creation date 57<br />
in the Open dialog box 37<br />
Info palette 56<br />
rating 58<br />
Info palette 22, 27, 56<br />
information, image<br />
See image information<br />
installing applications 5<br />
inverting<br />
selections 163<br />
IPTC data 38<br />
editing 58<br />
italic text formatting 168<br />
J<br />
JPEG files 38<br />
K<br />
keyword tags<br />
See tags
L<br />
layers 147<br />
adding text or graphics 149<br />
collapsing groups 151<br />
creating 152<br />
expanding groups 151<br />
mirroring 102<br />
moving 155<br />
rearranging 155<br />
renaming 153<br />
selecting 151<br />
setting opacity 155<br />
viewing 154<br />
Layers palette 27, 150<br />
displaying or hiding 151<br />
expanding or collapsing layers<br />
151<br />
selecting layers 151<br />
learning 15<br />
Learning Center palette 18, 27<br />
displaying or hiding 19<br />
using 19<br />
Lighten/Darken tool 32<br />
lightening photos<br />
See brightening photos<br />
lines<br />
applying through text 168<br />
erasing straight from<br />
backgrounds 96<br />
erasing straight 95<br />
loading<br />
images 35<br />
Local Tone Mapping 80<br />
180 <strong>Corel</strong> PaintShop <strong>Pro</strong> <strong>X4</strong> <strong>User</strong> <strong>Guide</strong><br />
M<br />
Magic Wand tool 31<br />
creating selections with 161<br />
Makeover tool 31<br />
applying eye drops with 87<br />
applying suntans with 87<br />
applying the Thinify effect 87<br />
removing blemishes with 86<br />
whitening teeth with 86<br />
Manage workspace 22, 41<br />
choosing display mode 43<br />
setting up 41<br />
Marker tool 34<br />
marquee, selection 157<br />
materials 121<br />
swapping foreground and<br />
background 123<br />
Materials palette 27, 121<br />
displaying or hiding 123<br />
menu bar 24<br />
merging photos 107<br />
Mesh Warp tool 34<br />
Mixer palette 28<br />
montages 149<br />
Move tool 31
moving<br />
layers 155<br />
N<br />
Navigation palette 27<br />
new features 2<br />
newsgroups 20<br />
noise<br />
removing 76<br />
removing quickly 77<br />
O<br />
Object Extractor 96<br />
Object Remover tool 32<br />
objects<br />
cutting from background 97<br />
image, removing 91, 104<br />
Oil Brush tool 34<br />
one-step fixes<br />
noise 77<br />
photos 74<br />
opacity<br />
setting for layers 155<br />
opening<br />
application 6<br />
images 36<br />
images from the Navigation<br />
palette 37<br />
RAW photos 37<br />
Organizer palette 27<br />
e-mailing photos from 169<br />
organizing images 41<br />
Overview palette 27<br />
Index 181<br />
P<br />
Paint Brush tool 32<br />
painting<br />
with picture tubes 144<br />
paintings 149<br />
Palette Knife tool 34<br />
palettes 24<br />
displaying 28<br />
hiding 28<br />
resizing 28<br />
types of 26<br />
using 26<br />
Pan tool 31<br />
panoramic photos 150<br />
Pastel tool 34<br />
Pen tool 34<br />
perspective<br />
correcting 71<br />
Perspective Correction tool 31<br />
Photo Blend 118<br />
Photo effects 133<br />
Black and White Film 134<br />
film and filter effects 134
Selective Focus 135<br />
Sepia Toning 134<br />
Time Machine 133<br />
Vignette 135<br />
photos<br />
creating vintage-style 139<br />
Pick tool 31<br />
picture frames 141<br />
Picture Tube tool 33, 143<br />
picture tubes 143<br />
painting with 144<br />
pixels<br />
restoring to background 98<br />
playing videos 52<br />
PNG files 38<br />
Point to Point selections 161<br />
preserving<br />
images 148<br />
Preset Shape tool 33<br />
Preview images 22<br />
previewing<br />
images 37<br />
images in the Manage<br />
workspace 51<br />
print layout templates<br />
printing images with 173<br />
print layouts 174<br />
printing<br />
active images 172<br />
contact sheets 171, 173<br />
cropped images 69<br />
Help topics 17<br />
images 171<br />
images with templates 173<br />
Push tool 32<br />
182 <strong>Corel</strong> PaintShop <strong>Pro</strong> <strong>X4</strong> <strong>User</strong> <strong>Guide</strong><br />
Q<br />
Quick Review 10<br />
Quick Review mode<br />
using 59<br />
quitting 6<br />
R<br />
rating images 57, 58<br />
RAW files 38<br />
RAW photos 61<br />
adjusting settings 63<br />
capturing edits 64<br />
converting to another format<br />
64<br />
editing 64<br />
opening 37<br />
supported file formats 61<br />
using the Camera RAW Lab 62<br />
rearranging<br />
layers 155<br />
Rectangle tool 33<br />
Red Eye tool 31
ed-eye, removing 84<br />
with Red Eye tool 84<br />
renaming<br />
files 54<br />
layers 153<br />
resizing<br />
palettes 28<br />
resources<br />
learning 15<br />
restoring<br />
erased pixels to background<br />
96, 98<br />
erased pixels to images 95<br />
images 83<br />
retouching<br />
images 83<br />
reusing effects 132<br />
reversing<br />
foreground and background<br />
123<br />
RGB color model<br />
choosing colors from values<br />
126<br />
displaying values 126<br />
rotating<br />
image thumbnails 53<br />
images 66<br />
images to specified angles 67<br />
Index 183<br />
S<br />
saturation<br />
increasing or decreasing 76<br />
Saturation Up/Down tool 33<br />
saving<br />
effect settings 132<br />
images 38<br />
scaling<br />
photos with Smart Carver 103<br />
Scratch Remover tool 32<br />
scratches, removing 89<br />
Script Output palette 28<br />
searching for images 45<br />
advanced search 46<br />
quick search 46<br />
selecting<br />
layers 151<br />
multiple thumbnails 52<br />
Selection tool 31<br />
creating selections with 159<br />
selections 157<br />
adding to 163<br />
clearing 163<br />
creating 157<br />
inverting 163<br />
mirroring 102<br />
modifying 162<br />
subtracting from 163<br />
Selective Focus 135, 136
sending<br />
photos by e-mail 169<br />
Sepia Toning effect 134<br />
applying 136<br />
sharing<br />
photos 169<br />
sharing services<br />
uploading photos 170<br />
Sharpen tool 32<br />
sharpening<br />
edges 76<br />
Skin Smoothing feature<br />
smoothing skin tone with 88<br />
Smart Carver 103<br />
Smart Collections searches 47<br />
Smart Edge selections 161<br />
Smart Photo Fix<br />
fine-tuning basic corrections<br />
with 75<br />
Smear tool 34<br />
smoothing<br />
skin tone 88<br />
Smudge tool 32<br />
Soften tool 32<br />
sorting image thumbnails 52<br />
special effects<br />
See effects<br />
spraying images 143<br />
starting the application 6<br />
status bar 24<br />
stitching photos 150<br />
straight lines<br />
erasing 96<br />
straight lines, erasing<br />
from images 95<br />
Straighten tool 31<br />
straightening<br />
angles 71<br />
cropping images after 71<br />
images 70<br />
strikethrough text formatting<br />
168<br />
strokes<br />
setting properties 122<br />
styles 121<br />
suntan, applying 87<br />
support, customer 7, 20<br />
swapping foreground and<br />
background 123<br />
swatches<br />
choosing colors 126<br />
Symmetric Shape tool 34<br />
184 <strong>Corel</strong> PaintShop <strong>Pro</strong> <strong>X4</strong> <strong>User</strong> <strong>Guide</strong><br />
T<br />
tags 47<br />
assigning to images 48<br />
creating 48
deleting from catalog 48<br />
find nontagged images 50<br />
find tagged images 49<br />
removing from images 49<br />
tanning effect 87<br />
Technical Support 20<br />
teeth, whitening 86<br />
templates<br />
print layout. See print layout<br />
templates<br />
text 165<br />
adding to layers 149<br />
creating 166<br />
deleting 167<br />
formatting 167<br />
Text tool 33<br />
Thinify effect 87<br />
thumbnails 51<br />
browsing for folders 45<br />
displaying in preview area 37<br />
playing videos from 52<br />
rotating 53<br />
sorting 52<br />
viewing for folders 44<br />
zooming in and out 52<br />
tilt-shift 135, 136<br />
Time Machine effect 133<br />
tones<br />
adjusting balance 77<br />
correcting 148<br />
smoothing skin 88<br />
Tool Options palette 27<br />
toolbars 29<br />
tools<br />
types of 30<br />
Tools toolbar<br />
using tools 30<br />
tooltips<br />
for toolbars 29<br />
for tools 30<br />
trays 60<br />
adding 60<br />
removing 60<br />
tripod, for bracketing 109<br />
tutorials 15<br />
Index 185<br />
U<br />
underlining text 168<br />
uninstalling applications 5<br />
updating <strong>Corel</strong> products 7, 20<br />
uploading photos to sharing<br />
services 170<br />
V<br />
vector layers<br />
collapsing 151<br />
expanding 151<br />
videos, playing 52
viewing<br />
layers 154<br />
Vignette 135, 138<br />
W<br />
Warp Brush tool 34, 144<br />
warping<br />
image areas 145<br />
images 144<br />
Web-based resources<br />
accessing 20<br />
workflow 9<br />
workspaces 21<br />
Adjust 23<br />
deleting current images 40<br />
Edit 24<br />
Manage 22<br />
switching between 26<br />
Z<br />
Zoom tool 31<br />
zooming<br />
image thumbnails 52<br />
186 <strong>Corel</strong> PaintShop <strong>Pro</strong> <strong>X4</strong> <strong>User</strong> <strong>Guide</strong>
<strong>Corel</strong>® PaintShop <strong>Pro</strong> <strong>X4</strong> <strong>User</strong> <strong>Guide</strong><br />
Copyright 2011 <strong>Corel</strong> <strong>Corporation</strong>. All rights reserved.<br />
<strong>Pro</strong>duct specifications, pricing, packaging, technical support and information<br />
(“specifications”) refer to the retail English version only. The specifications for all<br />
other versions (including other language versions) may vary.<br />
INFORMATION IS PROVIDED BY COREL ON AN “AS IS” BASIS, WITHOUT ANY<br />
OTHER WARRANTIES OR CONDITIONS, EXPRESS OR IMPLIED, INCLUDING, BUT<br />
NOT LIMITED TO, WARRANTIES OF MERCHANTABLE QUALITY, SATISFACTORY<br />
QUALITY, MERCHANTABILITY OR FITNESS FOR A PARTICULAR PURPOSE, OR<br />
THOSE ARISING BY LAW, STATUTE, USAGE OF TRADE, COURSE OF DEALING OR<br />
OTHERWISE. THE ENTIRE RISK AS TO THE RESULTS OF THE INFORMATION<br />
PROVIDED OR ITS USE IS ASSUMED BY YOU. COREL SHALL HAVE NO LIABILITY<br />
TO YOU OR ANY OTHER PERSON OR ENTITY FOR ANY INDIRECT, INCIDENTAL,<br />
SPECIAL, OR CONSEQUENTIAL DAMAGES WHATSOEVER, INCLUDING, BUT<br />
NOT LIMITED TO, LOSS OF REVENUE OR PROFIT, LOST OR DAMAGED DATA OR<br />
OTHER COMMERCIAL OR ECONOMIC LOSS, EVEN IF COREL HAS BEEN ADVISED<br />
OF THE POSSIBILITY OF SUCH DAMAGES, OR THEY ARE FORESEEABLE. COREL<br />
IS ALSO NOT LIABLE FOR ANY CLAIMS MADE BY ANY THIRD PARTY. COREL’S<br />
MAXIMUM AGGREGATE LIABILITY TO YOU SHALL NOT EXCEED THE COSTS<br />
PAID BY YOU TO PURCHASE THE MATERIALS. SOME STATES/COUNTRIES DO<br />
NOT ALLOW EXCLUSIONS OR LIMITATIONS OF LIABILITY FOR CONSEQUENTIAL<br />
OR INCIDENTAL DAMAGES, SO THE ABOVE LIMITATIONS MAY NOT APPLY TO<br />
YOU.<br />
© 2011 <strong>Corel</strong> <strong>Corporation</strong>. All rights reserved. <strong>Corel</strong>, <strong>Corel</strong>DRAW, PaintShop<br />
Photo, Painter, <strong>Corel</strong> DESIGNER, Smart Carver, Thinify, VideoStudio,<br />
WordPerfect, WinDVD, WinZip, Digital Studio, the <strong>Corel</strong> logo, and the <strong>Corel</strong><br />
Balloon logo are trademarks or registered trademarks of <strong>Corel</strong> <strong>Corporation</strong> and/<br />
or its subsidiaries. All other product names and any registered and unregistered<br />
trademarks mentioned are used for identification purposes only and remain the<br />
exclusive property of their respective owners.