HD26 Connection and Setting Guideline - Kingstarinternational.nl
HD26 Connection and Setting Guideline - Kingstarinternational.nl
HD26 Connection and Setting Guideline - Kingstarinternational.nl

Create successful ePaper yourself
Turn your PDF publications into a flip-book with our unique Google optimized e-Paper software.
1. Installing CameraManager<br />
<strong>HD26</strong> <strong>Connection</strong> <strong>and</strong> <strong>Setting</strong> <strong>Guideline</strong><br />
Dow<strong>nl</strong>oad CameraManager <strong>and</strong> the full manual from our website or find them on the TF<br />
card which is located at the side of the camera. To access the TF card, remove it from the<br />
camera <strong>and</strong> place it in the TF card slot of your PC. If your computer doesn’t have a TF card<br />
slot, you can use a card adapter or an external card reader. After accessing the TF card, copy<br />
the folder “CameraManager-PC” to your PC. (The video recording function of the camera cannot be<br />
used without the TF card. Insert the TF card back into the camera after copying the folder.)<br />
Open the folder “CameraManager-PC” on your computer <strong>and</strong> double-click on CameraManager.msi<br />
to install the software. CameraManager needs Microsoft .NET Framework 2.0 (or higher). If you<br />
don’t have it installed yet, please install it with from the folder or dow<strong>nl</strong>oad it from<br />
www.update.microsoft.com, then install CameraManager.<br />
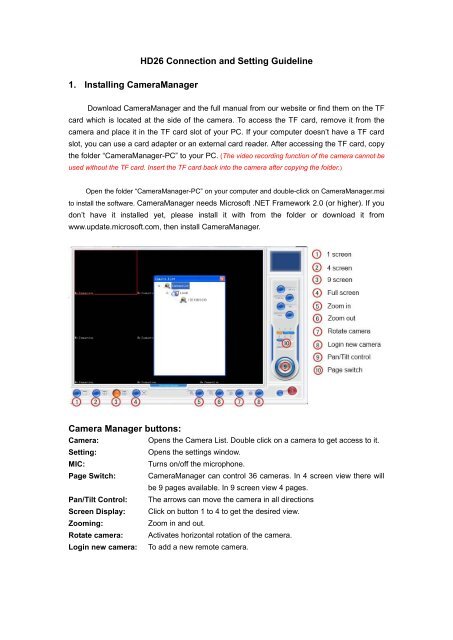
Camera Manager buttons:<br />
Camera:<br />
Opens the Camera List. Double click on a camera to get access to it.<br />
<strong>Setting</strong>:<br />
MIC:<br />
Page Switch:<br />
Pan/Tilt Control:<br />
Screen Display:<br />
Zooming:<br />
Rotate camera:<br />
Login new camera:<br />
Opens the settings window.<br />
Turns on/off the microphone.<br />
CameraManager can control 36 cameras. In 4 screen view there will<br />
be 9 pages available. In 9 screen view 4 pages.<br />
The arrows can move the camera in all directions<br />
Click on button 1 to 4 to get the desired view.<br />
Zoom in <strong>and</strong> out.<br />
Activates horizontal rotation of the camera.<br />
To add a new remote camera.
2. Network settings<br />
Option A: DHCP<br />
In most situations, your router will automatically h<strong>and</strong> out an IP address to all connected<br />
devices. (If your network is setup with static IP addresses, please refer to option B below.)<br />
Connect the LAN port of the camera to your router by using a network cable. Make sure that<br />
your computer is connected to the same router, either by cable or by Wi-Fi.<br />
Turn on the camera, open CameraManager on your computer. You will see your camera in<br />
the Camera List under “Local”. The IP address shown in the list is your camera. When you<br />
connect more than one camera, you will see more than one IP address in the Local list.<br />
Login Camera<br />
Copy the camera’s IP address, open your browser (we strongly suggest Internet Explorer),<br />
input the IP address in the address bar <strong>and</strong> push the ‘Enter’ key.<br />
The following window will appear:
Input user name <strong>and</strong> password. By defauly, both are set as “admin”. You can change this<br />
later to personalize your camera login.<br />
When the login was successful, the camera system status will be shown.
Option B: Static IP address<br />
Connect the camera to your computer with a network cable. The camera’s IP address is<br />
fixed as 192.168.1.139.<br />
Open the TCP/IP settings window of your computer. Write down your computer’s fixed IP<br />
address before you continue the following steps.<br />
Set the computer’s IP address as 192.168.1.251.<br />
Login camera:<br />
Open your browser (we strongly suggest Internet Explorer), input 192.168.1.139 in the<br />
address bar <strong>and</strong> push the ’Enter’ key.<br />
The remaining steps are the same as in option A, DHCP.<br />
After login to the camera, adjust the camera’s IP address into an IP address in the range of<br />
your original computer settings. When this is done, you can change back your computer’s<br />
fixed IP address to the original.<br />
Detailed operation <strong>and</strong> setting, please refer to the user manual stored in the TF card