Programmable Logic Design Quick Start Handbook
Programmable Logic Design Quick Start Handbook
Programmable Logic Design Quick Start Handbook

Create successful ePaper yourself
Turn your PDF publications into a flip-book with our unique Google optimized e-Paper software.
<strong>Programmable</strong><br />
<strong>Logic</strong> <strong>Design</strong><br />
<strong>Quick</strong> <strong>Start</strong><br />
<strong>Handbook</strong><br />
by Karen Parnell and Nick Mehta<br />
April 2004<br />
Xilinx • i
PROGRAMMABLE LOGIC DESIGN: QUICK START HANDBOOK •<br />
© 2004, Xilinx, Inc.<br />
“Xilinx” is a registered trademark of Xilinx, Inc. Any rights not expressly granted herein are reserved.<br />
The <strong>Programmable</strong> <strong>Logic</strong> Company is a service mark of Xilinx, Inc.<br />
All terms mentioned in this book are known to be trademarks or service marks and are the property of their<br />
respective owners. Use of a term in this book should not be regarded as affecting the validity of any trademark<br />
or service mark.<br />
All rights reserved. No part of this book may be reproduced, in any form or by any means, without written<br />
permission from the publisher.<br />
PN 0402205 Rev. 4, 4/04<br />
Xilinx • ii
ABSTRACT<br />
Whether you design with discrete logic, base all of your designs on microcontrollers,<br />
or simply want to learn how to use the latest and most advanced<br />
programmable logic software, you will find this book an interesting insight into<br />
a different way to design.<br />
<strong>Programmable</strong> logic devices were invented in the late 1970s and have since<br />
proved to be very popular, now one of the largest growing sectors in the semiconductor<br />
industry. Why are programmable logic devices so widely used<br />
Besides offering designers ultimate flexibility, programmable logic devices also<br />
provide a time-to-market advantage and design integration. Plus, they’re easy<br />
to design with and can be reprogrammed time and time again – even in the field<br />
– to upgrade system functionality.<br />
This book was written to complement the popular Xilinx Campus Seminar<br />
series, but you can also use it as a stand-alone tutorial and information source<br />
for the first of many programmable logic designs. After you have finished your<br />
first design, this book will prove useful as a reference guide or quick start handbook.<br />
The book details the history of programmable logic devices; where and<br />
how to use them; how to install the free, fully functioning design software<br />
(Xilinx WebPACK ISE software is included with this book); and then guides<br />
you through your first designs. There are also sections on VHDL and schematic<br />
capture design entry, as well as a data bank of useful applications examples.<br />
We hope you find this book practical, informative, and above all easy to<br />
use.<br />
Karen Parnell and Nick Mehta<br />
Xilinx • iii
PROGRAMMABLE LOGIC DESIGN: QUICK START HANDBOOK •<br />
Navigating This Book<br />
This book was written for both the professional engineer who has never<br />
designed using programmable logic devices and for the new engineer embarking<br />
on an exciting career in electronics design.<br />
To accommodate these two audiences, we offer the following navigation<br />
section, to help you decide in advance which sections would be most useful.<br />
C HAPTER 1: INTRODUCTION<br />
Chapter 1 is an overview of how and where PLDs are used. It gives a brief<br />
history of programmable logic devices and goes on to describe the different<br />
ways of designing with PLDs.<br />
C HAPTER 2: XILINX SOLUTIONS<br />
Chapter 2 describes the products and services offered by Xilinx to ensure<br />
that your PLD designs enable a time-to-market advantage, design flexibility,<br />
and system future-proofing. The Xilinx portfolio includes CPLD and FPGA<br />
devices, design software, design services and support, and IP cores.<br />
C HAPTER 3: WEBPACK ISE DESIGN SOFTWARE<br />
Xilinx WebPACK ISE design software offers a complete design suite based<br />
on the Xilinx Foundation ISE series software. Chapter 3 describes how to<br />
install the software and what each module does.<br />
C HAPTER 4: WEBPACK ISE DESIGN ENTRY<br />
Chapter 4 is a step-by-step approach to your first design. The following<br />
pages are intended to demonstrate the basic PLD design entry implementation<br />
process.<br />
Xilinx • iv
NAVIGATING THIS BOOK<br />
C HAPTER 5: IMPLEMENTING CPLDS<br />
Chapter 5 discusses the synthesis and implementation process for CPLDs.<br />
The design targets a CoolRunner-II CPLD.<br />
C HAPTER 6: IMPLEMENTING FPGAS<br />
Chapter 6 takes the VHDL or schematic design through to a working physical<br />
device. The design is the same design as described in previous chapters,<br />
but instead targets a Spartan-3 FPGA.<br />
C HAPTER 7: DESIGN REFERENCE BANK<br />
Chapter 7, the final chapter, contains a useful list of design examples and<br />
applications that will give you a jump start into your future programmable<br />
logic designs. This section also offers pointers on where to look for and<br />
download code and search for IP cores from the Xilinx website.<br />
Xilinx • v
PROGRAMMABLE LOGIC DESIGN: QUICK START HANDBOOK •<br />
Table of Contents<br />
Navigating This Book<br />
Table of Contents<br />
Chapter 1: Introduction<br />
The History of <strong>Programmable</strong> <strong>Logic</strong> .................................................................. 1<br />
Complex <strong>Programmable</strong> <strong>Logic</strong> Devices (CPLDs)............................................. 4<br />
Why Use a CPLD ....................................................................................... 4<br />
Field <strong>Programmable</strong> Gate Arrays (FPGAs) ....................................................... 6<br />
<strong>Design</strong> Integration....................................................................................... 8<br />
The Basic <strong>Design</strong> Process ..................................................................................... 9<br />
HDL File Change Example ................................................................................ 13<br />
Before (16 x 16 multiplier):....................................................................... 13<br />
After (32 x 32 multiplier): ......................................................................... 13<br />
Intellectual Property (IP) Cores......................................................................... 14<br />
<strong>Design</strong> Verification.............................................................................................. 14<br />
Functional Simulation .................................................................... 16<br />
Device Implementation ................................................................. 16<br />
Fitting ............................................................................................... 16<br />
Place and Route .............................................................................. 17<br />
Downloading or Programming .................................................... 18<br />
System Debug ................................................................................. 19<br />
Chapter 2: Xilinx Solutions<br />
Introduction.......................................................................................................... 21<br />
Xilinx Devices....................................................................................................... 22<br />
Platform FPGAs................................................................................................... 22<br />
Virtex FPGAs ............................................................................................. 22<br />
Virtex-II Pro FPGAs .................................................................................. 23<br />
The Power of Xtreme Processing ................................................. 23<br />
XtremeDSP – ................................................................................... 23<br />
The Ultimate Connectivity Platform ........................................... 24<br />
The Power of Integration................................................................ 24<br />
Enabling a New Development Paradigm ................................... 24<br />
Industry-Leading Tools ................................................................. 24<br />
Xilinx • vi
TABLE OF CONTENTS<br />
Virtex FPGAs........................................................................................................ 24<br />
Spartan FPGAs..................................................................................................... 25<br />
Spartan-3 FPGAs........................................................................................ 25<br />
Shift register SRL16 blocks ............................................................ 27<br />
As much as 520 Kb distributed SelectRAM memory ............ 27<br />
As much as 1.87 Mb Embedded block RAM .............................. 27<br />
Memory Interfaces .......................................................................... 27<br />
Multipliers ....................................................................................... 28<br />
XCITE Digitally Controlled Impedance Technology – ............ 28<br />
Spartan-3 XCITE DCI Technology Highlights ........................... 28<br />
Full- and half-impedance input buffers ...................................... 29<br />
Spartan-3 Features and Benefits ................................................. 29<br />
Spartan-IIE FPGAs .................................................................................... 31<br />
Spartan-IIE Architectural Features ......................................................... 32<br />
<strong>Logic</strong> Cells ....................................................................................... 35<br />
Block RAM ....................................................................................... 37<br />
Delay-Locked Loop ........................................................................ 38<br />
Configuration .................................................................................. 39<br />
Xilinx CPLDs ........................................................................................................ 41<br />
Product Features: ............................................................................ 41<br />
Selection Considerations: .............................................................. 41<br />
XC9500 ISP CPLD Overview ................................................................... 42<br />
XC9500 5V Family .......................................................................... 42<br />
Flexible Pin-Locking Architecture ............................................... 42<br />
Full IEEE 1149.1 JTAG Development and Debugging Support 42<br />
XC9500 Product Overview Table ................................................. 43<br />
XC9500XL 3.3V Family ............................................................................. 43<br />
Family Highlights ........................................................................... 44<br />
Performance ..................................................................................... 44<br />
Powerful Architecture .................................................................... 44<br />
Highest Reliability .......................................................................... 44<br />
Advanced Technology ................................................................... 44<br />
Outperforms All Other 3.3V CPLDs ............................................ 45<br />
XC9500XV 2.5V CPLD Family ................................................................. 45<br />
High Performance Through Advanced Technology ................. 45<br />
The System <strong>Design</strong>er’s CPLD ....................................................... 45<br />
CoolRunner Low-Power CPLDs ............................................................. 47<br />
XPLA3 Architecture ....................................................................... 48<br />
<strong>Logic</strong> Block Architecture ............................................................... 49<br />
FoldBack NANDs ........................................................................... 50<br />
Macrocell Architecture ................................................................... 51<br />
I/O Cell ............................................................................................ 52<br />
Simple Timing Model .................................................................... 52<br />
Slew Rate Control ........................................................................... 53<br />
XPLA3 Software Tools ................................................................... 53<br />
Xilinx • vii
PROGRAMMABLE LOGIC DESIGN: QUICK START HANDBOOK •<br />
Xilinx • viii<br />
CoolRunner-II CPLDs............................................................................... 55<br />
CoolRunner-II Architecture Description .................................... 56<br />
CoolRunner-II Function Block...................................................... 57<br />
CoolRunner-II Macrocell ............................................................... 59<br />
Advanced Interconnect Matrix (AIM) ......................................... 60<br />
I/O Blocks ....................................................................................... 61<br />
Output Banking .............................................................................. 61<br />
DataGATE ....................................................................................... 62<br />
Additional Clock Options: ............................................................ 63<br />
<strong>Design</strong> Security ............................................................................... 65<br />
CoolRunner-II Application Examples ......................................... 66<br />
CoolRunner Reference <strong>Design</strong>s............................................................... 68<br />
Accessing the Reference <strong>Design</strong>s 68<br />
Military and Aerospace ...................................................................................... 71<br />
Automotive and Industrial ................................................................................ 71<br />
Xilinx IQ Solutions – Architecting Automotive Intelligence .............. 71<br />
<strong>Design</strong>-In Flexibility ....................................................................... 72<br />
<strong>Design</strong> Tools......................................................................................................... 73<br />
<strong>Design</strong> Entry............................................................................................... 73<br />
Synthesis ..................................................................................................... 74<br />
Implementation and Configuration........................................................ 74<br />
Board-Level Integration............................................................................ 74<br />
Verification Technologies......................................................................... 75<br />
Static Verification ........................................................................... 75<br />
Dynamic Verification...................................................................... 76<br />
Debug Verification ......................................................................... 76<br />
Board-Level Verification ............................................................... 76<br />
Advanced <strong>Design</strong> Techniques................................................................. 76<br />
Embedded SW <strong>Design</strong> Tools Center ...................................................... 77<br />
Embedded Software Tools for Virtex-II Pro FPGAs ................. 77<br />
Xilinx IP Cores ..................................................................................................... 78<br />
Web-Based Information Guide.......................................................................... 78<br />
End Markets ............................................................................................... 79<br />
Silicon Products and Solutions................................................................ 80<br />
<strong>Design</strong> Resources....................................................................................... 80<br />
System Resources ...................................................................................... 81<br />
DSP Central ..................................................................................... 81<br />
Algorithms/Cores .......................................................................... 81<br />
Xilinx Online (IRL) .................................................................................... 81<br />
Configuration Solutions ........................................................................... 82<br />
Processor Central....................................................................................... 82<br />
The Embedded Development Kit (EDK) .................................... 82<br />
PowerPC Embedded Processor Solution .................................... 82<br />
The UltraController Solution ........................................................ 82
TABLE OF CONTENTS<br />
MicroBlaze and PicoBlaze Soft Processor Solutions .................. 83<br />
Third-Party Processors Solution ................................................... 84<br />
CoreConnect Technology .............................................................. 84<br />
Tools and Partnerships ............................................................................. 84<br />
Memory Corner ......................................................................................... 84<br />
Silicon .......................................................................................................... 85<br />
<strong>Design</strong> Tools and Boards.......................................................................... 85<br />
Technical Literature and Training........................................................... 85<br />
Connectivity Central ................................................................................. 86<br />
Networking and Datapath Products ........................................... 86<br />
Control Plane and Backplane Products ....................................... 86<br />
High-Speed <strong>Design</strong> Resources................................................................. 86<br />
Signal Integrity Tools ................................................................................ 86<br />
Partnerships................................................................................................ 86<br />
Signal Integrity........................................................................................... 86<br />
Signal Integrity Fundamentals ..................................................... 87<br />
Simulation Tools ............................................................................. 87<br />
Multi-Gigabit Signaling ................................................................. 87<br />
Services.................................................................................................................. 87<br />
Xilinx <strong>Design</strong> Services............................................................................... 87<br />
IP Core Modification...................................................................... 87<br />
FPGA <strong>Design</strong> From Specification ................................................. 87<br />
FPGA System <strong>Design</strong> ..................................................................... 87<br />
Embedded Software <strong>Design</strong> .......................................................... 88<br />
Education Services............................................................................................... 88<br />
Live E-Learning Environment ................................................................. 88<br />
Day Segment Courses ............................................................................... 89<br />
Computer-Based Training (CBT) ............................................................ 89<br />
University Program................................................................................... 89<br />
Xilinx University Resource Center............................................... 89<br />
Xilinx Answers Database ............................................................... 89<br />
Xilinx Student Edition Frequently Asked Questions ................ 90<br />
<strong>Design</strong> Consultants ................................................................................... 90<br />
Technical Support...................................................................................... 90<br />
Chapter 3: WebPACK ISE <strong>Design</strong> Software<br />
Module Descriptions........................................................................................... 91<br />
WebPACK <strong>Design</strong> Suite ..................................................................................... 93<br />
WebPACK <strong>Design</strong> Entry .......................................................................... 93<br />
WebPACK StateCAD ................................................................................ 93<br />
WebPACK MXE Simulator ...................................................................... 94<br />
WebPACK HDL Bencher Tool................................................................. 94<br />
WebPACK FPGA Implementation Tools............................................... 94<br />
WebPACK CPLD Implementation Tools............................................... 94<br />
Xilinx • ix
PROGRAMMABLE LOGIC DESIGN: QUICK START HANDBOOK •<br />
WebPACK iMPACT Programmer .......................................................... 94<br />
WebPACK ChipViewer............................................................................ 95<br />
XPower........................................................................................................ 95<br />
WebPACK CD-ROM Installation...................................................................... 95<br />
Getting <strong>Start</strong>ed..................................................................................................... 96<br />
Licenses....................................................................................................... 96<br />
Projects ........................................................................................................ 97<br />
Summary .............................................................................................................. 97<br />
Xilinx • x<br />
Chapter 4: WebPACK ISE<br />
<strong>Design</strong> Entry<br />
Introduction.......................................................................................................... 99<br />
<strong>Design</strong> Entry....................................................................................................... 100<br />
The Language Template......................................................................... 104<br />
Close the Language Templates.............................................................. 104<br />
Edit the Counter Module........................................................................ 105<br />
Save the Counter Module....................................................................... 107<br />
Functional Simulation....................................................................................... 107<br />
State Machine Editor......................................................................................... 112<br />
Top-Level VHDL <strong>Design</strong>s................................................................................ 120<br />
Top-Level Schematic <strong>Design</strong>s.......................................................................... 125<br />
ECS Hints.................................................................................................. 125<br />
I/O Markers ............................................................................................. 128<br />
Chapter 5: Implementing CPLDs<br />
Introduction........................................................................................................ 131<br />
Synthesis ............................................................................................................. 132<br />
Constraints Editor ............................................................................................. 133<br />
CPLD Reports .................................................................................................... 142<br />
Timing Simulation............................................................................................. 144<br />
Configuration..................................................................................................... 145<br />
Chapter 6: Implementing FPGAs<br />
Introduction........................................................................................................ 147<br />
Synthesis ............................................................................................................. 150<br />
The Constraints File .......................................................................................... 153<br />
FPGA Reports .................................................................................................... 158<br />
Programming ..................................................................................................... 159<br />
Summary ............................................................................................................ 159
Chapter 7: <strong>Design</strong> Reference Bank<br />
TABLE OF CONTENTS<br />
Introduction........................................................................................................ 161<br />
Get the Most out of Microcontroller-Based <strong>Design</strong>s .................................... 161<br />
Conventional Stepper Motor Control................................................... 162<br />
Using a Microcontroller to Control a Stepper Motor ......................... 165<br />
Stepper Motor Control Using a CPLD.................................................. 166<br />
PC-Based Motor Control ........................................................................ 168<br />
<strong>Design</strong> Partitioning ................................................................................. 170<br />
Conclusion ................................................................................................ 172<br />
Documentation and Example Code................................................................ 173<br />
Website Reference.............................................................................................. 177<br />
ACRONYMS<br />
GLOSSARY OF TERMS<br />
Xilinx • xi
PROGRAMMABLE LOGIC DESIGN: QUICK START HANDBOOK •<br />
Xilinx • xii
C HAPTER 1<br />
Introduction<br />
The History of <strong>Programmable</strong> <strong>Logic</strong><br />
By the late 1970s, standard logic devices were all the rage, and printed circuit<br />
boards were loaded with them. Then someone asked, “What if we gave<br />
designers the ability to implement different interconnections in a bigger<br />
device” This would allow designers to integrate many standard logic devices<br />
into one part.<br />
To offer the ultimate in design flexibility, Ron Cline from Signetics (which<br />
was later purchased by Philips and then eventually Xilinx) came up with the<br />
idea of two programmable planes. These two planes provided any combination<br />
of “AND” and “OR” gates, as well as sharing of AND terms across multiple<br />
ORs.
PROGRAMMABLE LOGIC DESIGN: QUICK START HANDBOOK • CHAPTER 1<br />
This architecture was very flexible, but at the time wafer geometries of<br />
10 µm made the input-to-output delay (or propagation delay) high, which<br />
made the devices relatively slow.<br />
FIGURE 1-1:<br />
WHAT IS A CPLD<br />
MMI (later purchased by AMD) was enlisted as a second source for the<br />
PLA array. After fabrication issues, it was modified to become the programmable<br />
array logic (PAL) architecture by fixing one of the programmable planes.<br />
This new architecture differed from that of the PLA in that one of the programmable<br />
planes was fixed – the OR array. PAL architecture also had the<br />
added benefit of faster Tpd and less complex software, but without the flexibility<br />
of the PLA structure.<br />
Xilinx • 2
INTRODUCTION<br />
Other architectures followed, such as the PLD. This category of devices is<br />
often called Simple PLD.<br />
FIGURE 1-2:<br />
SPLD ARCHITECTURES<br />
The architecture had a mesh of horizontal and vertical interconnect tracks.<br />
At each junction was a fuse. With the aid of software tools, designers could<br />
select which junctions would not be connected by “blowing” all unwanted<br />
fuses. (This was done by a device programmer, but more commonly these days<br />
is achieved with ISP).<br />
Input pins were connected to the vertical interconnect. The horizontal<br />
tracks were connected to AND-OR gates, also called “product terms”. These in<br />
turn connected to dedicated flip-flops, whose outputs were connected to output<br />
pins.<br />
PLDs provided as much as 50 times more gates in a single package than discrete<br />
logic devices! This was a huge improvement, not to mention fewer devices<br />
needed in inventory and a higher reliability over standard logic.<br />
PLD technology has moved on from the early days with companies such as<br />
Xilinx producing ultra-low-power CMOS devices based on flash memory technology.<br />
Flash PLDs provide the ability to program the devices time and time<br />
again, electrically programming and erasing the device. Gone are the days of<br />
erasing for more than 20 minutes under an UV eraser.<br />
Xilinx • 3
PROGRAMMABLE LOGIC DESIGN: QUICK START HANDBOOK • CHAPTER 1<br />
Complex <strong>Programmable</strong> <strong>Logic</strong> Devices (CPLDs)<br />
Complex programmable logic devices (CPLDs) extend the density of<br />
SPLDs.<br />
The concept is to have a few PLD blocks or macrocells on a single device<br />
with a general-purpose interconnect in-between. Simple logic paths can be<br />
implemented within a single block.<br />
More sophisticated logic requires multiple blocks and uses the general-purpose<br />
interconnect in-between to make these connections.<br />
FIGURE 1-3:<br />
CPLD ARCHITECTURE<br />
CPLDs are great at handling wide and complex gating at blistering speeds<br />
– 5 nanoseconds, for example, which is equivalent to 200 MHz.<br />
The timing model for CPLDs is easy to calculate so before starting your<br />
design you can calculate your input-to-output speeds.<br />
WHY USE A CPLD<br />
CPLDs enable ease of design, lower development costs, more product revenue<br />
for your money, and the opportunity to speed your products to market.<br />
Ease of <strong>Design</strong>: CPLDs offer the simplest way to implement a design. Once<br />
a design has been described, by schematic and/or HDL entry, you simply use<br />
CPLD development tools to optimize, fit, and simulate the design.<br />
The development tools create a file that is used to customize (that is, program)<br />
a standard off-the-shelf CPLD with the desired functionality. This pro-<br />
Xilinx • 4
INTRODUCTION<br />
vides an instant hardware prototype and allows the debugging process to<br />
begin.<br />
If modifications are needed, you can enter design changes into the CPLD<br />
development tool, and re-implement and test the design immediately.<br />
Lower Development Costs: CPLDs offer very low development costs.<br />
Because CPLDs are re-programmable, you can easily and very inexpensively<br />
change your designs. This allows you to optimize your designs and continue to<br />
add new features to enhance your products.<br />
CPLD development tools are relatively inexpensive (or in the case of Xilinx,<br />
free). Traditionally, designers have had to face large cost penalties such as rework,<br />
scrap, and development time. With CPLDs, you have flexible solutions,<br />
thus avoiding many traditional design pitfalls.<br />
More Product Revenue: CPLDs offer very short development cycles,<br />
which means your products get to market quicker and begin generating revenue<br />
sooner. Because CPLDs are re-programmable, products can be easily modified<br />
using ISP over the Internet. This in turn allows you to easily introduce<br />
additional features and quickly generate new revenue. (This also results in an<br />
expanded time for revenue).<br />
Thousands of designers are already using CPLDs to get to market quicker<br />
and stay in the market longer by continuing to enhance their products even<br />
after they have been introduced into the field. CPLDs decrease TTM and extend<br />
TIM.<br />
Reduced Board Area: CPLDs offer a high level of integration (that is, a<br />
large number of system gates per area) and are available in very small form factor<br />
packages.<br />
This provides the perfect solution for designers whose products which<br />
must fit into small enclosures or who have a limited amount of circuit board<br />
space to implement the logic design.<br />
Xilinx CoolRunner CPLDs are available in the latest chip scale packages.<br />
For example, the CP56 CPLD has a pin pitch of 0.5 mm and is a mere 6 mm x 6<br />
mm in size, making it ideal for small, low-power end products.<br />
Cost of Ownership: Cost of Ownership can be defined as the amount it<br />
costs to maintain, fix, or warranty a product.<br />
For instance, if a design change requiring hardware rework must be made<br />
to a few prototypes, the cost might be relatively small. However, as the number<br />
of units that must be changed increases, the cost can become enormous.<br />
Because CPLDs are re-programmable, requiring no hardware rework, it<br />
costs much less to make changes to designs implemented using them. Therefore<br />
cost of ownership is dramatically reduced.<br />
Don’t forget that the ease or difficulty of design changes can also affect<br />
opportunity costs. Engineers who spend time fixing old designs could be working<br />
on introducing new products and features ahead of the competition.<br />
Xilinx • 5
PROGRAMMABLE LOGIC DESIGN: QUICK START HANDBOOK • CHAPTER 1<br />
There are also costs associated with inventory and reliability. PLDs can<br />
reduce inventory costs by replacing standard discrete logic devices. Standard<br />
logic has a predefined function. In a typical design, lots of different types have<br />
to be purchased and stocked. If the design is changed, there may be excess stock<br />
of superfluous devices.<br />
This issue can be alleviated by using PLDs. You only need to stock one<br />
device; if your design changes, you simply reprogram. By utilizing one device<br />
instead of many, your board reliability will increase by only picking and placing<br />
one device instead of many.<br />
Reliability can also be increased by using ultra-low-power CoolRunner<br />
CPLDs. Their lower heat dissipation and lower power operation leads to<br />
decreased FIT.<br />
Field <strong>Programmable</strong> Gate Arrays (FPGAs)<br />
In 1985, a company called Xilinx introduced a completely new idea: combine<br />
the user control and time to market of PLDs with the densities and cost<br />
benefits of gate arrays.<br />
Customers liked it – and the FPGA was born. Today Xilinx is still the number-one<br />
FPGA vendor in the world.<br />
An FPGA is a regular structure of logic cells (or modules) and interconnect,<br />
which is under your complete control. This means that you can design, program,<br />
and make changes to your circuit whenever you wish.<br />
With FPGAs now exceeding the 10 million gate limit (the Xilinx Virtex-II<br />
FPGA is the current record holder), you can really dream big.<br />
Xilinx • 6
INTRODUCTION<br />
FIGURE 1-4:<br />
FPGA ARCHITECTURE<br />
With the introduction of the Spartan series of FPGAs, Xilinx can now compete<br />
with gate arrays on all aspects – price, gate, and I/O count, as well as performance<br />
and cost.<br />
The Spartan-IIE FPGA provides as many as 300,000 gates at a price point<br />
that enables application specific standard product (ASSP) replacement. For<br />
example, a Reed Solomon IP core implemented in a Spartan-II XC2S100 FPGA<br />
has an effective cost of $9.95, whereas the equivalent ASSP would cost around<br />
$20.<br />
There are two basic types of FPGAs: SRAM-based reprogrammable and<br />
OTP. These two types of FPGAs differ in the implementation of the logic cell<br />
and the mechanism used to make connections in the device.<br />
The dominant type of FPGA is SRAM-based and can be reprogrammed as<br />
often as you choose. In fact, an SRAM FPGA is reprogrammed every time it’s<br />
powered up, because the FPGA is really a fancy memory chip. That’s why you<br />
need a serial PROM or system memory with every SRAM FPGA.<br />
Xilinx • 7
PROGRAMMABLE LOGIC DESIGN: QUICK START HANDBOOK • CHAPTER 1<br />
FIGURE 1-5:<br />
DIGITAL LOGIC HISTORY<br />
In the SRAM logic cell, instead of conventional gates, an LUT determines<br />
the output based on the values of the inputs. (In the “SRAM logic cell” diagram<br />
above, six different combinations of the four inputs determine the values of the<br />
output.) SRAM bits are also used to make connections.<br />
OTP FPGAs use anti-fuses (contrary to fuses, connections are made, not<br />
“blown,” during programming) to make permanent connections in the chip.<br />
Thus, OTP FPGAs do not require SPROM or other means to download the program<br />
to the FPGA.<br />
However, every time you make a design change, you must throw away the<br />
chip! The OTP logic cell is very similar to PLDs, with dedicated gates and flipflops.<br />
DESIGN INTEGRATION<br />
The integration of 74 series standard logic into a low-cost CPLD is a very<br />
attractive proposition. Not only do you save PCB area and board layers – thus<br />
reducing your total system cost – but you only have to purchase and stock one<br />
generic part instead of as many as 20 pre-defined logic devices.<br />
In production, the pick and place machine only has to place one part, therefore<br />
speeding up production. Less parts means higher quality and better FIT<br />
factor.<br />
Xilinx • 8
INTRODUCTION<br />
By using Xilinx CoolRunner devices, you can benefit from low power consumption<br />
and reduced thermal emissions. This in turn leads to the reduction of<br />
the use of heat sinks (another cost savings) and a higher reliability end product.<br />
FIGURE 1-6:<br />
BASIC LOGIC DEFINITIONS<br />
The Basic <strong>Design</strong> Process<br />
The availability of products such as WebPACK ISE software has made it<br />
much easier to design with programmable logic. <strong>Design</strong>s can be described easily<br />
and quickly using a description language such as ABEL, VHDL, Verilog,<br />
or with a schematic capture package.<br />
Schematic capture is the traditional method that designers have used to<br />
specify gate arrays and programmable logic devices. It is a graphical tool that<br />
allows you to specify the exact gates required and how you want them connected.<br />
There are four basic steps to using schematic capture:<br />
1. After selecting a specific schematic capture tool and device library,<br />
begin building the circuit by loading the desired gates from the selected<br />
library. You can use any combination of gates that you need. You must<br />
choose a specific vendor and device family library at this time, but you<br />
don’t yet have to know what device within that family you will<br />
ultimately use with respect to package and speed.<br />
2. Connect the gates together using nets or wires. You have complete<br />
control of connecting the gates in whatever configuration is required<br />
for your application.<br />
Xilinx • 9
PROGRAMMABLE LOGIC DESIGN: QUICK START HANDBOOK • CHAPTER 1<br />
3. Add and label the input and output buffers. These will define the I/O<br />
package pins for the device.<br />
4. Generate a netlist.<br />
FIGURE 1-7:<br />
PLD DESIGN FLOW<br />
A netlist is a text equivalent of the circuit. It is generated by design tools<br />
such as a schematic capture program. The netlist is a compact way for other programs<br />
to understand what gates are in the circuit, how they are connected, and<br />
the names of the I/O pins.<br />
In the example below, the netlist reflects the actual syntax of the circuit in<br />
the schematic. There is one line for each of the components and one line for each<br />
of the nets. Note that the computer assigns names to components (G1 to G4) and<br />
to the nets (N1 to N8). When implementing this design, it will have input package<br />
pins A, B, C, and D, and output pins Q, R, and S.<br />
EDIF is the industry-wide standard for netlists; many others exist, including<br />
vendor-specific ones such as the Xilinx Netlist Format (XNF).<br />
Once you have the design netlist, you have all you need to determine what<br />
the circuit does.<br />
Xilinx • 10
INTRODUCTION<br />
FIGURE 1-8:<br />
DESIGN SPECIFICATION – NETLIST<br />
The example on the previous pages is obviously very simplistic. Let’s<br />
describe a more realistic design of 10,000 equivalent gates.<br />
The typical schematic page contains about 200 gates, contained with soft<br />
macros. Therefore, it would require 50 schematic pages to create a 10,000-gate<br />
design! Each page needs to go through all the steps mentioned previously: adding<br />
components, interconnecting the gates, adding I/Os, and generating a<br />
netlist. This is rather time-consuming, especially if you want to have a 20,000,<br />
50,000, or even larger design.<br />
Another inherent problem with using schematic capture is the difficulty in<br />
migrating between vendors and technologies. If you initially create your 10,000-<br />
gate design with FPGA vendor X and then want to migrate to a gate array, you<br />
would have to modify every one of those 50 pages using the gate array vendor’s<br />
component library.<br />
There has to be a better way ... and of course, there is. It’s called high-level<br />
design (HLD), behavioral, or hardware description language (HDL). For our<br />
purposes, these three terms are essentially the same thing.<br />
The idea is to use a high-level language to describe the circuit in a text file<br />
rather than a graphical low-level gate description. The term behavioral is used<br />
because in this powerful language, you describe the function or behavior of the<br />
circuit in words rather than figuring out the appropriate gates needed to create<br />
the application.<br />
There are two major flavors of HDL: VHDL and Verilog.<br />
Xilinx • 11
PROGRAMMABLE LOGIC DESIGN: QUICK START HANDBOOK • CHAPTER 1<br />
As an example, let’s design a 16 x 16 multiplier specified with a schematic<br />
capture and an HDL file.<br />
A multiplier is a regular but complex arrangement of adders and registers<br />
that requires quite a few gates. Our example has two 16-bit inputs (A and B) and<br />
a 32-bit product output (Y = A x B) – that’s a total of 64 I/Os. This circuit requires<br />
approximately 6,000 equivalent gates.<br />
In the schematic implementation, the required gates would have to be<br />
loaded, positioned on the page, and interconnected, with I/O buffers added.<br />
That’s about three days’ worth of work.<br />
The HDL implementation, which is also 6,000 gates, requires eight lines of<br />
text and can be done in three minutes. This file contains all the information necessary<br />
to define our 16 x 16 multiplier.<br />
So, as a designer, which method would you choose In addition to the tremendous<br />
time savings, the HDL method is completely vendor-independent.<br />
This opens up tremendous design possibilities for engineers.<br />
FIGURE 1-9:<br />
DESIGN SPECIFICATION – MULTIPLIER<br />
To create a 32 x 32 multiplier, you could simply modify the work you’d<br />
already done for the smaller multiplier.<br />
For the schematic approach, this would entail making three copies of the 30<br />
pages, then figuring out where to edit the 90 pages so that they addressed the<br />
larger bus widths. This would probably require four hours of graphical editing.<br />
Xilinx • 12
INTRODUCTION<br />
For the HDL specification, it would be a matter of changing the bus references<br />
from 15 to 31 in line 2 and 31 to 63 in line 3. This would probably require<br />
about four seconds.<br />
HDL File Change Example<br />
BEFORE (16 X 16 MULTIPLIER):<br />
entity MULT is<br />
port(A,B:in std_logic(15 downto 0);<br />
Y:out std_logic(31 downto 0));<br />
end MULT;<br />
architecture BEHAVE of MULT is<br />
begin<br />
Y
PROGRAMMABLE LOGIC DESIGN: QUICK START HANDBOOK • CHAPTER 1<br />
using the best gate configuration to minimize power, or using the FPGAfriendly,<br />
register-rich configuration for state machines.<br />
You can easily experiment with different vendors, device families, and optimization<br />
constraints, thus exploring many different solutions instead of just one<br />
with the schematic approach.<br />
To recap, the advantages of high level design and synthesis are many. It is<br />
much simpler and faster to specify your design using HLD, and much easier to<br />
make changes to the design because of the self-documenting nature of the language.<br />
You are relieved from the tedium of selecting and interconnecting at the<br />
gate level. Merely select the library and optimization criteria (e.g., speed, area)<br />
and the synthesis tool will determine the results.<br />
You can also try different design alternatives and select the best one for the<br />
application. In fact, there is no real practical alternative for designs exceeding<br />
10,000 gates.<br />
Intellectual Property (IP) Cores<br />
IP cores are very complex pre-tested system-level functions that are used in<br />
logic designs to dramatically shorten development time.<br />
The benefits of using an IP core include:<br />
• Faster time to market<br />
• A simplified development process<br />
• Minimal design risk<br />
• Reduced software compile time<br />
• Reduced verification time<br />
• Predictable performance/functionality.<br />
IP cores are similar to vendor-provided soft macros in that they simplify the<br />
design specification step by removing designers from gate-level details of commonly<br />
used functions.<br />
IP cores differ from soft macros in that they are generally much larger system-level<br />
functions, such as a PCI bus interface, DSP filter, or PCMCIA interface.<br />
They are extensively tested (and hence rarely free of charge) to prevent<br />
designers from having to verify the IP core functions themselves.<br />
<strong>Design</strong> Verification<br />
<strong>Programmable</strong> logic designs are verified by using a simulator, which is a<br />
software program that confirms the functionality or timing of a circuit.<br />
The industry-standard formats used ensure that designs can be reused. If a<br />
vendors changes its libraries, only a synthesis recompile is necessary.<br />
Xilinx • 14
INTRODUCTION<br />
Even if you decide to move to a different vendor and/or technology, you’re<br />
just a compile away after selecting the new library. It’s even design-tool independent,<br />
so you can try synthesis tools from different vendors and pick the best<br />
results.<br />
IP cores are more commonly available in HDL format, since that makes<br />
them easier to modify and use with different device vendors.<br />
After completing the design specification, you’ll need to know if the circuit<br />
actually works as it’s supposed to. That is the purpose of design verification.<br />
A simulator simulates the circuit. You’ll need to provide the design information<br />
(via the netlist after schematic capture or synthesis) and the specific<br />
input pattern, or test vectors, that you want checked. The simulator takes this<br />
information and determines the outputs of the circuit.<br />
FIGURE 1-10:<br />
THE PLD DESIGN FLOW<br />
Xilinx • 15
PROGRAMMABLE LOGIC DESIGN: QUICK START HANDBOOK • CHAPTER 1<br />
Xilinx • 16<br />
Functional Simulation<br />
At this point in the design flow, a functional simulation only checks that the<br />
circuits give the right combinations of ones and zeros. You would conduct a timing<br />
simulation a little later in the design flow.<br />
If there are any problems, you can go back to the schematic or HDL file,<br />
make changes, re-generate the netlist, and then rerun the simulation. <strong>Design</strong>ers<br />
typically spend 50% of their development time going through this loop until the<br />
design works as required.<br />
Using HDL offers an additional advantage when verifying the design: You<br />
can simulate directly from the HDL source file. This bypasses the time-consuming<br />
synthesis process that would normally be required for every design change<br />
iteration.<br />
Once the circuit works correctly, running the synthesis tool generates the<br />
netlist for the next step in the design flow – device implementation.<br />
Device Implementation<br />
A design netlist completely describes the design using the gates for a specific<br />
vendor/device family. Once it’s fully verified, it’s time to put this in a chip,<br />
referred to as device implementation.<br />
Translate comprises various programs used to import the design netlist and<br />
prepare it for layout. The programs will vary among vendors.<br />
Some of the more common programs during translate include: optimization,<br />
translation to the physical device elements, and device-specific design rule<br />
checking (e.g,. does the design exceed the number of clock buffers available in<br />
this device).<br />
During the stage of the design flow, you will be asked to select the target<br />
device, package, speed grade, and any other device-specific options.<br />
The translate step usually ends with a comprehensive report of the results<br />
of all the programs executed. In addition to warnings and errors is usually a listing<br />
of device and I/O utilization, which helps you to determine if you’ve<br />
selected the best device.<br />
Fitting<br />
For CPLDs, the design step is called fitting, meaning to “fit” the design to<br />
the target device. In the diagram above, a section of the design is fit to the CPLD.<br />
CPLDs are a fixed architecture, so the software needs to pick the gates and<br />
interconnect paths that match the circuit. This is usually a fast process.<br />
The biggest potential problem is if you had previously assigned the exact<br />
locations of the I/O pins, commonly referred to as pin locking. Most often, this<br />
occurs when using a legacy design iteration that has been committed to the<br />
printed circuit board layout.<br />
Architectures that support I/O pin locking (such as the Xilinx XC9500 and<br />
CoolRunner CPLDs) have a very big advantage. They allow you to keep the
INTRODUCTION<br />
original I/O pin placements regardless of the number of design changes, utilization,<br />
or required performance.<br />
Pin locking is very important when using ISP. If you layout your PCB to<br />
accept a specific pin out, and then change the design, you can re-program confident<br />
that you pin out will stay the same.<br />
Place and Route<br />
For FPGAs, place and route programs are run after compile. “Place” is the<br />
process of selecting specific modules, or logic blocks, in the FPGAs where<br />
design gates will reside.<br />
“Route,” as the name implies, is the physical routing of the interconnect<br />
between the logic blocks.<br />
Most vendors provide automatic place and route tools so that you don’t<br />
have to worry about the intricate details of the device architecture. Some vendors<br />
offer tools that allow expert users to manually place and/or route the most<br />
critical parts of their designs to achieve better performance than with the automatic<br />
tools. Floorplanner is a type of manual tool.<br />
Place and route programs require the longest time to complete successfully<br />
because it’s a complex task to determine the location of large designs, ensure<br />
that they all get connected correctly, and meet the desired performance.<br />
These programs however, can only work well if the target architecture has<br />
sufficient routing for the design. No amount of fancy coding can compensate for<br />
an ill-conceived architecture, especially if there are not enough routing tracks.<br />
If you were to encounter this problem, the most common solution would be<br />
to use a larger device. And you would likely remember the experience the next<br />
time you selected a vendor.<br />
A related program is called timing-driven place and route (TDPR). This allows<br />
you to specify timing criteria that will be used during device layout.<br />
A static timing analyzer is usually part of the vendor’s implementation software.<br />
It provides timing information about paths in the design. This information<br />
is very accurate and can be viewed in many different ways, such as<br />
displaying all paths in the design and ranking them from longest to shortest<br />
delay.<br />
In addition, at this point you can use the detailed layout information after<br />
reformatting and go back to your chosen simulator with detailed timing information.<br />
This process is called back-annotation and has the advantage of providing<br />
the accurate timing as well as the zeros and ones operation of your design.<br />
In both cases, the timing reflects delays of the logic blocks as well as the<br />
interconnect.<br />
The final implementation step is the download or program.<br />
Xilinx • 17
PROGRAMMABLE LOGIC DESIGN: QUICK START HANDBOOK • CHAPTER 1<br />
Downloading or Programming<br />
Download generally refers to volatile devices such as SRAM FPGAs. As the<br />
name implies, you download the device configuration information into the<br />
device memory.<br />
The bitstream that is transferred contains all the information to define the<br />
logic and interconnect of the design and is different for every design.<br />
Because SRAM devices lose their configuration when the power is turned<br />
off, the bitstream must be stored somewhere for a production solution. A common<br />
such place is a serial PROM. There is an associated piece of hardware that<br />
connects from the computer to a board containing the target device.<br />
Program is used to program all non-volatile programmable logic devices,<br />
including serial PROMs. Programming performs the same function as download,<br />
except that the configuration information is retained after the power is<br />
removed from the device.<br />
For antifuse devices, programming can only be done once per device –<br />
hence the term one-time programmable.<br />
Programming of Xilinx CPLDs can be done in-system via JTAG or with a<br />
conventional device programmer such as Data I/O.<br />
JTAG Boundary Scan – formally known as IEEE/ANSI standard<br />
1149.1_1190 – is a set of design rules that facilitate testing, device programming,<br />
and debugging at the chip, board, and system levels.<br />
In-system programming has an added advantage in that devices can be soldered<br />
directly to the PCB (such as TQFP surface-mount-type devices). If the<br />
design changes, the devices do not need to be removed from the board but simply<br />
re-programmed in-system.<br />
Xilinx • 18
INTRODUCTION<br />
FIGURE 1-11:<br />
DEVICE IMPLEMENTATION – DOWNLOAD/PROGRAM<br />
System Debug<br />
The device is now working, but you still need to verify that the device<br />
works in the actual board, a process called system debug.<br />
Any major problems here mean that you have made an assumption on the<br />
device specification that is incorrect, or have not considered some aspect of the<br />
signal required to/from the programmable logic device.<br />
If so, you can collect data on the problem and go back to the drawing (or<br />
behavioral) board.<br />
Xilinx has the world’s first WebPOWERED programmable logic devices.<br />
This means we have the first WebFITTER CPLD design fitting tool, enabling<br />
you to fit your design in real time at our website.<br />
Simply take your existing design to our WebFITTER web page – these files<br />
can be HDL source code or netlists – and specify your target device or your key<br />
design criteria, such as speed or low power. Then press “fit.”<br />
You will receive your results moments later via e-mail, which includes full<br />
fitter results, design files, and a programming file (JEDEC file). If you like the<br />
results, you can then obtain an online price.<br />
You can download your personal copy in modules, so you can decide<br />
which parts you need. Modules include the design environment (Project Navigator),<br />
XST (Xilinx Synthesis Tool), ModelSim Xilinx Edition <strong>Start</strong>er (a thirdparty<br />
simulator), ChipViewer, and eventually ECS schematic capture and VSS.<br />
Xilinx • 19
PROGRAMMABLE LOGIC DESIGN: QUICK START HANDBOOK • CHAPTER 1<br />
Xilinx ChipViewer (a Java utility) graphically represents pin constraints<br />
and assignments. You can also use this tool to graphically view design implementations<br />
from the chip boundary to the individual macrocell equations.<br />
Xilinx • 20
C HAPTER 2<br />
Xilinx Solutions<br />
Introduction<br />
Xilinx programmable logic solutions help minimize risks for electronic<br />
equipment manufacturers by shortening the time required to develop products<br />
and take them to market.<br />
You can design and verify the unique circuits in Xilinx programmable<br />
devices much faster than by choosing traditional methods such as mask-programmed,<br />
fixed logic gate arrays.<br />
Moreover, because Xilinx devices are standard parts that need only to be<br />
programmed, you are not required to wait for prototypes or pay large nonrecurring<br />
engineering (NRE) costs.<br />
Customers incorporate Xilinx programmable logic into products for a wide<br />
range of markets. Those include data processing, telecommunications, networking,<br />
industrial control, instrumentation, consumer electronics, automotive,<br />
defense, and aerospace markets.<br />
Leading-edge silicon products, state-of-the-art software solutions, and<br />
world-class technical support make up the total solution that Xilinx delivers.<br />
The software component of this solution is critical to the success of every design<br />
project.<br />
Xilinx Software Solutions provide powerful tools that make designing with<br />
programmable logic simple. Push-button design flows, integrated online help,<br />
multimedia tutorials, and high-performance automatic and auto-interactive<br />
tools help you achieve optimum results. In addition, the industry’s broadest<br />
array of programmable logic technology and EDA integration options deliver<br />
unparalleled design flexibility.
PROGRAMMABLE LOGIC DESIGN: QUICK START HANDBOOK • CHAPTER 2<br />
Xilinx Devices<br />
Xilinx is also actively developing breakthrough technology that will enable<br />
the hardware in Xilinx-based systems to be upgraded remotely over any kind of<br />
network – including the Internet – even after the equipment has been shipped<br />
to a customer.<br />
Xilinx “Online Upgradeable Systems” would allow equipment manufacturers<br />
to remotely add new features and capabilities to installed systems, or<br />
repair problems without having to physically exchange hardware.<br />
FIGURE 2-1:<br />
XILINX DEVICES AT A GLANCE<br />
Platform FPGAs<br />
VIRTEX FPGAS<br />
The Virtex-II product is the first embodiment of the Platform FPGA, once<br />
again setting a new benchmark in performance and offering a feature set that is<br />
unparalleled.<br />
It's an era where Xilinx leads the way, strengthened by our strategic alliances<br />
with IBM, Wind River Systems, Conexant, RocketChips, The Math-<br />
Works, and other technology leaders.<br />
Xilinx • 22
XILINX SOLUTIONS<br />
The Platform FPGA delivers:<br />
• SystemIO interfaces to bridge emerging standards<br />
• XtremeDSP FPGA-based DSP solution for unprecedented DSP<br />
performance (as much as 100 times faster than the leading DSP<br />
processor)<br />
• Coming soon, Empower! processor technology for flexible highperformance<br />
system processing needs.<br />
With densities ranging from 40,000 to 10 million system gates, the Virtex-II<br />
solution delivers enhanced system memory and lightning-fast DSP through a<br />
flexible IP-immersion fabric.<br />
Additionally, significant new capabilities address system-level design<br />
issues, including flexible system interfaces with signal integrity (SystemIO,<br />
DCI); complex system clock management (Digital Clock Manager); and onboard<br />
EMI management (EMIControl).<br />
Virtex-II solutions are empowered by advanced design tools that drive<br />
time-to-market advantages through fast design, powerful synthesis, smart<br />
implementation algorithms, and efficient verification capabilities.<br />
Not only does the fabric provide the ability to integrate a variety of soft IP,<br />
but it also has the capability of embedding hard IP cores such as processors and<br />
gigabit serial I/Os in future Virtex-II families.<br />
VIRTEX-II PRO FPGAS<br />
“The Platform for <strong>Programmable</strong> Systems'”<br />
With as many as four IBM PowerPC 405 processors immersed into the<br />
industry's leading FPGA fabric; Xilinx/Conexant's flawless high-speed serial<br />
I/O technology; and Wind River Systems's cutting-edge embedded design<br />
tools, Xilinx delivers a complete development platform of infinite possibilities.<br />
The Power of Xtreme Processing<br />
Each PowerPC runs at 300+ MHz delivering 420 Dhrystone MIPS, supported<br />
by IBM CoreConnect bus technology. With the unique Xilinx IP<br />
immersion architecture, you can now harness the power of high-performance<br />
processors, along with easy integration of soft IP, into the industry's highest performance<br />
programmable logic.<br />
XtremeDSP – The World's Fastest <strong>Programmable</strong> DSP Solution<br />
The Xilinx XtremeDSP solution is the world’s fastest programmable DSP<br />
solution. With as many as 556 embedded 18 x 18 multipliers; 10 Mb of embedded<br />
block RAM; and an extensive library of DSP algorithms and tools including<br />
System Generator for DSP, ISE, and Cadence <strong>Design</strong> Systems SPW, the<br />
XtremeDSP tool is the industry's premier programmable solution for enabling<br />
TeraMAC/s applications.<br />
Xilinx • 23
PROGRAMMABLE LOGIC DESIGN: QUICK START HANDBOOK • CHAPTER 2<br />
The Ultimate Connectivity Platform<br />
The first programmable device to combine embedded processors along<br />
with 3.125 Gbps transceivers, the Virtex-II Pro series of FPGAs addresses all<br />
existing connectivity requirements as well as the emerging high-speed interface<br />
standards.<br />
Xilinx RocketIO transceivers offer a complete serial interface solution,<br />
supporting 10 Gigabit Ethernet with XAUI, 3GIO, and SerialATA, among others.<br />
Our SelectIO-Ultra technology supports 840 Mbps LVDS and high-speed<br />
single-ended standards such as XSBI and SFI-4.<br />
The Power of Integration<br />
In a single off-the-shelf programmable device, you can take advantage of<br />
microprocessors, the highest density of on-chip memory, multi-gigabit serial<br />
transceivers, digital clock managers, on-chip termination, and more. The result<br />
is a dramatic simplification of board layout, a reduced bill of materials, and<br />
unbeatable time to market.<br />
Enabling a New Development Paradigm<br />
For the first time, you can partition and repartition your systems between<br />
hardware and software at any time during the development cycle – even after<br />
the product has shipped.<br />
This means you can optimize the overall system, guaranteeing your performance<br />
target in the most cost-efficient manner. You can also debug hardware<br />
and software simultaneously at speed.<br />
Industry-Leading Tools<br />
Optimized for the PowerPC, Wind River Systems's industry-proven<br />
embedded tools are the premier support for real-time microprocessor and logic<br />
designs. Driving the Virtex-II Pro FPGA is the Xilinx lightning-fast ISE software,<br />
the most comprehensive, easy-to-use development system available.<br />
Virtex FPGAs<br />
The Xilinx Virtex series was the first line of FPGAs to offer one million system<br />
gates. Introduced in 1998, the Virtex product line fundamentally redefined<br />
programmable logic by expanding the traditional capabilities of FPGAs to<br />
include a powerful set of features that address board level problems for high<br />
performance system designs.<br />
The latest devices in the Virtex-E series, unveiled in 1999, offer more than<br />
three million system gates.<br />
Virtex-EM devices, introduced in 2000 and the first FPGAs to be manufactured<br />
using an advanced copper process, offer additional on-chip memory for<br />
network switch applications<br />
Xilinx • 24
.<br />
XILINX SOLUTIONS<br />
FIGURE 2-2:<br />
PLATFORM FPGAS<br />
Spartan FPGAs<br />
Xilinx Spartan FPGAs are ideal for low-cost, high-volume applications and<br />
are targeted as replacements for fixed-logic gate arrays and ASSP products such<br />
as bus interface chip sets. The five members of the family are the Spartan-3<br />
(1.2V), Spartan-IIE (1.8V), Spartan-II (2.5V), Spartan XL (3.3V), and Spartan (5V)<br />
devices.<br />
SPARTAN-3 FPGAS<br />
The Spartan-3 (1.2V, 90 nm) FPGA is not only available for a very low cost,<br />
but it integrates many architectural features associated with high-end programmable<br />
logic. This combination of low cost and features makes it an ideal replacement<br />
for ASICs (gate arrays) and many ASSP devices.<br />
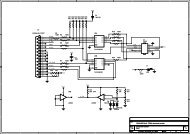
For example, a Spartan-3 FPGA in a car multimedia system could absorb<br />
many system functions, including embedded IP cores, custom system interfaces,<br />
DSP, and logic. The diagram below shows such a system:<br />
Xilinx • 25
PROGRAMMABLE LOGIC DESIGN: QUICK START HANDBOOK • CHAPTER 2<br />
FIGURE 2-3:<br />
CAR MULTIMEDIA SYSTEM<br />
In the car multimedia system shown in Figure 2-3, the PCI bridge takes the<br />
form of a pre-verified drop in IP core, and the device-level and board-level<br />
clocking functions are implemented in the Spartan-3 on-chip DCMs.<br />
CAN core IP can connect to the body electronics modules. These cores are<br />
provided by Xilinx AllianceCORE partners such as Bosch, Memec <strong>Design</strong>,<br />
CAST, Inc., Xylon, and Intelliga.<br />
On-chip 18 x 18 multipliers can be used in DSP-type activities such as filtering<br />
and formatting. Other custom-designed interfaces can be implemented to<br />
off-chip processors, an IDE interface to the drive unit of a DVD player, audio,<br />
memory, and LCD.<br />
Additionally, the Spartan-3 XCITE digitally controlled impedance technology<br />
can reduce EMI and component count by providing on-chip tuneable<br />
impedances to provide line matching without the need for external resistors.<br />
The Spartan-3 family is based on IBM and UMC advanced 90 nm, eightlayer<br />
metal process technology. Xilinx uses 90 nm technology to drive pricing<br />
down to under $20 for a one-million-gate FPGA (approximately 17,000 logic<br />
cells), which represents a cost savings as high as 80 percent compared to competitive<br />
offerings.<br />
A smaller die size and 300 mm wafers improve device densities and yields,<br />
thereby reducing overall production costs. This in turn leads to a more highly<br />
integrated, less expensive product that takes up less board space when<br />
designed into an end product.<br />
Xilinx • 26
XILINX SOLUTIONS<br />
FIGURE 2-4:<br />
SPARTAN-3 FEATURES<br />
The Spartan-3 FPGA memory architecture provides the optimal granularity<br />
and efficient area utilization.<br />
Shift Register SRL16 Blocks<br />
• Each CLB LUT works as a 16-bit fast, compact shift register<br />
• Cascade LUTs to build longer shift registers<br />
• Implement pipeline registers and buffers for video or wireless<br />
As Much as 520 Kb Distributed SelectRAM Memory<br />
• Each LUT works as a single-port or dual-port RAM/ROM<br />
• Cascade LUTs to build larger memories<br />
• Applications include flexible memory sizes, FIFOs, and buffers<br />
As Much as 1.87 Mb Embedded Block RAM<br />
• As many as 104 blocks of synchronous, cascadable 18 Kb block RAM<br />
• Configure each 18 Kb block as a single- or dual-port RAM<br />
• Supports multiple aspect ratios, data-width conversion, and parity<br />
• Applications include data caches, deep FIFOs, and buffers<br />
Memory Interfaces<br />
• Enable electrical interfaces such as HSTL and SSTL to connect to popular<br />
external memories<br />
Xilinx • 27
PROGRAMMABLE LOGIC DESIGN: QUICK START HANDBOOK • CHAPTER 2<br />
Multipliers<br />
• Enable simple arithmetic and math as well as advanced DSP functions,<br />
enabling you to derive more than 330 billion MACs/s of DSP<br />
performance<br />
• As many as 104 18 x 18 multipliers support 18-bit signed or 17-bit<br />
unsigned multiplication, which you can cascade to support wider bits<br />
• Constant coefficient multipliers: On-chip memories and logic cells work<br />
hand-in-hand to build compact multipliers with a constant operand<br />
• <strong>Logic</strong> Cell multipliers: Implement user-preferred algorithms such as<br />
Baugh-Wooley, Booth, Wallace tree, and others<br />
DCMs deliver sophisticated digital clock management that’s impervious to<br />
system jitter, temperature, voltage variations, and other problems typically<br />
found with PLLs integrated into FPGAs.<br />
• Flexible frequency generation from 25 MHz to 325 MHz<br />
• 100 ps jitter<br />
• Integer multiplication and division parameters<br />
• Quadrature and precision phase shift control<br />
• 0, 90, 180, 270 degrees<br />
• Fine grain control (1/256 clock period) for clock data<br />
synchronization<br />
• Precise 50/50 duty cycle generation<br />
• Temperature compensation<br />
XCITE Digitally Controlled Impedance Technology – A Xilinx<br />
Innovation<br />
I/O termination is required to maintain signal integrity. With hundreds of<br />
I/Os and advanced package technologies, external termination resistors are no<br />
longer viable.<br />
I/O termination dynamically eliminates drive strength variation due to<br />
process, temperature, and voltage fluctuations.<br />
Spartan-3 XCITE DCI Technology Highlights<br />
• Series and parallel termination for single-ended and differential<br />
standards<br />
• Maximum flexibility with support of series and parallel termination on<br />
all I/O banks<br />
• Input, output, bidirectional, and differential I/O support<br />
• Wide series impedance range<br />
• Popular standard support, including LVDS, LVDSEXT, LVCMOS,<br />
LVTTL, SSTL, HSTL, GTL, and GTLP<br />
Xilinx • 28
XILINX SOLUTIONS<br />
• Full- and half-impedance input buffers<br />
TABLE 2-1:<br />
XCITE DCI TECHNOLOGY ADVANTAGES<br />
Advantage<br />
Second Generation<br />
Technology<br />
Lower Costs<br />
Absolute I/O Flexibility<br />
Maximum I/O Bandwidth<br />
Immunity to Temperature<br />
and Voltage Changes<br />
Eliminates Stub Reflection<br />
Increases System Reliability<br />
Details<br />
Proven in the field and used extensively<br />
by customers<br />
Fewer resistors, fewer PCB traces, and<br />
smaller board area, result in lower PCB<br />
costs.<br />
Any termination on any I/O bank. Non-<br />
XCITE technology alternatives deliver<br />
limited functionality<br />
Less ringing and reflections maximize<br />
I/O bandwidth<br />
Temperature and voltage variations lead<br />
to significant impedance mismatches.<br />
XCITE technology dynamically adjusts<br />
on-chip impedance to such variations<br />
reducing and improving reliability<br />
Improves discrete termination<br />
techniques by eliminating the distance<br />
between the package pin and resistor.<br />
Fewer components on board, deliver<br />
higher reliability<br />
TABLE 2-2:<br />
Device<br />
Spartan-3 Features and Benefits<br />
SPARTAN-3 FPGA FAMILY OVERVIEW<br />
XC<br />
3S50<br />
XC<br />
3S200<br />
XC<br />
3S400<br />
XC<br />
3S1000<br />
XC<br />
3S1500<br />
SC<br />
3S2000<br />
XC<br />
3S4000<br />
XC<br />
3S5000<br />
System Gates 50K 200K 400K 1000K 1500K 2000K 4000K 5000K<br />
<strong>Logic</strong> Cells 1,728 4,320 8,064 17,280 29,952 46,080 62,208 74,880<br />
18x18 Multipliers 4 12 16 24 32 40 96 104<br />
Block RAM Bits 72K 216K 288K 432K 576K 720K 1,728K 1,872K<br />
Distributed RAM<br />
Bits<br />
12K 30K 56K 120K 208K 320K 432K 520K<br />
Xilinx • 29
PROGRAMMABLE LOGIC DESIGN: QUICK START HANDBOOK • CHAPTER 2<br />
TABLE 2-2:<br />
SPARTAN-3 FPGA FAMILY OVERVIEW (CONTINUED)<br />
Device<br />
XC<br />
3S50<br />
XC<br />
3S200<br />
XC<br />
3S400<br />
XC<br />
3S1000<br />
XC<br />
3S1500<br />
SC<br />
3S2000<br />
XC<br />
3S4000<br />
XC<br />
3S5000<br />
DCMs 2 4 4 4 4 4 4 4<br />
I/O Standards 23 23 23 23 23 23 23 23<br />
Max. Differential<br />
I/O Pairs<br />
Max. Single Ended<br />
I/O<br />
56 76 116 175 221 270 312 344<br />
124 173 264 391 487 565 712 784<br />
Package<br />
User<br />
I/O<br />
User<br />
I/O<br />
User<br />
I/O<br />
User<br />
I/O<br />
User<br />
I/O<br />
User<br />
I/O<br />
User<br />
I/O<br />
User<br />
I/O<br />
VQ100 63 63 - - - - - -<br />
TQ144 97 97 97 - - - - -<br />
PQ208 124 141 141 - - - - -<br />
FT256 - 173 173 173 - - - -<br />
FG320 - - 221 221 221 - - -<br />
FG456 - - 264 333 333<br />
FG676 - - - 391 487 489 - -<br />
FG900 - - - - - 565 633 633<br />
FG1156 - - - - - - 712 764<br />
TABLE 2-3:<br />
SPARTAN-3 FEATURES AND BENEFITS<br />
Spartan-3 Feature<br />
FPGA fabric and routing, up to<br />
5,000,000 system gates<br />
Block RAM – 18k blocks<br />
Distributed RAM<br />
Shift register mode (SRL16)<br />
Benefit<br />
Allows for implementation of system level<br />
function blocks, high on-chip connectivity and<br />
high-throughput<br />
Enables implementation of large packet<br />
buffers/FIFOs, line buffers<br />
For implementing smaller FIDOs/Buffers, DSP<br />
coefficients<br />
16-bit shift register ideal for capturing high<br />
speed or burst mode data and to store data in<br />
DSP and encryption applications e.g. fast<br />
pipelining<br />
Xilinx • 30
TABLE 2-3:<br />
SPARTAN-3 FEATURES AND BENEFITS (CONTINUED)<br />
Spartan-3 Feature<br />
Dedicated 18 x 18 multiplier blocks<br />
Single-ended signalling (up to 622<br />
Mbps) – LVTTL, LVCMOS, GTL,<br />
GTL+, PCI, HSTL-I, II, III, SSTL-I,II<br />
Differential signalling (up to 622<br />
Mbps) - LVDS, BLVDS, Ultra LVD,<br />
SRSDS and LDT<br />
Digital clock management (DCM)<br />
Global routing resources<br />
<strong>Programmable</strong> output drive<br />
Benefit<br />
XILINX SOLUTIONS<br />
High speed DSP processing; use of multipliers in<br />
conjunction with fabric allows for ultra-fast,<br />
parallel DSP operations<br />
Connectivity to commonly used chip-to-chip,<br />
memory (SRAM, SDRAM) and chip-tobackplane<br />
signalling standards; eliminates the<br />
need for multiple translation ICs<br />
Differential signalling at low cost – bandwidth<br />
management (saving the number of pins,<br />
reduced power consumption, reduced EMI, high<br />
noise immunity<br />
Eliminate on-chip and board level clock delay,<br />
simultaneous multiply and divide, reduction of<br />
board level clock speed and number of board<br />
level clocks, adjustable clock phase for ensuring<br />
coherency<br />
Distribution of clocks and other signals with<br />
very high fanout throughout the device<br />
Improves signal integrity, achieving right trade<br />
off between Tco and ground bounce<br />
SPARTAN-IIE FPGAS<br />
The Spartan-IIE (1.8V core) family of FPGAs offers some of the most<br />
advanced FPGA technologies available today, including programmable support<br />
for multiple I/O standards (including LVDS, LVPECL, and HSTL); on-chip<br />
block RAM; and digital delay lock loops for both chip-level and board-level<br />
clock management.<br />
In addition, Spartan-IIE devices provide superior value by eliminating the<br />
need for many simple ASSPs such as phase lock loops, FIFOs, I/O translators,<br />
and system bus drivers that in the past have been necessary to complete a system<br />
design.<br />
Xilinx • 31
PROGRAMMABLE LOGIC DESIGN: QUICK START HANDBOOK • CHAPTER 2<br />
FIGURE 2-5:<br />
SPARTAN-IIE SYSTEM INTEGRATION<br />
Xilinx • 32
XILINX SOLUTIONS<br />
FIGURE 2-6:<br />
SPARTAN-IIE ARCHITECTURE<br />
SPARTAN-IIE ARCHITECTURAL FEATURES<br />
Spartan-IIE devices leverage the basic feature set of the Virtex-E architecture<br />
to offer outstanding value. The basic CLB structure contains distributed<br />
RAM and performs basic logic functions.<br />
Four DLLs are used for clock management and can perform clock de-skew,<br />
clock multiplication, and clock division. Clock de-skew can be done on an external<br />
(board level) or internal (chip level) basis.<br />
The block memory blocks are 4 Kb each and can be configured from 1 to 16<br />
bits wide. Each of the two independent ports can be configured independently<br />
for width.<br />
The SelectIO feature allows many different I/O standards to be implemented<br />
in the areas of chip-to-chip, chip-to-memory, and chip-to-backplane<br />
interfaces.<br />
Xilinx • 33
PROGRAMMABLE LOGIC DESIGN: QUICK START HANDBOOK • CHAPTER 2<br />
FIGURE 2-7:<br />
SPARTAN-IIE BLOCK DIAGRAM<br />
The Spartan-IIE family of FPGAs is implemented with a regular, flexible,<br />
programmable architecture of CLBs, surrounded by a perimeter of programmable<br />
IOBs, interconnected by a powerful hierarchy of versatile routing resources.<br />
The architecture also provides advanced functions such as block RAM and<br />
clock control blocks.<br />
Xilinx • 34
XILINX SOLUTIONS<br />
FIGURE 2-8:<br />
SPARTAN-IIE INPUT/OUTPUT BLOCK<br />
The Spartan-IIE IOB features inputs and outputs that support 19 I/O signalling<br />
standards, including LVDS, BLVDS, LVPECL, LVCMOS, HSTL, SSTL,<br />
and GTL.<br />
These high-speed inputs and outputs are capable of supporting various<br />
state-of-the-art memory and bus interfaces. Three IOB registers function either<br />
as edge-triggered D-type flip-flops or as level-sensitive latches. Each IOB has a<br />
CLK shared by the three registers and independent CE signals for each register.<br />
In addition to the CLK and CE control signals, the three registers share a<br />
set/reset. For each register, you can independently configure this signal as a<br />
synchronous set, a synchronous reset, an asynchronous preset, or an asynchronous<br />
clear.<br />
Xilinx • 35
PROGRAMMABLE LOGIC DESIGN: QUICK START HANDBOOK • CHAPTER 2<br />
FIGURE 2-9:<br />
SPARTAN-IIE BANKING OF I/O STANDARDS<br />
Some of the I/O standards require VCCO and/or VREF voltages. These<br />
voltages are connected externally to device pins that serve groups of IOBs,<br />
called banks.<br />
Consequently, restrictions exist about which I/O standards can be combined<br />
within a given bank. Eight I/O banks result from separating each edge of<br />
the FPGA into two banks. Each bank has multiple VCCO pins, all of which<br />
must be connected to the same voltage. This voltage is determined by the output<br />
standards in use.<br />
<strong>Logic</strong> Cells<br />
The basic building block of the Spartan-IIE CLB is the logic cell. A logic cell<br />
includes a four-input function generator, carry logic, and a storage element.<br />
The output from the function generator in each logic cell drives both the<br />
CLB output and the D input of the flip-flop. Each Spartan-IIE CLB contains four<br />
logic cells, organized in two similar slices.<br />
In addition to the four basic logic cells, the Spartan-IIE CLB contains logic<br />
that combines function generators to provide functions of five or six inputs.<br />
Consequently, when estimating the number of system gates provided by a<br />
given device, each CLB counts as 4.5 logic cells.<br />
Xilinx • 36
XILINX SOLUTIONS<br />
FIGURE 2-10:<br />
SPARTAN-IIE LOGIC CELL<br />
Spartan-IIE function generators are implemented as 4-input LUTs. In addition<br />
to operating as a function generator, each LUT can provide a 16 x 1-bit synchronous<br />
RAM.<br />
Furthermore, two LUTs within a slice can be combined to create a 16 x 2-bit<br />
or 32 x 1-bit synchronous RAM, or a 16 x 1-bit dual-port synchronous RAM.<br />
The Spartan-IIE LUT can also provide a 16-bit shift register that is ideal for<br />
capturing high-speed or burst-mode data. This SRL16 mode can increase the<br />
effective number of flip-flops by a factor of 16.<br />
Adding flip-flops enables fast pipelining, which is ideal for DSP applications.<br />
The storage elements in the Spartan-IIE slice can be configured either as<br />
edge-triggered D-type flip-flops or as level-sensitive latches.<br />
Xilinx • 37
PROGRAMMABLE LOGIC DESIGN: QUICK START HANDBOOK • CHAPTER 2<br />
Block RAM<br />
Spartan-IIE FPGAs incorporate several large block SelectRAM+ memories.<br />
These complement the distributed SelectRAM+ resources that provide<br />
shallow RAM structures implemented in CLBs.<br />
Block SelectRAM+ memory blocks are organized in columns. All Spartan-II<br />
devices contain two such columns, one along each vertical edge. These columns<br />
extend the full height of the chip.<br />
Each memory block is four CLBs high, and consequently, a Spartan-IIE<br />
device eight CLBs high will contain two memory blocks per column, and a total<br />
of four blocks.<br />
FIGURE 2-11:<br />
SPARTAN-IIE ON-CHIP MEMORY<br />
Xilinx • 38<br />
FIGURE 2-12:<br />
BLOCK RAM APPLICATIONS
Delay-Locked Loop<br />
XILINX SOLUTIONS<br />
Associated with each global clock input buffer is a fully digital DLL that can<br />
eliminate skew between the clock input pad and internal clock input pins<br />
throughout the device.<br />
Each DLL drives two global clock networks. The DLL monitors the input<br />
clock and the distributed clock, and automatically adjusts a clock delay element.<br />
Additional delay is introduced such that clock edges reach internal flip-flops<br />
exactly one clock period after they arrive at the input.<br />
This closed-loop system effectively eliminates clock-distribution delay by<br />
ensuring that clock edges arrive at internal flip-flops in synch with clock edges<br />
arriving at the input.<br />
FIGURE 2-13:<br />
SPARTAN-IIE CLOCK MANAGEMENT<br />
Xilinx • 39
PROGRAMMABLE LOGIC DESIGN: QUICK START HANDBOOK • CHAPTER 2<br />
FIGURE 2-14:<br />
SPARTAN FAMILY COMPARISON<br />
Configuration<br />
Configuration is the process by which the FPGA is programmed with a<br />
configuration file generated by the Xilinx development system. Spartan-IIE<br />
devices support both serial configuration, using the master/slave serial and<br />
JTAG modes, as well as byte-wide configuration employing the slave parallel<br />
mode.<br />
Xilinx • 40
XILINX SOLUTIONS<br />
FIGURE 2-15:<br />
SPARTAN-IIE FAMILY OVERVIEW<br />
FIGURE 2-16:<br />
SPARTAN FPGA PART NUMBERING GUIDE<br />
Xilinx • 41
PROGRAMMABLE LOGIC DESIGN: QUICK START HANDBOOK • CHAPTER 2<br />
Xilinx CPLDs<br />
Currently, Xilinx offers CPLD products in two categories: XC9500 and<br />
CoolRunner devices. To choose a CPLD that’s right for you, review the product<br />
features below to identify the product family that fits your application. You<br />
should also review the selection considerations to choose the device that best<br />
meets your design criteria.<br />
Product Features:<br />
XC9500 Device – The XC9500 ISP CPLD families take complex programmable<br />
logic devices to new heights of performance, features, and flexibility.<br />
These families deliver industry-leading speeds while providing the flexibility<br />
of enhanced customer-proven pin-locking architecture, along with extensive<br />
IEEE Std.1149.1 JTAG Boundary Scan support. This CPLD family is ideal for<br />
high-speed, low-cost designs.<br />
CoolRunner Device – The CoolRunner CPLD families offer extreme low<br />
power, making them the leaders in an all-new market segment: portable electronics.<br />
With standby current in the low micro amps and minimal operational<br />
power consumption, these parts are ideal for any application is that is especially<br />
power sensitive, such as battery-powered or portable applications.<br />
The CoolRunner-II CPLD extends usage as it offers system-level features<br />
such as LVTTL and SSTL, clocking modes, and input hysteresis.<br />
Selection Considerations:<br />
To decide which device best meets your design criteria, take a minute to jot<br />
down your design specs (using the list below as a criteria reference). Next, go to<br />
a specific product family page to get more detailed information about the device<br />
you need.<br />
Density – Each part gives an equivalent “gate count,” or estimate of the<br />
logic density of the part.<br />
Number of Registers – Count up the number of registers you need for your<br />
counters, state machines, registers, and latches. The number of macrocells in the<br />
device must be at least this large.<br />
Number of I/O Pins – How many inputs and outputs does your design<br />
need<br />
Speed Requirements – What is the fastest combinatorial path in your<br />
design This will determine the Tpd (in nanoseconds) of the device. What is the<br />
fastest sequential circuit in your design This will tell you what fMax you need.<br />
Package – What electromechanical constraints are you under Do you need<br />
the smallest ball grid array package possible, or can you use a more ordinary<br />
QFP Or are you prototyping and need to use a socketed device, such as a PLCC<br />
package<br />
Xilinx • 42
XILINX SOLUTIONS<br />
Low Power – Is your end product battery- or solar-powered Does your<br />
design require the lowest power devices possible Do you have heat dissipation<br />
concerns<br />
System-Level Functions – Does your board have multi-voltage devices Do<br />
you need to level shift between these devices Do you need to square up clock<br />
edges Do you need to interface to memories and microprocessors<br />
XC9500 ISP CPLD OVERVIEW<br />
The high-performance, low-cost XC9500 families of Xilinx CPLDs are targeted<br />
for leading-edge systems that require rapid design development, longer<br />
system life, and robust field upgrade capability.<br />
The XC9500 families range in density from 36 to 288 macrocells and are<br />
available in 2.5-volt (XC9500XV), 3.3-volt (XC9500XL) and 5-volt (XC9500) versions.<br />
These devices support ISP, which allows manufacturers to perform unlimited<br />
design iterations during the prototyping phase, extensive system in-board<br />
debugging, program and test during manufacturing, and field upgrades.<br />
Based on advanced process technologies, the XC9500 families provide fast,<br />
guaranteed timing; superior pin locking; and a full JTAG-compliant interface.<br />
All XC9500 devices have excellent quality and reliability characteristics with a<br />
10,000 program/erase cycle endurance rating and 20-year data retention.<br />
XC9500 5V Family<br />
The XC9500 ISP CPLD family features six devices ranging from 36 to 288<br />
macrocells, with a wide variety of package combinations that both minimize<br />
board space and maintain package footprints as designs grow or shrink.<br />
The I/O pins allow direct interfacing to both 3- and 5-volt systems, while<br />
the latest in compact, easy-to-use CSP and BGA packaging gives you access to<br />
as many as 192 signals.<br />
Flexible Pin-Locking Architecture<br />
XC9500 devices, in conjunction with our fitter software, give you the maximum<br />
in routeability and flexibility while maintaining high performance. The<br />
architecture is feature-rich, including individual product term (p-term) output<br />
enables, three global clocks, and more p-terms per output than any other CPLD.<br />
The proven ability of the architecture to adapt to design changes while<br />
maintaining pin assignments has been demonstrated in countless real-world<br />
customer designs since the introduction of the XC9500 family.<br />
Full IEEE 1149.1 JTAG Development and Debugging Support<br />
The JTAG capability of the XC9500 family is the most comprehensive of any<br />
CPLD on the market. It features the standard support including BYPASS, SAM-<br />
PLE/PRELOAD, and EXTEST.<br />
Xilinx • 43
PROGRAMMABLE LOGIC DESIGN: QUICK START HANDBOOK • CHAPTER 2<br />
Additional Boundary Scan instructions, not found in any other CPLD,<br />
include INTEST (for device functional test), HIGHZ (for bypass), and USER-<br />
CODE (for program tracking), for maximum debugging capability.<br />
The XC9500 family is supported by a wide variety of industry-standard<br />
third-party development and debugging tools including Corelis, JTAG Technologies,<br />
and Asset Intertech. These tools allow you to develop Boundary Scan test<br />
vectors to interactively analyze, test, and debug system failures. The family is<br />
also supported on all major ATE platforms, including Teradyne, Hewlett Packard,<br />
and Genrad.<br />
XC9500 Product Overview Table<br />
TABLE 2-4:<br />
XC9500 PRODUCT OVERVIEW<br />
XC9500XL 3.3V FAMILY<br />
The XC9500XL CPLD family is targeted for leading-edge systems that<br />
require rapid design development, longer system life, and robust field upgrade<br />
capability.<br />
This 3.3V ISP family provides unparalleled performance and the highest<br />
programming reliability, with the lowest cost in the industry.<br />
XC9500XL CPLDs also complement the higher-density Xilinx FPGAs to<br />
provide a total logic solution, within a unified development environment. The<br />
Xilinx • 44
XILINX SOLUTIONS<br />
XC9500XL family is fully WebPOWERED via its free WebFITTER CPLD design<br />
fitting tool and WebPACK ISE software.<br />
Family Highlights<br />
• Lowest cost per macrocell<br />
• State-of-the-art pin-locking architecture<br />
• Highest programming reliability reduces system risk<br />
• Complements Xilinx 3.3V FPGA families<br />
Performance<br />
• 5 ns pin-to-pin speed<br />
• 222 MHz system frequency<br />
Powerful Architecture<br />
• Wide 54-input function blocks<br />
• As many as 90 product-terms per macrocell<br />
• Fast and routable Fast CONNECT II switch matrix<br />
• Three global clocks with local inversion<br />
• Individual OE per output, with local inversion<br />
FIGURE 2-17:<br />
XC9500XL BLOCK FAN-IN<br />
Highest Reliability<br />
• Endurance rating of 10,000 cycles<br />
• Data retention rating of 20 years<br />
• Immune from "ISP Lock-Out" failure mode<br />
• Allows arbitrary mixed-power sequencing and waveforms<br />
•<br />
Advanced Technology<br />
• Third-generation, proven CPLD technology<br />
Xilinx • 45
PROGRAMMABLE LOGIC DESIGN: QUICK START HANDBOOK • CHAPTER 2<br />
• Mainstream, scalable, high-reliability processing<br />
• Fast ISP and erase times<br />
Outperforms All Other 3.3V CPLDs<br />
• Extended data retention supports longer system operating life<br />
• Virtually eliminates ISP failures<br />
• Superior pin-locking for lower design risk<br />
• Glitch-free I/O pins during power-up<br />
• Full IEEE 1149.1 (JTAG) ISP and Boundary Scan testing<br />
• Free WebPOWERED software<br />
XC9500XV 2.5V CPLD FAMILY<br />
The Xilinx XC9500XV 2.5V CPLD family is based on an advanced architecture<br />
that combines system flexibility and low cost to allow for faster time to<br />
market and lower manufacturing and support costs.<br />
<strong>Design</strong>ed to operate with an internal core voltage of 2.5V, the XC9500XV silicon<br />
offers 30% lower power consumption than 3.3V CPLDs, resulting in lower<br />
heat dissipation and increased long-term device reliability.<br />
The XC9500XV silicon plus the powerful WebPOWERED software offers a<br />
valuable logic solution that can’t be beat when it comes to cost and ease of use.<br />
High Performance Through Advanced Technology<br />
Manufactured on the latest generation 0.25 µm process, the new XC9500XV<br />
CPLDs provide the same advanced architectural features and densities of the<br />
3.3V XC9500XL family, with device offerings of 36, 72, 144, and 288 macrocells.<br />
A high-performance version offering pin-to-pin delays as low as 3.5 ns and<br />
system frequencies as fast as 275 MHz will be available later this year.<br />
The 2.5V XC9500XV devices also include optimized support for ISP<br />
through the industry's most extensive IEEE1149.1 JTAG and IEEE 1532 programming<br />
capability, which helps to streamline the manufacturing, testing, and<br />
programming of CPLD-based electronic products, including remote field<br />
upgrades.<br />
The System <strong>Design</strong>er’s CPLD<br />
The advanced architecture employed in the XC9500XV CPLD allows for<br />
easy design integration, thus empowering you to fully concentrate on your system<br />
design and not so much on chip-level details.<br />
The unique features offered in the XC9500XV include a 54-input block fanin,<br />
which contributes to the device’s superior pin-locking capability; built-in<br />
input hysteresis for improved noise margin; bus-hold circuitry for better I/O<br />
control; hot-plugging capability to eliminate the need for power sequencing;<br />
and local and global clock control to provide maximum flexibility.<br />
Xilinx • 46
XILINX SOLUTIONS<br />
TABLE 2-5:<br />
XC9500XV AND XC9500XL PRODUCT SELECTION<br />
FIGURE 2-18:<br />
XC9500 PART NUMBERING SYSTEM<br />
Xilinx • 47
PROGRAMMABLE LOGIC DESIGN: QUICK START HANDBOOK • CHAPTER 2<br />
COOLRUNNER LOW-POWER CPLDS<br />
There are two members to the CoolRunner series, CoolRunner XPLA3<br />
device (3.3V) and the CoolRunner-II (1.8V) device. Let’s look at the CoolRunner<br />
XPLA3 devices.<br />
CoolRunner CPLDs combine very low power with high speed, high density,<br />
and high I/O counts in a single device. The CoolRunner 3.3V family ranges<br />
in density from 32 to 512 macrocells.<br />
CoolRunner CPLDs feature Fast Zero Power technology, allowing the<br />
devices to draw virtually no power in standby mode. This makes them ideal for<br />
the fast-growing market of battery-operated portable electronic equipment,<br />
such as:<br />
• Laptop PCs<br />
• Telephone handsets<br />
• Personal digital assistants<br />
• Electronic games<br />
• Web tablets.<br />
These CPLDs also use far less dynamic power during actual operation compared<br />
to conventional CPLDs, an important feature for high-performance, heatsensitive<br />
equipment such as telecom switches, video conferencing systems, simulators,<br />
high-end testers, and emulators.<br />
FIGURE 2-19:<br />
SENSE AMPLIFIER VS. CMOS CPLDS<br />
The CoolRunner XPLA3 eXtended family of CPLDs is targeted for lowpower<br />
applications that include portable, handheld, and power-sensitive applications.<br />
Each member of the XPLA3 family includes Fast Zero Power design technology<br />
that combines low power and high speed. With this design technique,<br />
the XPLA3 family offers true pin-to-pin speeds of 5.0 ns, while simultaneously<br />
delivering power that is
XILINX SOLUTIONS<br />
caded chain of pure CMOS gates, the dynamic power is also substantially lower<br />
than any competing CPLD.<br />
CoolRunner devices are the only total CMOS PLDs, as they use both a<br />
CMOS process technology and the patented full CMOS Fast Zero Power design<br />
technique.<br />
FIGURE 2-20:<br />
CPLD APPLICATION TRENDS<br />
XPLA3 Architecture<br />
The XPLA3 architecture features a direct input register path, multiple<br />
clocks, JTAG programming, 5V-tolerant I/Os, and a full PLA structure. These<br />
enhancements deliver high speed coupled with flexible logic allocation, which<br />
results in the ability to make design changes without changing pin-outs.<br />
The XPLA3 architecture includes a pool of 48 product terms that can be<br />
allocated to any macrocell in the logic block. This combination allows logic to be<br />
allocated efficiently throughout the logic block and support as many product<br />
terms as needed per macrocell. In addition, using a variable number of product<br />
terms per macrocell incurs no speed penalty.<br />
The XPLA3 family features industry-standard IEE 1149.1 JTAG interface,<br />
through which (ISP) and reprogramming of the device can occur. The XPLA3<br />
CPLD is electrically reprogrammable using industry-standard device programmers<br />
from vendors such as Data I/O, BP Microsystems, and SMS.<br />
Xilinx • 49
PROGRAMMABLE LOGIC DESIGN: QUICK START HANDBOOK • CHAPTER 2<br />
Figure 2-21 shows a high-level block diagram of the XPLA3 architecture.<br />
The XPLA3 architecture comprises logic blocks inter-connected by ZIA. The<br />
ZIA is a virtual cross point switch. Each logic block has 36 inputs from the ZIA<br />
and 16 macrocells.<br />
From this point of view, this architecture looks like many other CPLD architectures.<br />
What makes the XPLA3 family unique is logic allocation inside each<br />
logic block and the design technique used to implement these logic blocks.<br />
FIGURE 2-21:<br />
COOLRUNNER XPLA3 ARCHITECTURE OVERVIEW<br />
<strong>Logic</strong> Block Architecture<br />
Figure 2-22 illustrates the logic block architecture of CoolRunner XPLA<br />
CPLDs.<br />
Each logic block contains a PLA array that generates control terms and<br />
macrocells for use as asynchronous clocks, resets, presets, and output enables.<br />
The other p-terms serve as additional single inputs into each macrocell.<br />
There are eight FoldBack NAND p-terms that are available for ease of fitting<br />
and pin locking.<br />
Sixteen product terms are coupled with the associated programmable OR<br />
gate into the VFM. The VFM increases logic optimization by implementing any<br />
two input logic functions before entering the macrocell.<br />
Xilinx • 50
XILINX SOLUTIONS<br />
FIGURE 2-22:<br />
COOLRUNNER XPLA3 LOGIC BLOCK<br />
Each macrocell supports combinatorial or registered inputs, preset and<br />
reset, configurable D, T, or latch functions. If a macrocell needs more product<br />
terms, it simply gets the additional product terms from the PLA array.<br />
FoldBack NANDs<br />
XPLA3 utilizes FoldBack NANDs to increase the effective product term<br />
width of a programmable logic device. These structures effectively provide an<br />
inverted product term to be used as a logic input by all of the local product<br />
terms.<br />
Xilinx • 51
PROGRAMMABLE LOGIC DESIGN: QUICK START HANDBOOK • CHAPTER 2<br />
Macrocell Architecture<br />
Figure 2-23 shows the architecture of a macrocell used in the CoolRunner<br />
XPLA3 CPLD. Any macrocell can be reset or pre-set on power-up.<br />
FIGURE 2-23:<br />
COOLRUNNER XPLA3 MACROCELL DIAGRAM<br />
Each macrocell register can be configured as a D-, T-, or latch-type flip-flop,<br />
or combinatorial logic function. Each of these flip-flops can be clocked from any<br />
one of eight sources.<br />
Two global synchronous clocks are derived from the four external clock<br />
pins. There is one universal clock signal. You can individually configure the<br />
clock input signals CT[4:7] (local control terms) as either a PRODUCT term or<br />
SUM term equation created from the 36 signals available inside the logic block.<br />
There are two feedback paths to the ZIA: one from the macrocell and one<br />
from the I/O pin. Using the I/O pin as an output enables the output buffer, and<br />
the macrocell feedback path can be used to feed back the logic implemented in<br />
the macrocell.<br />
When an I/O pin is used as an input, the output buffer will be tri-stated and<br />
the input signal fed into the ZIA via the I/O feedback path. The logic implemented<br />
in the buried macrocell can be fed back to the ZIA via the macrocell<br />
feedback path. If the macrocell is configured as an input, a path to the register<br />
provides a fast input setup time.<br />
Xilinx • 52
I/O Cell<br />
XILINX SOLUTIONS<br />
The output-enable multiplexer has eight possible modes, including a programmable<br />
WPU eliminating the need for external termination on unused<br />
I/Os. The I/O cell is 5V tolerant and has a single-bit slew-rate control for reducing<br />
EMI generation.<br />
Outputs are 3.3V PCI electrical specification compatible (no internal clamp<br />
diode).<br />
Simple Timing Model<br />
Figure 2-24 shows the XPLA3 timing model, which has three main timing<br />
parameters: T PD , T SU , and T CO .<br />
In other architectures, you may be able to fit the design into the CPLD, but<br />
you may not be sure whether system timing requirements can be met until after<br />
the design has been fit into the device.<br />
This is because the timing models of other architectures are very complex<br />
including such things as timing dependencies on the number of parallel<br />
expanders borrowed, sharable expanders, and varying numbers of X and Y<br />
routing channels.<br />
In the XPLA3 architecture, you know up-front whether the design will<br />
meet system timing requirements. This is because of the simplicity of the timing<br />
model.<br />
FIGURE 2-24:<br />
COOLRUNNER XPLA3 SIMPLE TIMING MODEL<br />
Xilinx • 53
PROGRAMMABLE LOGIC DESIGN: QUICK START HANDBOOK • CHAPTER 2<br />
Slew Rate Control<br />
XPLA3 devices have slew rate control for each macrocell output pin. You<br />
have the option to enable the slew rate control to reduce EMI. The nominal<br />
delay for using this option is 2.0 ns.<br />
XPLA3 Software Tools<br />
Software support for XPLA3 devices is provided by Xilinx WebPOWERED<br />
software products, which include the WebFITTER CPLD design fitting tool and<br />
WebPACK ISE software. Both tools are free.<br />
In addition, EDIF input is supported for all major third-party software<br />
flows, such as Cadence <strong>Design</strong> Systems, Mentor Graphics, Viewlogic, Exemplar,<br />
and Synopsys.<br />
TABLE 2-6:<br />
COOLRUNNER SUMMARY OF FEATURES AND BENEFITS<br />
Features<br />
Total CMOS architecture with FZP<br />
design technology<br />
32 to 512 macrocell device<br />
selections<br />
5V tolerant I/Os and multi I/O<br />
standards<br />
PLA array<br />
Bus-friendly I/O<br />
Multiple clocking options<br />
Fast input registers<br />
Benefits<br />
Lowest stand-by current and total<br />
current consumption of any CPLD;<br />
therefore longer battery life,<br />
increased reliability, and less heat<br />
dissipation<br />
Suits full range of designs and<br />
applications; able to migrate up<br />
and down densities if design grows<br />
or shrinks<br />
Simplifies multi-voltage design<br />
and level shifting<br />
Optimizes sharing and resource<br />
utilization (all product terms<br />
available)<br />
Pull-up resistor for I/O termination<br />
<strong>Design</strong> flexibility<br />
Supports direct high-speed<br />
interface<br />
Xilinx • 54
TABLE 2-6:<br />
VFM (Variable Function MUX) and<br />
foldback NANDs<br />
Small, surface mount packages –<br />
0.8 mm and 0.5 mm ball pitch chip<br />
scale packages<br />
Industrial, commercial, and<br />
automotive temperature ranges<br />
XILINX SOLUTIONS<br />
COOLRUNNER SUMMARY OF FEATURES AND BENEFITS (CONTINUED)<br />
Features<br />
Benefits<br />
Superior logic optimization and<br />
device fitting – fit first time designs<br />
and lower costs by being able to use<br />
a smaller device<br />
Smallest footprint and board space<br />
savings ideal for handheld devices<br />
like PDAs and cellphones<br />
Can be used in all application areas<br />
from telematics and set-top boxes<br />
to medical and harsh environment<br />
applications<br />
FIGURE 2-25:<br />
COOLRUNNER FAMILY OVERVIEW<br />
Xilinx • 55
PROGRAMMABLE LOGIC DESIGN: QUICK START HANDBOOK • CHAPTER 2<br />
FIGURE 2-26:<br />
COOLRUNNER XPLA3 PART NUMBER SYSTEM<br />
COOLRUNNER-II CPLDS<br />
Xilinx CoolRunner-II CPLDs deliver the high speed and ease of use associated<br />
with the XC9500/XL/XV CPLD family and the extremely low power versatility<br />
of the XPLA3.<br />
This means that the exact same parts can be used for high-speed data communications,<br />
computing systems, and leading-edge portable products, with the<br />
added benefit of ISP.<br />
Low power consumption and high-speed operation are combined into a<br />
single family that is easy to use and cost effective. Xilinx-patented Fast Zero<br />
Power architecture inherently delivers extremely low power performance without<br />
the need for special design measures.<br />
Clocking techniques and other power-saving features extend your power<br />
budget. These design features are supported from Xilinx ISE 4.1i, the WebFIT-<br />
TER CPLD design tool, and WebPACK ISE software onwards.<br />
Figure 2-27 shows the CoolRunner-II CPLD package offering with corresponding<br />
I/O count. All packages are surface mount, with more than half of<br />
them ball-grid technologies. The ultra-tiny packages permit maximum functional<br />
capacity in the smallest possible area.<br />
The CMOS technology used in CoolRunner-II CPLDs generates minimal<br />
heat, allowing the use of tiny packages during high-speed operation.<br />
At least two densities are present in each package, with three in the VQ100<br />
(100-pin, 1.0 mm QFP) and TQ144 (144-pin, 1.4 mm QFP), and in the FT256 (256-<br />
ball, 1.0 mm-spacing FLBGA).<br />
The FT256 is particularly suited for slim-dimensioned portable products<br />
with mid- to high-density logic requirements.<br />
Xilinx • 56
XILINX SOLUTIONS<br />
Figure 2-27 also details the distribution of advanced features across the<br />
CoolRunner-II CPLD family. The family has uniform basic features, with<br />
advanced features included in densities where they are most useful. For example,<br />
it is unlikely that you would need four I/O banks on 32- and 64-macrocell<br />
parts, but very likely for 384- and 512-macrocell parts.<br />
The I/O banks are groupings of I/O pins using any one of a subset of compatible<br />
voltage standards that share the same V CCIO level. The clock division<br />
capability is less efficient on small parts, but more useful and likely to be used<br />
on larger ones. DataGATE technology, an ability to block and latch inputs to<br />
save power, is valuable in larger parts, but brings marginal benefit to small<br />
parts.<br />
FIGURE 2-27:<br />
COOLRUNNER-II FAMILY OVERVIEW<br />
CoolRunner-II Architecture Description<br />
The CoolRunner-II CPLD is a highly uniform family of fast, low-power<br />
devices. The underlying architecture is a traditional CPLD architecture, combining<br />
macrocells into function blocks interconnected with a global routing matrix,<br />
the Xilinx Advanced Interconnect Matrix (AIM).<br />
The function blocks use a PLA configuration that allows all product terms<br />
to be routed and shared among any of the macrocells of the function block.<br />
Xilinx • 57
PROGRAMMABLE LOGIC DESIGN: QUICK START HANDBOOK • CHAPTER 2<br />
<strong>Design</strong> software can efficiently synthesize and optimize logic that is subsequently<br />
fit to the function blocks and connected with the ability to utilize a very<br />
high percentage of device resources.<br />
The software easily and automatically manages design changes, exploiting<br />
the 100% routeability of the PLA within each function block. This extremely<br />
robust building block delivers the industry’s highest pin-out retention under<br />
very broad design conditions.<br />
The design software automatically manages device resources so that you<br />
can express your designs using completely generic constructs, without needing<br />
to know the architectural details. If you’re more experienced, you can take<br />
advantage of these details to more thoroughly understand the software’s<br />
choices and direct its results.<br />
Figure 2-28 shows the high-level architecture whereby function blocks<br />
attach to pins and interconnect to each other within the internal interconnect<br />
matrix. Each function block contains 16 macrocells.<br />
FIGURE 2-28:<br />
COOLRUNNER-II HIGH-LEVEL ARCHITECTURE<br />
CoolRunner-II Function Block<br />
The CoolRunner-II CPLD function blocks contain 16 macrocells, with 40<br />
entry sites for signals to arrive for logic creation and connection.<br />
The internal logic engine is a 56-product term PLA. All function blocks,<br />
regardless of the number contained in the device, are identical.<br />
Xilinx • 58
XILINX SOLUTIONS<br />
At the high level, the p-terms reside in a PLA. This structure is extremely<br />
flexible and very robust when compared to fixed or cascaded p-term function<br />
blocks.<br />
Classic CPLDs typically have a few p-terms available for a high-speed path<br />
to a given macrocell. They rely on capturing unused p-terms from neighboring<br />
macrocells to expand their product term tally when needed.<br />
The result of this architecture is a variable timing model and the possibility<br />
of stranding unusable logic within the function block.<br />
The PLA is different – and better. First, any p-term can be attached to any<br />
OR gate inside the function block macrocell(s).<br />
Second, any logic function can have as many p-terms as needed attached to<br />
it within the function block, to an upper limit of 56.<br />
Third, you can reuse product terms at multiple macrocell OR functions so<br />
that within a function block, you need only create a particular logical product<br />
once, but you can reuse it as many as 16 times within the function block. Naturally,<br />
this works well with the fitting software, which identifies product terms<br />
that can be shared.<br />
FIGURE 2-29:<br />
LOGIC ALLOCATION – TYPICAL PAL VS. PLA<br />
Xilinx • 59
PROGRAMMABLE LOGIC DESIGN: QUICK START HANDBOOK • CHAPTER 2<br />
The software places as many functions as it can into function blocks. There<br />
is no need to force macrocell functions to be adjacent or have any other restriction<br />
except for residing in the same function block, which is handled by the software.<br />
Functions need not share a common clock, common set/reset, or common<br />
output enable to take full advantage of the PLA. In addition, every p-term<br />
arrives with the same time delay incurred. There are no cascade time adders for<br />
putting more product terms in the function block.<br />
When the function block p-term budget is reached, a small interconnect<br />
timing penalty routes signals to another function block to continue creating<br />
logic. Xilinx design software handles all this automatically.<br />
CoolRunner-II Macrocell<br />
The CoolRunner-II CPLD macrocell is extremely efficient and streamlined<br />
for logic creation. You can develop SOP logic expressions comprising as many<br />
as 40 inputs and span 56 product terms within a single function block.<br />
The macrocell can further combine the SOP expression into an XOR gate<br />
with another single p-term expression.<br />
The resulting logic expression’s polarity is also selectable. The logic function<br />
can be pure combinatorial or registered, with the storage element operating<br />
selectively as a D or T flip-flop, or transparent latch.<br />
Available at each macrocell are independent selections of global, functionblock<br />
level, or local p-term-derived clocks, sets, resets, and output enables. Each<br />
macrocell flip-flop is configurable for either single edge or DualEDGE clocking,<br />
providing either double data rate capability or the ability to distribute a slower<br />
clock (thereby saving power).<br />
For single-edge clocking or latching, either clock polarity may be selected<br />
per macrocell.<br />
CoolRunner-II macrocell details are shown in Figure 2-30. Standard logic<br />
symbols are used in the in figure, except the trapezoidal multiplexers have<br />
input selection from statically programmed configuration select lines (not<br />
shown).<br />
Xilinx application note XAPP376 gives a detailed explanation of how logic<br />
is created in the CoolRunner-II CPLD family.<br />
Xilinx • 60
XILINX SOLUTIONS<br />
FIGURE 2-30:<br />
COOLRUNNER-II MACROCELL<br />
When configured as a D-type flip-flop, each macrocell has an optional clock<br />
enable signal permitting state hold while a clock runs freely.<br />
Note that control terms are available to be shared for key functions within<br />
the function block, and are generally used whenever the exact same logic function<br />
would be repeatedly created at multiple macrocells.<br />
The control term product terms are available for function block clocking<br />
(CTC), function block asynchronous set (CTS), function block asynchronous<br />
reset (CTR), and function block output enable (CTE).<br />
You can configure any macrocell flip-flop as an input register or latch,<br />
which takes in the signal from the macrocell’s I/O pin and directly drives the<br />
AIM. The macrocell combinatorial functionality is retained for use as a buried<br />
logic node if needed.<br />
Advanced Interconnect Matrix (AIM)<br />
AIM is a highly connected low-power rapid switch directed by the software<br />
to deliver a set of as many as 40 signals to each function block for the creation of<br />
logic.<br />
Results from all function block macrocells, as well as all pin inputs, circulate<br />
back through the AIM for additional connection available to all other function<br />
blocks, as dictated by the design software. The AIM minimizes both propagation<br />
delay and power as it makes attachments to the various function blocks.<br />
Xilinx • 61
PROGRAMMABLE LOGIC DESIGN: QUICK START HANDBOOK • CHAPTER 2<br />
I/O Blocks<br />
I/O blocks are primarily transceivers. However, each I/O is either automatically<br />
compliant with standard voltage ranges or can be programmed to<br />
become compliant.<br />
In addition to voltage levels, each input can selectively arrive through<br />
Schmitt-trigger inputs. This adds a small time delay, but substantially reduces<br />
noise on that input pin.<br />
Hysteresis also allows easy generation of external clock circuits. The<br />
Schmitt-trigger path is best illustrated in Figure 2-31. Outputs can be directly<br />
driven, tri-stated, or open-drain configured. A choice of slow or fast slew rate<br />
output signal is also available.<br />
FIGURE 2-31:<br />
COOLRUNNER-II I/O BLOCK<br />
Xilinx • 62<br />
Output Banking<br />
CPLDs are widely used as voltage interface translators; thus, the output<br />
pins are grouped in large banks.<br />
The smallest parts are not banked, so all signals will have the same output<br />
swing for 32- and 64-macrocell parts.<br />
The medium parts (128 and 256 macrocell) support two output banks. With<br />
two, the outputs will switch to one of two selected output voltage levels, unless<br />
both banks are set to the same voltage.
XILINX SOLUTIONS<br />
The larger parts (384 and 512 macrocell) support four output banks, split<br />
evenly. They can support groupings of one, two, three, or four separate output<br />
voltage levels. This kind of flexibility permits easy interfacing to 3.3V, 2.5V, 1.8V,<br />
and 1.5V in a single part.<br />
DataGATE<br />
Low power is the hallmark of CMOS technology. Other CPLD families use<br />
a sense amplifier approach to create p-terms, which always has a residual current<br />
component.<br />
This residual current can be several hundred milliamps, making these<br />
CPLDs unusable in portable systems.<br />
CoolRunner-II CPLDs use standard CMOS methods to create the CPLD<br />
architecture and deliver the corresponding low current consumption, without<br />
any special tricks.<br />
However, sometimes you might want to reduce the system current even<br />
more by selectively disabling unused circuitry. The patented DataGATE technology<br />
permits a straightforward approach to additional power reduction.<br />
Each I/O pin has a series switch that can block the arrival of unused freerunning<br />
signals that may increase power consumption. Disabling these<br />
switches enables you to complete your design and choose which sections will<br />
participate in the DataGATE function.<br />
FIGURE 2-32:<br />
DATAGATE FUNCTION IN COOLRUNNER-II CPLDS<br />
The DataGATE logic function drives an assertion rail threaded through<br />
medium- and high-density CoolRunner-II CPLD parts.<br />
Xilinx • 63
PROGRAMMABLE LOGIC DESIGN: QUICK START HANDBOOK • CHAPTER 2<br />
You can select which inputs to block under the control of the DataGATE<br />
function, effectively blocking controlled switching signals so that they do not<br />
drive internal chip capacitances.<br />
Output signals that do not switch are held by the bus hold feature. You can<br />
choose any set of input pins can be chosen to participate in the DataGATE function.<br />
Figure 2-32 shows how DataGATE function works. One I/O pin drives the<br />
DataGATE assertion rail. It can have any desired logic function on it – something<br />
as simple as mapping an input pin to the DataGATE function or as complex<br />
as a counter or state machine output driving the DataGATE I/O pin<br />
through a macrocell.<br />
When the DataGATE rail is asserted low, any pass transistor switch<br />
attached to it is blocked. Each pin has the ability to attach to the AIM through a<br />
DataGATE pass transistor, and be blocked.<br />
A latch automatically captures the state of the pin when it becomes blocked.<br />
The DataGATE assertion rail threads throughout all possible I/Os, so each can<br />
participate if chosen.<br />
One macrocell is singled out to drive the rail, and that macrocell is exposed<br />
to the outside world (through a pin) for inspection. If the DataGATE function is<br />
not needed, this pin is an ordinary I/O.<br />
Additional Clock Options: Division, DualEDGE, and CoolCLOCK<br />
Division<br />
Circuitry has been included in the CoolRunner-II CPLD architecture to<br />
divide one externally supplied global clock by standard values, with options for<br />
division by 2, 4, 6, 8, 10, 12, 14, and 16 (see Figure 2-33). This capability is supplied<br />
on the GCK2 pin.<br />
The resulting clock produced will be 50% duty cycle for all possible divisions.<br />
Xilinx • 64
XILINX SOLUTIONS<br />
Note that a synchronous reset is included to guarantee that no runt clocks<br />
can get through to the global clock nets. The signal is buffered and driven to<br />
multiple traces with minimal loading and skew.<br />
FIGURE 2-33:<br />
COOLRUNNER-II CLOCK DIVISION<br />
DualEDGE<br />
Each macrocell has the ability to double its input clock switching frequency.<br />
Figure 2-30 shows the macrocell flip-flop with the DualEDGE option (doubled<br />
clock) at each macrocell.<br />
The source to double can be a control term clock, a product term clock, or<br />
one of the available global clocks. The ability to switch on both clock edges is<br />
vital for a number of synchronous memory interface applications as well as certain<br />
double data rate I/O applications.<br />
CoolCLOCK<br />
In addition to the DualEDGE flip-flop, you can gain additional power savings<br />
by combining the clock division circuitry with the DualEDGE circuitry.<br />
This capability is called CoolCLOCK and is designed to reduce clocking power<br />
within the CPLD.<br />
Because the clock net can be a significant power drain, you can reduce the<br />
clock power by driving the net at half frequency, and then doubling the clock<br />
rate using DualEDGE triggering at the macrocells.<br />
Xilinx • 65
PROGRAMMABLE LOGIC DESIGN: QUICK START HANDBOOK • CHAPTER 2<br />
Figure 2-34 illustrates how CoolCLOCK is created by internal clock cascading,<br />
with the divider and DualEDGE flip-flop working together.<br />
FIGURE 2-34:<br />
COOLCLOCK<br />
<strong>Design</strong> Security<br />
You can secure your designs during programming to prevent either accidental<br />
overwriting or pattern theft via readback.<br />
CoolRunner-II CPLDs have four independent levels of security provided<br />
on-chip, eliminating any electrical or visual detection of configuration patterns.<br />
Xilinx • 66
XILINX SOLUTIONS<br />
These security bits can be reset only by erasing the entire device. Additional<br />
details are omitted intentionally.<br />
FIGURE 2-35:<br />
COOLRUNNER-II DEVICE SECURITY<br />
CoolRunner-II Application Examples<br />
FIGURE 2-36:<br />
SYSTEM VOLTAFE INTEGRATION EXAMPLE<br />
Xilinx • 67
PROGRAMMABLE LOGIC DESIGN: QUICK START HANDBOOK • CHAPTER 2<br />
FIGURE 2-37:<br />
DDR RAM INTERFACE EXAMPLE<br />
FIGURE 2-38:<br />
PDA USING FREE REFERENCE DESIGNS EXAMPLE<br />
Xilinx • 68
XILINX SOLUTIONS<br />
COOLRUNNER REFERENCE DESIGNS<br />
CoolRunner reference designs are HDL code-based designs that can help<br />
reduce the time of CPLD designs. They are available free of charge.<br />
These reference designs take the form of not-for-pay IP, which can be used<br />
as is. Unlike purchased IP, these reference designs do not come with direct support.<br />
They are built around application notes and have been tested in WebPACK<br />
software. They are fully functional through the WebPACK simulator and testbench.<br />
You can find CoolRunner reference designs in the Xilinx IP Center<br />
(http://www.xilinx.com/ipcenter/) by searching on the keyword “CoolRunner.”<br />
Accessing the Reference <strong>Design</strong>s<br />
From the Xilinx.com website, select “Products and Services” from the top<br />
bar and then select “Silicon Solutions.” Select “CoolRunner-II CPLDs” from the<br />
left-hand side bar and then select “CoolRunner Reference <strong>Design</strong>s.”<br />
This will bring up a page that details all of the reference designs available<br />
for selection. Click on the application note that of interest and download the<br />
PDF file. Open the application and go to the last page of the document.<br />
FIGURE 2-39:<br />
APPLICATION NOTE REFERENCE DESIGN LINK<br />
Xilinx • 69
PROGRAMMABLE LOGIC DESIGN: QUICK START HANDBOOK • CHAPTER 2<br />
Click on the link and the following page will appear:<br />
FIGURE 2-40:<br />
REFERNECE DESIGN DOWNLOAD INSTRUCTIONS<br />
FIGURE 2-41:<br />
“REGISTER ME” LINK<br />
Click on the “Register Me” button to gain access to the free HDL code.<br />
Xilinx • 70
.<br />
XILINX SOLUTIONS<br />
FIGURE 2-42:<br />
LOG IN PAGE<br />
The page above will appear. If you are already a Xilinx registered user,<br />
please enter your user name and password.<br />
If you are new to the Xilinx web site, you will need to create an account.<br />
Once successful, you will see a page saying “You will receive an e-mail with<br />
links to the downloadable files.”<br />
You will then be sent an e-mail listing all of the HDL files, with links to each<br />
file. You can then download and start to use any of the HDL design examples in<br />
conjunction with your WebPACK software.<br />
Xilinx • 71
PROGRAMMABLE LOGIC DESIGN: QUICK START HANDBOOK • CHAPTER 2<br />
Table 2-7 details the current reference designs. These are continually<br />
updated, so check regularly for new listings.<br />
TABLE 2-7:<br />
CURRENT REFERENCE DESIGNS<br />
Military and Aerospace<br />
Xilinx is the leading supplier of high-reliability PLDs to the aerospace and<br />
defense markets. These devices are used in a wide range of applications such as<br />
electronic warfare, missile guidance and targeting, RADAR, SONAR communications,<br />
signal processing, avionics, and satellites.<br />
The Xilinx QPro family of ceramic and plastic QML products provides<br />
you with advanced programmable logic solutions for next-generation designs.<br />
The QPro family also includes select products that are radiation hardened for<br />
use in satellite and other space applications.<br />
Our quality management system is fully compliant with all ISO9001<br />
requirements. In 1997, Xilinx became fully qualified as a QML supplier by meeting<br />
all of the requirements for MIL Standard 38535.<br />
Automotive and Industrial<br />
Xilinx • 72<br />
XILINX IQ SOLUTIONS – ARCHITECTING AUTOMOTIVE<br />
INTELLIGENCE<br />
In-car electronic content is increasing at a phenomenal rate. It includes such<br />
applications as navigation systems, entertainment systems, instrument clusters,<br />
advanced driver information systems, and communications devices.
XILINX SOLUTIONS<br />
To address the needs of automotive electronics designers, Xilinx has created<br />
a new family of devices with an extended industrial temperature range option.<br />
This new “IQ” family consists of existing Xilinx industrial grade (I) FPGAs<br />
and CPLDs, with the addition of a new extended temperature grade (Q) for<br />
selected devices.<br />
The new IQ product grade (-40°C to +125°C ambient for CPLDs and junction<br />
for FPGAs) is ideal for automotive and industrial applications. The wide<br />
range of device density and package combinations enables you to deliver highperformance,<br />
cost-effective, flexible solutions that meet your application needs.<br />
<strong>Design</strong>-In Flexibility<br />
With Xilinx IQ devices, you can design-in flexibility and get your product to<br />
market faster than ever before.<br />
Because many new standards continue to evolve (such as the LIN, MOST,<br />
and FlexRay in-car busing standards), you need the flexibility to quickly modify<br />
your designs at any time.<br />
With our unique Internet Reconfigurable <strong>Logic</strong> (IRL) capability, you can<br />
remotely and automatically modify your designs, in the field, after your product<br />
has left the factory.<br />
By combining our latest IQ PLDs with our solutions infrastructure of highproductivity<br />
software, IP cores, design services, and customer education, you<br />
can develop advanced, highly flexible products faster than ever before.<br />
For more information, visit www.xilinx.com/automotive.<br />
FIGURE 2-43:<br />
IQ DEVICES ORDERING INFORMATION<br />
Xilinx • 73
PROGRAMMABLE LOGIC DESIGN: QUICK START HANDBOOK • CHAPTER 2<br />
TABLE 2-8:<br />
Product<br />
Group<br />
IQ TEMPERATURE RANGE<br />
Temperature Grade/Range (ºC)<br />
C I Q<br />
FPGA Tj = 0 to +85 Tj = -40 to +100 Tj = -40 to +125<br />
CPLD Ta = 0 to +70 Ta = -40 to +85 Ta = -40 to +125<br />
TABLE 2-9:<br />
AVAILABLE IQ DEVICES IN EXTENDED TEMPERATURE<br />
IQ Device Family<br />
Spartan XL (3.3V)<br />
XC9500XL (3.3V)<br />
CoolRunner XPLA3 (3.3V)<br />
Spartan-II (2.5V)<br />
CoolRunner-II (1.8V)<br />
Spartan-IIE (1.8V)<br />
XC9500 (5V)<br />
Densities<br />
15k gates to 40k gates<br />
36 and 72 macrocells<br />
32 to 512 macrocells<br />
15k gates to 200k gates<br />
32 to 512 macrocells<br />
50k gates to 600k gates<br />
36 and 72 macrocells<br />
<strong>Design</strong> Tools<br />
<strong>Programmable</strong> logic design has entered an era in which device densities are<br />
measured in the millions of gates, and system performance is measured in hundreds<br />
of megahertz. Given these system complexities, the critical success factor<br />
in the creation of a design is your productivity.<br />
Xilinx offers complete electronic design tools that enable the implementation<br />
of designs in Xilinx PLDs. These development solutions combine powerful<br />
technology with a flexible, easy-to-use graphical interface to help you achieve<br />
the best possible designs within your project schedule – regardless of your experience<br />
level.<br />
The “<strong>Design</strong> Tools Center” web pages cover both the Xilinx ISE tools suite<br />
as well as design tools from our software partners. It is arranged by the following<br />
topics:<br />
DESIGN ENTRY<br />
ISE software greatly improves your time to market and productivity by<br />
accelerating the design entry process.<br />
ISE tools support today’s most popular methods for design capture, including<br />
HDL and schematic entry, integration of IP cores, and robust support for<br />
reuse of your own IP.<br />
Xilinx • 74
XILINX SOLUTIONS<br />
This rich mixture of design entry capabilities provides the easiest-to-use<br />
design environment available today for all logic design.<br />
SYNTHESIS<br />
ISE advanced HDL synthesis engines produce optimized results for PLD<br />
synthesis, one of the most essential steps in your design methodology. It takes<br />
your conceptual HDL design definition and generates a logical or physical representation<br />
for the targeted silicon device.<br />
A state-of-the-art synthesis engine is required to produce highly optimized<br />
results with a fast compile and turnaround time.<br />
To meet this requirement, the synthesis engine must be tightly integrated<br />
with the physical implementation tool and proactively meet design timing<br />
requirements by driving the placement in the physical device.<br />
In addition, cross probing between the physical design report and the HDL<br />
design code further enhances the turnaround time.<br />
Xilinx ISE software provides seamless integration with leading synthesis<br />
engines from Mentor Graphics, Exemplar, Synopsys, and Synplicity.<br />
The ISE product also includes Xilinx proprietary synthesis technology, or<br />
XST. With just the push of a button, you can start any leading synthesis engine<br />
within ISE. You can even use multiple synthesis engines to obtain the most optimized<br />
result of your programmable logic design.<br />
IMPLEMENTATION AND CONFIGURATION<br />
<strong>Programmable</strong> logic design implementation assigns the logic created during<br />
design entry and synthesis into specific physical resources.<br />
The term "place and route" has historically been used to describe the implementation<br />
process for FPGA devices, while "fitting" has been used for CPLDs.<br />
Implementation is followed by device configuration, where a bitstream is<br />
generated from the physical place and route information and downloaded into<br />
the target PLD.<br />
To ensure that you get your product to market quickly, Xilinx ISE software<br />
provides several key technologies required for design implementation, including:<br />
• Ultra-fast runtimes enable multiple "turns" per day<br />
• ProActive Timing Closure drives high-performance results<br />
• Timing-driven place and route combined with push-button ease.<br />
BOARD-LEVEL INTEGRATION<br />
ISE software provides intensive support to help you ensure your programmable<br />
logic design works within the context of the entire system.<br />
Xilinx • 75
PROGRAMMABLE LOGIC DESIGN: QUICK START HANDBOOK • CHAPTER 2<br />
Xilinx understands critical issues such as complex board layout, signal<br />
integrity, high-speed bus interface, high-performance I/O bandwidth, and electromagnetic<br />
interference for system-level designers.<br />
To ease the these challenges, ISE software provides support to all Xilinx<br />
leading FPGA technologies:<br />
• XCITE<br />
• Digital clock management for system timing<br />
• EMI control management for electromagnetic interference<br />
• Complete pin configurations<br />
• Packaging information for board-level integration<br />
• ISE board-level verification<br />
• IBIS models<br />
• Stamp models<br />
• LMG models<br />
• ChipScope ILA.<br />
VERIFICATION TECHNOLOGIES<br />
ISE software includes verification support at all stages of your design, from<br />
design entry to board-level integration.<br />
Static Verification<br />
Static verification tools allow you to verify your design without requiring<br />
the creation of lengthy test vectors. Verification can be exhaustive or selective,<br />
allowing you to rapidly detect implementation errors in advance.<br />
Static verification tools also deliver extensive diagnosis and debug capabilities.<br />
The following static verification tools are supported:<br />
• Constraints Editor<br />
• Delay Calculator<br />
• Trace<br />
• Timing Analyzer<br />
• Prime Time<br />
• XPower<br />
• Formality<br />
• Conformal LEC<br />
• DRC<br />
• Chip Viewer.<br />
Xilinx • 76
Dynamic Verification<br />
XILINX SOLUTIONS<br />
You can save time by using dynamic verification to intercept logical or<br />
HDL-based errors early in the design cycle. By exposing a design to realistic and<br />
extensive stimuli, you can find many functional problems at this stage.<br />
The following dynamic verification tools are supported:<br />
• HDL Bencher<br />
• ModelSim XE<br />
• StateBench<br />
• HDL Simulation Libraries.<br />
Debug Verification<br />
Debug verification tools speed up the process of viewing, identifying, and<br />
correcting design problems at different stages of the design cycle.<br />
Debug verification includes the ability to view, “live,” all internal signals<br />
and nodes within an FPGA. These tools can also assist in HDL-based designs by<br />
checking coding style for optimum performance.<br />
The following debug verification tools are supported:<br />
• LEDA<br />
• FPGA Editor Probe<br />
• ChipScope ILA<br />
• ChipScope Pro.<br />
Board-Level Verification<br />
Using board-level verification tools ensures that your design performs as<br />
intended once integrated with the rest of the system.<br />
The Xilinx ISE environment supports the following board-level verification<br />
tools:<br />
• IBIS Models<br />
• Tau<br />
• BLAST<br />
• Stamp Models<br />
• Impact.<br />
ADVANCED DESIGN TECHNIQUES<br />
As your FPGA requirements grow, your design problems can change.<br />
High-density design environments mean multiple teams working through distributed<br />
nodes on the same project, across the aisle or in different parts of the<br />
world.<br />
ISE software’s advanced design options are targeted at making high-density<br />
designs as easy to realize as the smallest glue logic.<br />
Xilinx • 77
PROGRAMMABLE LOGIC DESIGN: QUICK START HANDBOOK • CHAPTER 2<br />
Floorplanner – The Xilinx high-level floorplanner is a graphic planning<br />
tool that lets you map your design onto the target chip. Floorplanning can efficiently<br />
drive your high-density design process.<br />
Modular <strong>Design</strong> – This gives you the ability to partition a large design into<br />
individual modules. Each module can then be floorplanned, designed, implemented,<br />
and locked until the remaining modules are finished.<br />
Partial Reconfigurability – Useful for applications requiring the loading of<br />
different designs into the same area of the device, partial reconfiguration allows<br />
you to flexibly change portions of a design without having to reset or completely<br />
reconfigure the entire device.<br />
Internet Team <strong>Design</strong> – This allows managers to drive each team and its<br />
design module from a standard Internet browser using the corporate intranet<br />
structure.<br />
High-Level Languages – As design densities increase, the need for a higher<br />
level of abstraction becomes more important. Xilinx is driving and supporting<br />
industry standards and their respective support tools.<br />
EMBEDDED SW DESIGN TOOLS CENTER<br />
Embedded Software Tools for Virtex-II Pro Platform FPGAs<br />
The term "embedded software tools" most often applies to the tools<br />
required to create, edit, compile, link, load, and debug high-level language<br />
code, usually C or C++, for execution on a processor engine.<br />
With the Virtex-II Pro Platform FPGA, you will be able to target design<br />
modules for either silicon hardware (FPGA gates) or as software applications,<br />
running on process engines like the embedded PowerPC hard core.<br />
When it comes to embedded software development, Xilinx offers multiple<br />
levels of support. Xilinx supports the Virtex-II Pro Platform FPGA embedded<br />
processors with "Xilinx versions" of established tools for both low-cost and<br />
high-performance markets.<br />
For hardware-centric engineers who want to move design modules into<br />
software running on the Virtex-II Pro Platform FPGA PowerPC core, Xilinx provides<br />
a simple and low-cost solution.<br />
Alternatively, if software-centric engineers want a feature-rich environment<br />
in which to develop more complex applications, Xilinx supplies access to specialized<br />
best-of-class tools from the embedded industry leader.<br />
This prevents you from having to embrace completely new development<br />
methodologies. You will be able to port existing legacy designs more easily to<br />
the Virtex-II Pro Platform FPGA.<br />
Xilinx • 78
XILINX SOLUTIONS<br />
Xilinx IP Cores<br />
The Xilinx website has a comprehensive database of Xilinx LogiCORE<br />
and third-party AllianceCORE verified and tested cores. To find them, visit the<br />
Xilinx IP Center at www.xilinx.com/ipcenter.<br />
The CORE Generator tool from Xilinx delivers highly optimized cores<br />
compatible with standard design methodologies for Xilinx FPGAs.<br />
This easy-to-use tool generates flexible, high-performance cores with a high<br />
degree of predictability. You can also download future core offerings from the<br />
Xilinx website.<br />
The CORE Generator tool is provided as part of Xilinx Foundation ISE software.<br />
Web-Based Information Guide<br />
The “Products and Services” and “End Markets” sections on the Xilinx<br />
website give you information about where and how Xilinx devices can be used<br />
in end applications and markets.<br />
The data ranges from application notes, white papers, and industry information<br />
to reference designs and example code.<br />
These pages are updated regularly, making them ideal to bookmark for<br />
research purposes or for downloading code or design solutions to shorten your<br />
design time to market.<br />
Xilinx • 79
PROGRAMMABLE LOGIC DESIGN: QUICK START HANDBOOK • CHAPTER 2<br />
The sections within the “Products and Services” page on the Xilinx website<br />
are:<br />
FIGURE 2-44:<br />
PRODUCTS AND SERVICES WEBSITE<br />
Let’s look at each of these web-based sections.<br />
END MARKETS<br />
The eSP web portal is located within the “End Markets” section on the Xilinx<br />
website. It is the industry's first web portal dedicated to providing comprehensive<br />
solutions that accelerate product development.<br />
To make it as easy as possible, we've provided a choice for locating material.<br />
You can select a specific market solution or a broad-reaching technology from<br />
two drop-down menus: “Network Solutions” or “Technologies.”<br />
In “Market Solutions,” choose from:<br />
• Metro Access Networks<br />
• Automotive<br />
• Broadband<br />
• Industrial<br />
• Medical and Scientific<br />
Xilinx • 80
XILINX SOLUTIONS<br />
• Test and Measurement<br />
• Digital Video Technologies (DVT)<br />
• Home Networking<br />
• Wireless Networks.<br />
In the “Technologies” section, choose from:<br />
• Wired Networks<br />
• Consumer<br />
• Additional Topics (such as digital video imaging and capture and<br />
editing).<br />
The site was designed to decrease the time spent in the pre-design phase.<br />
This phase, which increasingly has become the designers’ Achilles’ heel,<br />
involves visiting seminars, learning new standards, assimilating the data, analyzing<br />
market trends, and more.<br />
The eSP web portal saves time by proving up-to-date information about<br />
emerging standards and protocols, how and where they are used, impartial<br />
information about which one is best for your application, and pre-tested reference<br />
designs that can be purchased and used.<br />
The eSP web portal (www.xilinx.com/esp) includes:<br />
• White Papers<br />
• System Diagrams<br />
• Ask the Experts<br />
• Glossary of Terms<br />
• System Solutions Boards/reference design boards<br />
• eSP News<br />
• Industry Events<br />
• Tutorials on the latest standards and protocols.<br />
SILICON PRODUCTS AND SOLUTIONS<br />
These web pages allow you to gain in-depth details on Xilinx silicon products,<br />
including FPGAs (Virtex and Spartan), CPLDs (CoolRunner and XC9500)<br />
and RocketPHY transceivers. Data sheets, user guides, FAQs, white papers,<br />
and application notes are also available.<br />
DESIGN RESOURCES<br />
This section details the selection of Xilinx and third-party design software.<br />
From here, you can also go to the IP Center for details about development<br />
boards and platforms.<br />
Xilinx • 81
PROGRAMMABLE LOGIC DESIGN: QUICK START HANDBOOK • CHAPTER 2<br />
SYSTEM RESOURCES<br />
DSP Central<br />
These web pages detail the XtremeDSP solutions that deliver the performance<br />
and flexibility needed to quickly build complex, high-performance DSP<br />
systems.<br />
Driven by the broadband revolution and explosive growth in wireless<br />
products, the demand for digital signal processing featuring extreme performance<br />
and great flexibility is growing faster than what conventional DSP can<br />
deliver.<br />
The rapid convergence of different technology segments – 3G and 4G wireless<br />
communication systems, high-bandwidth networking, real-time video<br />
broadcasting, and high-performance computing systems – is producing what<br />
analysts call ”The beginning of a new information technology era.”<br />
Xilinx, the recognized leader in programmable logic solutions, is well established<br />
in these technology segments and uniquely positioned to address this<br />
new DSP paradigm now.<br />
The XtremeDSP solution can give you computing capabilities approaching<br />
1 Tera MAC/s – more than 100 times faster than conventional DSP solutions.<br />
Using our comprehensive line of industry-leading FPGAs, easy-to-use<br />
tools, and optimized algorithms, along with the most comprehensive technical<br />
support, services, and third-party programs in the industry, you’ll have the confidence<br />
to tackle even the most challenging applications using the Xilinx XtremeDSP<br />
tool.<br />
DSP Central provides information that will enable you to achieve the maximum<br />
benefit from Xilinx DSP solutions. This section provides details and<br />
design information in the following areas:<br />
Algorithms/Cores<br />
In this comprehensive listing of intellectual property, you can search for<br />
algorithms by type:<br />
• DSP Cores<br />
• Communication and Networking<br />
• Video/Image Processing<br />
• IP Updates.<br />
XILINX ONLINE (IRL)<br />
You can access and upgrade hardware from your desktop anywhere in the<br />
world with the Xilinx IRL capability.<br />
The mission of the Xilinx Online program is to enable, identify, and promote<br />
any Xilinx programmable system that is connected to a network that can<br />
Xilinx • 82
XILINX SOLUTIONS<br />
be fixed, upgraded, or otherwise modified after the system has been deployed<br />
in the field.<br />
The design technology for creating Xilinx Online applications is called<br />
Internet Reconfigurable <strong>Logic</strong>, or IRL. IRL design technology comprises robust<br />
PLD technology, your network connectivity, and software design tools.<br />
Put these individual pieces together and network-based hardware<br />
upgradeability becomes a reality. You can access details through the “Systems<br />
Resources” main web page or visit www.xilinx.com/irl.<br />
CONFIGURATION SOLUTIONS<br />
Located under the “Products and Services” section of the Xilinx website,<br />
this section provides easy-to-use, pre-engineered solutions to configure all Xilinx<br />
FPGAs and CPLDs.<br />
All aspects of configuration are explained, whether from a PROM for<br />
FPGAs or via ISP for CPLDs. The section also includes third-party Boundary<br />
Scan tools, embedded software solutions, ISP cables, ATE and programmer<br />
support, and configuration storage devices.<br />
PROCESSOR CENTRAL<br />
This section provides information that will enable you to reap maximum<br />
benefits from Xilinx FPGA processing solutions.<br />
It offers the freedom to design a custom solution with a choice of hard processors<br />
(as many as four embedded PowerPC processors in Virtex-II Pro<br />
devices) or soft processors (with the MicroBlaze soft processor core and Pico-<br />
Blaze microprocessor core in Virtex-II, Virtex-E, Spartan-II, and Spartan-IIE<br />
FPGAs).<br />
Processor Central also includes more than 40 soft processor peripherals and<br />
the necessary embedded software tools to easily complete your design.<br />
The Processor Central section has the following detailed web pages:<br />
The Embedded Development Kit (EDK)<br />
EDK is an all-encompassing solution for designing embedded programmable<br />
systems using the IBM PowerPC hard processor core and the Xilinx Micro-<br />
Blaze soft processor core in Xilinx FPGAs.<br />
PowerPC Embedded Processor Solution<br />
Embedding IBM's PowerPC processor core into the Virtex-II Pro FPGA provides<br />
the ultimate platform FPGA solution.<br />
The UltraController Solution<br />
Xilinx offers a powerful, easy-to-use Virtex-II Pro FPGA PowerPC-based<br />
microcontroller solution ideal for embedded hardware and software applications.<br />
Xilinx • 83
PROGRAMMABLE LOGIC DESIGN: QUICK START HANDBOOK • CHAPTER 2<br />
The UltraController Solution is an easy-to-use, pre-engineered Virtex-II Pro<br />
device microcontroller.<br />
Based on the PowerPC and internal block RAMs, UltraController delivers<br />
performance exceeding many commercial microcontrollers, yet occupies less<br />
than 50 logic cells of fabric.<br />
It is optimized for embedding software/hardware applications in Virtex-II<br />
Pro devices, while minimizing the time and effort of building a full CPU-based<br />
system.<br />
UltraController uses a simplified software design flow for faster development<br />
time. It offers a single hardware HDL module with two memory versions,<br />
for use across all applications.<br />
Key features of the UltraController include:<br />
• A completely self-contained PowerPC system<br />
• The ability to implement applications using "C" code<br />
• As many as 32 general-purpose inputs and outputs<br />
• Ultra low power – 0.9 mW/MHz<br />
• Full debug support via JTAG<br />
• Integration with simplified ISE/EDK design flows.<br />
MicroBlaze and PicoBlaze Soft Processor Solutions<br />
Xilinx introduces the industry’s fastest 32-bit soft processor core running at<br />
100 D-MIPS on a Virtex-II Pro FPGA. The PicoBlaze 8-bit microprocessor core is<br />
the clear leader in FPGA-based soft processors.<br />
Formerly known as KCPSM, the PicoBlaze processor runs at speeds of 116<br />
MHz, yet occupies a tiny footprint of just 154 logic cells. This combination of<br />
high performance and miniscule size, when coupled with the Xilinx MicroBlaze<br />
product, offers you a broad range of "right-sized" solutions from 8 to 32 bits.<br />
All of Xilinx soft CPUs offer performance that is two to four times faster<br />
than competitive offerings, at sizes ranging from one-half to one-fifth the size.<br />
Xilinx • 84
XILINX SOLUTIONS<br />
TABLE 2-10:<br />
XILINX SOFT PROCESSORS<br />
Soft Processor Architecture<br />
Bus<br />
MIPS/<br />
Speed<br />
Size<br />
FPGA<br />
Support<br />
Support<br />
MicroBlaze<br />
32-bit<br />
RISC<br />
Harvar<br />
d style<br />
buses<br />
32-bit<br />
instructi<br />
on and<br />
data<br />
buses<br />
100 D-<br />
MIPs<br />
150<br />
MHz<br />
225<br />
CLBs<br />
Virtex<br />
Virtex-E<br />
Virtex-II<br />
Virtex-II Pro<br />
Spartan-II<br />
Spartan-IIE<br />
MicroBlaze<br />
Developments<br />
Kit (MDK) – soft<br />
processor core,<br />
peripherals,<br />
GNU-based<br />
software tools<br />
(Compiler,<br />
assembler,<br />
debugger, and<br />
linker)<br />
PicoBlaze 8-bit 8-bit<br />
address<br />
and<br />
data<br />
busses<br />
35<br />
MIPS<br />
116<br />
MHz<br />
35<br />
CLBs<br />
Virtex<br />
Spartan-II<br />
Free of charge<br />
reference design<br />
and application<br />
note, assembler<br />
Third-Party Processors Solution<br />
Both soft processor cores and companion processors are available from<br />
third-party sources that support Xilinx devices.<br />
CoreConnect Technology<br />
The IBM CoreConnect bus architecture is an on-chip bus that enables communication<br />
between the processor core and its peripherals.<br />
TOOLS AND PARTNERSHIPS<br />
Xilinx offers comprehensive tools to design with its hard and soft processor<br />
cores by partnering with industry leaders through our XPERTS and AllianceCORE<br />
programs.<br />
MEMORY CORNER<br />
The Memory Corner is a one-stop memory shop, providing solutions for<br />
leading-edge memory technologies.<br />
The Memory Corner represents the collaborative efforts of Xilinx and major<br />
memory manufacturers including Cypress Semiconductor Corporation, Samsung<br />
Semiconductor, Integrated Device Technology, Micron Technology Inc.,<br />
NEC Electronics, and Toshiba America Electronic Components Corp.<br />
The Memory Corner includes a comprehensive overview of the latest<br />
memory technologies in the form of application notes, tutorials, and reference<br />
Xilinx • 85
PROGRAMMABLE LOGIC DESIGN: QUICK START HANDBOOK • CHAPTER 2<br />
designs to help simplify the memory selection process and the implementation<br />
of the controller.<br />
Xilinx provides embedded memory solutions as well as memory controllers<br />
for DRAM and SRAM product families.<br />
FIGURE 2-45:<br />
MEMORY SOLUTIONS ON THE XILINX WEBSITE<br />
SILICON<br />
Xilinx FPGAs are tailored to meet the requirements of different DSP applications.<br />
This section helps you to select the most cost-effective silicon solution<br />
for applications requiring high-speed DSP.<br />
DESIGN TOOLS AND BOARDS<br />
Xilinx works with industry leaders to provide comprehensive tools for prototyping<br />
and development.<br />
• DSP Software Tools (including free evaluations)<br />
• DSP Hardware Tools<br />
TECHNICAL LITERATURE AND TRAINING<br />
This section features an extensive list of DSP application notes, conference<br />
papers, white papers, articles, training classes, and online seminars.<br />
Xilinx • 86
XILINX SOLUTIONS<br />
CONNECTIVITY CENTRAL<br />
The industry is moving from parallel to serial I/O. By using serial I/O, you<br />
can reduce system cost through fewer pins, cheaper PCBs, smaller connectors,<br />
lower EMI, better signal integrity, and noise immunity. In addition, serial I/O<br />
simplifies your system design and provides scalable bandwidth.<br />
Our dedicated Serial Tsunami Solutions web portal is a one-stop shop for<br />
the latest design resources to enable serial design success.<br />
Terabit networks (among other applications) require high-bandwidth system<br />
interconnect technology. The Xilinx SystemIO solution provides complete<br />
connectivity for high-performance applications, utilizing a combination of the<br />
FPGA physical interface, compliant IP cores, design tools, and partnerships.<br />
Networking and Datapath Products<br />
By using the Xilinx SystemIO networking IP cores and reference designs,<br />
you can quickly build your edge and core routers, layer2/3+<br />
switches, optical cross connects, and LANs, WANs, and MANs.<br />
Control Plane and Backplane Products<br />
Building on our PCI IP leadership, we are also providing IP cores for more<br />
system interconnectivity standards, including PCI Express, PCI-X, Cardbus,<br />
and RapidIO.<br />
HIGH-SPEED DESIGN RESOURCES<br />
Xilinx Virtex-II series Platform FPGAs are the ideal solution for building<br />
high-performance designs. In addition, Xilinx provides a variety of system<br />
tools, reference designs, and application notes for help with your high-speed<br />
designs.<br />
SIGNAL INTEGRITY TOOLS<br />
Building a working system today requires knowing a great deal more than<br />
just logic design. The documents and links in this area will help you design a<br />
reliable PC board quickly.<br />
PARTNERSHIPS<br />
Xilinx works with other networking industry leaders to provide you with a<br />
complete connectivity solution, including device interoperability testing, thirdparty<br />
IP, and design services.<br />
SIGNAL INTEGRITY<br />
Building a working system today requires you to know more than just<br />
Boolean logic and HDL code. The documents and links in this area are designed<br />
to give you everything you need to achieve reliable PCB designs on the first try.<br />
Let’s list the areas accessible from this web page:<br />
Xilinx • 87
PROGRAMMABLE LOGIC DESIGN: QUICK START HANDBOOK • CHAPTER 2<br />
Services<br />
Xilinx • 88<br />
Signal Integrity Fundamentals<br />
• Overview of SI principles and glossary<br />
• PCB design considerations<br />
• High-density package routing information, PCB checklist, and other<br />
resources<br />
• Power supply and bypassing<br />
• Bypass capacitor selection, power consumption, and voltage regulator<br />
information<br />
• Thermal design<br />
• Literature and tools for keeping FPGAs cool<br />
Simulation Tools<br />
• IBIS information, models, and simulation tool vendors<br />
Multi-Gigabit Signaling<br />
• Signal integrity in the gigahertz domain<br />
XILINX DESIGN SERVICES<br />
Xilinx <strong>Design</strong> Services, or XDS, combines skills and experience in system,<br />
logic, and embedded software design to provide a unique development partner.<br />
Leveraging these skill sets will help you optimize your budget, schedule,<br />
and performance requirements.<br />
The XDS portfolio includes:<br />
IP Core Modification<br />
• Modifications or integration of existing Xilinx LogiCORE products and<br />
drivers<br />
• <strong>Quick</strong> access to LogiCORE source code and a team with experience and<br />
expertise with LogiCORE products<br />
• Fixed bid/fixed price contracts<br />
FPGA <strong>Design</strong> From Specification<br />
• Turnkey FPGA design, ASIC conversions, and driver development and<br />
integration<br />
• Expertise in optimizing Xilinx technology to provide the best solution<br />
• Excellent project management to ensure on-time and correct deliveries<br />
• Fixed bid/fixed price contracts<br />
FPGA System <strong>Design</strong><br />
• System architecture consulting, FPGA logic, and embedded software
XILINX SOLUTIONS<br />
design<br />
• Broad applications experience and immense depth of experience with<br />
Xilinx embedded processing tools and products<br />
• Fixed bid/fixed price contracts<br />
Embedded Software <strong>Design</strong><br />
• Complex embedded software designs with real-time constraints, driver<br />
development, and integration with hardware<br />
• Experience with FPGA platform design, including processors and gates<br />
• Expertise in hardware/software co-design techniques<br />
• Fixed bid/fixed price contracts<br />
Overall, XDS offers:<br />
• Professional project management<br />
• System-level experience around the world<br />
• Faster project ramp-up<br />
• Experienced FPGA design engineers<br />
• FPGA hardware and software experts<br />
• Accelerated knowledge of FPGA systems<br />
• Access to ready-made intellectual property cores.<br />
To find out more, please visit the XDS home page or e-mail designservices@xilinx.com.<br />
Education Services<br />
Participation in a Xilinx training course is one of the fastest and most efficient<br />
ways to learn how to design with Xilinx FPGA devices. Hands-on experience<br />
with the latest information and software allows you to implement your<br />
own design in less time, with more effective use of the devices.<br />
Not only design engineers, but test engineers, component engineers, CAD<br />
engineers, technicians, and engineering managers may want to participate in<br />
the training to understand Xilinx products.<br />
Our learning services provide a number of courses in a variety of delivery<br />
methods.<br />
LIVE E-LEARNING ENVIRONMENT<br />
You can choose from more than 70 online classes or modules covering a<br />
broad range of topics and skills involving Xilinx products and services.<br />
The one-hour modules are taught weekly at different times throughout the<br />
day to support worldwide access. Live instructors present the modules in real<br />
time. During each session, you can interact with the instructor or collaborate<br />
with online subject experts.<br />
Xilinx • 89
PROGRAMMABLE LOGIC DESIGN: QUICK START HANDBOOK • CHAPTER 2<br />
DAY SEGMENT COURSES<br />
Xilinx continues to develop and offer traditional day-length courses.<br />
Working with various Xilinx product development groups, our new<br />
courses reflect current product releases. This serves to make training available<br />
when you need it and for the products you need.<br />
Classes are held in centers around the world, although specific onsite<br />
instruction is also available.<br />
For more information, visit www.support.xilinx.com and click on “Courses”<br />
under “Education.”<br />
COMPUTER-BASED TRAINING (CBT)<br />
Xilinx introduced computer-based training with Verilog CBT, which allows<br />
you to learn the Verilog language at your own pace without ever leaving your<br />
office.<br />
Verilog CBT is based on the traditional three-day course, converted into a<br />
computerized self-study program.<br />
For more information, e-mail eurotraining@xilinx.com, telephone +44 (0)870<br />
7350 548, or visit www.xilinx.com/support/education-home.htm.<br />
UNIVERSITY PROGRAM<br />
The mission of the Xilinx University Program (XUP) is to promote Xilinx as<br />
the technology of choice in the academic community. XUP has provided donations,<br />
discounted products, and services to universities since 1985.<br />
Today there are more than 1,600 universities using Xilinx in class labs, or<br />
about 18% of all engineering universities worldwide.<br />
The resources available to universities include:<br />
Xilinx University Resource Center<br />
Developed and maintained by the Department of Electrical and Computer<br />
Engineering at Michigan State University, the Xilinx University Resource Center<br />
website (xup.msu.edu/) is designed specifically to support and encourage<br />
universities using Xilinx products in the classroom.<br />
Here, you’ll find references and resources regarding everything from hardware<br />
data sheets to tutorials on using the Xilinx search engine effectively. You<br />
can save vast amounts of time and energy by using the resources contained<br />
within these pages.<br />
Xilinx Answers Database<br />
The Xilinx Answers Database is located at www.xilinx.com/support/searchtd.htm.<br />
Xilinx • 90
Xilinx Student Edition Frequently Asked Questions<br />
XILINX SOLUTIONS<br />
The Xilinx Student Edition FAQ is located at university.xilinx.com/univ/xsefaq1.htm.<br />
DESIGN CONSULTANTS<br />
The Xilinx XPERTS Program qualifies, develops, and supports design consultants,<br />
ensuring that they have superior design skills and the ability to work<br />
successfully with customers.<br />
XPERTS is a worldwide program that allows easy access to certified experts<br />
in Xilinx device architectures, software tools, and cores.<br />
XPERTS partners also offer consulting in the areas of HDL synthesis and<br />
verification, customization and integration, system-level designs, and teambased<br />
design techniques.<br />
A listing of partners in the Xilinx XPERTS program is located at www.xilinx.com/ipecenter.<br />
For more information on Xilinx products and services, please consult the<br />
Xilinx Data Source CDROM in the back of this book, or visit www.xilinx.com.<br />
TECHNICAL SUPPORT<br />
Xilinx provides 24-hour access to a set of sophisticated tools for resolving<br />
technical issues via the Web.<br />
The Xilinx search utility scans through thousands of answer records to<br />
return solutions for the given issue. Several problem-solver tools are also available<br />
for assistance in specific areas, like configuration or install.<br />
A complete suite of one-hour modules is also available at the desktop via<br />
live or recorded e-learning.<br />
Lastly, if you have a valid service contract, you can access Xilinx engineers<br />
over the Web by opening a case against a specific issue.<br />
For technical support, visit www.support.xilinx.com.<br />
Xilinx • 91
PROGRAMMABLE LOGIC DESIGN: QUICK START HANDBOOK • CHAPTER 2<br />
Xilinx • 92
C HAPTER 3<br />
WebPACK ISE<br />
<strong>Design</strong> Software<br />
WebPACK ISE design software offers a complete design suite based on the<br />
Xilinx ISE series software. This chapter describes how to install the software and<br />
what each module does.<br />
Module Descriptions<br />
Individual WebPACK ISE modules give you the ability to tailor the design<br />
environment to your chosen PLDs as well as the preferred design flow.<br />
In general, the design flow for FPGAs and CPLDs is identical. You can<br />
choose whether to enter the design in schematic form or in HDL, such as<br />
VHDL, Verilog, or ABEL.<br />
The design can also comprise of a mixture of schematic diagrams and<br />
embedded HDL symbols. There is also a facility to create state machines in a<br />
diagrammatic form and let the software tools generate optimized code from a<br />
state diagram.<br />
WebPACK ISE software incorporates a Xilinx version of the ModelSim simulator<br />
from Model Technology (a Mentor Graphics company), referred to as<br />
MXE (ModelSim Xilinx Edition).<br />
This powerful simulator is capable of simulating functional VHDL before<br />
synthesis, or simulating after the implementation process for timing verification.<br />
WebPACK ISE software offers an easy-to-use GUI to visually create a test<br />
pattern. A testbench is then generated and compiled into MXE, along with the<br />
design under test.
PROGRAMMABLE LOGIC DESIGN -- QUICK START HANDBOOK • CHAPTER 3<br />
The flow diagram below shows the similarities and differences between<br />
CPLD and FPGA software flows.<br />
FIGURE 3-1:<br />
WEBPACK SOFTWARE DESIGN FLOW<br />
When your design is complete and you’re happy with the simulation<br />
results, you can then download the design to the required device.<br />
Although we’ll discuss details of the software flow in Chapters 5 and 6,<br />
here’s a basic overview.<br />
For FPGAs, the implementation process includes four key steps.<br />
1. Translate – Interprets the design and runs a “design rule check.”<br />
2. Map – Calculates and allocates resources in the targeted device.<br />
3. Place and Route – Places the CLBs in a logical position and utilizes the<br />
routing resources.<br />
Xilinx • 92
WEBPACK ISE DESIGN SOFTWARE<br />
4. Generate Programming File – Creates a programming bitstream.<br />
For CPLDs, the implementation process includes:<br />
1. Translate – Interprets the design and runs a “design rule check.”<br />
2. Fit – Allocates resource usage and connections.<br />
3. Generate Programming File – Creates a JED file for programming.<br />
WebPACK <strong>Design</strong> Suite<br />
TABLE 3-1:<br />
WEBPACK DEVICE SUPPORT<br />
Device<br />
Support<br />
Virtex-II Pro<br />
Virtex-II<br />
Virtex-E<br />
Spartan-IIE<br />
Spartan-II<br />
Spartan-3<br />
CoolRunner-II<br />
CoolRunner<br />
XC9500 Families<br />
Up to XC2VP2<br />
Up to XC2V250<br />
Up to XCV300E<br />
Up to XC2S300E<br />
Up to XC2S200<br />
Up to XC3S400<br />
All<br />
All<br />
All<br />
WEBPACK DESIGN ENTRY<br />
The WebPACK tool suite supports several different design entries. The XST<br />
synthesis tool synthesizes HDL code in VHDL, Verilog, or ABEL into a netlist.<br />
Schematic designs are converted into VHDL or Verilog, which are then synthesized<br />
by XST in the same way.<br />
WEBPACK STATECAD<br />
StateCAD is a tool for graphically entering state machines in “bubble diagram”<br />
form.<br />
You simply draw the states, transitions, and outputs, and StateCAD gives a<br />
visual test facility. State machines are generated in HDL and then added to the<br />
WebPACK ISE project.<br />
Xilinx • 93
PROGRAMMABLE LOGIC DESIGN -- QUICK START HANDBOOK • CHAPTER 3<br />
Xilinx • 94<br />
WEBPACK MXE SIMULATOR<br />
The WebPACK MXE Simulator can be used for both functional and timing<br />
simulation. The necessary libraries are already pre-compiled into MXE. Prewritten<br />
scripts seamlessly compile the design to be tested, as well as its testbench.<br />
For functional simulation, the written code is simulated before synthesis.<br />
After fitting (CPLDs) or place and route (FPGAs), you can simulate the design<br />
using the same original testbench as a test fixture, but with logic and routing<br />
delays added.<br />
WEBPACK HDL BENCHER TOOL<br />
The HDL Bencher tool generates the testbenches, allowing you to simulate<br />
the design under test.<br />
The HDL Bencher tool reads the design under test. You simply enter signal<br />
transitions in a graphical timing diagram GUI.<br />
You can also enter your expected simulation results, allowing the simulator<br />
to flag a warning if the simulation did not yield the expected results.<br />
WEBPACK FPGA IMPLEMENTATION TOOLS<br />
As we discussed, there are several steps to implementing an FPGA design.<br />
Xilinx FPGA implementation tools perform all of these steps.<br />
WEBPACK CPLD IMPLEMENTATION TOOLS<br />
Similarly, CPLD implementation tools perform all of the steps in the CPLD<br />
implementation flow outlined previously.<br />
WEBPACK IMPACT PROGRAMMER<br />
The iMPACT programmer module allows you to program a device in-system<br />
for all devices available in the WebPACK software. (You must connect a<br />
JTAG cable to the PC’s parallel port.)<br />
For FPGAs, the programmer module allows you to configure a device via<br />
the JTAG cable.<br />
Xilinx FPGAs are based on a volatile SRAM technology, so the device will<br />
not retain configuration data when you remove the power. Therefore, this configuration<br />
method is normally only used for test purposes.<br />
CPLDs, however, are non-volatile devices. Once programmed, they will<br />
retain their program until it’s erased or reprogrammed.<br />
The programmer module also includes a PROM file formatter. The use of<br />
an external PROM is a popular method of storing FPGA configuration data.<br />
The PROM file formatter takes in the bitstream generated during the implementation<br />
phase and provides an MCS- or HEX-formatted file used by PROM<br />
programmers.
WEBPACK ISE DESIGN SOFTWARE<br />
WEBPACK CHIPVIEWER<br />
The ChipViewer tool can be used to examine the design after implementation.<br />
It shows the connections between pins of the device, as well as the configuration<br />
of the internal logical resources.<br />
XPOWER<br />
As power consumption becomes increasingly important in modern digital<br />
designs, the XPower tool is available to calculate the power consumption of a<br />
design running inside a device.<br />
WebPACK CD-ROM Installation<br />
First, insert the CD. If the installation does not start automatically, navigate<br />
to the CD drive using Microsoft Windows Explorer software.<br />
Double-click on the setup.exe file to start the installation process. (The<br />
installation process may have already started automatically).<br />
As the installation process starts up, you’ll see a window asking for a registration<br />
key. To get the registration key, enter the product ID on the CD sleeve at<br />
the website given in the window.<br />
FIGURE 3-2:<br />
REGISTRATION KEY WINDOW<br />
Once at the registration web page, follow the online registration process by<br />
selecting “new customer please register” from the first online screen.<br />
Enter the data requested at each stage. You’ll need to create and enter a<br />
memorable user name and password.<br />
When requested, enter the product ID in the appropriate field.<br />
A CD registration key number will then be sent to you via e-mail.<br />
Xilinx • 95
PROGRAMMABLE LOGIC DESIGN -- QUICK START HANDBOOK • CHAPTER 3<br />
Your key number will look something like this:<br />
1234-xxxx-xxxx<br />
To proceed with installation, enter your key number into the WebInstall<br />
Wizard CD Registration Key window and select the “next” button.<br />
Select the WebPACK software configuration you wish to install from the<br />
following choices:<br />
TABLE 3-2:<br />
WEBPACK SOFTWARE OPTIONS<br />
Software<br />
Focus Area<br />
Module Type<br />
Complete Tool Set<br />
<strong>Design</strong> Environment Only<br />
Description<br />
Everything required for<br />
CPLDs<br />
CPLD <strong>Design</strong> Entry only<br />
CPLD Programming Tools Only CPLD Programming tool<br />
only<br />
CPLD<br />
and<br />
FPGA<br />
Optional Tools<br />
Complete ISE WebPACK<br />
Software<br />
Complete Device<br />
Programming Software<br />
XPower and ChipViewer<br />
Everything required for<br />
both CPLD and FPGA<br />
designs<br />
Programming support for<br />
both CPLDs and FPGAs<br />
Getting <strong>Start</strong>ed<br />
If you have enough disk space, we recommend that you install the complete<br />
ISE WebPACK software, although it’s also possible to upgrade later.<br />
LICENSES<br />
The MXE Simlulator is the only tool that requires a license.<br />
MXE Simulator is licensed via the FlexlM product from Macrovision. It<br />
requires you to situate a starter license file on your hard drive, pointed to by a<br />
set lm_license_file environment setting.<br />
The license is free and is applied for online after installation, after which<br />
you’ll receive a license.dat file via e-mail.<br />
From the <strong>Start</strong> menu, go to Programs > ModelSimXE 5.xx > Submit License<br />
Request.<br />
Xilinx • 96
Summary<br />
PROJECTS<br />
WEBPACK ISE DESIGN SOFTWARE<br />
When starting a project the default location of the project will be:<br />
c:\Xilinx_WebPACK\bin\nt<br />
You can create a unique directory on your hard drive for working on<br />
projects, e.g. c:\my_projects.<br />
Should you need to uninstall and reinstall WebPACK ISE software due to<br />
problems on your system, we recommend that you delete the entire WebPACK<br />
ISE directory structure.<br />
In this chapter, we explained the functions of all WebPACK ISE modules,<br />
along with installation instructions of the modules you require.<br />
You can decide which modules are necessary for your intended design and<br />
install only relevant modules.<br />
In the next section, we’ll take you through your first PLD design using the<br />
powerful features of WebPACK ISE software. Our example design is a simple<br />
traffic light controller that uses a VHDL counter and a state machine. The design<br />
entry process is identical for FPGAs and CPLDs.<br />
Xilinx • 97
PROGRAMMABLE LOGIC DESIGN -- QUICK START HANDBOOK • CHAPTER 3<br />
Xilinx • 98
C HAPTER 4<br />
WebPACK ISE<br />
<strong>Design</strong> Entry<br />
Introduction<br />
This chapter describes a step-by-step approach to a simple design.<br />
The following pages are intended to demonstrate the basic PLD design<br />
entry and implementation process.<br />
In this example tutorial, you’ll design a simple traffic light controller in<br />
VHDL.<br />
Our design is initially targeted at a CoolRunner-II CPLD, and we also show<br />
how you can convert the project to target a Spartan-3 FPGA.<br />
We’ll also discuss some of the advanced features of the architecture.
PROGRAMMABLE LOGIC DESIGN -- QUICK START HANDBOOK • CHAPTER 4<br />
<strong>Design</strong> Entry<br />
To start WebPACK ISE software, select <strong>Start</strong> > Programs > Xilinx ISE 6 ><br />
Project Navigator.<br />
To create a new project, select File > New Project.<br />
FIGURE 4-1:<br />
NEW PROJECT WINDOW – PROJECT NAME<br />
Call the project “Traffic” and put it in your <strong>Design</strong>s directory. For this tutorial,<br />
we will be using an HDL top level.<br />
Click the Next> button.<br />
Enter the following into the New Project dialog box:<br />
Device Family:<br />
CoolRunner-II<br />
Device:<br />
xc2c256<br />
Package:<br />
TQ144<br />
Speed Grade: -7<br />
Synthesis Tool:<br />
XST (VHDL/Verilog)<br />
Simulator:<br />
ModelSim<br />
Generated Simulation Language: VHDL<br />
Xilinx • 100
WEBPACK ISE DESIGN ENTRY<br />
FIGURE 4-2:<br />
NEW PROJECT WINDOW – DEVICE AND DESIGN FLOW<br />
Click the Next> button.<br />
Add a new source to the project by clicking on the New Source button.<br />
Add a VHDL module and call it “Counter.”<br />
FIGURE 4-3:<br />
NEW SOURCE WINDOW<br />
Xilinx • 101
PROGRAMMABLE LOGIC DESIGN -- QUICK START HANDBOOK • CHAPTER 4<br />
Click the Next> button.<br />
Create a 4-Bit Counter Module<br />
FIGURE 4-4:<br />
DEFINE VHDL SOURCE WINDOW<br />
Declare three ports: “clock,” “reset,” and “count.” The clock and reset ports<br />
should both be of direction “in.”<br />
Count should be direction “inout” and should be a 4-bit vector with MSB 3,<br />
LSB 0.<br />
Click the Next> button.<br />
Review the contents of the final window and click the Finish button.<br />
This has automatically generated the entity in the counter VHDL module.<br />
Xilinx • 102
WEBPACK ISE DESIGN ENTRY<br />
Notice that a file called “counter.vhd” has been added to the project in the<br />
Sources in Project window of the Project Navigator.<br />
FIGURE 4-5:<br />
SOURCE IN PROJECT WINDOW<br />
Double-click on this source to open it in the WebPACK ISE Editor window.<br />
FIGURE 4-6:<br />
COUNTER WINDOW<br />
Xilinx • 103
PROGRAMMABLE LOGIC DESIGN -- QUICK START HANDBOOK • CHAPTER 4<br />
You can remove the source files from the WebPACK ISE GUI by clicking on<br />
the add/remove arrow.<br />
As the project builds, you will notice how the WebPACK ISE tool manages<br />
hierarchy and associated files in the Sources window.<br />
Double-clicking on any file name in the Sources window allows that file to<br />
be edited in the main Text Editor.<br />
THE LANGUAGE TEMPLATE<br />
The language template is an excellent tool to assist you in creating HDL<br />
code.<br />
It has a range of popular functions such as counters, multiplexers, decoders,<br />
and shift registers. It also has templates for creating common operators<br />
(such as “IF/THEN” and “FOR” loops) often associated with software languages.<br />
Language templates are used as a reference. They can be copied and pasted<br />
into the design, then customized for their intended purpose.<br />
Usually, you must change the bus width or signal names, and sometimes<br />
modify the functionality.<br />
In this tutorial, the template uses the signal name “clk.” The design requires<br />
the signal to be called “clock.” The counter in the template is too complex for<br />
this particular requirement, so some sections are deleted.<br />
Open the language templates by clicking the button located on the far right<br />
side of the toolbar.<br />
Xilinx • 104<br />
You can also access the language template from the Edit > Language Template<br />
menu.<br />
Click and drag the counter template from the VHDL > Synthesis > Templates<br />
folder and drop it into the “counter.vhd” architecture between the begin<br />
and end statements.<br />
An alternate method is to highlight the code in the language template that<br />
you want to use in your code and right-click your mouse button. Then select use<br />
in “counter.vhd.”<br />
CLOSE THE LANGUAGE TEMPLATES<br />
Notice the color-coding used in the HDL Editor. The green text indicates a<br />
comment. The commented text in this template shows which libraries are<br />
required in the VHDL header. The port definitions are required if this counter<br />
was used in its entirety.
WEBPACK ISE DESIGN ENTRY<br />
As you have already created the entity, this information is not required. You<br />
can delete the green comments if you wish.<br />
The counter from the template shows a loadable bidirectional counter. For<br />
this design, only a 4-bit up counter is required.<br />
EDIT THE COUNTER MODULE<br />
Replace “clk” with the word “clock” by using the Edit > Replace function.<br />
Delete this section:<br />
if CE=’1’ then<br />
if LOAD=’1’ then<br />
COUNT
PROGRAMMABLE LOGIC DESIGN -- QUICK START HANDBOOK • CHAPTER 4<br />
You can toggle the line numbers in the side bar on or off and place bookmarks<br />
to mark lines of interest in the source file.<br />
FIGURE 4-7:<br />
COUNTER IN VHDL WINDOW<br />
A typical VHDL module consists of library declarations, an entity, and an<br />
architecture.<br />
The library declarations are needed to tell the compiler which packages are<br />
required.<br />
The entity declares all ports associated with the design. Count (3 down to 0)<br />
means that count is a 4-bit logic vector.<br />
This design has two inputs – clock and reset – and one output, a 4-bit bus<br />
called “count.”<br />
The actual functional description of the design appears after the begin statement<br />
in the architecture.<br />
The function of this design is to increment a signal “count” when clock = 1<br />
and there is an event on the clock. This is resolved into a positive edge.<br />
The reset is asynchronous as is evaluated before the clock action.<br />
Xilinx • 106
WEBPACK ISE DESIGN ENTRY<br />
The area still within the architecture – but before the begin statement – is<br />
where declarations reside.<br />
We’ll give some examples of component and signal declarations later in this<br />
chapter.<br />
SAVE THE COUNTER MODULE<br />
You can now simulate the counter module of the design.<br />
With “counter.vhd” highlighted in the Source window, the Process window<br />
will give all the available operations for that particular module.<br />
A VHDL file can be synthesized and then implemented through to a bitstream.<br />
Normally, a design consists of several lower-level modules wired together<br />
by a top-level file. This design currently only has one module that can be simulated.<br />
Functional Simulation<br />
To simulate a VHDL file, you must first create a testbench.<br />
From the Project menu, select “New Source” as before.<br />
Select “Test Bench Waveform” as the source type and give it the name<br />
“counter_tb.”<br />
FIGURE 4-8:<br />
NEW SOURCE WINDOW<br />
Xilinx • 107
PROGRAMMABLE LOGIC DESIGN -- QUICK START HANDBOOK • CHAPTER 4<br />
Click the Next> button.<br />
The testbench is going to simulate the counter module, so when asked<br />
which source you want to associate the source with, select “Counter” and click<br />
the Next> button.<br />
Review the information and click the Finish button.<br />
The HDL Bencher tool now reads in the design. The “Initialize Timing” box<br />
sets the frequency of the system clock, setup requirements, and output delays.<br />
Set initialize timing as follows and click OK:<br />
Clock high time:<br />
50 ns<br />
Clock low time:<br />
50 ns<br />
Input setup time:<br />
10 ns<br />
Output valid delay:<br />
10 ns<br />
FIGURE 4-9:<br />
HDL BENCHER WINDOW<br />
Note that the blue cells are for entering input stimulus and the yellow cells<br />
are for entering expected response.<br />
When entering a stimulus, clicking the left mouse button on the cell will<br />
cycle through the available values for that cell.<br />
Open a pattern text field and button by double-clicking on a signal’s cell or<br />
single-clicking on a bus cell. From this Pattern window, you can enter a value in<br />
the text field or click on the Pattern button to open a Pattern Wizard.<br />
Enter the input stimulus as follows:<br />
Set the RESET cell below CLK cycle 1 to a value of “1.”<br />
Set the RESET cell below CLK cycle 2 to a value of “0.”<br />
Enter the expected response as follows:<br />
Click the yellow COUNT[3:0] cell under CLK cycle 1 and click the Pattern<br />
button to launch the Pattern Wizard. Set the Pattern Wizard parameters to count<br />
up from 0 to 1111 (see Figure 4-10).<br />
Xilinx • 108
WEBPACK ISE DESIGN ENTRY<br />
Click OK to accept the parameters.<br />
FIGURE 4-10:<br />
PATTERN WIZARD WINDOW<br />
Your waveform should look like Figure 4-11.<br />
FIGURE 4-11:<br />
WAVEFORM WINDOW<br />
Xilinx • 109
PROGRAMMABLE LOGIC DESIGN -- QUICK START HANDBOOK • CHAPTER 4<br />
Click File > Save to save the waveform.<br />
Close the HDL Bencher tool.<br />
The ISE Sources in Project window should look like Figure 4-12.<br />
FIGURE 4-12:<br />
NEW SOURCES IN PROJECT WINDOW<br />
To make changes to the waveform used to create the testbench, double-click<br />
on “counter_tb.tbw.”<br />
Now that the testbench is created, you can simulate the design.<br />
Select “counter_tb.tbw” in the ISE Source window. In the Process window,<br />
expand the ModelSim simulator by clicking; then right-click on “Simulate<br />
Behavioral VHDL Model.”<br />
Selelect Properties.<br />
In the Simulation Run Time field, type “–all” and hit OK.<br />
By default, MXE will only run for 1us. The –all property runs MXE until the<br />
end of the testbench.<br />
In the Process window, double-click on “Simulate Behavioral VHDL<br />
Model.”<br />
This will bring up the Model Technology MXE dialog box.<br />
WebPACK ISE software automates the simulation process by creating and<br />
launching a simulation macro file (a “.do” file, or in this case an “.fdo” file). This<br />
creates the design library, compiles the design and testbench source files, and<br />
calls a user-editable “.do file” called “counter_tb.udo.”<br />
It also invokes the simulator, opens all the viewing windows, adds all the<br />
signals to the Wave window, adds all the signals to the List window, and runs<br />
the simulation for the time specified by the simulation run time property.<br />
Xilinx • 110
WEBPACK ISE DESIGN ENTRY<br />
Maximize the Wave window. From the Zoom menu, select Zoom Full.<br />
FIGURE 4-13:<br />
WAVE WINDOW<br />
Use File > Exit to close the ModelSim simulator.<br />
Alternatively, closing the main ModelSim window using the usual close<br />
window button will close down the ModelSim program.<br />
Take a snapshot of your design by selecting Project > Take Snapshot.<br />
FIGURE 4-14:<br />
PROJECT SNAPSHOT WINDOW<br />
Taking a snapshot of your project saves the current state of your project in a<br />
subdirectory (with the same name as the snapshot) so that you can go back to it<br />
in the future. You can view project snapshots by selecting the Sources window<br />
snapshot tab in the Project Navigator.<br />
Xilinx • 111
PROGRAMMABLE LOGIC DESIGN -- QUICK START HANDBOOK • CHAPTER 4<br />
If the design had only one module (one level of hierarchy), the implementation<br />
phase would be the next step.<br />
This design, however, has a further module to represent a more typical<br />
VHDL design.<br />
State Machine Editor<br />
For our traffic light design, the counter acts as a timer that determines the<br />
transitions of a state machine.<br />
The state machine will run through four states, each state controlling a combination<br />
of the three lights.<br />
State 1: Red Light<br />
State 2: Red and Amber Light<br />
State 3: Green Light<br />
State 4: Amber Light<br />
To invoke the state machine editor, select New Source from the project<br />
menu.<br />
Highlight State Diagram and give it the name “stat_mac.dia.”<br />
Click the Next> button, then the Finish button.<br />
FIGURE 4-15:<br />
NEW SOURCE WINDOW<br />
Xilinx • 112
WEBPACK ISE DESIGN ENTRY<br />
Open the State Machine Wizard by clicking on the button in the main<br />
toolbar.<br />
FIGURE 4-16:<br />
STATE MACHINE WIZARD WINDOW<br />
Set the number of states to “4” and hit the Next> button.<br />
Click the Next> button to build a synchronous state machine.<br />
Xilinx • 113
PROGRAMMABLE LOGIC DESIGN -- QUICK START HANDBOOK • CHAPTER 4<br />
In the Setup Transitions box, type “TIMER” in the Next field (shown in<br />
Figure 4-17).<br />
FIGURE 4-17:<br />
SETUP TRANSITIONS WINDOW<br />
Click on the Finish button and drop the state machine on the page.<br />
Double-click on the Reset State 0 colored yellow. Rename the state name<br />
“RED.”<br />
Hit the Output Wizard button.<br />
This design will have three outputs named RD, AMB, and GRN. In the<br />
DOUT field, type “RD” to declare an output.<br />
Xilinx • 114
WEBPACK ISE DESIGN ENTRY<br />
Set RD to a constant “1” with a registered output, as shown in Figure 4-18.<br />
FIGURE 4-18:<br />
LOGIC WIZARD WINDOW<br />
Click on OK and then OK the Edit State box.<br />
In a similar fashion, edit the other states:<br />
Rename State 1 to “REDAMB” and use the output wizard to set RD = 1, and<br />
a new output AMB equal to “1” with a registered output.<br />
Rename State 2 to “GREEN” and use the output wizard to set a new output<br />
GRN equal to “1” with a registered output.<br />
Rename State 3 to “AMBER” and use the output wizard to set AMB = 1.<br />
The state machine should look like Figure 4-19.<br />
Xilinx • 115
PROGRAMMABLE LOGIC DESIGN -- QUICK START HANDBOOK • CHAPTER 4<br />
(If you set a signal as registered in the Output Wizard and then select Signal<br />
and re-open the wizard, it is no longer ticked as registered.)<br />
FIGURE 4-19:<br />
STATE DIAGRAM<br />
Double-click on the transition line between state “RED” and state<br />
“REDAMB.”<br />
Xilinx • 116
WEBPACK ISE DESIGN ENTRY<br />
In the edit condition window, set a transition to occur when timer is 1111 by<br />
editing the Condition field to TIMER = “1111.” (Don’t forget the double quotes<br />
(“), as these are part of VHDL syntax.).<br />
FIGURE 4-20:<br />
EDIT CONDITIONS WINDOW<br />
Repeat for the other transitions:<br />
Transition REDAMB to GREEN, TIMER = “0100”<br />
Transition GREEN to AMBER, TIMER = “0011”<br />
Transition AMBER to RED, TIMER = “0000”<br />
Hence, the traffic light completes a RED, REDAMB, GREEN, AMBER once<br />
every three cycles of the counter.<br />
Finally, declare the vector TIMER by clicking on the button on the left-hand<br />
side of the toolbar.<br />
Xilinx • 117
PROGRAMMABLE LOGIC DESIGN -- QUICK START HANDBOOK • CHAPTER 4<br />
Drop the marker on the page, double-click on it, and enter the name<br />
“TIMER” with a width of 4 bits (Range 3:0).<br />
FIGURE 4-21:<br />
EDIT VECTOR WINDOW<br />
Click OK.<br />
Your completed state machine should look like Figure 4-22.<br />
FIGURE 4-22:<br />
STATE MACHINE DRAWING<br />
Xilinx • 118
Click on the Generate HDL button on the top toolbar.<br />
WEBPACK ISE DESIGN ENTRY<br />
The Results window should read “Compiled Perfectly.” Close the dialog<br />
box and the generated HDL Browser window.<br />
Save and close StateCAD.<br />
The state machine can now be added to the WebPACK ISE project.<br />
In the Project Navigator, go to the Project menu and select Add Source.<br />
In the Add Existing Sources box, find “STAT_MAC.vhd.”<br />
Click on Open and declare it as a VHDL Module.<br />
In the Project Navigator, go to the Project menu and select Add Source.<br />
In the Add Existing Sources box, find “stat_mac.dia.”<br />
The state diagram will be added to the top of the Sources window. Doubleclicking<br />
on this file will open up the state diagram in StateCAD.<br />
FIGURE 4-23:<br />
SOURCE IN PROJECT WINDOW SHOWING MODEL VIEW<br />
Xilinx • 119
PROGRAMMABLE LOGIC DESIGN -- QUICK START HANDBOOK • CHAPTER 4<br />
Top-Level VHDL <strong>Design</strong>s<br />
At this point in the flow, two modules in the design are connected together<br />
by a top-level file.<br />
Some designers like to create a top-level schematic diagram, while others<br />
like to keep the design entirely text-based.<br />
Because this section discusses the latter, the counter and state machine will<br />
be connected using a top.vhd file.<br />
If you prefer the former, jump directly to the next section Top-Level Schematic<br />
<strong>Design</strong>s, page 125. You will have the opportunity to do both by continuing<br />
through this tutorial.<br />
Take a snapshot of the project from Project > Take Snapshot.<br />
FIGURE 4-24:<br />
PROJECT SNAPSHOT<br />
From the Project menu, select New Source and create a VHDL module<br />
called “top.”<br />
FIGURE 4-25:<br />
NEW SOURCE WINDOW SHOWING VHDL MODULE<br />
Xilinx • 120
WEBPACK ISE DESIGN ENTRY<br />
Click on the Next> button and fill out the Define VHDL Source dialog box,<br />
as shown in Figure 4-26.<br />
FIGURE 4-26:<br />
DEFINE VHDL SOURCE WINDOW<br />
Click on the Next> button, then the Finish button.<br />
Your new file, “top.vhd,” should look like Figure 4-27.<br />
FIGURE 4-27:<br />
NEW VHDL FILE<br />
Xilinx • 121
PROGRAMMABLE LOGIC DESIGN -- QUICK START HANDBOOK • CHAPTER 4<br />
In the Sources window, highlight “counter.vhd.”<br />
In the Process window, double-click View VHDL Instantiation Template<br />
from the <strong>Design</strong> Entry Utilities section.<br />
Highlight and copy the component declaration and instantiation.<br />
FIGURE 4-28:<br />
INSTANTIATION TEMPLATE<br />
Close the instantiation template, as shown in Figure 4-28.<br />
Paste the component declaration and instantiation into “top.vhd.”<br />
Rearrange the component declaration so that it lies before the begin statement<br />
in the architecture. Rearrange the instantiation so that it lies between the<br />
begin and end statement (see Figure 4-29 for reference).<br />
Highlight “stat_mac.vhd” in the Sources window and double-click View<br />
VHDL Instantiation Template from the <strong>Design</strong> Utilities section.<br />
Repeat the copy-and-paste procedure previously described.<br />
Declare a signal called “timer” by adding the following line above the component<br />
declarations inside the architecture:<br />
signal timer : std_logic_vector(3 downto 0);<br />
Xilinx • 122
WEBPACK ISE DESIGN ENTRY<br />
Connect the counter and state machine instantiated modules so that your<br />
“top.vhd” file looks like Figure 4-29.<br />
FIGURE 4-29: TOP.VHD FILE<br />
When you save “top.vhd,” notice how the Sources window automatically<br />
manages the hierarchy of the whole design, with “counter.vhd” and<br />
“stat_mac.vhd” becoming sub-modules of “top.vhd.”<br />
You can now simulate the entire design.<br />
Add a new testbench waveform source as before, but this time, associate it<br />
with the module “top.”<br />
Accept the timing in the Initialize Timing dialog box and click OK.<br />
In the waveform diagram, enter the input stimulus as follows:<br />
Set the RESET cell below CLK cycle 1 to a value of “1.”<br />
Xilinx • 123
PROGRAMMABLE LOGIC DESIGN -- QUICK START HANDBOOK • CHAPTER 4<br />
Click the RESET cell below CLK cycle 2 to reset if low.<br />
Scroll to the 64th clock cycle; right-click and select Set End of<br />
Testbench.<br />
FIGURE 4-30:<br />
Waveform Diagram<br />
Close the Edit Test Bench window.<br />
Click the Save Waveform button.<br />
Close the HDL Bencher tool.<br />
The “top_tb.tbw” file will now be associated with the top-level VHDL module.<br />
Simulate Functional VHDL Model in the Process window.<br />
FIGURE 4-31:<br />
WAVEFORM WINDOW<br />
Xilinx • 124
You are now ready to go to the implementation stage.<br />
WEBPACK ISE DESIGN ENTRY<br />
Top-Level Schematic <strong>Design</strong>s<br />
Sometimes, it’s easier to visualize designs when they have a schematic top<br />
level that instantiates the individual blocks of HDL. The blocks can then be<br />
wired together in the traditional method.<br />
For designs in the WebPACK ISE tool, the entire project can be schematicbased.<br />
This section discusses the method of connecting VHDL modules via the<br />
ECS schematic tool.<br />
If you have worked through the previous session, you will first need to<br />
revert to the screen shown in Figure 4-32 (two modules with no top-level file).<br />
At the bottom of the Sources window, select the Snapshot View tab.<br />
Highlight Snap2 (two modules). In the Project menu, select Make Snapshot<br />
Current.<br />
This action will take you back to the stage in the flow with only the<br />
“counter.vhd” and the “stat_mac.vhd” files.<br />
WebPACK ISE software will ask if you would like to take another snapshot<br />
of the design in its current state.<br />
Select Yes and create a third snapshot called “vhdl_top.”<br />
The Sources window module view should look like Figure 4-32.<br />
FIGURE 4-32:<br />
SOURCES IN PROJECT WINDOW<br />
ECS HINTS<br />
The ECS schematic capture program is designed around you selecting the<br />
action you wish to perform, followed by the object on which the action will be<br />
performed.<br />
Xilinx • 125
PROGRAMMABLE LOGIC DESIGN -- QUICK START HANDBOOK • CHAPTER 4<br />
In general, most Windows applications currently operate by selecting the<br />
object and then the action to be performed on that object.<br />
Understanding this fundamental philosophy of operation makes learning<br />
ECS a much more enjoyable experience.<br />
From the Project menu, select New Source > Schematic and give it the<br />
name “top_sch.”<br />
FIGURE 4-33:<br />
NEW SOURCE WINDOW SHOWING TOP_SCH<br />
Click the Next> button, then the Finish button.<br />
The ECS Schematic Editor window will now appear.<br />
Back in the Project Navigator, highlight “counter.vhd” in the Sources window.<br />
In the Process window, double-click on Create Schematic Symbol from the<br />
<strong>Design</strong> Entry Utilities section. This will create a schematic symbol and add it to<br />
the library in the Schematic Editor.<br />
Create another symbol – this time for the state machine – by highlighting<br />
“stat_mac.vhd” and double-clicking on Create Schematic Symbol.<br />
Returning to the Schematic editor, the symbol libraries can be found under<br />
the Symbol tab on the left-hand side of the page.<br />
Add the counter and state machine by clicking on the new library in the<br />
Categories window at the top right of the ECS page and then selecting Counter.<br />
Move the cursor over the sheet and drop the counter symbol by clicking<br />
where it should be placed.<br />
Xilinx • 126
WEBPACK ISE DESIGN ENTRY<br />
Move the cursor back into the Categories window and place the<br />
“stat_mac” symbol on the sheet.<br />
Zoom in using the button so your zoom button and the window looks like<br />
Figure 4-34.<br />
FIGURE 4-34:<br />
CLOSE-UP OF COUNTER AND STATE MACHINE SYMBOLS<br />
Select the Add Wire tool from the Drawing toolbar.<br />
To add a wire between two pins, click once on the symbol pin, once at each<br />
vertex, and once on the destination pin.<br />
ECS will let you decide whether to use the Autorouter or manually place<br />
the signals on the page.<br />
To add a hanging wire, click on the symbol pin to start the wire once at each<br />
vertex. Then double-click at the location where you want the wire to terminate.<br />
Wire up the counter and state machine as shown in Figure 4-35:<br />
FIGURE 4-35:<br />
COUNTER AND STATE MACHINE SYMBOLS WITH WIRE<br />
Xilinx • 127
PROGRAMMABLE LOGIC DESIGN -- QUICK START HANDBOOK • CHAPTER 4<br />
Select the Add Net Names tool from the Drawing toolbar.<br />
Type “clock” (notice that the text appears in the window in the top lefthand<br />
side of the ECS page) and then place the net name on the end of the clock<br />
wire.<br />
To add net names to wires that will be connected to your FPGA/CPLD<br />
I/Os, place the net name on the end of the hanging wire.<br />
Finish adding net names so that your schematic looks similar to<br />
Figure 4-36.<br />
FIGURE 4-36:<br />
MORE NET NAMES<br />
ECS recognizes that count(3:0) and TIMER(3:0) are buses, and so connects<br />
them together with a bus rather than a single net.<br />
I/O MARKERS<br />
Select the Add I/O Marker tool from the Drawing toolbar.<br />
With the Input type selected, click and drag around all the inputs to which<br />
you want to add input markers.<br />
Repeat for the outputs but select Output type.<br />
Xilinx • 128
Your completed schematic should look like Figure 4-37.<br />
WEBPACK ISE DESIGN ENTRY<br />
FIGURE 4-37:<br />
ADDING I/O MARKERS<br />
Save the design and exit the Schematic editor.<br />
(In the <strong>Design</strong> Entry utilities, you can view the VHDL created from the<br />
schematic when “top_sch” is selected in the Sources window. The synthesis tool<br />
actually works from this file.)<br />
You can now simulate the entire design.<br />
Highlight “top_sch.sch” in the Sources window.<br />
Add a new testbench waveform source by right-clicking on “top_sch.sch”<br />
and selecting New Source. Call this source “top_sch_tb” and associate it with<br />
“top.”<br />
Accept the timing in the Initialize Timing dialog box and click OK.<br />
In the waveform diagram, enter the input stimulus as follows:<br />
Set the RESET cell below CLK cycle 1 to a value of “1.”<br />
Click the RESET cell below CLK cycle 2 to reset it low.<br />
Xilinx • 129
PROGRAMMABLE LOGIC DESIGN -- QUICK START HANDBOOK • CHAPTER 4<br />
Go to the 64th clock cycle, right-click and select Set End of<br />
Testbench.<br />
FIGURE 4-38:<br />
Waveform Diagram<br />
Close the Edit Test Bench window.<br />
Click the Save Waveform button.<br />
Close the HDL Bencher tool.<br />
With “top_sch_tb.tbw” selected in the Sources window, expand ModelSim<br />
simulator and double-click Simulate Behavioral VHDL Model in the Process<br />
window.<br />
FIGURE 4-39:<br />
MODELSIM SIMULATION WINDOW<br />
You are now ready to go to the implementation stage.<br />
Xilinx • 130
C HAPTER 5<br />
Implementing CPLDs<br />
Introduction<br />
After you have successfully simulated your design, the synthesis stage converts<br />
the text-based design into an NGC netlist file.<br />
The netlist is a non-readable file that describes the actual circuit to be implemented<br />
at a very low level.<br />
The implementation phase uses the netlist and a constraints file to recreate<br />
the design using the available resources within the CPLD.<br />
Constraints may be physical or timing and are commonly used for setting<br />
the required frequency of the design or declaring the required pinout.<br />
The first step is translate. This step checks the design and ensures that the<br />
netlist is consistent with the chosen architecture. Translate also checks the UCF<br />
for any inconsistencies. In effect, this stage prepares the synthesized design for<br />
use within a CPLD.<br />
The fit stage distributes the design to the resources in the CPLD and places<br />
those resources according to the constraints specified. Obviously, if the design is<br />
too big for the chosen device, the fit process will not be able to complete its job.<br />
The fitter also uses the UCF file to understand timing and may sometimes<br />
decide to change the actual design.<br />
For example, sometimes the fitter will change the D-Type flip-flops in the<br />
design to Toggle Type or T-Type registers. It all depends on how well the design<br />
converts into product terms.<br />
Once the fitter has completed, it is good practice to re-simulate. As all the<br />
logic delays added by the macrocells, switch matrix, and flip-flops are known,<br />
MXE can use information for timing simulation.
PROGRAMMABLE LOGIC DESIGN -- QUICK START HANDBOOK • CHAPTER 5<br />
Synthesis<br />
The fitter creates a JEDEC file, which is used to program the device either<br />
on the board via a parallel cable or using programming equipment.<br />
The steps of implementation must be carried out in this order.<br />
WebPACK ISE software will automatically perform the steps required if a<br />
particular step is selected.<br />
For example, if the design has only just been functionally simulated and<br />
you decide to do a timing simulation, the software will automatically synthesize,<br />
translate, and tit the design. It will then generate the timing information<br />
before it opens MXE and gives the timing simulation results.<br />
The rest of this chapter demonstrates the steps required to successfully<br />
implement our traffic light design.<br />
The XST synthesis tool will only attempt to synthesize the file highlighted<br />
in the Sources window.<br />
In our traffic light design, “top.vhd” (for VHDL designs) or “top_sch” (for<br />
schematic designs) instantiates two lower level blocks, “stat_mac” and<br />
“counter.”<br />
The synthesis tool recognizes all the lower level blocks used in the top-level<br />
code and synthesizes them together to create a single bitstream.<br />
In the Sources window, ensure that “top.vhd” (or “top_sch” for schematic<br />
flows) is highlighted.<br />
In the Process window, expand the Synthesis subsection by clicking on the<br />
“+” next to Synthesize.<br />
You can now check your design by double-clicking on Check Syntax.<br />
Ensure that any errors in your code are corrected before you continue. If the<br />
syntax check is OK, a tick will appear.<br />
Xilinx • 132
IMPLEMENTING CPLDS<br />
The design should be okay because both the HDL Bencher tool and MXE<br />
simulator have already checked for syntax errors. (It is useful, when writing<br />
code, to periodically check your design for any mistakes using this feature.)<br />
FIGURE 5-1:<br />
PROCESS WINDOW SHOWING CHECK SYNTAX<br />
Right-click on Synthesize and select Properties.<br />
A window appears allowing you to influence the way in which your design<br />
is interpreted.<br />
The Help feature will explain each of the options in each tab. Click on the<br />
HDL Options tab.<br />
In the Xilinx Specific Options tab, ensure that the Add IO Buffers box is<br />
ticked. The I/O buffers will be attached to all the port names in the top-level<br />
entity of the design.<br />
Clicking on Help in each tab demonstrates the complex issue of synthesis<br />
and how the final result could change. The synthesis tool will never alter the<br />
function of the design, but it has a huge influence on how the design will perform<br />
in the targeted device.<br />
Click OK in the Process Properties window and double-click on Synthesize.<br />
When the synthesis is complete, a green tick will appear next to Synthesize.<br />
Double-click on View Synthesis Report.<br />
Constraints Editor<br />
To get the ultimate performance from the device, you must tell the implementation<br />
tools what and where performance is required.<br />
This design is particularly slow and timing constraints are unnecessary.<br />
Constraints can also be physical; pin locking is a physical constraint.<br />
Xilinx • 133
PROGRAMMABLE LOGIC DESIGN -- QUICK START HANDBOOK • CHAPTER 5<br />
For this design, assume that the specification for clock frequency is 100<br />
MHz and that the pin-out has been pre-determined to that of a CoolRunner-II<br />
pre-designed board.<br />
In the Source window, add a New Source of type Implementation Constraints<br />
File. Call this file “top_constraints “and associate it with the module<br />
“top.”<br />
FIGURE 5-2:<br />
CONSTRAINTS FILE AS A SOURCE<br />
In the Process window, expand the User Constraints section and doubleclick<br />
on Assign Package Pins.<br />
FIGURE 5-3:<br />
ASSIGN PACKAGE PINS IN PACE TOOL<br />
Xilinx • 134
IMPLEMENTING CPLDS<br />
Notice that the translate step in the Implement <strong>Design</strong> section runs automatically.<br />
This is because the implementation stage must see the netlist before it<br />
can offer you the chance to constrain sections of the design.<br />
When translate has completed, the Xilinx PACE (Pinout Area and Constraints<br />
Editor) tool opens.<br />
If there are already constraints in the UCF file, these will be imported by<br />
PACE and displayed. As we have an empty UCF file, nothing exists for PACE to<br />
import.<br />
In the <strong>Design</strong> Object List, you can enter a variety of constraints on the I/O<br />
pins used in the design. PACE recognizes the five pins in the design and displays<br />
them in the list.<br />
Click in the Loc area next to each signal and enter the following location<br />
constraints:<br />
clock<br />
p38<br />
reset<br />
p143<br />
red_light p11<br />
green_light p13<br />
amber_light p12<br />
FIGURE 5-4:<br />
ENTER LOCATION CONSTRAINTS<br />
When a pin is highlighted in the <strong>Design</strong> Object List, the pin to which it is<br />
“Loc’ed” is highlighted in the Package Pins view.<br />
Save the PACE session and exit the PACE tool.<br />
It is now possible to see the constraints in the UCF file.<br />
With “top_constraints.ucf” highlighted in the Source window, double-click<br />
Edit Constraints (Text) in the Process window.<br />
The UCF file will open in the main window of the ISE Project Navigator.<br />
Xilinx • 135
PROGRAMMABLE LOGIC DESIGN -- QUICK START HANDBOOK • CHAPTER 5<br />
The constraints entered into PACE can be seen in Figure 5-5.<br />
FIGURE 5-5:<br />
TEXT CONSTRAINTS IMPORTED FROM PACE<br />
To force a signal onto a global resource, you can apply the BUFG constraint.<br />
In this case, we will apply the BUFG constraint to the clock signal.<br />
Enter the following syntax in the text file:<br />
NET "clock" BUFG=CLK;<br />
Save and close the text file.<br />
The next step is to create timing constraints. With the UCF highlighted in<br />
the Source window, double-click on Create Timing Constraints in the Process<br />
window.<br />
The Constraints Editor will open. This tool can be used to set location constraints,<br />
but for this tutorial it will only be used to create timing constraints.<br />
The Constraints Editor recognizes the one global signal in the design.<br />
Xilinx • 136
DoubLe-click in the Period window of the global clock signal.<br />
IMPLEMENTING CPLDS<br />
FIGURE 5-6:<br />
CLOCK PERIOD EDITOR WINDOW<br />
In the Clock Period definition window, change the Time value to 10 ns. The<br />
duty cycle should stay at 50% high, 50% low.<br />
The period constraint is now written into the UCF file and can be seen in the<br />
constraints list at the bottom of the Constraints Editor.<br />
A period constraint ensures that the internal paths starting and ending at<br />
synchronous points (flip-flop, latch) have a logic delay less than 10 ns.<br />
Click the Ports tab in the Constraints Editor. As there were already constraints<br />
in the UCF, they have been imported.<br />
Xilinx • 137
PROGRAMMABLE LOGIC DESIGN -- QUICK START HANDBOOK • CHAPTER 5<br />
Highlight the three outputs “red_light,” “green_light,” and “amber_light”<br />
using ctrl select.<br />
FIGURE 5-7:<br />
CONSTRAINTS EDITOR – CREATE GROUP<br />
In the Group Name field, type “lights” and then click the Create Group button.<br />
In the Select Group box, select “lights” and click the Clock to Pad button.<br />
Xilinx • 138
IMPLEMENTING CPLDS<br />
In the Clock to Pad dialog box, set the Time Requirement to 15 ns relative to<br />
the clock. (There is only one clock, but in some designs there may be more).<br />
FIGURE 5-8:<br />
CLOCK TO PAD DIALOG BOX<br />
Click OK.<br />
Notice that the Clock to Pad fields have been filled in automatically and<br />
that the UCF generated has appeared in the UCF constraints tab at the bottom of<br />
the screen.<br />
The UCF file should look similar to Figure 5-9.<br />
FIGURE 5-9:<br />
COMPLETE CONSTRAINTS LIST<br />
Xilinx • 139
PROGRAMMABLE LOGIC DESIGN -- QUICK START HANDBOOK • CHAPTER 5<br />
Save the Constraints Editor session and exit the Constraints Editor.<br />
CoolRunner-II architecture supports the use of non 50:50 duty cycle clocks<br />
by implementing input hysteresis. This can be selected on a pin-by-pin basis.<br />
For example, if the clock used in this design is an RC oscillator, the input<br />
hysteresis can be used to clean up the clock using the following constraint syntax:<br />
NET “clock” schmitt_trigger;<br />
The CoolRunner-II CPLD also supports different I/O standards.<br />
If the three light signals had to go to a downstream device that required the<br />
signals to conform to a certain I/O standard, you could use the following constraint<br />
syntax:<br />
NET “red_light” IOSTANDARD=LVTTL;<br />
The permissible standards are LVTTL, LVCMOS15, LVCMOS18,<br />
LVCMOS25, LVCMOS33. On larger devices (128 macrocell and larger), the permissible<br />
standards are HSTL_I, SSTL2_I, and SSTL3_I.<br />
However, you can use only one I/O standard per bank, so take care when<br />
assigning different I/O standards in a design.<br />
The CoolRunner-II family has several features that are aimed at reducing<br />
power consumption in the device.<br />
One of these features is known as CoolClock. The clock signal on Global<br />
Clock Input 2 (GCK2) is divided by 2 as soon as it enters the device.<br />
All of the registers clocked by this clock are then automatically configured<br />
as dual-edge triggered flip-flops.<br />
The highest toggling net in the design will now be toggling at half the frequency,<br />
which will reduce the power consumption of that net without compromising<br />
the performance of the design.<br />
The CoolClock attribute can be applied by right-clicking on GCK2 in Chip-<br />
Viewer or by adding the following line in the UCF:<br />
NET “clock” COOL_CLK;<br />
However, we will not use these features in this tutorial.<br />
For more information on the use of CoolRunner-II CPLDs, and their<br />
advanced features, visit www.xilinx.com/apps/epld.htm for a number of application<br />
notes, often including free code examples.<br />
You must re-run translate so the new constraints can be read.<br />
Xilinx • 140
IMPLEMENTING CPLDS<br />
Click on the “+” next to Implement <strong>Design</strong> in the Process window.<br />
FIGURE 5-10:<br />
DESIGN PROCESS WINDOW<br />
The implementation steps are now visible. An orange question mark indicates<br />
that translate is now out of date and should be re-run.<br />
A right-click on Implement <strong>Design</strong> allows you to edit the properties for each<br />
particular step.<br />
FIGURE 5-11:<br />
PROCESS PROPERTIES – IMPLEMENT DESIGN<br />
The Help button will explain the operation of each field.<br />
You can set the default I/O standard under the Fitting tab of the Process<br />
Properties window, as shown in Figure 5-11.<br />
Xilinx • 141
PROGRAMMABLE LOGIC DESIGN -- QUICK START HANDBOOK • CHAPTER 5<br />
In this case, we will set the Output Voltage Standard to LVCMOS18 so that<br />
all of our pins are configured to be compliant with the LVCMOS 1.8V standard.<br />
You can implement your design by double-clicking on Implement <strong>Design</strong>.<br />
When there is a green tick next to Implement <strong>Design</strong>, the design has completed<br />
the implementation stage.<br />
The timing analysis is performed by default on the design.<br />
To look at the Timing Report, expand the Optional Implementation Tools<br />
branch in the Process window. Then expand the Generate Timing branch and<br />
double-click on Timing Report.<br />
CPLD Reports<br />
Two reports are available that detail the fitting results and associated timing<br />
of the design. These are:<br />
The Translation Report shows any errors in the design or the UCF.<br />
The CPLD Fitter Report can be opened in two ways, either in a standard<br />
text window within the ISE GUI or in a browser window.<br />
To select which format to open, go to Edit > Preferences > General > CPLD<br />
Fitter Report.<br />
FIGURE 5-12:<br />
ISE PREFERENCES<br />
Xilinx • 142
IMPLEMENTING CPLDS<br />
To open the CPLD Fitter Report, expand the Fit branch and double-click on<br />
the Fitter Report Process.<br />
FIGURE 5-13:<br />
CPLD HTML FITTER REPORT<br />
The same information is contained in both the HTML and text reports, but<br />
the HTML report has been designed to make the information more readable<br />
and easier to find.<br />
You can browse through several sections of the HTML Fitter Report by<br />
using the menu on the left-hand side of the page.<br />
The Summary section of the report gives a summary of the total resources<br />
available in the device (256 macrocells, 118 I/O pins, etc.), and how much is<br />
used by the design.<br />
The errors and warnings generated during fitting can be seen in the Errors<br />
and Warnings section.<br />
The Mapped Inputs and Mapped <strong>Logic</strong> sections give information about<br />
signals, macrocells, and pins in the fitted design. The key to the meaning of the<br />
abbreviations is available by pressing the legend button.<br />
The Function Block Summary looks into each function block and shows<br />
which macrocell is used to generate the signals on the external pins.<br />
By clicking on a specific function block (e.g., FB1) in the Function Blocks<br />
section, all of the macrocells in that function block will be shown.<br />
Xilinx • 143
PROGRAMMABLE LOGIC DESIGN -- QUICK START HANDBOOK • CHAPTER 5<br />
Clicking on a specific macrocell will bring up a diagram of how that macrocell<br />
is configured.<br />
An XC2C256 device has 16 function blocks, of which only two have been<br />
used for logic functions in this design.<br />
The design could be packed into a single function block, but the chosen I/O<br />
pins dictate which macrocells (and hence which function blocks) are used.<br />
A great feature of CPLDs is the deterministic timing, as a fixed delay exists<br />
per macrocell.<br />
The Timing Report is able to give the exact propagation delays and setup<br />
times and clock-to-out times.<br />
These values are displayed in the first section of the report you will have<br />
created.<br />
The next section lists the longest setup time, cycle time (logic delay between<br />
synchronous points as constrained by the period constraint), and clock-to-out<br />
time.<br />
The setup and clock-to-out times don’t strictly affect the design’s performance.<br />
These parameter limitations are dependent on the upstream and downstream<br />
devices on the board.<br />
The cycle time is the maximum period of the internal system clock. The<br />
report shows that this design has a minimum cycle time of 7.1 ns, or 140 MHz.<br />
The next section shows all the inputs and outputs of the design and their<br />
timing relationship with the system clock. Three lights will have a 6.0 ns delay<br />
with respect to the clock input.<br />
The clock to setup section details the internal nets to and from a synchronous<br />
point. The maximum delay in this section dictates the maximum system<br />
frequency.<br />
“amber_light”, “red_light” and “green_light” are the D-Type flip-flops used<br />
to register the outputs.<br />
The last section details all the path type definitions, explaining the difference<br />
between the types mentioned previously in the report.<br />
To generate a detailed timing report, right-click on Generate Timing in the<br />
Process window and select Properties > Timing Report Format > Detail.<br />
Timing Simulation<br />
The process of timing simulation is very similar to the functional method.<br />
With “top_tb.vhd” (or “top_sch_tb.vhd” for schematic flow) selected in the<br />
Sources window, expand the ModelSim simulator section in the Process window<br />
and right-click on Simulate Post Fit VHDL Model.<br />
Select Properties. In the Simulation Run Time field, type “all.”<br />
Click OK, then double-click on Simulate Post Fit VHDL Model.<br />
Xilinx • 144
IMPLEMENTING CPLDS<br />
MXE will open, but this time implementing a different script file and compiling<br />
a post-route VHDL file (time_sim.vhd) is compiled.<br />
Time_sim.vhd is a very low-level VHDL file generated by the implementation<br />
tools. It references the resources within the CPLD and takes timing information<br />
from a separate file.<br />
Use the zoom features and cursors to measure the added timing delays.<br />
FIGURE 5-14:<br />
SIMULATION WAVEFORM<br />
Configuration<br />
A DLC7 Parallel-IV JTAG cable is required to configure the device from the<br />
iMPACT programmer.<br />
Ensure that the cable is plugged in to the computer and that the ribbon<br />
cable/flying leads are connected properly to the board.<br />
You must also connect the power jack of the Parallel-IV cable to either the<br />
mouse or keyboard PS2 port of the PC.<br />
Xilinx • 145
PROGRAMMABLE LOGIC DESIGN -- QUICK START HANDBOOK • CHAPTER 5<br />
With “top.vhd” highlighted in the Source window, double-click on Configure<br />
Device (iMPACT) in the Process window.<br />
FIGURE 5-15:<br />
IMPACT PROGRAMMER MAIN WINDOW<br />
Right-click on the Xilinx XC2C256 icon that appears in the iMPACT window<br />
and select Program.<br />
The design will now download into the device.<br />
You have now successfully programmed your first CoolRunner-II CPLD.<br />
Xilinx • 146
C HAPTER 6<br />
Implementing FPGAs<br />
Introduction<br />
After you have successfully simulated your design, the synthesis stage converts<br />
the text-based HDL design into an NGC netlist file.<br />
The netlist is a non-readable file that describes the actual circuit to be implemented<br />
at a very low level.<br />
The implementation phase uses the netlist and a constraints file to recreate<br />
the design using the available resources within the FPGA.<br />
Constraints may be physical or timing and are commonly used for setting<br />
the required frequency of the design or declaring the required pin-out.<br />
The map stage distributes the design to the resources available in the FPGA.<br />
Obviously, if the design is too big for the specified device, mapping will be<br />
incomplete.<br />
The map stage also uses the UCF file to understand timing and may sometimes<br />
decide to add further logic (replication) to meet the given timing requirements.<br />
Map has the ability to “shuffle’ the design around LUTs to create the best<br />
possible implementation for the design. The whole process is automatic and<br />
requires little user input.<br />
The place and route stage works with the allocated CLBs and chooses the<br />
best location for each block.<br />
For a fast logic path, it makes sense to place relevant CLBs next to each<br />
other simply to minimize the path length. The routing resources are then allocated<br />
to each connection, again using a careful selection of the best possible<br />
routing types.
PROGRAMMABLE LOGIC DESIGN -- QUICK START HANDBOOK • CHAPTER 6<br />
For example, if you need a signal for many areas of the design, the place<br />
and route tool would use a “longline” to span the chip with minimal delay or<br />
skew.<br />
At this point, it is good practice to re-simulate. As all of the logic delays<br />
added by the LUTs and flip-flops are now known (as well as the routing delays),<br />
MXE can use this information for timing simulation.<br />
Finally, a program called “bitgen” takes the output of place and route and<br />
creates a programming bitstream.<br />
When developing a design, it may not be necessary to create a bit file on<br />
every implementation, as you may only need to ensure that a particular portion<br />
of your design passes timing verification.<br />
The steps of implementation must be carried out in this order:<br />
1. Synthesize<br />
2. Fit<br />
3. Timing Simulate<br />
4. Program.<br />
WebPACK ISE software will automatically perform the steps required if a<br />
particular step is selected.<br />
For example, if the design has only just been functionally simulated and<br />
you decide to do a timing simulation, the software will automatically synthesize<br />
and fit. It will then generate the timing information before it opening MXE<br />
and giving timing simulation results.<br />
In this chapter, we’ll demonstrate the steps required to successfully implement<br />
our traffic light design into a Spartan-3 FPGA.<br />
Xilinx • 148
IMPLEMENTING FPGAS<br />
Double-click on “xc2c256-7tq144 – XST VHDL” in the Sources window,<br />
shown inFigure 6-1.<br />
FIGURE 6-1:<br />
SOURCES IN PROJECT WINDOW<br />
Enter the following characteristics:<br />
Change the Device Family to Spartan3<br />
In the Device field, select xc3s50<br />
Change the Package field to tq144<br />
Enter the Speed Grade as -4<br />
Top Level Module HDL<br />
Synthesis Tool XST (VHDL/Verilog)<br />
Simulator ModelSim<br />
Generated Simulation Language VHDL<br />
Click on OK.<br />
The project, originally targeted at a CoolRunner-II CPLD, is now targeting a<br />
Xilinx Spartan-3 FPGA.<br />
The green ticks in the Process window should have disappeared and been<br />
replaced by orange question marks, indicating that the design must be re-synthesized<br />
and re-implemented.<br />
Xilinx • 149
PROGRAMMABLE LOGIC DESIGN -- QUICK START HANDBOOK • CHAPTER 6<br />
Synthesis<br />
The XST synthesis tool will only attempt to synthesize the file highlighted<br />
in the Source window.<br />
In our traffic light design, “top.vhd” (for VHDL designs) or “top_sch” (for<br />
schematic designs) instantiates two lower level blocks, “stat_mac” and<br />
“counter.”<br />
The synthesis tool recognizes all the lower level blocks used in the top-level<br />
code and synthesizes them together to create a single netlist.<br />
In the Sources window, ensure that “top.vhd” (or “top_sch” for schematic<br />
flows) is highlighted.<br />
In the Process window, expand the Synthesis subsection by clicking on the<br />
“+” next to Synthesize.<br />
You can now check your design by double-clicking on Check Syntax.<br />
Ensure that any errors in your code are corrected before you continue. If the<br />
syntax check is OK, a tick will appear (as shown in Figure 6-2).<br />
The design should be okay because both the Bencher and MXE have<br />
already checked for syntax errors. (It is useful, when writing code, to periodically<br />
check your design for any mistakes using this feature.)<br />
FIGURE 6-2:<br />
PROCESSES WINDOW SHOWING CHECK SYNTAX HAS<br />
COMPLETED SUCCESSFULLY<br />
Right-click on Synthesize and select Properties.<br />
A window will appear allowing you to influence the way in which your<br />
design is interpreted.<br />
The Help feature explains each of the options in each tab.<br />
Click on the HDL Options tab.<br />
Xilinx • 150
IMPLEMENTING FPGAS<br />
The FSM encoding algorithm option looks for state machines and determines<br />
the best method of optimizing.<br />
For FPGAs, state machines are usually “one hot” encoded. This is because<br />
of the abundance of flip-flops in FPGA architectures.<br />
A one hot encoded state machine will use one flip-flop per state. Although<br />
this may seem wasteful, the next state logic is reduced, and the design is likely<br />
to run much faster.<br />
Leave the setting on “auto” to achieve this fast one hot encoding.<br />
In the Xilinx Specific Options tab, ensure that the Add I/O Buffers box is<br />
ticked.<br />
The I/O buffers will be attached to all of the port names in the top-level<br />
entity of the design.<br />
Clicking on Help in each tab demonstrates the complex issue of synthesis<br />
and how the final result could change.<br />
The synthesis tool will never alter the function of the design, but it has a<br />
huge influence on how the design will perform in the targeted device.<br />
Click OK in the Process Properties window and double-click on Synthesize.<br />
The first section of the report summarizes just the synthesis settings.<br />
Each entity in the design is then compiled and analyzed.<br />
The next section in the report gives synthesis details and documents how<br />
the design was interpreted.<br />
Note that the state machine is one hot encoded, as each state name (red,<br />
amber, redamb, and green) has been assigned its own 1-bit register.<br />
Xilinx • 151
PROGRAMMABLE LOGIC DESIGN -- QUICK START HANDBOOK • CHAPTER 6<br />
When synthesis chooses to use primitive macros it is known as “inference.”<br />
As registered outputs were selected in the state machine, three further registers<br />
were inferred.<br />
FIGURE 6-3:<br />
EXTRACT OF SYNTHESIS REPORT<br />
The Final Report section shows the resources used within the FPGA.<br />
FIGURE 6-4:<br />
RESOURCE REPORT<br />
Xilinx • 152
IMPLEMENTING FPGAS<br />
The Constraints File<br />
To get the ultimate performance from the device, you must tell the implementation<br />
tools what and where performance is required.<br />
This design is particularly slow and timing constraints are unnecessary.<br />
Constraints can also be physical; pin locking is a physical constraint.<br />
For this design, assume that the specification for clock frequency is 100<br />
MHz and that the pin-out has been pre-determined to that of a Spartan-3<br />
device.<br />
There are already some constraints in the UCF from the previous project<br />
implementation. It will be necessary to delete these constraints.<br />
Highlight “top_constraints.ucf” in the Source window. Expand the “+”<br />
next to User Constraints and double-click Edit Constraints (Text).<br />
Highlight all of the constraints and delete them. Save the UCF and close it.<br />
Double-click on Assign Package Pins.<br />
Alternatively, you can highlight the top level (“top.vhd”) and expand the<br />
User Constraints branch.<br />
FIGURE 6-5:<br />
PROCESS WINDOW SHOWING ASSIGN PACKAGE PINS<br />
The PACE tool will be launched.<br />
Assign all I/O pins in the <strong>Design</strong> Object List as follows.<br />
reset<br />
red_light<br />
green_light<br />
clock<br />
amber_light<br />
p36<br />
p44<br />
p52<br />
p55<br />
p46<br />
Xilinx • 153
PROGRAMMABLE LOGIC DESIGN -- QUICK START HANDBOOK • CHAPTER 6<br />
Save and Exit the PACE session.<br />
Double-click on Create Timing Constraints in the Process window, as seen<br />
above Assign Package Pins in Figure 6-5.<br />
Notice that the Constraints Editor is invoked and picks up the LOC constraints<br />
entered in PACE.<br />
These can be edited by double-clicking on them in the read-write window<br />
or under the Ports tab in the Main window.<br />
Double-click in the Period window of the global signal clock and enter a<br />
period of 10 ns.<br />
FIGURE 6-6:<br />
SPECIFY PERIOD CONSTRAINT<br />
Click OK.<br />
Click on the Ports tab in the Constraints Editor. As there were already constraints<br />
in the UCF, they have been imported.<br />
Xilinx • 154
IMPLEMENTING FPGAS<br />
Highlight the three outputs “red_light,” “green_light,” and “amber_light”<br />
using ctrl select.<br />
FIGURE 6-7:<br />
CONSTRAINTS EDITOR – CREATE GROUP<br />
In the Group Name field, type “lights” and then hit Create Group.<br />
In the Select Group box, select lights and hit the Clock to Pad button.<br />
Xilinx • 155
PROGRAMMABLE LOGIC DESIGN -- QUICK START HANDBOOK • CHAPTER 6<br />
In the Clock to Pad dialog box, set the time requirement to 15 ns relative to<br />
the clock. There is only one clock, but in some designs there may be more.<br />
FIGURE 6-8:<br />
CLOCK TO PAD DIALOG BOX<br />
Click OK.<br />
Notice that the Clock to Pad fields have been filled in automatically. Also<br />
notice that the UCF generated has appeared in the UCF Constraints tab at the<br />
bottom of the screen.<br />
The UCF file should look similar to Figure 6-9.<br />
FIGURE 6-9:<br />
COMPLETE CONSTRAINTS FILE<br />
Xilinx • 156
IMPLEMENTING FPGAS<br />
Save and close the Constraints Editor session.<br />
Click on the “+” next to Implement <strong>Design</strong> in the Process window.<br />
FIGURE 6-10:<br />
PROCESS WINDOW SHOWING IMPLEMENT DESIGN<br />
Implement the design by double-clicking on Implement <strong>Design</strong>. (You could<br />
run each stage separately if required.)<br />
When there is a green tick next to Translate, Map, and Place and Route,<br />
your design has completed the implementation stage.<br />
FIGURE 6-11:<br />
COMPLETED IMPLEMENTATION<br />
A green tick means that the design ran through without any warnings.<br />
Xilinx • 157
PROGRAMMABLE LOGIC DESIGN -- QUICK START HANDBOOK • CHAPTER 6<br />
A yellow exclamation point may mean that there is a warning in one of the<br />
reports.<br />
A common warning, which can be safely ignored in CPLD designs, is that<br />
an “fpga_don’t_touch” attribute has been applied to an instance.<br />
If you’ve followed the design procedure outlined in this example, there<br />
should be no errors or warnings.<br />
FPGA Reports<br />
Each stage has its own report. Clicking on the “+” next to each stage lists the<br />
reports available:<br />
1. The Translate Report shows any errors in the design or the UCF.<br />
2. The Map Report confirms the resources used within the device and<br />
describes trimmed and merged logic. It will also describe exactly where<br />
each portion of the design is located in the actual device.<br />
A detailed Map Report can be chosen in the Properties for map.<br />
3. The Post-Map Static Timing Report shows the logic delays only (no<br />
routing) covered by the timing constraints. This design has two timing<br />
constraints, the clock period and the clock-to-out time of the three<br />
lights.<br />
If the logic-only delays don’t meet timing constraints, the additional delay<br />
added by routing will only add to the problem.<br />
Without a routing delay, these traffic lights would run at 216 MHz!<br />
4. The Place and Route Report gives a step-by-step progress report.<br />
The place and route tool must be aware of timing requirements. It will list<br />
the given constraints and report how comfortably the design fell within – or<br />
how much it failed – the constraints.<br />
5. The Asynchronous Delay Report is concerned with the worst path<br />
delays in the design – both logic and routing.<br />
6. The Pad Report displays the final pin-out of the design, with<br />
information regarding the drive strength and signalling standard.<br />
7. The Guide Report shows how well a guide file has been met (if one was<br />
specified).<br />
The Post Place and Route Static Timing Report adds the routing delays.<br />
Notice that the max frequency of the clock has dropped.<br />
WebPACK ISE software has additional tools for complex timing analysis<br />
and floor planning, which are beyond the scope of this introductory book.<br />
Xilinx • 158
IMPLEMENTING FPGAS<br />
Programming<br />
Right-click on Generate Programming file and click on Properties.<br />
Under the <strong>Start</strong>-Up Options tab, ensure that the startup clock is set to JTAG<br />
Clock by selecting JTAG Clock from the drop-down menu.<br />
Double-click on Generate Programming File.<br />
This operation creates a .bit file that can be used by the iMPACT programmer<br />
to configure a device.<br />
Expand the Generate Programming File tools subsection.<br />
Double-click on Configure Device (iMPACT).<br />
A DLC7 Parallel-IV JTAG cable is required to configure the device from the<br />
iMPACT Programmer.<br />
Ensure that the cable is plugged in to the computer and that the ribbon<br />
cable/flying leads are connected properly to the board.<br />
You must also connect the power jack of the Parallel-IV cable to either the<br />
mouse or keyboard port of the PC.<br />
If the chain specified in the design is not automatically picked up from the<br />
ISE tool, right-click in the top half of the iMPACT window and select Add Xilinx<br />
Device.<br />
Browse to the location of the project (c:\designs\traffic) and change the file<br />
type to .bit.<br />
Open “top.bit” (“top_sch.bit” for schematic designs). The iMPACT Programmer<br />
has drawn a picture of the programming chain.<br />
Click on the picture of the device.<br />
From the Operations Menu, select Program.<br />
Summary<br />
This chapter has taken the VHDL or Schematic design through to a working<br />
physical device. The steps discussed were:<br />
• Synthesis and Synthesis report<br />
• Timing and Physical Constraints using the Constraints Editor<br />
• The Reports Generated throughout the Implementation flow<br />
• Timing Simulation<br />
• Creating and Downloading a bitstream.<br />
Xilinx • 159
PROGRAMMABLE LOGIC DESIGN -- QUICK START HANDBOOK • CHAPTER 6<br />
Xilinx • 160
C HAPTER 7<br />
<strong>Design</strong> Reference Bank<br />
Introduction<br />
Our final chapter contains a useful list of design examples and applications<br />
that will give you a good jump start into your future programmable logic<br />
designs.<br />
We selected the application examples from a comprehensive list of application<br />
notes available from the Xilinx website, as well as extracts from the Xilinx<br />
quarterly magazine, the Xcell Journal (To subscribe, click on “Subscribe to Xcell<br />
Journal” at www.xilinx.com/publications/xcellonline/).<br />
This section will also give you pointers on where to look for and download<br />
code and search for IP from the Xilinx website.<br />
Get the Most out of Microcontroller-Based <strong>Design</strong>s<br />
Microcontrollers don’t make the world go round, but they most certainly<br />
help us get around in the world. You can find microcontrollers in automobiles,<br />
microwave ovens, automatic teller machines, VCRs, point-of-sale terminals,<br />
robotic devices, wireless telephones, home security systems, and satellites, to<br />
name just a few applications.<br />
In the never-ending quest for faster, better, and cheaper products, advanced<br />
designers are now pairing CPLDs with microcontrollers to take advantage of<br />
the strengths of each.<br />
Microcontrollers are naturally good at sequential processes and computationally<br />
intensive tasks, as well as a host of non-time-critical tasks.
PROGRAMMABLE LOGIC DESIGN -- QUICK START HANDBOOK •<br />
CPLDs such as Xilinx CoolRunner devices are ideal for parallel processing,<br />
high-speed operations, and applications where lots of inputs and outputs are<br />
required.<br />
Although faster and more powerful microcontrollers do exist, 8-bit microcontrollers<br />
own much of the market because of their low cost and low power<br />
characteristics.<br />
The typical operational speed is around 20 MHz, but some microcontroller<br />
cores divide clock frequency internally and use multiple clock cycles per<br />
instruction (operations often include fetch-and-execute instruction cycles).<br />
Thus, with a clock division of 2 – with each instruction taking as long as<br />
three cycles – the actual speed of a 20 MHz microcontroller is divided by 6. This<br />
works out to an operational speed of only 3.33 MHz.<br />
CoolRunner CPLDs are much, much faster than microcontrollers and can<br />
easily reach system speeds in excess of 100 MHz. Today, we are even seeing<br />
CoolRunner devices with input-to-output delays as short as 3.5 ns, which<br />
equates to impressive system speeds as fast as 285 MHz.<br />
CoolRunner CPLDs make ideal partners for microcontrollers, because they<br />
not only can perform high-speed tasks, they can perform those tasks with ultralow<br />
power consumption.<br />
Xilinx offers free software and low-cost hardware design tools to support<br />
CPLD integration with microcontrollers.<br />
The Xilinx CPLD design process is quite similar to that used on microcontrollers,<br />
you can quickly learn how to partition your designs across a CPLD and<br />
microcontroller to maximum advantage.<br />
So far, a design partition over a microcontroller and a CPLD sounds good in<br />
theory, but will it work in the field<br />
We will devote the rest of this chapter to design examples that show how<br />
you can enhance a typical microcontroller design by utilizing the computational<br />
strengths of the microcontroller and the speed of a CoolRunner CPLD.<br />
CONVENTIONAL STEPPER MOTOR CONTROL<br />
A frequent use of microcontrollers is to run stepper motors. Figure 7-1<br />
depicts a typical four-phase stepper motor driving circuit. The four windings<br />
have a common connection to the motor supply voltage (Vss), which typically<br />
ranges from 5V to 30V.<br />
• 162
DESIGN REFERENCE BANK<br />
A high-powered NPN transistor drives each of the four phases. (Incidentally,<br />
MOSFETs can also be used to drive stepper motors.)<br />
FIGURE 7-1:<br />
STEPPER MOTOR CONTROLLER<br />
Each motor phase current may range from 100 mA to as much as 10A. The<br />
transistor selection depends on the drive current, power dissipation, and gain.<br />
The series resistors should be selected to limit the current to 8 mA per output<br />
to suit either the microcontroller or CPLD outputs. The basic control<br />
sequence of a four-phase motor is achieved by activating one phase at a time.<br />
At the low-cost end, the motor rotor rotates through 7.5 degrees per step, or<br />
48 steps per revolution.<br />
More accurate, higher cost versions have a basic resolution of 1.8 degrees<br />
per step.<br />
Furthermore, it is possible to half-step these motors to achieve a resolution<br />
of 0.9 degrees per step. Stepper motors tend to have a much lower torque than<br />
other motors, which is advantageous in precise positional control.<br />
•163
PROGRAMMABLE LOGIC DESIGN -- QUICK START HANDBOOK •<br />
The examples that follow show how either a microcontroller or a CPLD can<br />
control stepper motor tasks to varying degrees of accuracy. As Figure 7-2 illustrates,<br />
the design flow for both is quite similar.<br />
FIGURE 7-2:<br />
DESIGN FLOW COMPARISON<br />
Both flows start with text entry. Assembly language targets microcontrollers;<br />
the ABEL hardware description language targets PLDs.<br />
After entering the text “description,” the design is either compiled (microcontroller)<br />
or synthesized (PLD). Next, the design is verified by some form of<br />
simulation or test.<br />
Once verified, the design is downloaded to the target device – either a<br />
microcontroller or PLD. We can then program the devices in-system using an<br />
inexpensive ISP cable.<br />
One of the advantages of a PLD over a microcontroller occurs during<br />
board-level testing. Using a JTAG Boundary Scan, the PLD can be fully tested<br />
on the board. The PLD can also be used as a “gateway” to test the rest of the<br />
board’s functionality. After the board-level test is completed, the PLD can then<br />
be programmed with the final code in-system via the JTAG port.<br />
Microcontrollers can include monitor debug code internal to the device for<br />
limited code testing and debugging. With the advent of flash-based microcontrollers,<br />
these can now also be programmed in-system.<br />
• 164
DESIGN REFERENCE BANK<br />
USING A MICROCONTROLLER TO CONTROL A STEPPER MOTOR<br />
Figure 7-3 shows assembly language targeting a Philips 80C552 microcontroller.<br />
The stepper motor that the microcontroller will control has four sets of coils.<br />
When logic level patterns are applied to each set of coils, the motor steps<br />
through its angles.<br />
The speed of the stepper motor shaft depends on how fast the logic level<br />
patterns are applied to the four sets of coils. The manufacturer’s motor specification<br />
data sheet provides the stepping motor code.<br />
A very common stepping code is given by the following hexadecimal numbers:<br />
A 9 5 6<br />
Each hex digit is equal to four binary bits:<br />
1010 1001 0101 0110<br />
These binary bits represent voltage levels applied to each of the coil driver<br />
circuits. The steps are:<br />
1010 5V 0V 5V 0V<br />
1001 5V 0V 0V 5V<br />
0101 0V 5V 0V 5V<br />
0110 0V 5V 5V 0V<br />
If you send this pattern repeatedly, then the motor shaft rotates.<br />
•165
PROGRAMMABLE LOGIC DESIGN -- QUICK START HANDBOOK •<br />
The assembly language program in Figure 7-3 continually rotates the stepper<br />
motor shaft. By altering the value of R0 in the delay loop, this will give fine<br />
control over speed; altering the value of R1 will give coarse variations in speed.<br />
FIGURE 7-3:<br />
ASSEMBLY LANGUAGE PROGRAM TO ROTATE THE STEPPER MOTOR SHAFT<br />
STEPPER MOTOR CONTROL USING A CPLD<br />
Figure 7-4 shows a design written in ABEL hardware description language.<br />
Within the Xilinx CPLD, four inputs are required to fully control the stepper<br />
motor. The CLK input synchronizes the logic and determines the speed of rotation.<br />
The motor advances one step per clock period.<br />
The angle of rotation of the shaft will depend on the specific motor used.<br />
The direction (DIR) control input changes the sequence at the outputs (PH1 to<br />
PH4) to reverse the motor direction.<br />
The enable input (EN) determines whether the motor is rotating or holding.<br />
The active low reset input (RST) initializes the circuit to ensure that the correct<br />
starting sequence is provided to the outputs.<br />
-- Stepper Motor Controller<br />
library IEEE;<br />
use IEEE.std_logic_1164.all;<br />
entity step1 is<br />
• 166
DESIGN REFERENCE BANK<br />
port (<br />
clk : in std_logic; -- input to determine speed of rotation<br />
rst : in std_logic; -- resets and initializes the circuit<br />
en : in std_logic; -- determines whether motor rotating or holding<br />
dir : in std_logic; -- motor direction control<br />
ph1 : inout std_logic; -- output to motor phase 1<br />
ph2 : inout std_logic; -- output to motor phase 2<br />
ph3 : inout std_logic; -- output to motor phase 3<br />
ph4 : inout std_logic -- output to motor phase 4<br />
);<br />
end step1;<br />
architecture equation of step1 is<br />
begin<br />
Process (rst,clk)<br />
begin<br />
if rst = ’0’ then<br />
ph1
PROGRAMMABLE LOGIC DESIGN -- QUICK START HANDBOOK •<br />
FIGURE 7-4:<br />
CPLD ABEL PROGRAM TO CONTROL A STEPPER MOTOR<br />
The phase equations (PH1 to PH4) are written with a colon and equal sign<br />
(:=) to indicate a registered implementation of the combinatorial equation.<br />
Each phase equation is either enabled (EN), indicating that the motor is<br />
rotating, or disabled (!EN), indicating that the current active phase remains on<br />
and the motor is locked.<br />
The value of the direction input (DIR) determines which product term is<br />
used to sequence clockwise or counterclockwise. The asynchronous equations<br />
(for example, ph1.AR=!rst) initialize the circuit.<br />
The ABEL hardware description motor control module can be embedded<br />
within a macro function and saved as a reusable standard logic block, which can<br />
be shared by many designers within the same organization – this is the beauty<br />
of design reuse.<br />
This “hardware” macro function is independent of any other function or<br />
event not related to its operation. Therefore, it cannot be affected by extraneous<br />
system interrupts or other unconnected system state changes.<br />
Such independence is critical in safety systems. Extraneous system interrupts<br />
in a purely software-based system could cause indeterminate states that<br />
are hard to test or simulate.<br />
PC-BASED MOTOR CONTROL<br />
Our next example (Figure 7-5 and Figure 7-6) is more complex, because<br />
now the motor is connected to a PC-based system via an RS-232 serial connection.<br />
This implementation has a closed loop system controlling rotation, speed,<br />
and direction.<br />
There is also the addition of a safety-critical emergency stop, which has the<br />
highest level of system interrupt. This means that if the emergency stop is acti-<br />
• 168
DESIGN REFERENCE BANK<br />
vated, it will override any other process or interrupt and will immediately stop<br />
the motor from rotating.<br />
FIGURE 7-5:<br />
DESIGN PARTITIONING<br />
FIGURE 7-6:<br />
MICROCONTROLLER IMPLEMENTATION<br />
•169
PROGRAMMABLE LOGIC DESIGN -- QUICK START HANDBOOK •<br />
This design solution purely uses a microcontroller. The main functions it<br />
performs are:<br />
• Interrupt control<br />
• Status feedback to the PC<br />
• Accurate motor control.<br />
This configuration would probably be implemented in a single microcontroller<br />
device with specific motor control peripherals, such as a capture-compare<br />
unit.<br />
This configuration would also need a built-in UART. These extra functions<br />
usually add extra cost to the overall microcontroller device.<br />
Due to the nature of the microcontroller, the interrupt handling must be<br />
thoroughly mapped out, because interrupts could affect the speed of the motor.<br />
In a safety-critical system, emergency stops implemented in software<br />
require exhaustive testing and verification before they can be used in the final<br />
system to ensure that they operate properly under all software related conditions,<br />
including software bugs and potential software states.<br />
The output from the motor rotation sensor is very fast, so control of the<br />
speed of the motor could cause problems if system interrupts occurred.<br />
DESIGN PARTITIONING<br />
As we noted before, microcontrollers are very good at computational tasks,<br />
and CPLDs are excellent in high-speed systems, with their abundance of I/Os.<br />
• 170
DESIGN REFERENCE BANK<br />
Figure 7-7 shows how we can use a microcontroller and a CPLD in a partitioned<br />
design to achieve the greatest control over a stepper motor.<br />
FIGURE 7-7:<br />
PARTITIONED DESIGN: MICROCONTROLLER AND CPLD<br />
The microcontroller:<br />
• Interprets ASCII commands from the PC.<br />
• Reports status of the motor to the PC.<br />
• Converts required speed into control vectors (small mathematical<br />
algorithm).<br />
• Decides direction of rotation of the motor.<br />
• Computes stop point and sets a value into the pulse count comparison<br />
register.<br />
• Monitors progress (control loop) and adapts speed.<br />
• Recovers from emergency stops.<br />
Although the microcontroller performs recovery from emergency stops, the<br />
actual emergency stop is implemented by the CPLD, because this is the safetycritical<br />
part of the design.<br />
Because the CPLD is considered independent hardware, safety-critical<br />
proving and sign-off are more straightforward than software safety systems.<br />
Additionally, all of the high-speed interface functions are also implemented<br />
in the CPLD, because it is very fast and has abundant inputs and outputs.<br />
Meanwhile, the UART and FIFO sections of the design can be implemented<br />
in the microcontroller in the form of a microcontroller peripheral, or imple-<br />
•171
PROGRAMMABLE LOGIC DESIGN -- QUICK START HANDBOOK •<br />
mented in a larger, more granular PLD such as an FPGA – for example, a Xilinx<br />
Spartan device.<br />
Using a PLD in this design has the added benefit of gaining the ability to<br />
absorb any other discrete logic elements on the PCB or in the total design into<br />
the CPLD.<br />
Under this new configuration, we can consider the CPLD as offering hardware-based<br />
subroutines or as a mini co-processor.<br />
The microcontroller still performs ASCII string manipulation and mathematical<br />
functions, but it now has more time to perform these operations – without<br />
interruption. The motor control is now independently stable and safe.<br />
Microcontroller/CPLD design partitioning can reduce overall system costs.<br />
This solution uses low-cost devices to implement the functions they do best –<br />
computational functions in the microcontroller and high-speed, high I/O tasks<br />
in the CPLD.<br />
In safety-critical systems, why not put the safety-critical functions in “hardware”<br />
(CPLDs) to cut down on safety system approval time scales<br />
System testing can also be made easier by implementing the difficult-tosimulate<br />
interrupt handling into programmable logic.<br />
Low-cost microcontrollers are now in the region of US $1.00, but if your<br />
design requires extra peripherals (for example, a capture-compare unit for accurate<br />
motor control, ADCs, or UARTs), this can quadruple the cost of your microcontroller.<br />
A low cost microcontroller coupled with a low cost CPLD from Xilinx can<br />
deliver the same performance at approximately half the cost.<br />
In low-power applications, microcontrollers are universally accepted as<br />
low-power devices and have been the automatic choice of designers.<br />
The CoolRunner family of ultra-low power CPLDs are an ideal fit in this<br />
arena and may be used to complement your low-power microcontroller to integrate<br />
designs in battery-powered, portable designs (
DESIGN REFERENCE BANK<br />
Full-functioning software design tools for Xilinx CPLDs are free of charge<br />
and may be downloaded from the Xilinx website. Thus, your first project using<br />
CPLDs can be not only quick and painless, but very cost-effective as well.<br />
(Excerpted from the Xilinx Xcell Journal, Issue 39, Spring 2001.)<br />
Documentation and Example Code<br />
The following is a list of selected application notes, white papers, tutorials,<br />
and example code that can be downloaded from the Xilinx website.<br />
This list grows longer as more applications are developed. For the latest list,<br />
please visit www.xilinx.com/apps/appsweb.htm.<br />
TABLE 7-1: DOCUMENTATION LIST<br />
Title Number Family<br />
<strong>Design</strong><br />
Code<br />
Embedded Instrumentation<br />
Using XC9500 CPLDs<br />
Configuring Xilinx FPGAs<br />
Using an XC9500 CPLD and<br />
Parallel PROM<br />
Xilinx FPGAs: A Technical<br />
Overview for the First-Time<br />
User<br />
Choosing a Xilinx Product<br />
Family<br />
XAPP076<br />
XAPP079<br />
XAPP097<br />
XAPP100<br />
XC9500<br />
XC9500<br />
FPGA<br />
All<br />
XC9500 Remote Field Upgrade XAPP102 XC9500<br />
A <strong>Quick</strong> JTAG ISP Checklist XAPP104 XC9500<br />
A CPLD VHDL Introduction XAPP105 XC9500<br />
Adapting ASIC <strong>Design</strong>s for<br />
Use with Spartan FPGAs<br />
170 MHz FIFOs using the<br />
Virtex Block SelectRAM+<br />
Feature<br />
XAPP119<br />
XAPP131<br />
Spartan<br />
Virtex<br />
Synthesizable High-<br />
Performance SDRAM<br />
Controllers<br />
XAPP134 Virtex FREE<br />
VHDL<br />
and<br />
Verilog<br />
•173
PROGRAMMABLE LOGIC DESIGN -- QUICK START HANDBOOK •<br />
TABLE 7-1: DOCUMENTATION LIST (CONTINUED)<br />
Synthesizable 200 MHz ZBT<br />
SRAM Interface<br />
Virtex Synthesizable Delta-<br />
Sigma DAC v 1.1<br />
MP3 NG: A Next Generation<br />
Consumer Platform<br />
Implementing an ISDN<br />
PCMCIA Modem Using<br />
Spartan Device, v1.0<br />
Title Number Family<br />
Using Delay-Locked Loops in<br />
Spartan-II FPGAs<br />
High Speed FIFOs In Spartan-II<br />
FPGAs<br />
IDCT Implementation in Virtex<br />
Devices for MPEG<br />
Applications, v 1.1<br />
PicoBlaze 8-Bit Microcontroller<br />
for Virtex Devices<br />
CoolRunner Visor Springboard<br />
LED Test v1.1<br />
CoolRunner XPLA3 SMBus<br />
Controller Implementation<br />
CoolRunner CPLD3 CPLD<br />
8051 Microcontroller Interface<br />
XAPP136 Virtex FREE<br />
VHDL<br />
and<br />
Verilog<br />
XAPP154<br />
XAPP169<br />
XAPP170<br />
Virtex<br />
Spartan-II<br />
Spartan<br />
XAPP174 Spartan-II FREE<br />
VHDL<br />
and<br />
Verilog<br />
XAPP175 Spartan-II FREE<br />
VHDL<br />
and<br />
Verilog<br />
XAPP208 Virtex FREE<br />
VHDL<br />
XAPP213<br />
XAPP357<br />
Virtex and<br />
Spartan<br />
CoolRunner<br />
<strong>Design</strong><br />
Code<br />
XAPP353 CoolRunner FREE<br />
VHDL<br />
and<br />
Verilog<br />
XAPP349 CoolRunner FREE<br />
VHDL<br />
and<br />
Verilog<br />
• 174
DESIGN REFERENCE BANK<br />
TABLE 7-1: DOCUMENTATION LIST (CONTINUED)<br />
CoolRunner Serial Peripheral<br />
Interface Master v1.2<br />
XAPP348 CoolRunner FREE<br />
VHDL<br />
and<br />
Verilog<br />
UARTs in Xilinx CPLDs XAPP341 CoolRunner FREE<br />
VHDL<br />
and<br />
Verilog<br />
<strong>Design</strong> of a 16b/20b<br />
Encoder/Decoder Using a<br />
CoolRunner XPLA3 CPLD<br />
CoolRunner CPLD I2C Bus<br />
Controller Implementation<br />
Manchester Encoder-Decoder<br />
for Xilinx CPLDs v1.3<br />
<strong>Design</strong> of a MP3 Portable<br />
Player Using a CoolRunner<br />
CPLD<br />
Content Addressable Memory<br />
(CAM)<br />
in ATM Applications<br />
Virtex Analog to Digital<br />
Converter v1.1<br />
Title Number Family<br />
<strong>Design</strong> an Eight Channel<br />
Digital Volt Meter with a<br />
Springboard Development Kit<br />
XAPP336 CoolRunner FREE<br />
VHDL<br />
and<br />
Verilog<br />
XAPP333 CoolRunner FREE<br />
VHDL<br />
and<br />
Verilog<br />
XAPP339 CoolRunner FREE<br />
VHDL<br />
and<br />
Verilog<br />
XAPP328 CoolRunner FREE<br />
VHDL<br />
and<br />
Verilog<br />
XAPP202<br />
XAPP155<br />
Virtex, Virtex-<br />
II<br />
Virtex<br />
<strong>Design</strong><br />
Code<br />
FREE<br />
VHDL<br />
and<br />
Verilog<br />
XAPP146 CoolRunner FREE<br />
VHDL<br />
and<br />
Verilog<br />
•175
PROGRAMMABLE LOGIC DESIGN -- QUICK START HANDBOOK •<br />
TABLE 7-1: DOCUMENTATION LIST (CONTINUED)<br />
• 176<br />
Exemplar/ModelSim Tutorial<br />
for CPLDs<br />
Workstation Flow for Xilinx<br />
CoolRunner CPLDs<br />
OrCAD/ModelSim Tutorial for<br />
CPLDs<br />
Understanding the<br />
CoolRunner-II Timing Model<br />
Understanding the<br />
CoolRunner-II <strong>Logic</strong> Engine<br />
Using CoolRunner-II<br />
Advanced Features<br />
High Speed <strong>Design</strong> with<br />
CoolRunner-II CPLDs<br />
Powering CoolRunner-II<br />
CPLDs<br />
Low Power <strong>Design</strong> with<br />
CoolRunner-II CPLDs<br />
Tutorial<br />
Tutorial<br />
Tutorial<br />
XAPP375<br />
XAPP376<br />
CPLDs<br />
CPLDs<br />
CPLDs<br />
CoolRunner-II<br />
CoolRunner-II<br />
XAPP378 CoolRunner-II FREE<br />
HDL<br />
XAPP379<br />
XAPP389<br />
XAPP377<br />
CoolRunner-II<br />
CoolRunner-II<br />
CoolRunner-II<br />
Title Number Family <strong>Design</strong><br />
Code<br />
CoolRunner-II I/O<br />
Characteristics<br />
Title Number Family<br />
5V Tolerance Techniques for<br />
CoolRunner-II Devices<br />
Building Crosspoint Switches<br />
with CoolRunner-II CPLD<br />
Telematics Digital<br />
Convergence – How to Cope<br />
with Emerging Standards and<br />
Protocols<br />
CipherStream Protocol: How<br />
CoolRunner-II CPLDs Protect<br />
FPGA IP v1.0<br />
XAPP382<br />
XAPP429<br />
CoolRunner-II<br />
CoolRunner-II<br />
XAPP380 CoolRunner-II FREE<br />
HDL<br />
WP194<br />
WP197<br />
All Products<br />
CoolRunner-II<br />
<strong>Design</strong><br />
Code
DESIGN REFERENCE BANK<br />
TABLE 7-1: DOCUMENTATION LIST (CONTINUED)<br />
Using CoolRunner CPLDs in<br />
Smart Card Reader<br />
Applications<br />
Could Automotive Processor<br />
Obsolescence be History<br />
Spartan-II Family as a Memory<br />
Controller for QDR-SRAMs<br />
Xilinx Spartan-II FIR Filter<br />
Solution<br />
Title Number Family<br />
WP118<br />
WP169<br />
WP111<br />
WP116<br />
CoolRunner-II<br />
All Products<br />
Spartan-II<br />
Spartan-II<br />
<strong>Design</strong><br />
Code<br />
Website Reference<br />
The following table is a summary of useful websites and web pages that<br />
could help you with your programmable logic designs.<br />
TABLE 7-2:<br />
WEBSITE SUMMARY<br />
Website/Page Topic Resources Available<br />
www.xilinx.com<br />
General Xilinx<br />
Website<br />
Product data, investor<br />
information,<br />
application notes<br />
www.support.xilinx.com Technical Support Comprehensive<br />
resource for all<br />
technical support<br />
www.xilinx.com/ipcenter IP Search Engine Xilinx and third-party<br />
IP and cores<br />
www.xilinx.com/esp<br />
Emerging<br />
Standards and<br />
Protocol web<br />
portal<br />
Resource portal,<br />
including data on<br />
home networking and<br />
Bluetooth – white<br />
papers, application<br />
notes, reference<br />
designs, block<br />
diagrams, “ask the<br />
experts,” links to<br />
industry websites<br />
•177
PROGRAMMABLE LOGIC DESIGN -- QUICK START HANDBOOK •<br />
TABLE 7-2:<br />
www.xilinx.com/support/<br />
education-home.htm<br />
http://xup.msu.edu<br />
WEBSITE SUMMARY (CONTINUED)<br />
Website/Page Topic Resources Available<br />
www.xilinx.com/support/<br />
searchtd.htm<br />
http://university.xilinx.co<br />
m/univ/xsefaq1.htm<br />
http://toolbox.xilinx.com/<br />
cgi-bin/forum<br />
Customer<br />
Education<br />
University<br />
Program<br />
Answers Database<br />
Student Edition<br />
FAQ<br />
Forums and Chat<br />
Rooms<br />
List of customer<br />
courses and types<br />
available<br />
www.model.com Simulation Model Technology<br />
www.optimagic.com/ <strong>Programmable</strong><br />
<strong>Logic</strong> Jump<br />
Station<br />
• 178
ACRONYMS<br />
ABEL<br />
ADC<br />
AIM<br />
ANSI<br />
ASIC<br />
ASSP<br />
ATE<br />
BGA<br />
BLVDS<br />
BUFG<br />
CAD<br />
CAN<br />
CBT<br />
CDMA<br />
CE<br />
CLB<br />
CLK<br />
CMOS<br />
CPLD<br />
CPLD<br />
CSP<br />
DCI<br />
DCM<br />
DCM<br />
DES<br />
DRAM<br />
DRC<br />
DSL<br />
DSP<br />
DTV<br />
ECS<br />
EDA<br />
EDIF<br />
Advanced Boolean Expression Language<br />
Analog-to-Digital Converter<br />
Advanced Interconnect Matrix<br />
American National Standards Institute<br />
Application Specific Integrated Circuit<br />
Application Specific Standard Product<br />
Automatic Test Equipment<br />
Ball Grid Array<br />
Backplane Low Voltage Differential Signaling<br />
Global Clock Buffer<br />
Computer Aided <strong>Design</strong><br />
Controller Area Network<br />
Computer Based Training<br />
Code Division Multiple Access<br />
Clock Enable<br />
Configurable <strong>Logic</strong> Block<br />
Clock Signal<br />
Complementary Metal Oxide Semiconductor<br />
Complex <strong>Programmable</strong> <strong>Logic</strong> Device<br />
Complex <strong>Programmable</strong> <strong>Logic</strong> Device<br />
Chip Scale Packaging<br />
Digitally Controlled Impedance<br />
Digital Clock Manager<br />
Digital Control Management<br />
Data Encryption Standard<br />
Dynamic Random Access Memory<br />
<strong>Design</strong> Rule Checker<br />
Digital Subscriber Line<br />
Digital Signal Processor<br />
Digital Television<br />
Schematic Editor<br />
Electronic <strong>Design</strong> Automation<br />
Electronic Digital Interchange Format<br />
Xilinx • 179
PROGRAMMABLE LOGIC DESIGN -- QUICK START HANDBOOK •<br />
EMI Electromagnetic Interference<br />
EPROM Erasable <strong>Programmable</strong> Read Only Memory<br />
eSP emerging Standards and Protocols<br />
FAT File Allocation Table<br />
FIFO First In First Out<br />
FIRFinite Impulse Response (Filter)<br />
FIT Failures in Time<br />
FLBGA Flip Chip Ball Grid Array<br />
fMax Frequency Maximum<br />
FPGA Field <strong>Programmable</strong> Gate Array<br />
FSM Finite State Machine<br />
GPS Global Positioning System<br />
GTL Gunning Transceiver <strong>Logic</strong><br />
GTLP Gunning Transceiver <strong>Logic</strong> Plus<br />
GUI Graphical User Interface<br />
HDL Hardware Description Language<br />
HDTV High Definition Television<br />
HEX Hexadecimal<br />
HSTL High Speed Transceiver <strong>Logic</strong><br />
I/O Inputs and Outputs<br />
IBIS I/O Buffer Information Specification<br />
IEEE Institute of Electrical and Electronics Engineers<br />
ILA Integrated <strong>Logic</strong> Analyzer<br />
IOB Input Output Block<br />
IP Intellectual Property<br />
IRL Internet Reconfigurable <strong>Logic</strong><br />
ISE Integrated Software Environment<br />
ISP In System Programming<br />
JEDEC Joint Electron Device Engineering Council<br />
JTAG Joint Test Advisory Group<br />
LAN Local Area Network<br />
LEC <strong>Logic</strong> Equivalence Checker<br />
LMG <strong>Logic</strong> Modeling Group<br />
LSB Least Significant Bit<br />
LUT Look Up Table<br />
LVCMOS Low Voltage Complementary Metal Oxide Semiconductor<br />
Xilinx • 180
ACRONYMS<br />
LVDS Low Voltage Differential Signaling<br />
LVDSEXT Low Voltage Differential Signaling Extension<br />
LVPECL Low Voltage Positive Emitter Coupled <strong>Logic</strong><br />
LVTTL Low Voltage Transistor to Transistor <strong>Logic</strong><br />
MAC Multiply and Accumulate<br />
MAN Metropolitan Area Network<br />
MCS Manipulate Comment Section<br />
MIL Military<br />
MOSFET Metal Oxide Semiconductor Field Effect Transistors<br />
MP3 MPEG Layer III Audio Coding<br />
MPEG Motion Picture Experts Group<br />
MSB Most Significant Bit<br />
MUX Multiplexer<br />
NAND Not And<br />
NGC Native Generic Compiler<br />
NRE Non-Recurring Engineering (Cost)<br />
OE Output Enable<br />
OTP One Time <strong>Programmable</strong><br />
PACE Pinout and Area Constraints Editor<br />
PAL <strong>Programmable</strong> Array <strong>Logic</strong><br />
PCB Printed Circuit Board<br />
PCI Peripheral Component Interconnect<br />
PCMCIA Personal Computer Memory Card International Association<br />
PCS Personnel Communications System<br />
PLA <strong>Programmable</strong> <strong>Logic</strong> Array<br />
PLD <strong>Programmable</strong> <strong>Logic</strong> Device<br />
PROM <strong>Programmable</strong> Read Only Memory<br />
QFP Quad Flat Pack<br />
QML Qualified Manufacturers Listing<br />
QPRO QML Performance Reliability of Supply Off the Shelf ASIC<br />
RAM Random Access Memory<br />
RC Radio Controlled<br />
ROM Read Only Memory<br />
SOP Sum of Product<br />
SPLD Simple <strong>Programmable</strong> <strong>Logic</strong> Device<br />
SRAM Static Random Access Memory<br />
Xilinx • 181
PROGRAMMABLE LOGIC DESIGN -- QUICK START HANDBOOK •<br />
SRL16 Shift Register LUT<br />
SSTL Stub Series Terminated Transceiver <strong>Logic</strong><br />
TIM Time in Market<br />
Tpd Time of Propagation Delay (through the device)<br />
TQFP Thin Quad Flat Pack<br />
TTM Time to Market<br />
UCF User Constraints File<br />
UMTS Universal Mobile Telecommunications System<br />
UV Ultraviolet<br />
VCCO Voltage Current Controlled Oscillator<br />
VFM Variable Function Multiplexer<br />
VHDL VHISC High Level Description Language<br />
VHSIC Very High Speed Integrated Circuit<br />
VREF Voltage Reference<br />
VSS Visual Software Solutions<br />
WAN Wireless Area Network<br />
WLAN Wireless Local Access Network<br />
WPU Weak Pull Up<br />
XCITE Xilinx Controlled Impedance Technology<br />
XORExclusive OR<br />
XST Xilinx Synthesis Technology<br />
ZIA Zero Power Interconnect Array<br />
Xilinx • 182
PROGRAMMABLE LOGIC DESIGN -- QUICK START HANDBOOK •<br />
Xilinx • 184
Glossary of Terms<br />
GLOSSARY OF TERMS<br />
ABEL – Advanced Boolean Expression Language, low-level language for<br />
design entry, from Data I/O.<br />
AIM – Advanced Interconnect Matrix in the CoolRunner-II CPLD that provides<br />
the flexible interconnection between the PLA function blocks.<br />
Antifuse – A small circuit element that can be irreversibly changed from<br />
being non-conducting to being conducting with ~100 Ohm. Anti-fuse-based<br />
FPGAs are thus non-volatile and can be programmed only once (see OTP).<br />
AQL – Acceptable Quality Level. The relative number of devices, expressed<br />
in parts-per-million (ppm), that might not meet specification or be defective.<br />
Typical values are around 10 ppm.<br />
ASIC – Application Specific Integrated Circuit, also called a gate array.<br />
Asynchronous logic that is not synchronized by a clock. Asynchronous designs<br />
can be faster than synchronous ones, but are more sensitive to parametric<br />
changes and are thus less robust.<br />
ASSP – Application-Specific Standard Product. Type of high-integration<br />
chip or chipset ASIC that is designed for a common yet specific application.<br />
ATM – Asynchronous Transfer Mode. A very high-speed (megahertz to<br />
gigahertz) connection-oriented bit-serial protocol for transmitting data and realtime<br />
voice and video in fixed-length packets (48-byte payload, 5-byte header).<br />
Back Annotation – Automatically attaching timing values to the entered<br />
design format after the design has been placed and routed in an FPGA.<br />
Behavioral Language – Top-down description from an even higher level<br />
than VHDL.<br />
Block RAM – A block of 2k to 4k bits of RAM inside an FPGA. Dual-port<br />
and synchronous operation are desirable.<br />
CAD – Computer Aided <strong>Design</strong>, using computers to design products.<br />
CAE – Computer Aided Engineering, analyses designs created on a computer.<br />
CLB – Configurable <strong>Logic</strong> Block. Xilinx-specific name for a block of logic<br />
surrounded by routing resources. A CLB contains two or four LUTs (function<br />
generators) plus two or four flip-flops.<br />
CMOS – Complementary Metal-Oxide-Silicon. Dominant technology for<br />
logic and memory. Has replaced the older bipolar TTL technology in most<br />
applications (except very fast ones). CMOS offers lower power consumption<br />
and smaller chip sizes compared to bipolar and now meets or even beats TTL<br />
speed.<br />
Xilinx • 183
PROGRAMMABLE LOGIC DESIGN -- QUICK START HANDBOOK •<br />
Xilinx • 184<br />
Compiler – software that converts a higher language description into a<br />
lower-level representation. For FPGAs: the complete partition, place and route<br />
process.<br />
Configuration – The internally stored file that controls the FPGA so that it<br />
performs the desired logic function. Also, the act of loading an FPGA with that<br />
file.<br />
Constraints – Performance requirements imposed on the design, usually in<br />
the form of max allowable delay, or required operating frequency.<br />
CoolCLOCK – Combination of the clock divider and clock doubler functions<br />
in CoolRunner-II CPLDs to further reduce power consumption associated<br />
with high-speed clocked-in internal device networks.<br />
CPLD – Complex <strong>Programmable</strong> <strong>Logic</strong> Device, synonymous with EPLD.<br />
PAL-derived programmable logic devices that implement logic as sum-of-products<br />
driving macrocells. CPLDs are known to have short pin-to-pin delays, and<br />
can accept wide inputs, but have relatively high power consumption and fewer<br />
flip-flops compared to FPGAs.<br />
CUPL – Compiler Universal for <strong>Programmable</strong> <strong>Logic</strong>, CPLD development<br />
tool available from <strong>Logic</strong>al Devices.<br />
DataGATE – A function within CoolRunner-II devices to block free-running<br />
input signals, effectively blocking controlled switching signals so they do<br />
not drive internal chip capacitances to further reduce power consumption. Can<br />
be selected on all inputs.<br />
Input Hysteresis – Input hysteresis provides designers with a tool to minimize<br />
external components, whether using the inputs to create a simple clock<br />
source or reducing the need for external buffers to sharpen a slow or noisy input<br />
signal. Function found in CoolRunner-II CPLDs (may also be referred to as<br />
Schmitt Trigger inputs in the text).<br />
DCM – Digital Clock Manager. Provides zero-delay clock buffering, precise<br />
phase control, and precise frequency generation on Xilinx Virtex-II FPGAs.<br />
DCI – Digitally Controlled Impedance in the Virtex-II solution dynamically<br />
eliminates drive strength variation due to process, temperature, and voltage<br />
fluctuation. DCI uses two external high-precision resistors to incorporate equivalent<br />
input and output impedance internally for hundreds of I/O pins.<br />
Debugging – The process of finding and eliminating functional errors in<br />
software and hardware.<br />
Density – Amount of logic in a device, often used to mean capacity. Usually<br />
measured in gates, but for FPGAs, better expressed in logic cells, each consisting<br />
of a 4-input LUT and a flip-flop.<br />
DLL – Delay Locked Loop, A digital circuit used to perform clock management<br />
functions on- and off-chip.<br />
DRAM – Dynamic Random Access Memory. A low-cost/read-write memory<br />
where data is stored on capacitors and must be refreshed periodically.
GLOSSARY OF TERMS<br />
DRAMs are usually addressed by a sequence of two addresses – row address<br />
and column address – which makes them slower and more difficult to use than<br />
SRAMs.<br />
DSP – Digital Signal Processing. The manipulation of analog data that has<br />
been sampled and converted into a digital representation. Examples are filtering,<br />
convolution, and Fast Fourier Transform<br />
EAB – Embedded Array Block. Altera name for block RAM in FLEX10K.<br />
EDIF – Electronic Data Interchange Format. Industry-standard for specifying<br />
a logic design in text (ASCII) form.<br />
EPLD – Erasable <strong>Programmable</strong> <strong>Logic</strong> Devices, synonymous with CPLDs.<br />
PAL-derived programmable logic devices that implement logic as sum-of-products<br />
driving macrocells. EPLDs are known to have short pin-to-pin delays, and<br />
can accept wide inputs, but have relatively high power consumption and fewer<br />
flip-flops than FPGAs.<br />
Embedded RAM – Read-write memory stored inside a logic device.<br />
Avoids the delay and additional connections of an external RAM.<br />
ESD – Electro-Static Discharge. High-voltage discharge can rupture the<br />
input transistor gate oxide. ESD-protection diodes divert the current to the supply<br />
leads.<br />
5-Volt Tolerant – Characteristic of the input or I/O pin of a 3.3V device that<br />
allows this pin to be driven to 5V without any excessive input current or device<br />
breakdown. Very desirable feature.<br />
FIFO – First-In-First-Out memory, where data is stored in the incoming<br />
sequence and is read out in the same sequence. Input and output can be asynchronous<br />
to each other. A FIFO needs no external addresses, although all modern<br />
FIFOs are implemented internally with RAMs driven by circular read and<br />
write counters.<br />
FIT – Failure In Time. Describes the number of device failures statistically<br />
expected for a certain number of device-hours. Expressed as failures per one billion<br />
device hours. Device temperature must be specified. MTBF can be calculated<br />
from FIT.<br />
Flash – Non-volatile programmable technology, an alternative to Electrically-Erasable<br />
<strong>Programmable</strong> Read-Only Memory (EEPROM) technology. The<br />
memory content can be erased by an electrical signal. This allows in-system programmability<br />
and eliminates the need for ultraviolet light and quartz windows<br />
in the package.<br />
Flip-Flop – Single-bit storage cell that samples its Data input at the active<br />
(rising or falling) clock edge, and then presents the new state on its Q output<br />
after that clock edge, holding it there until after the next active clock edge.<br />
Floorplanning – Method of manually assigning specific parts of the design<br />
to specific chip locations. Can achieve faster compilation, better utilization, and<br />
higher performance.<br />
Xilinx • 185
PROGRAMMABLE LOGIC DESIGN -- QUICK START HANDBOOK •<br />
Xilinx • 186<br />
Footprint – The printed circuit pattern that accepts a device and connects its<br />
pins appropriately. Footprint-compatible devices can be interchanged without<br />
modifying the PC board.<br />
FPGA – Field <strong>Programmable</strong> Gate Array. An integrated circuit that contains<br />
configurable (programmable) logic blocks and configurable (programmable)<br />
interconnect between those blocks.<br />
Function Generator – Also called look-up-table, with N-inputs and one<br />
output. Can implement any logic function of its N-inputs. N is between 2 and 6;<br />
4-input function generators are most popular.<br />
GAL – Generic Array <strong>Logic</strong>. Lattice name for a variation on PALs Gate.<br />
Smallest logic element with several inputs and one output. AND gate output is<br />
high when all inputs are high. OR gate output is high when at least one input is<br />
high. A 2-input NAND gate is used as the measurement unit for gate array complexity.<br />
Gate Array – ASIC where transistors are pre-defined, and only the interconnect<br />
pattern is customized for the individual application.<br />
GTL – Gunning Transceiver <strong>Logic</strong>. A high-speed, low-power back-plane<br />
standard.<br />
GUI – Graphic User Interface. A way of representing the computer output<br />
on the screen as graphics, pictures, icons, and windows. Pioneered by Xerox<br />
and the Macintosh, now universally adopted (e.g., by Windows 95).<br />
HDL – Hardware Description Language.<br />
Hierarchical <strong>Design</strong> – <strong>Design</strong> description in multiple layers, from the highest<br />
(overview) to the lowest (circuit details). Alternative: flat design, where<br />
everything is described at the same level of detail. Incremental design making<br />
small design changes while maintaining most of the layout and routing.<br />
Interconnect – Metal lines and programmable switches that connect signals<br />
between logic blocks and between logic blocks and the I/O.<br />
IOB or I/O – Input/Output block. <strong>Logic</strong> block with features specialized for<br />
interfacing with the PC board.<br />
ISO9000 – An internationally recognized quality standard. Xilinx is certified<br />
to ISO9001 and ISO9002.<br />
IP – Intellectual Property. In the legal sense: patents, copyrights, and trade<br />
secrets. In integrated circuits: pre-defined large functions, called cores, that help<br />
you complete large designs faster.<br />
IQ – Extended temperature devices for automotive and industrial applications.<br />
ISP – In-System <strong>Programmable</strong> device. A programmable logic device that<br />
can be programmed after it has been connected to (soldered into) the system PC<br />
board. Although all SRAM-based FPGAs are naturally ISP, this term is only<br />
used with certain CPLDs, to distinguish them from the older CPLDs that must<br />
be programmed in programming equipment.
GLOSSARY OF TERMS<br />
JTAG – Joint Test Action Group. Older name for IEEE 1149.1 Boundary<br />
Scan, a method to test PC boards and ICs.<br />
LogiBLOX – Formerly called X-Blox. Library of logic modules, often with<br />
user-definable parameters, like data width. Very similar to LPM.<br />
<strong>Logic</strong> Cell – Metric for FPGA density. One logic cell is one 4-input look-up<br />
table plus one flip-flop.<br />
LPM – Library of Parameterized Modules. Library of logic modules, often<br />
with user-definable parameters, like data width. Very similar to LogiBlox.<br />
LUT – Look-Up Table. Also called function generator with N inputs and<br />
one output. Can implement any logic function of its N inputs. N is between 2<br />
and 6; 4-input LUTs are most popular.<br />
Macrocell – The logic cell in a sum-of-products CPLD or PAL/GAL.<br />
Mapping – Process of assigning portions of the logic design to the physical<br />
chip resources (CLBs). With FPGAs, mapping is a more demanding and more<br />
important process than with gate arrays.<br />
MTBF – Mean Time Between Failure. The statistically relevant up-time<br />
between equipment failure. See also FIT.<br />
Netlist – Textual description of logic and interconnects. See also XNF and<br />
EDIF.<br />
NRE – Non-Recurring Engineering charges. <strong>Start</strong>up cost for the creation of<br />
an ASIC, gate array, or HardWire. Pays for layout, masks, and test development.<br />
FPGAs and CPLDs do not require NRE.<br />
Optimization – <strong>Design</strong> change to improve performance. See also Synthesis.<br />
OTP – One-Time <strong>Programmable</strong>. Irreversible method of programming<br />
logic or memory. Fuses and anti-fuses are inherently OTP. EPROMs and<br />
EPROM-based CPLDs are OTP if their plastic package blocks the ultraviolet<br />
light needed to erase the stored data or configuration.<br />
PAL – <strong>Programmable</strong> Array <strong>Logic</strong>. Oldest practical form of programmable<br />
logic, implemented a sum-of-products plus optional output flip-flops.<br />
Partitioning – In FPGAs, the process of dividing the logic into sub-functions<br />
that can later be placed into individual CLBs. Partitioning precedes placement.<br />
PCI – Peripheral Component Interface. Synchronous bus standard characterized<br />
by short range, light loading, low cost, and high performance. A 33 MHz<br />
PCI can support data byte transfers of up to 132 megabytes per second on 36<br />
parallel data lines (including parity) and a common clock. There is also a new 66<br />
MHz standard.<br />
PCMCIA – Personal Computer Memory Card Interface Association. (Also:<br />
People Can’t Memorize Computer Industry Acronyms). Physical and electrical<br />
standard for small plug-in boards for portable computers.<br />
Xilinx • 187
PROGRAMMABLE LOGIC DESIGN -- QUICK START HANDBOOK •<br />
Pin-Locking – Rigidly defining and maintaining the functionality and timing<br />
requirements of device pins while the internal logic is still being designed or<br />
modified. Pin-locking has become important, since circuit-board fabrication<br />
times are longer than PLD design implementation times.<br />
PIP – <strong>Programmable</strong> Interconnect Point. In Xilinx FPGAs, a point where<br />
two signal lines can be connected, as determined by the device configuration.<br />
Placement – In FPGAs, the process of assigning specific parts of the design<br />
to specific locations (CLBs) on the chip. Usually done automatically.<br />
PLA – <strong>Programmable</strong> <strong>Logic</strong> Array. The first and most flexible programmable<br />
logic configuration with two programmable planes providing any combination<br />
of “AND” and “OR” gates and sharing of AND terms across multiple ORs.<br />
This architecture is implemented in CoolRunner and CoolRunner-II devices.<br />
PLD – <strong>Programmable</strong> <strong>Logic</strong> Device. Most generic name for all programmable<br />
logic: PALs, CPLDs, and FPGAs.<br />
QML – Qualified Manufacturing Line. For example, ISO9000.<br />
Routing – The interconnection, or the process of creating the desired interconnection,<br />
of logic cells to make them perform the desired function. Routing<br />
follows partitioning and placement.<br />
Schematic – Graphic representation of a logic design in the form of interconnected<br />
gates, flip-flops, and larger blocks. Older and more visually intuitive<br />
alternative to the increasingly more popular equation-based or high-level language<br />
text description of a logic design.<br />
SelectRAM – Xilinx-specific name for a small RAM (usually 16 bits), implemented<br />
in a LUT.<br />
Simulation – Computer modeling of logic and (sometimes) timing behavior<br />
of logic driven by simulation inputs (stimuli or vectors).<br />
SPROM – Serial <strong>Programmable</strong> Read-Only Memory. Non-volatile memory<br />
device that can store the FPGA configuration bitstream. The SPROM has a<br />
built-in address counter, receives a clock, and outputs a serial bitstream.<br />
SRAM – Static Random Access Memory. Read-write memory with data<br />
stored in latches. Faster than DRAM and with simpler timing requirements, but<br />
smaller in size and about four times as expensive than DRAM of the same<br />
capacity.<br />
SRL16 – Shift Register LUT, an alternative mode of operation for every<br />
function generator (LUT) that are part of every CLB in Virtex and Spartan<br />
FPGAs. This mode increases the number of flip-flops by 16. Adding flip-flops<br />
enables fast pipelining – ideal in DSP applications.<br />
Static Timing – Detailed description of on-chip logic and interconnect<br />
delays.<br />
Sub-Micron – The smallest feature size is usually expressed in micron (µ =<br />
millionth of a meter, or thousandth of a millimeter) The state of the art is moving<br />
Xilinx • 188
GLOSSARY OF TERMS<br />
from 0.35µ to 0.25µ, and may soon reach 0.18µ. The wavelength of visible light<br />
is 0.4 to 0.8µ. 1 mil = 25.4µ.<br />
Synchronous – Circuitry that changes state only in response to a common<br />
clock, as opposed to asynchronous circuitry that responds to a multitude of<br />
derived signals. Synchronous circuits are easier to design, debug, and modify,<br />
and tolerate parameter changes and speed upgrades better than asynchronous<br />
circuits.<br />
Synthesis – Optimization process of adapting a logic design to the logic<br />
resources available on the chip, like LUTs, longline, and dedicated carry. Synthesis<br />
precedes mapping.<br />
SystemI/O – Technology incorporated in Virtex-II FPGAs that uses the<br />
SelectIO-Ultra blocks to provide the fastest and most flexible electrical interfaces<br />
available. Each I/O pin is individually programmable for any of the 19 singleended<br />
I/O standards or six differential I/O standards, including LVDS, SSTL,<br />
HSTL II, and GTL+. SelectIO-Ultra technology delivers 840 Mbps LVDS performance<br />
using dedicated DDR registers.<br />
TBUFs – Buffers with a tri-state option, where the output can be made inactive.<br />
Used for multiplexing different data sources onto a common bus. The pulldown-only<br />
option can use the bus as a wired AND function.<br />
Timing – Relating to delays, performance, or speed.<br />
Timing Driven – A design or layout method that takes performance<br />
requirements into consideration.<br />
UART – Universal Asynchronous Receiver/Transmitter. An 8-bit-parallelto-serial<br />
and serial-to-8-bit-parallel converter, combined with parity and startdetect<br />
circuitry and sometimes even FIFO buffers. Used widely in asynchronous<br />
serial communications interfaces such as modems.<br />
USB – Universal Serial Bus. A new, low-cost, low-speed, self-clocking bitserial<br />
bus (1.5 MHz and 12 MHz) using four wires (Vcc, ground, differential<br />
data) to daisy-chain as many as 128 devices.<br />
VME – Older bus standard, popular with MC68000-based industrial computers.<br />
XNF File – Xilinx proprietary description format for a logic design Alternative:<br />
EDIF.<br />
Xilinx • 189
PROGRAMMABLE LOGIC DESIGN -- QUICK START HANDBOOK •<br />
Xilinx • 190