You also want an ePaper? Increase the reach of your titles
YUMPU automatically turns print PDFs into web optimized ePapers that Google loves.
<strong>User</strong><br />
<strong>manual</strong><br />
Item No. 8033
Copyrights and acknowledgements<br />
Copyrights and acknowledgements<br />
Skype, Skype logo and S logo are trademarks or registered trademarks of Skype Limited.<br />
Microsoft, Windows and Windows NT are registered trademarks of Microsoft Corporation in the United<br />
States and other countries.<br />
Windows Vista is a trademark of the Microsoft group of companies.<br />
Windows Live is a registered trademark of Microsoft Corporation.<br />
Mac and Mac OS are trademarks of Apple Inc.<br />
MPEG4<br />
This product is licensed under the MPEG-4 visual patent portfolio license for the personal and noncommercial<br />
use of a consumer for (i) encoding video in compliance with the MPEG-4 VISUAL standard<br />
(“MPEG-4 VIDEO”) and/or (ii) decoding MPEG-4 video that was encoded by a consumer engaged in a<br />
personal or non-commercial activity and/or was obtained from a video provider license by MPEG LA to<br />
provideMPEG-4 video. No license is granted or shall be implied for any other use. Additional information<br />
including that relating to promotional, internal and commercial uses and licensing may be obtained from<br />
MPEG LA, LLC. See HTTP://WWW.MPEGLA.COM.<br />
All other nationally and internationally recognized trademarks and tradenames are hereby acknowledged.<br />
© Copyright 2008 <strong>WowWee</strong> Group Ltd. All rights reserved.<br />
2
Contents<br />
Contents<br />
Thank you for purchasing Rovio from <strong>WowWee</strong>! . . . . . . . . . . . . . . . . . . . . . 6<br />
Package contents ......................................................... 7<br />
Getting started .....................................................10<br />
Battery and power requirements ...........................................10<br />
Rovio . . . . . . . . . . . . . . . . . . . . . . . . . . . . . . . . . . . . . . . . . . . . . . . . . . . . . . . . . . . . . . . . . . . . . . . . .10<br />
Charging dock and TrueTrack Beacon . . . . . . . . . . . . . . . . . . . . . . . . . . . . . . . . . . . . . . . . . . .10<br />
Assembling the charging dock .............................................10<br />
Location ................................................................10<br />
Assembling the charging dock .............................................11<br />
Disassembling the charging dock .................................................12<br />
Installing and charging the battery pack . . . . . . . . . . . . . . . . . . . . . . . . . . . . . . . . . . . . 13<br />
Low battery ...................................................................14<br />
Installing the Rovio Setup software ........................................15<br />
PC users .......................................................................15<br />
For advanced PC users . . . . . . . . . . . . . . . . . . . . . . . . . . . . . . . . . . . . . . . . . . . . . . . . . . . . . . . . . .16<br />
Mac users . . . . . . . . . . . . . . . . . . . . . . . . . . . . . . . . . . . . . . . . . . . . . . . . . . . . . . . . . . . . . . . . . . . . .17<br />
Rovio basics ........................................................21<br />
Rovio charging dock ......................................................21<br />
TrueTrack Beacons . . . . . . . . . . . . . . . . . . . . . . . . . . . . . . . . . . . . . . . . . . . . . . . . . . . . . . . 22<br />
Power switch LED light indicator ...........................................22<br />
Rovio’s interface .........................................................22<br />
Overview of the Rovio interface ......................................23<br />
Using Rovio’s interface . . . . . . . . . . . . . . . . . . . . . . . . . . . . . . . . . . . . . . . . . . . . . . . . . . . 23<br />
System requirements . . . . . . . . . . . . . . . . . . . . . . . . . . . . . . . . . . . . . . . . . . . . . . . . . . . . . . . . . . .23<br />
Web browser supported features ..........................................23<br />
Description of interface . . . . . . . . . . . . . . . . . . . . . . . . . . . . . . . . . . . . . . . . . . . . . . . . . . 24<br />
Navigation controls. . . . . . . . . . . . . . . . . . . . . . . . . . . . . . . . . . . . . . . . . . . . . . . . . . . . . . . . . . . . .25<br />
Camera controls ...............................................................26<br />
Camera capture control .........................................................26<br />
Headlight control . . . . . . . . . . . . . . . . . . . . . . . . . . . . . . . . . . . . . . . . . . . . . . . . . . . . . . . . . . . . . .26<br />
Auxiliary controls . . . . . . . . . . . . . . . . . . . . . . . . . . . . . . . . . . . . . . . . . . . . . . . . . . . . . . . . . . . . . .27<br />
Indicators . . . . . . . . . . . . . . . . . . . . . . . . . . . . . . . . . . . . . . . . . . . . . . . . . . . . . . . . . . . . . . . . . . . . .29<br />
Settings .......................................................................30<br />
Rovio online help ...............................................................36<br />
3
Contents<br />
Video display contextual menu ............................................36<br />
Accessing the interface from your internal network .....................37<br />
Setting up port forwarding . . . . . . . . . . . . . . . . . . . . . . . . . . . . . . . . . . . . . . . . . . . . . . . . . . . . . .38<br />
Using a domain name with Rovio .....................................39<br />
Creating, saving and playing back paths . . . . . . . . . . . . . . . . . . . . . . . . . . . . . . . 41<br />
Updating the Rovio firmware .........................................43<br />
Restoring Rovio to factory defaults . . . . . . . . . . . . . . . . . . . . . . . . . . . . . . . . . . . 44<br />
Caring for Rovio . . . . . . . . . . . . . . . . . . . . . . . . . . . . . . . . . . . . . . . . . . . . . . . . . . . . 45<br />
Precautions . . . . . . . . . . . . . . . . . . . . . . . . . . . . . . . . . . . . . . . . . . . . . . . . . . . . . . . . . . . . . 45<br />
Safety ..................................................................45<br />
Use and handling . . . . . . . . . . . . . . . . . . . . . . . . . . . . . . . . . . . . . . . . . . . . . . . . . . . . . . . . 45<br />
FAQs ..............................................................46<br />
Appendix A . . . . . . . . . . . . . . . . . . . . . . . . . . . . . . . . . . . . . . . . . . . . . . . . . . . . . . . . 48<br />
Rovio browser and platform compatibility . . . . . . . . . . . . . . . . . . . . . . . . . . . . . . . . . . 48<br />
Appendix B . . . . . . . . . . . . . . . . . . . . . . . . . . . . . . . . . . . . . . . . . . . . . . . . . . . . . . . . 49<br />
Terminology . . . . . . . . . . . . . . . . . . . . . . . . . . . . . . . . . . . . . . . . . . . . . . . . . . . . . . . . . . . . 49<br />
Index ..............................................................50<br />
Limited warranty . . . . . . . . . . . . . . . . . . . . . . . . . . . . . . . . . . . . . . . . . . . . . . . . . . . 52<br />
4
Introduction<br />
5
Introduction<br />
Thank you for purchasing Rovio from <strong>WowWee</strong>!<br />
With Rovio, you will always be just a click away from the people and places that are<br />
important to you. Rovio is the Wi-Fi equipped mobile webcam that enables you to<br />
view and interact with its environment through streaming video and audio, wherever<br />
it is! Easily control Rovio remotely 24/7 from anywhere in the world! Use any webequipped<br />
device: PC or Mac, cell phone, smartphone, PDA or even your video game<br />
console.<br />
The TrueTrack Navigation System allows you to use the Rovio interface to store<br />
waypoints — with one click Rovio will automatically navigate itself to the chosen<br />
point. Rovio’s built-in LED headlight will help you guide it even in dimly lit locations,<br />
so you’ll always know what is going on at home or at the office. Rovio’s self-docking<br />
function allows you to send Rovio back to the charging dock to recharge, with the<br />
click of a button on your browser!<br />
6
Introduction<br />
Package contents<br />
Package contents<br />
This package contains the following:<br />
1 x Rovio 1 x Charging dock with built-in TrueTrack Beacon<br />
1 x Mast<br />
1 x 6 V 3000 mAH<br />
NiMH rechargeable<br />
battery pack<br />
1 x Quick start<br />
guide<br />
1 x <strong>User</strong> <strong>manual</strong><br />
1 x 8 V AC/DC adapter<br />
1 x USB cable<br />
1 x Rovio Setup<br />
CD<br />
7
Quick overview<br />
Rovio<br />
Quick overview<br />
Rovio<br />
USB connector<br />
Power button<br />
with LED indicator<br />
Neck<br />
Antenna<br />
TrueTrack sensor<br />
Microphone<br />
Camera<br />
IR sensors<br />
LED indicators<br />
Headlight<br />
Speaker<br />
Omni-directional<br />
wheels<br />
Underside of Rovio<br />
Battery compartment<br />
Charging contacts<br />
8
Quick overview<br />
Charging dock<br />
Charging dock<br />
Charging dock mast<br />
Charging contacts<br />
TrueTrack Beacon<br />
Metal rim<br />
LED indicator<br />
8 V AC/DC adapter<br />
Back view of charging dock<br />
Dock<br />
Power connector<br />
(From power adapter)<br />
9
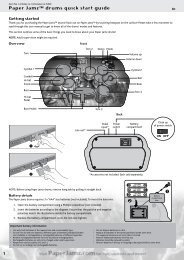
Getting started<br />
Battery and power requirements<br />
Getting started<br />
This section describes how to get your Rovio up and running.<br />
Battery and power requirements<br />
This section describes the battery and power requirements for Rovio and its charging<br />
dock with built-in TrueTrack Beacon.<br />
Rovio<br />
Rovio uses a rechargeable 6 V NiMH battery pack (included).<br />
Charging dock and TrueTrack Beacon<br />
The charging dock with built-in TrueTrack Beacon requires power from an 8V AC/DC<br />
adapter.<br />
Assembling the charging dock<br />
When you first open the Rovio package the charging dock will be in two parts. You<br />
will need to put the parts together and then set up the built-in TrueTrack Beacon.<br />
Location<br />
In order for Rovio to accurately self-dock, the charging dock should ideally be placed<br />
where it will not be disturbed and preferably against a wall. Ideally, the room should<br />
have a flat ceiling no higher than about 10-12 feet (3-3.6 meters) with a clear space<br />
onto which the built-in TrueTrack Beacon can project its infrared beams. Air vents,<br />
large light panels or chandeliers, tall objects or furniture might prevent Rovio from<br />
detecting the signal that is projected onto the ceiling.<br />
Important power adapter information<br />
• Examine the AC/DC adapter regularly for damage to the cord, plug, enclosure and other parts.<br />
• The AC/DC adapter is not a toy.<br />
• Equipment liable to be cleaned with liquid are to be disconnected from the transformer<br />
before cleaning.<br />
10
Getting started<br />
Assembling the charging dock<br />
Assembling the charging dock<br />
To assemble the charging dock:<br />
1. Place the charging dock on the floor in the room you want to use as Rovio’s<br />
home base.<br />
2. Attach the mast to the charging dock by slotting it into position as illustrated.<br />
3. Plug the power cable into the port on the back<br />
of the charging dock and then plug the power<br />
adapter into the electrical outlet.<br />
The LED indicator on the charging dock will<br />
light up, and the TrueTrack Beacon attached to<br />
the dock will light up red.<br />
If the LED indicator on the base does not light<br />
up, it means that there is a problem with the<br />
connection between the mast and the base.<br />
Unplug the power adapter, and detach the mast. To learn how, refer to the<br />
section Disassembling the charging dock. Next, reattach the mast and then<br />
reconnect the adapter.<br />
If the Beacon is not lit, touch the metal rim on the Beacon and it will light up.<br />
11
Getting started<br />
Assembling the charging dock / Disassembling the charging dock<br />
4. Two red dots will project light onto the ceiling. To optimize the signal, point<br />
the red dots at the center of the ceiling away from unsmooth surfaces such as<br />
lighting fixtures, fans, air vents and corners.<br />
NOTES:<br />
The red dots are a guide to help you set up the charging dock. If the light turns<br />
off while you are positioning the dots, touch the metal rim to reactivate it. During<br />
normal operation the red light will not be lit.<br />
In order for Rovio to be able to self-dock and recharge, you must power the charging<br />
dock at all times.<br />
Important battery information<br />
• Use only fresh batteries of the required size and recommended type.<br />
• Rechargeable batteries are only to be charged under adult supervision.<br />
• Respect the correct polarity, (+) and (-).<br />
• Do not throw batteries into the fire.<br />
• The supply terminals are not to be short-circuited.<br />
• Batteries should be replaced by adults.<br />
• Remove batteries if the product is not going to be used for some time.<br />
• This user <strong>manual</strong> should be kept because it contains important information.<br />
Disassembling the charging dock<br />
To disassemble the charging dock:<br />
1. Unplug the power cable from the back of the charging dock and from the<br />
electrical outlet.<br />
12<br />
2. Turn the charging dock over and locate the two tabs that hold the mast in<br />
place. Using two fingers, squeeze both tabs towards each other and remove<br />
the mast
Getting started<br />
Installing and charging the battery pack<br />
Installing and charging the battery pack<br />
Before you use your Rovio, you need to install and charge the battery pack.<br />
To install the batteries:<br />
1. Locate and open the battery compartment door on the underside of Rovio.<br />
2. Using a Phillips screwdriver (not included) loosen the two screws on the<br />
battery compartment door and remove it.<br />
3. Locate and note the orientation of the battery connector and connect it to the<br />
battery. Insert and connect the battery according to the diagram in step 2.<br />
4. Replace the battery compartment door and tighten the screws using the<br />
screwdriver. Do not over-tighten.<br />
13
Getting started<br />
Installing and charging the battery pack<br />
To charge the batteries:<br />
1. Ensure that the power to the electrical outlet is turned on and that Rovio is<br />
turned on by pressing the power button; Rovio’s LEDs will light up.<br />
2. Place Rovio in its assembled charging dock as illustrated.<br />
The LEDs on Rovio will pulse quickly to indicate that it has begun charging.<br />
3. During charging, the LEDs on Rovio will pulse<br />
slowly; a single charge takes approximately two<br />
hours.<br />
When Rovio has finished charging the LEDs will<br />
remain lit. It is safe to leave Rovio on its charging<br />
dock after the charge has completed.<br />
Low battery<br />
When Rovio’s batteries begin to run low, it will warn you with the following:<br />
• Rovio interface warning message.<br />
• Power switch LED light indicator flashes green, orange or red (refer to the<br />
section Power switch LED light indicator).<br />
If Rovio is in the same room as its charging dock and the interface indicates that it<br />
has a navigation signal, it will automatically try to return to the charging dock when<br />
its batteries are running low after you click on the low battery warning message.<br />
Otherwise, you can send it back to its charging dock by clicking on the Home<br />
button on the interface. Refer to the Auxiliary controls table in the Description of<br />
interface section for details.<br />
If you ignore the request to drive Rovio back to its charging dock and continue to use<br />
it, Rovio will shut off automatically when its batteries are drained, and you might not<br />
be able to drive it back to the charging dock to recharge.<br />
NOTE: Rovio must detect the charging base before it can navigate home.<br />
14
Configuring your Rovio the first time<br />
Installing the Rovio Setup software<br />
Configuring your Rovio the first time<br />
Before you use Rovio for the first time, you will need to configure your Rovio.<br />
To install the Rovio Setup software, your computer set-up must have the following:<br />
• Windows XP or Window Vista<br />
• USB connectivity<br />
• Wireless access point (WAP) device (for example, your wireless router)<br />
• A CD/DVD drive<br />
• A Wi-Fi card (for Ad hoc setup)<br />
NOTE: If you are a Mac user, refer to the subsection Mac users in the section Installing<br />
the Rovio Setup software to learn how to configure Rovio without the Rovio Setup CD.<br />
IMPORTANT: Rovio does not support WPA passwords on wireless access points;<br />
it only supports WEP passwords. For instance, if your wireless router uses a WPA<br />
password, you will need to change it to a WEP password. Refer to your<br />
router’s user <strong>manual</strong>.<br />
Please go to www.wowweesupport.com to check if a firmware update supporting<br />
WPA has become available.<br />
Installing the Rovio Setup software<br />
This section describes setting up Rovio on PC and Mac computers.<br />
PC users<br />
NOTE: To run the Rovio Setup CD, you need a PC computer running Windows XP or<br />
Windows Vista equipped with a CD drive.<br />
To run the Rovio Setup:<br />
1. Verify that your wireless router is turned on and working. Also ensure that<br />
Rovio is fully-charged and ON.<br />
2. Insert the Rovio Setup CD in your CD drive on your computer.<br />
15
Configuring your Rovio the first time<br />
Installing the Rovio Setup software<br />
3. If Autoplay is enabled on your computer, the<br />
Rovio Setup installation dialog will appear. If it<br />
does not, locate the RovioSetup.exe file on the<br />
CD and click on it to begin installation.<br />
The Rovio Setup wizard will appear.<br />
4. Follow the onscreen instructions for installing the Rovio Setup software.<br />
NOTE: If you are using the Rovio Setup CD, you should not turn Rovio on while it is<br />
connected to your computer via USB.<br />
For advanced PC users<br />
You can install the Rovio Setup software without the Rovio Setup CD (Ad hoc mode).<br />
Note that you need a WiFi card on your PC. To do so:<br />
NOTE: These instructions for advanced PC users can only be used to first configure<br />
Rovio or after you restore it to its default factory settings.<br />
1. Ensure that Rovio is fully-charged and ON.<br />
2. From your Windows Control Panel, select Network Connection or Network<br />
and Sharing Center (Windows Vista), and then click on the option to create a<br />
new connection.<br />
3. Follow the onscreen instructions to create an advanced connection, that is,<br />
you want to connect directly to another computer.<br />
4. Connect to the ROVIO_WOWWEE network (Rovio’s default SSID).<br />
5. In the Local Area Connection Properties dialog, select the TCP/IP option, and<br />
then click on Properties.<br />
The TCP/IP Properties option appears.<br />
16
Configuring your Rovio the first time<br />
Mac users<br />
6. Select the option Use the following IP address and enter the following<br />
information:<br />
IP address 192.168.10.5<br />
Subnet mask 255.255.255.0<br />
Default gateway<br />
Leave blank<br />
7. Once your Ad hoc connection is established, you can interface directly with<br />
Rovio to change its settings from the Settings button (refer to the Settings<br />
subsection in the Description of interface section). Enter http://192.168.10.18<br />
in the address bar of your Internet browser.<br />
Your Rovio is now configured to work on your internal network.<br />
NOTES:<br />
Once configured on your internal network, or if you have changed Rovio’s settings,<br />
you can reset Rovio to Ad hoc mode via its interface.<br />
You can configure Rovio to be accessible from an external network; follow the links in<br />
the setup wizard for further details, refer to the <strong>WowWee</strong> Support site<br />
(www.wowweesupport.com), or refer to the section Using Rovio from an external<br />
network.<br />
Mac users<br />
If you are running a Mac you will need to configure your Rovio without the Rovio<br />
Setup CD.<br />
NOTE: You need to be logged in with administrative privileges.<br />
To do so:<br />
1. Verify that your AirPort is on and<br />
connected to your wireless router<br />
(this should also be turned on and<br />
working). Ensure that Rovio is fully<br />
charged and ON.<br />
17
Configuring your Rovio the first time<br />
Mac users<br />
2. Note your current Wi-Fi settings.<br />
a. From the Apple menu, select System Preferences.<br />
b. Select the Network option and then select AirPort located in the Network<br />
Status pane.<br />
c. Click on the Advanced button, and then select the TCP/IP tab. Note all<br />
the network settings that appear, as you will need them throughout the<br />
configuration.<br />
3. You need to verify the IP address that you will use for Rovio. From the Finder<br />
select Applications, then Utilities, then select Terminal.<br />
a. Type ping -c2 and then<br />
type the first three sets<br />
of numbers from the IP<br />
address you noted in<br />
step 2c (e.g. ping -c2<br />
210.172.15)<br />
followed by 6 (e.g. ping -c2 210.172.15.6) and press Enter.<br />
b.<br />
c.<br />
If the application returns with a data message containing<br />
0 packets received, note the IP address and continue to step 4.<br />
If the application<br />
returns with 1 packet<br />
received or 2 packets<br />
received the IP address<br />
is not available. To try<br />
a different IP address,<br />
repeat step 3a adding<br />
1 to the final digit (e.g.<br />
ping -c2 210.172.15.7).<br />
18<br />
Continue to add 1 to the final figure until you receive the data message<br />
0 packets received. Note the IP address.
Configuring your Rovio the first time<br />
Mac users<br />
4. You need to connect directly to your Rovio (Ad hoc connection). Click on<br />
AirPort in the menu bar on top of the screen. Select the ROVIO_WOWWEE<br />
network (your Rovio).<br />
5. You now need to adjust the TCP/IP settings for your computer to work with<br />
Rovio. To do so:<br />
a. From the Apple menu, select System Preferences.<br />
b. Select the Network option and then select AirPort located in the Network<br />
Status pane.<br />
c. Click on the Advanced button, and then select the TCP/IP tab.<br />
d. From the Configure IP options, change the setting to Manually.<br />
e. In the IP Address field, enter 192.168.10.2 and then click on OK. This will<br />
be the IP address of your computer.<br />
6. In the address bar of your preferred web browser, enter http://192.168.10.18;<br />
this is default the IP address for your Rovio. You should now be able to view<br />
the Rovio interface.<br />
If you do not see Rovio’s interface, try resetting your Rovio by turning it OFF<br />
and then ON again. Wait until the LED on the power button turns from orange<br />
to green and then refresh the web browser.<br />
19
Configuring your Rovio the first time<br />
Mac users<br />
7. Now you will configure Rovio’s<br />
network settings to work with your<br />
router. In the Rovio interface, click<br />
on the Settings button located at<br />
the top right. Select the Network<br />
tab.<br />
8. In the SSID field, type in the name<br />
of your wireless network (i.e. your<br />
router).<br />
9. Change the mode to Infrastructure.<br />
10. Next, if you use a wireless network<br />
password, you will need to enter it.<br />
Select the type of Encryption (e.g.<br />
WEP 64) and then select the type<br />
of Key (e.g. ASCII). Enter the router’s<br />
password in the field.<br />
11. In the IP Setup section select<br />
Manually<br />
12. In the IP address field, enter the IP<br />
address you noted down at step 3.<br />
13. Using the settings you noted at step 2c, enter the Subnet mask, Default<br />
gateway (this is your router’s IP) and DNS (if any) information, and then click<br />
on Update.<br />
14. You now need to connect to your wireless network. From the System<br />
Preferences item of your Apple menu, select Network, then AirPort, and then<br />
re-enter the settings details you noted at step 2c for your wireless network.<br />
Your Rovio is now connected to your internal wireless network.<br />
20
Rovio basics<br />
15. In the address bar of your web browser, enter in the IP address you entered in<br />
the Rovio settings from step 11 (e.g. 210.172.15.7). You can now control your<br />
Rovio using its interface.<br />
NOTE: If you want to set a password for your Rovio, turn the security settings on or<br />
off, or add a new user, click on the Settings button in the Rovio interface, and then<br />
select the Security tab. Enter the information for a new user.<br />
Uninstalling the Rovio Setup software<br />
To uninstall the Rovio Setup software (Windows users only):<br />
• From Program Files, locate the <strong>WowWee</strong>/Rovio directory, and then select Uninstall.<br />
Follow the onscreen instructions to uninstall the software.<br />
Rovio basics<br />
Rovio charging dock<br />
The charging dock is used as Rovio’s home base where it can recharge and be stored<br />
when it is not being used. Using Rovio’s interface, you can click on the Home button<br />
and Rovio will automatically navigate itself back to the charging dock to recharge.<br />
NOTE: You need to set the home position before you can use the send home function.<br />
To set the home position:<br />
1. Place Rovio in its charging dock.<br />
2. Click on the Save Home button . Rovio will drive away from the charging<br />
dock, record the home position, and then automatically dock itself in the<br />
charging dock<br />
NOTES:<br />
Ensure that Rovio’s neck is down (i.e. horizontal) while you save its home position.<br />
Rovio will automatically lower its neck when returning to its charging dock while selfdocking.<br />
21
Rovio basics<br />
TrueTrack Beacons<br />
Rovio uses TrueTrack Beacons to help it locate its charging dock (home base). The<br />
charging dock comes with a built-in TrueTrack Beacon. The Beacon projects two IR<br />
signals on the ceiling that Rovio uses as its guiding lights to track the location of the<br />
Beacon.<br />
To extend Rovio’s navigation distance, you can install additional TrueTrack Room<br />
Beacons (sold separately) to help it locate additional rooms to which you want Rovio<br />
to navigate.<br />
Power switch LED light indicator<br />
The following table describes the power switch LED light indicator colors:<br />
Power switch light<br />
color<br />
Green<br />
Green (blinking)<br />
Orange<br />
Orange (blinking)<br />
Red<br />
Red (blinking)<br />
Description<br />
Network connection is functioning properly.<br />
Low battery. Network connection is functioning properly.<br />
Rovio is booting and/or trying to connect to a network.<br />
Low battery. Rovio is booting and/or trying to connect to<br />
a network.<br />
Network connection is functioning properly and Rovio is<br />
being accessed.<br />
Low battery. Network connection is functioning properly<br />
and Rovio is being accessed.<br />
Rovio’s interface<br />
Rovio’s interface is entirely browser-based, which means you can access Rovio via<br />
the Internet using any web-enabled device. Refer to the section Overview of Rovio<br />
interface for more details.<br />
22
Overview of the Rovio interface<br />
Using Rovio’s interface<br />
Overview of the Rovio interface<br />
This section describes Rovio’s user interface.<br />
Using Rovio’s interface<br />
To control Rovio you must have a web-enabled device.<br />
System requirements<br />
Your web-enabled device must meet the following system requirements:<br />
• Device running one of the following browsers:<br />
• Internet Explorer 6 or higher*, or<br />
• Mozilla Firefox 1.5 or higher, or<br />
• Safari 3.0, or<br />
• Mobile Safari, or<br />
• Internet Explorer Mobile, or<br />
• Opera Mobile.<br />
• Wireless access point (WAP) device connected to your PC<br />
(for example, a wireless router)<br />
• High-speed Internet connection<br />
*Internet Explorer 6 or higher required for two-way audio feature.<br />
Web browser supported features<br />
The following table describes Rovio’s supported features according to the web<br />
browser.<br />
Browser Video Audio<br />
Internet Explorer MPEG4<br />
Mono, 8-bit<br />
(6.0 and up)<br />
Mozilla Firefox<br />
M-JPEG (motion JPEG) Not available<br />
(1.5 and up)<br />
Safari M-JPEG (motion JPEG) Not available<br />
Opera M-JPEG (motion JPEG) Not available<br />
For a more complete list of browser features, refer to Appendix A.<br />
23
Overview of Rovio’s interface<br />
Description of interface<br />
Description of interface<br />
This section outlines the main controls in the Rovio user interface.<br />
1. Navigation controls<br />
2. Camera position controls<br />
3. Camera capture control<br />
4. Headlight control<br />
5. Auxiliary controls<br />
6. Indicators<br />
7. Settings<br />
8. Video display pane<br />
9. Rovio online help<br />
24
Overview of Rovio’s interface<br />
Navigation controls<br />
The following tables outline the main controls in the Rovio user interface.<br />
NOTE: Depending on the web browser you use, some of these options might not be<br />
available.<br />
Navigation controls<br />
Command<br />
Rotation buttons<br />
Description<br />
Allows you to rotate Rovio on the spot in increments.<br />
Rotate Rovio counter-clockwise. Click on the button and hold<br />
for continuous turning.<br />
Rotate Rovio clockwise. Click on the button and hold for<br />
continuous turning.<br />
Direction arrows<br />
Joystick pad<br />
Rotate Rovio a set number of degrees relative to its current<br />
position: around 45, 90, 135, 180 degrees clockwise or counterclockwise.<br />
Directs Rovio left (left arrow), right (right arrow), forward (up<br />
arrow) and backward (down arrow).<br />
You can also use the following keyboard buttons to direct<br />
Rovio: a or left keyboard arrow (strafe left), d or right keyboard<br />
arrow (strafe right), w or up keyboard arrow (forwards), s or<br />
back keyboard arrow (backwards), q (turn left), e (turn right),<br />
Space bar (to stop driving autonomously), -/+ (to toggle<br />
speeds).<br />
Moves Rovio in the direction in which you drag the Rovio icon<br />
on the joystick pad.<br />
25
Overview of Rovio’s interface<br />
Camera controls, Camera capture control, Headlight control<br />
Camera controls<br />
Command<br />
Camera position low<br />
Description<br />
Positions the neck at the lowest position.<br />
You can also use the keyboard button 1.<br />
Camera position mid-way<br />
Positions the neck mid-way.<br />
You can also use the keyboard button 2.<br />
Camera position high<br />
Positions the neck at full height.<br />
You can also use the keyboard button 3.<br />
Camera capture control<br />
Command<br />
Camera<br />
Description<br />
Allows you to take a still photo screen capture and send it to a<br />
specified email address.<br />
NOTE: To send the screen capture to a specified email, you<br />
need to first configure the screen capture settings. Refer to the<br />
description of the Photo tab in the Settings section.<br />
Headlight control<br />
Command<br />
Headlight<br />
Description<br />
Toggles Rovio’s headlight.<br />
26
Overview of Rovio’s interface<br />
Auxiliary controls<br />
Auxiliary controls<br />
Command<br />
Paths tab<br />
Record/Save<br />
Delete<br />
Reset All<br />
Stop<br />
Save Home<br />
Description<br />
Allows you to set path of way points to which Rovio will<br />
navigate.<br />
Refer to the section Creating and saving paths for more<br />
details.<br />
Records a path and then saves it to Rovio’s memory using<br />
a path name.<br />
When you record a path, all commands are recorded<br />
including head positions, photo, and headlight commands..<br />
Deletes the selected path.<br />
Deletes all paths.<br />
Stops Rovio’s driving while moving along the current path.<br />
Saves the current location as Rovio’s home position (home<br />
base).<br />
Home<br />
Send Rovio back to charging dock. Note that you need to<br />
first set the home position (home base).<br />
You can also use the keyboard button H for this function<br />
Visual Tab<br />
NOTE: Rovio must be able to detect its charging dock (i.e.<br />
Room 0) in order to navigate home..<br />
Allows you to toggle the speed and quality of the<br />
streaming video.<br />
Use the slider to adjust the video quality. Move the slider<br />
to the left to decrease the video quality, that is, stream<br />
faster video (less frames/second and lower resolution);<br />
move the slider to the right to increase the video frame<br />
rate and resolution.<br />
27
Overview of Rovio’s interface<br />
Auxiliary controls<br />
Command<br />
Video priority<br />
slider<br />
Video<br />
brightness slider<br />
Maintain Ratio<br />
Audio tab<br />
Rovio’s Speaker<br />
Volume<br />
Rovio’s Mic<br />
Volume<br />
Description<br />
Adjusts Rovio’s video quality by adjusting video frame rate<br />
and quality. Move the slider to the left to lower the frame<br />
rate and quality; move the slider towards the right to<br />
increase the frame rate and quality.<br />
Adjusts the brightness of the video stream from Rovio.<br />
Move the slider to the left to lower the brightness; move<br />
the slider towards the right to increase brightness.<br />
Enable this option to maintain the aspect ratio of the<br />
video stream when it is resized. This option is enabled by<br />
default.<br />
Allows you to adjust Rovio’s output audio levels.<br />
NOTE: Depending on the web browser you use, some of<br />
these options might not be available.<br />
Use the slider to adjust Rovio’s speaker level. Move the<br />
slider to the left to lower the output level; move the slider<br />
towards the right to increase the output level.<br />
Use the slider to adjust Rovio’s microphone levels. Move<br />
the slider to the left to lower the microphone input<br />
levels; move the slider towards the right to increase the<br />
microphone input levels.<br />
28
Overview of Rovio’s interface<br />
Indicators<br />
Indicators<br />
Indicator<br />
Nav<br />
Description<br />
Indicates the strength of the navigation signal received from the<br />
charging dock or a TrueTrack Room Beacon.<br />
Full bars indicate a strong signal.<br />
0-9 Indicates the room ID number assigned to a room, as set on the<br />
TrueTrack Room Beacon (sold separately).<br />
0 is always assigned to the charging dock.<br />
Battery<br />
Note that the room ID numbers only appear when the Beacon is<br />
in range.<br />
Indicates the strength of Rovio’s battery.<br />
Full bars indicate a fully charged battery.<br />
Status<br />
Wi-Fi<br />
Indicates Rovio’s current driving status.<br />
Options: Roaming, Saving Home, Home Saved, Going Home,<br />
Docked, Recording Path, Following a [name of a path], Low<br />
navigation signal, No navigation signal.<br />
Indicates the strength of the wireless Internet connection<br />
(Wi-Fi signal).<br />
Full bars indicate a strong signal.<br />
29
Overview of Rovio’s interface<br />
Settings (Video and Movement tab)<br />
Settings<br />
This button allows you to specify various settings for Rovio including video<br />
preferences, router information and security settings.<br />
NOTE: Changes in the Settings menu are not recordable.<br />
Command<br />
Video tab<br />
Resolution<br />
Quality<br />
Frame Rate<br />
Brightness<br />
Movement tab<br />
Movement speed<br />
Description<br />
Allows you to adjust video settings.<br />
Set the video resolution to the required size (in pixels).<br />
Options: 176x144, 320x240, 352x288 (default),<br />
640x480<br />
Set the quality of the video stream.<br />
Options: Low, Medium (default), High<br />
Set the video frame rate (fps).<br />
Options: 1 to 30 frames per second (fps). Default is 30<br />
fps.<br />
Adjust the brightness of the video stream. Move the<br />
slider to the left to decrease the brightness; move the<br />
slider to the right to increase brightness.<br />
Allows you adjust movement settings<br />
Adjust the speed of Rovio’s movements.<br />
Move the slider to the left to decrease the speed<br />
of the movement; move the slider to the right to<br />
increase speed of the movement.<br />
30
Overview of Rovio’s interface<br />
Settings (Movement and Photo tab)<br />
Command<br />
Turn speed<br />
Angle Turn Speed<br />
IR Radar<br />
Description<br />
Adjust the speed of Rovio’s turning movements.<br />
Move the slider to the left to decrease the turning<br />
speed; move the slider to the right to increase turning<br />
speed.<br />
Adjust the speed of Rovio’s turning angle.<br />
Move the slider to the left to decrease the speed<br />
of the turning angle; move the slider to the right to<br />
increase the speed of the turning angle.<br />
Toggles Rovio’s obstacle detection feature.<br />
When enabled, Rovio’s viewing area lights up light<br />
blue on the joystick pad. When it is playing back a<br />
path and detects an obstacle, a flashing block appears<br />
at the top of the joystick pad and Rovio will stop<br />
moving towards the object and attempt to find a path<br />
around the obstacle.<br />
Photo tab<br />
Enable Email Photo<br />
SMTP settings<br />
SMTP Port<br />
<strong>User</strong>name<br />
NOTE: When you <strong>manual</strong>ly drive Rovio, it can only<br />
detect obstacles as it approaches them, but not avoid<br />
them.<br />
Specify settings for emailing screen captures from<br />
Rovio’s interface.<br />
Toggles the screen capture emailing function. Enable<br />
the option to allow the screen capture emailing<br />
function.<br />
Specify an SMTP server.<br />
Refer to your email client settings for reference.<br />
Specifies the port to use for your SMTP server.<br />
Default is 25.<br />
Enter the username you use for your mail server, if<br />
required..<br />
31
Overview of Rovio’s interface<br />
Settings (Photo and Security tab)<br />
Command<br />
Password<br />
Confirm Password<br />
Email Settings<br />
Sender Email<br />
Address<br />
Receiver Email<br />
Address<br />
Email Subject<br />
Email body<br />
Security tab.<br />
Enable <strong>User</strong><br />
Authentication<br />
<strong>User</strong> Accounts<br />
New <strong>User</strong><br />
<strong>User</strong>name<br />
Password<br />
Confirm<br />
Admin Access<br />
Add <strong>User</strong><br />
Description<br />
Enter the password you use for your mail server, if<br />
required..<br />
Enter the same password you use in the Password<br />
field, if required..<br />
Specify email settings to which you send video screen<br />
captures.<br />
Specify an email address from which to send video<br />
screen captures.<br />
Specify a destination email address to which to email<br />
video screen captures.<br />
Specify a subject line for your video screen capture<br />
email.<br />
Enter the text you want to appear in the body of the<br />
email you want for your video screen capture email.<br />
Allows you to adjust security settings<br />
Toggles the user authentication option.<br />
Click on the Update button to save the setting.<br />
Create a username for a new user on your Rovio.<br />
Create a password for the user being created for your<br />
Rovio.<br />
Enter the same password you entered in the password<br />
field.<br />
Allows you to create and manage accounts for<br />
administrative use.<br />
Also allows user acess permission settings.<br />
Click to add additional new users.<br />
32
Overview of Rovio’s interface<br />
Settings (Network tabs)<br />
Command<br />
Network tab<br />
Description<br />
Allows you to specify network options and settings<br />
Wi-Fi Settings<br />
SSID<br />
MAC Address<br />
Mode<br />
Channel<br />
Encryption<br />
Specify the wireless connection settings.<br />
Specify the name of the wireless router (SSID) you<br />
will use with Rovio. Also, in Ad hoc mode, it indicates<br />
the name of the Ad hoc network to which you are<br />
connected.<br />
Refer to your router settings for reference.<br />
Specify the MAC address of Rovio.<br />
Specify an Infrastructure or Ad hoc mode of<br />
networking. Default is Ad hoc.<br />
Selects a Wi-Fi channel on the router used to<br />
communicate with Rovio (used for Ad hoc mode).<br />
Note: No router is used in Ad hoc mode.<br />
Specify the type of encryption used for your router.<br />
Disable<br />
WEP 64<br />
WEP 128<br />
Key<br />
Web Port<br />
No encryption used.<br />
Use the 64-bit encryption key used for your router.<br />
Refer to your router settings for reference.<br />
Use the 128-bit encryption key used for your router.<br />
Refer to your router settings for reference.<br />
Specify a password key (WEP key) used on your router<br />
(in ASCII or HEX).<br />
Specify a communication channel on the router on<br />
which to use Rovio. Default channel is 80.<br />
33
Overview of Rovio’s interface<br />
Settings (Network tab)<br />
Command<br />
IP Setup<br />
Automatically<br />
from DHCP<br />
Description<br />
Allows you specify IP settings for your Rovio and<br />
router.<br />
Automatically select an IP address based on the<br />
router’s DHCP settings.<br />
Select this option if you do not want to specify an IP<br />
address.<br />
Manually<br />
Rovio IP address<br />
Subnet mask<br />
Default gateway<br />
DNS<br />
Update<br />
Reset<br />
NOTE: Selecting this option disables the options<br />
for <strong>manual</strong>ly setting Rovio’s IP address (i.e. Rovio IP<br />
address, Subnet mask, Default gateway, and DNS<br />
options).<br />
Specify an explicit IP address for your Rovio.<br />
Specify an IP address for Rovio.<br />
Specify a range of addresses to use with Rovio.<br />
Use 255.255.255.0 if you do not have a specific<br />
subnet mask.<br />
Specify a default network node (gateway) to use with<br />
Rovio.<br />
The default gateway address should be the IP address<br />
of your router.<br />
Specify the DNS server. Used to resolve DNS names to<br />
IP addresses for DNS names.<br />
Refer to your router’s settings for reference.<br />
Save all settings specified on this tab.<br />
Erase all settings on this tab.<br />
34
Overview of Rovio’s interface<br />
Settings (Network tab)<br />
Command<br />
Domain tab<br />
Enable<br />
Server<br />
Domain<br />
<strong>User</strong>name<br />
Password<br />
Confirm<br />
Overwrite IP<br />
Proxy Settings<br />
(optional)<br />
Server<br />
Port<br />
<strong>User</strong>name<br />
Password<br />
Update<br />
Reset<br />
Check Status<br />
Description<br />
Allows you to specify a dynamic domain name<br />
system.<br />
Refer to section Using a domain name with Rovio for<br />
more information.<br />
Toggle whether you to want to use a dynamic domain<br />
name system to access Rovio.<br />
Specifies the server.<br />
Specifies the domain name.<br />
Specifies the username for your account.<br />
Specifies the password for your account.<br />
Enter the password from the Password field.<br />
Allows you to overwrite and specify the IP address<br />
that is sent to your dynamic DNS server.<br />
Allows you to specify settings for a proxy server, if you<br />
use one.<br />
Specifies the server..<br />
Specifies the port to use..<br />
Specifies the username for your account.<br />
Specifies the password for your account.<br />
Saves all settings specified on this tab.<br />
Erases all settings on this tab.<br />
Allows you to verify Rovio’s status and its connection<br />
with your DNS server.<br />
35
Overview of Rovio’s interface<br />
Settings (System tab), Rovio online help, Video display contextual menu<br />
Command<br />
System tab<br />
Reboot system<br />
Restore Default<br />
Settings<br />
Update Firmware<br />
Image<br />
Description<br />
Allows you to reboot Rovio, restore system defaults,<br />
and update Rovio’s firmware.<br />
Click on the Reboot button to reboot Rovio.<br />
Click on the Restore button to restore default settings<br />
to Rovio.<br />
Allows you to update the Rovio firmware.<br />
Refer to Updating the Rovio firmware for more<br />
information.<br />
Rovio online help<br />
Command<br />
Help<br />
Description<br />
Accesses contextual help for the Rovio interface. Click on the<br />
Help button to access.<br />
Video display contextual menu<br />
The table below outlines the options available in the contextual menu (right-click) for<br />
the video display window.<br />
NOTE: This contextual menu is only available for Internet Explorer on a PC platform.<br />
Command<br />
Quality<br />
Low<br />
Medium<br />
High<br />
Resolution<br />
Description<br />
Allows you to toggle the quality of the video stream.<br />
Low image quality video stream.<br />
High image quality video stream.<br />
Highest image quality video stream.<br />
Allows you to adjust the resolution of the video stream, in pixels.<br />
176 x 144, 320 x 240, 352 x 288, 640 x 480<br />
36
Accessing the interface from your internal network<br />
Command<br />
Save Current<br />
Image As<br />
Start/Stop Mic<br />
Description<br />
Allows you to save screen capture in JPEG format.<br />
To save the screen capture, select this option, then name and<br />
save the file to your computer.<br />
Toggle the microphone on your computer.<br />
NOTES:<br />
This option only available on Internet Explorer on a PC<br />
(i.e. supports two-way audio streams).<br />
You should avoid using your computer microphone in the same<br />
room as Rovio as it will create audio feedback.<br />
Accessing the interface from your internal network<br />
To access Rovio’s interface:<br />
• In address bar of your browser window, enter the IP address of your Rovio<br />
(e.g. 192.168.10.18).<br />
NOTE: If you do not have the required ActiveX component installed in your Internet<br />
Explorer browser, you will be prompted to install it when you access Rovio’s interface<br />
(otherwise you will not be able to view the streaming video). When prompted, install<br />
the required ActiveX.<br />
To be able to access Rovio’s interface from outside your internal network, you will<br />
need to set up port forwarding. Refer to the section, Using Rovio from an external<br />
network.<br />
37
Using Rovio from an external network<br />
Setting up port forwarding<br />
Using Rovio from an external network<br />
To be able to use Rovio outside your internal network, you will need to set up port<br />
forwarding on your wireless router to be able to communicate with Rovio.<br />
Setting up port forwarding<br />
To be able to access Rovio over the internet from any internet access point, you will<br />
need to open up the required ports on your router (port forwarding).<br />
Refer to your router’s user <strong>manual</strong> on how to set up port forwarding. If you do not<br />
have a user <strong>manual</strong> for your router, you will need to refer to external sources to set<br />
up your router for port forwarding.<br />
To do so:<br />
1. Determine and note the make and model of your wireless router.<br />
2. Refer to the <strong>WowWee</strong> Support site (www.wowweesupport.com) for<br />
information on locating port forwarding information for your router. You will<br />
need this information to set the port forwarding details in Rovio’s settings.<br />
For Rovio, you will need to open up 2 ports: port 80 and port 554. Port 80 is<br />
for the M-JPEG stream and control over the Rovio; port 554 is for the MPEG4<br />
and audio stream.<br />
Configure your ports with the following options:<br />
Port 80 Port 554<br />
Protocol TCP TCP<br />
External TCP/IP Port 80 554<br />
IP Address [Rovio’s internal IP address]* [Rovio’s internal IP address]*<br />
Internal TCP/IP Port 80 554<br />
*Refer to the description of the Network tab in the section Overview of Rovio’s<br />
interface to determine your Rovio’s internal IP adress.<br />
38
Using a domain name with Rovio<br />
4. Save your router’s port forwarding settings.<br />
5. Test your configuration using a computer or other web-enabled device outside<br />
your internal network. You can also test your Rovio using port forwarding<br />
tools. Refer to the <strong>WowWee</strong> Support site for more details.<br />
Your Rovio is now set up for access outside your internal network.<br />
NOTE: Some Internet service providers do not allow for outbound traffic on port 80,<br />
in which case you might need to choose another port (other than 80) that is open<br />
for outbound traffic, for example, 8080. To do so, access Rovio’s network settings ,<br />
enter the new port number in the Web Port field and then save your changes. In this<br />
case, to access Rovio, you will need to enter the full web address including the port<br />
number, for example http://192.168.10.18:8080.<br />
Using a domain name with Rovio<br />
Once you have your external port forwarding configured, you can use a dynamic<br />
domain name system (DNS) with your Rovio, for instance abc.myrovio.com.<br />
If you have previously registered a domain name you want to use with Rovio, you can<br />
configure Rovio to use the domain name instead of an IP address.<br />
If you do not have a domain name previously registered, you can do so from a<br />
number of dynamic DNS service providers.<br />
39
Using a domain name with Rovio<br />
Once your ports are set up for forwarding, you can log onto Rovio to set up your<br />
domain name. To set up your domain name to be used with Rovio:<br />
1. From the Rovio interface, select Settings, then select the Domain tab.<br />
2. On the Domain tab, enable the Enable option.<br />
3. Enter the server information for your domain in the Server field.<br />
4. Enter the domain name information for your domain in the Domain field (for<br />
example, abc.myrovio.com).<br />
5. Enter the user name for your account in the <strong>User</strong>name field.<br />
6. Enter the password for your account in the Password field.<br />
If you use a proxy server (optional), you can enter the information in the<br />
Proxy Settings area.<br />
7. Click on Update to save your settings.<br />
Your Rovio is now configured to use your registered domain name. You can now enter<br />
your domain name in the address bar of your browser to access Rovio.<br />
NOTES:<br />
If you created a login and password for Rovio, you will be prompted to enter this<br />
information when you access it.<br />
If you used a port other than 80 for outbound traffic (see the section Using Rovio<br />
from an external network), you will need to use the port number in your web address.<br />
40
Creating, saving and playing back paths<br />
Creating, saving and playing back paths<br />
You can create up to ten paths for Rovio to remember and play back. A path can be<br />
made up of several actions in any order, including:<br />
To create a path:<br />
• A route that Rovio drives<br />
• Moving the camera position<br />
• Taking and emailing a photo<br />
1. On the Paths tab in the Rovio interface, click on the Record button to begin<br />
recording your path.<br />
2. Drive your Rovio to the location you want the path go to.<br />
3. Click on the Save Path button to stop recording and save the path. You will<br />
be prompted to name the path (default name is New Path). The path will be<br />
saved in Rovio’s memory.<br />
4. Repeat for any other paths you want to create.<br />
NOTES:<br />
Do not click Stop while recording a path. This will reset the record function and Rovio<br />
will not save the path.<br />
For large areas, multiple rooms, and/or areas with many walls, you should set up<br />
multiple TrueTrack Room Beacons (sold separately).<br />
To rename a path, click on the path from the list and then edit the name.<br />
To play back a path:<br />
• On the Paths tab in the Rovio interface, doubleclick<br />
on the name of the path you want to play.<br />
When it has played back the path, it will await a new<br />
command.<br />
41
Using Rovio with VoIP applications<br />
To delete a path:<br />
1. On the Paths tab in the Rovio interface, select the name of the path you want<br />
to delete.<br />
2. Click on the Delete button to delete the path.<br />
Using Rovio with VoIP applications<br />
You can use Rovio as your mobile webcam with VoIP applications in Windows® XP<br />
or Windows® Vista on PC platforms (such as Skype or Windows Live Messenger<br />
Call) after you install the Rovio Setup software; this allows you to use Rovio for<br />
streaming video. You first need to configure your application to use Rovio as your<br />
webcam in video chats.<br />
NOTE: When you use Rovio for your VoIP webcam, there is no audio stream. In this<br />
case, for audio, you should use a separate computer microphone (not included).<br />
To do so:<br />
1. Locate the video settings options in your VoIP application.<br />
2. Select Rovio IP Camera as your default camera and then confirm your<br />
selection.<br />
3. Locate the camera properties dialog in the VoIP application. Enter your the<br />
IP address of the Rovio you want to use. You will also need to enter your<br />
username and password, if security is enabled, and then click on OK.<br />
You should test and preview the camera’s video stream; most VoIP applications allow<br />
you to preview the video using the application’s interface.<br />
You can now use Rovio as your webcam when you have video chats with your<br />
contacts.<br />
For any updates to the Rovio VoIP application plugins, refer to the Rovio site<br />
(www.myrovio.com) or to the <strong>WowWee</strong> Support site (www.wowweesupport.com).<br />
42<br />
NOTE: There is no audio support for third party applications. Refer to the product<br />
support or <strong>WowWee</strong> Support sites for more information.
Updating the Rovio firmware<br />
Updating the Rovio firmware<br />
When firmware updates are available, you can download them and update the Rovio.<br />
NOTES:<br />
Ensure that Rovio is on and connected to your network. Also make sure that Rovio<br />
has enough battery power before updating it.<br />
All your settings will be overwritten when you update the firmware image. You will<br />
need to <strong>manual</strong>ly reconfigure them after updating firmware.<br />
IMPORTANT: Do not unplug Rovio from your computer (if plugged to the computer)<br />
nor turn it off while the firmware is being updated. Ensure Rovio is on. To update the<br />
Rovio firmware image:<br />
1. From the Rovio product site (www.myrovio.com) or the <strong>WowWee</strong> Support<br />
site (www.wowweesupport.com), locate the link for the latest Rovio<br />
firmware image and download it to your computer.<br />
2. Make sure Rovio is ON. In the Rovio interface, click the Settings button.<br />
3. In the System tab, locate the Select Firmware Image field, and click on the<br />
Browse button. A Choose file dialog appears.<br />
4. Locate the Rovio firmware image file you downloaded (*.bin) and then click<br />
on Open.<br />
5. Click on Update to update the firmware image. Wait for Rovio to reboot.<br />
Your Rovio should be updated with the latest firmware. You can verify the version<br />
number of the firmware in Rovio’s interface (located on the System tab of the<br />
Settings menu).<br />
IMPORTANT: Do not turn off Rovio until it has finished updating. The update will not<br />
take effect until you reboot Rovio. Ensure you have a full battery so that it does not<br />
lose power during the update.<br />
You can also restore Rovio’s default firmware using the Rovio Restore wizard. Refer to<br />
the section Restoring Rovio to factory defaults for more information.<br />
43
Restoring Rovio to factory defaults<br />
Restoring Rovio to factory defaults<br />
You can restore Rovio to its factory defaults, including its firmware, using the Rovio<br />
interface or the Rovio Restore wizard (using a PC), for instance, if you need to change<br />
the security settings.<br />
To do so:<br />
• From the Program Files directory, locate and run the Rovio Restore wizard<br />
(on a PC) and then follow the onscreen instructions.<br />
OR<br />
1. In the Rovio interface, click on the Settings button.<br />
2. Select the System tab.<br />
3. Click on the Restore defaults button.<br />
Rovio will be restored to the original factory settings.<br />
You can then run the Rovio Setup wizard again to reconfigure Rovio.<br />
44
Caring for Rovio<br />
Safety<br />
Caring for Rovio<br />
This section outlines various precautions, instructions and warnings on caring for<br />
Rovio.<br />
Precautions<br />
Before using this product, read this user <strong>manual</strong> and retain it for future reference.<br />
Safety<br />
This product has been designed with the highest concern for safety. However,<br />
note that any electrical device if used improperly has the potential of causing fire,<br />
electrical shock or personal injury. To help ensure accident-free operation, you should<br />
follow the guidelines outlined below:<br />
• Observe all warnings, precautions, and instructions.<br />
• If the device functions in an abnormal manner, produces unusual sounds or odors,<br />
or if it becomes hot to the touch, stop use, unplug the AC adapter (if used) from the<br />
electrical outlet, and disconnect any other cables to the object immediately.<br />
Use and handling<br />
• Do not use Rovio near water.<br />
• Do not immerse Rovio or any parts of it in water.<br />
• Do not expose Rovio to high temperatures, high humidity, or direct sunlight.<br />
• Do not expose Rovio to dust, smoke or steam.<br />
• Do not allow liquid or small particles to get into Rovio.<br />
• Do not place Rovio on surfaces that are unstable or subject to vibrations.<br />
• Do not throw or drop Rovio, or subject Rovio to strong physical shock.<br />
• Do not place Rovio close to items with a magnetic strip, such as a credit card.<br />
• Do not touch the TrueTrack sensors.<br />
• Avoid touching the camera lens as much as possible.<br />
• When required, gently clean the camera lens surface with a soft,<br />
non-abrasive cloth.<br />
• Never <strong>manual</strong>ly force Rovio’s neck up or down.<br />
45
FAQs<br />
FAQs<br />
This section lists frequently asked questions about Rovio.<br />
Q: I clicked on the Home button, but Rovio can’t seem to find its charging dock properly.<br />
What’s wrong<br />
A: There are number of reasons why Rovio can’t find its home base properly including:<br />
• You did not properly set Rovio’s home base to begin with. Verify that you have<br />
saved Rovio’s home base first.<br />
• There are obstacles in the way.<br />
• The charging dock is not properly placed.<br />
• The navigation signal of the charging dock is too weak or there is no signal.<br />
• Too many infrared signals or direct sunlight on the sensors causing interference.<br />
Q: Rovio’s interface is loaded but I do not see the video stream … what’s wrong<br />
A: Possible causes and solutions:<br />
• Make sure that Rovio is turned on. It might have been turned off while you<br />
were logging into Rovio’s interface.<br />
• The port forwarding settings are incorrect. Verify your port forwarding settings<br />
in your router’s firmware interface.<br />
• The required ActiveX is not installed for Internet Explorer. To install the required<br />
ActiveX component, click on the link that appears in the Rovio display panel<br />
or in the bar that appears at the top of the Internet Explorer window when<br />
you are prompted. Follow the onscreen instructions for installing the ActiveX<br />
component. If the link does not appear, verify that your pop-up blocker is<br />
turned off, and your security settings are NOT set to High.<br />
Q: Why is there no audio stream from Rovio<br />
A: Possible causes and solutions:<br />
• Two-way audio streaming is only supported on PC platforms running Internet<br />
Explorer 6.0 and up. Refer to Appendix A for a list of browser<br />
compatibility features.<br />
• If you are using Internet Explorer on a PC, your volume levels might be low.<br />
46
FAQs<br />
Q: I am trying to play back a path that I previously saved but Rovio doesn’t seem to play<br />
it back properly... What’s wrong<br />
A: There might be a few reasons why Rovio won’t play back a path, including:<br />
• Rovio’s batteries are weak or depleted and need recharging.<br />
• Rovio cannot detect the Room Beacons, for instance, they might have been<br />
moved from their original location or are not powered.<br />
• There are obstacles in the way.<br />
• The navigation signal is too weak or there is no signal.<br />
• Too many infrared signals or direct sunlight on the sensors causing interference.<br />
For more answers to questions, refer to www.myrovio.com or the <strong>WowWee</strong> Support<br />
site at www.wowweesupport.com.<br />
47
Appendix A<br />
Rovio browser and platform compatibility<br />
Appendix A<br />
Rovio browser and platform compatibility<br />
This table outlines Rovio browser and platform compatibility.<br />
Platform<br />
Internet browser<br />
PC computer<br />
Mac computer<br />
iPhone/ Pod Touch<br />
Internet<br />
Explorer<br />
Nintendo Wii<br />
Mobile devices with<br />
embedded browser<br />
x * √ o<br />
Mozilla<br />
Firefox<br />
o<br />
o<br />
Safari<br />
o o o o<br />
Opera<br />
o o o<br />
x = Two-way mono audio streaming* and MPEG4 video streaming.<br />
o = Supports M-JPEG (motion JPEG) streaming. No audio.<br />
√ = For Internet Explorer Mobile, image must be requested <strong>manual</strong>ly (i.e. not automatic streaming<br />
video). No audio.<br />
* Note on Mac platforms,Internet Explorer is no longer supported as of version 5.2.3.<br />
48
Appendix B<br />
Terminology<br />
Appendix B<br />
Terminology<br />
Some of the terms used in this <strong>manual</strong> are specific to Rovio.<br />
• ActiveX: Used to create software components for a specific function or set of<br />
functions for Windows platforms. Rovio uses ActiveX in Internet Explorer to allow<br />
streaming video and audio.<br />
• Ad hoc: In networking, a type of protocol in which the network is created “on-thefly”<br />
or decentralized. When you connect directly to Rovio using your computer,<br />
you are connecting to it using an Ad hoc connection (vs. connecting to it through a<br />
router).<br />
• DHCP: Dynamic host Configuration Protocol. A type of networking protocol for<br />
computer which determines the IP address when using dynamic IP addressing.<br />
• IP address: Internet Protocol address. A unique address for electronic devices such<br />
as computers or routers to identify the device over a computer network.<br />
• MAC address: Media Access Control address. An identifier for most network<br />
adapters that distinguishes hardware devices from each other on a network.<br />
Sometimes referred to as an Ethernet address.<br />
• Ports: A virtual data connection to exchange data, especially between computers<br />
and the Internet.<br />
• SSID: Service set identifier. Used to identify a router.<br />
• Subnet mask: A range of logical addresses for which all devices in the network are<br />
members.<br />
• Way points: In navigation, a reference point or location reference. For Rovio, a way<br />
point can be a location in your home which it can save to memory and to which it<br />
will drive when playing back paths..<br />
• Wi-Fi: Wireless technology.<br />
49
Index<br />
50<br />
Index<br />
A<br />
accounts<br />
managing 32<br />
ActiveX 46, 49<br />
Ad hoc 49<br />
Ad hoc setup<br />
Mac users 17<br />
PC users 16<br />
administrative privileges 17<br />
aspect ratio 28<br />
audio levels<br />
output 28<br />
audio stream<br />
troubleshooting 46<br />
B<br />
batteries<br />
charging 14<br />
installing 13<br />
battery<br />
indicator 29<br />
requirements 10<br />
brightness 28, 30<br />
browser compatibility 48<br />
browsers<br />
Internet Explorer 48<br />
Mozilla Firefox 48<br />
Opera 48<br />
Safari 48<br />
C<br />
channel<br />
Wi-Fi 33<br />
charging dock 14, 21<br />
assembling 10–11<br />
disassembling 12<br />
location 10<br />
overview 9<br />
powering 11, 12<br />
setup 12<br />
connection<br />
Ad hoc 17, 19<br />
D<br />
DHCP 49<br />
DHCP settings 34<br />
DNS server 34, 35<br />
domain name 40<br />
domain name system. See DNS sever<br />
E<br />
encryption 33<br />
router 33<br />
F<br />
frame rate 30<br />
H<br />
Home button 14, 27, 46<br />
home position. See Home button; See also Save<br />
Home button<br />
setting 21<br />
I<br />
infrared beams 10<br />
interface 19<br />
Internet Explorer 46, 48<br />
IP addres<br />
Rovio 34<br />
IP address 49<br />
pinging 18<br />
Rovio default 19<br />
IR Radar 31<br />
M<br />
MAC address 33, 49<br />
Mac user 15<br />
modes<br />
Ad hoc 33<br />
infrastructure 20, 33<br />
movements<br />
turning 31<br />
movement settings 30<br />
Mozilla Firefox 48<br />
N<br />
navigation<br />
signal strength 29<br />
network settings 33<br />
O<br />
obstacle detection 31<br />
Opera 48<br />
P<br />
package contents 7<br />
paths 27<br />
deleting 27<br />
deleting all saved 27<br />
interrupting driving 27<br />
recording 27<br />
saving 27<br />
platform compatibility 48<br />
port 80 38
Index<br />
port 554 38<br />
port forwarding 38<br />
Ports<br />
definition 49<br />
power<br />
requirements 10<br />
power switch 22<br />
R<br />
Room Beacon. See True Track Room Beacon<br />
room ID number 29<br />
Rovio<br />
configuring the first time 15<br />
default IP address 19<br />
overview 8<br />
reconfiguring 44<br />
Rovio Setup CD 15, 16<br />
Rovio Setup software 15<br />
installing on PC 15<br />
uninstalling 21<br />
S<br />
Safari 48<br />
Save Home button 21, 27<br />
screen captures<br />
emailing 31<br />
security settings 32<br />
self-docking function 10, 12<br />
settings<br />
DHCP 34<br />
email 32<br />
movement 30<br />
network 33<br />
security 32<br />
video 30<br />
wireless connection 33<br />
SMTP server 31<br />
software<br />
setup 15<br />
speaker level 28<br />
SSID 33, 49<br />
status<br />
indicator<br />
driving 29<br />
subnet mask 34<br />
Subnet mask 49<br />
T<br />
TCP/IP port<br />
external 38<br />
internal 38<br />
True Track Beacon 11–12<br />
TrueTrack Beacon 22<br />
TrueTrack Room Beacon 29<br />
U<br />
USB 15, 16<br />
V<br />
video<br />
quality 27<br />
speed 27<br />
video quality 30<br />
W<br />
way points 27<br />
definition 49<br />
web port 33<br />
WEP 64 33<br />
WEP 128 33<br />
WEP key 33<br />
WEP password 15. See WEP key<br />
wireless<br />
signal strength 29<br />
wireless connection settings 33<br />
WPA password 15<br />
51
Limited warranty<br />
WOWWEE 180-DAY LIMITED WARRANTY<br />
<strong>WowWee</strong>’s warranty obligations for this Rovio (this “Product”) are limited to the terms set forth below.<br />
<strong>WowWee</strong> Group Limited (“<strong>WowWee</strong>”) warrants to the original end-user purchaser that this Product will be free from defects in<br />
materials and workmanship under normal use for a period of 180 days from the date of retail purchase (the “Warranty Period”).<br />
This warranty is extended only to the original end-user purchaser of a new product that was not sold “as is”.<br />
If a defect arises:<br />
(1) you may within 30 days from the date of retail purchase (or such other period specified by the return policies of the place of<br />
purchase) return this Product to the place of purchase, together with the original proof of purchase and either the original box<br />
or the UPC code label from the box, and this Product will be replaced or, in the event that a replacement for this Product is not<br />
available at the place of purchase, either a refund of the purchase price for this Product or an store credit of equivalent retail value<br />
will be provided; or<br />
(2) you may after the day that is 30 days from the date of retail purchase (or such other period specified by the return policies of<br />
the place of purchase) and within the Warranty Period contact <strong>WowWee</strong> Customer Support to arrange for the replacement of this<br />
Product. In the event that a replacement for this Product is not available this Product will be replaced by <strong>WowWee</strong> with a product<br />
of equivalent or greater retail value.<br />
A purchase receipt or other proof of the date of retail purchase is required in order to claim the benefit of this warranty.<br />
If this Product is replaced, the replacement product becomes your property and the replaced Product becomes <strong>WowWee</strong>’s<br />
property. If the place of purchase refunds the purchase price of this Product or issues a store credit of equivalent retail value, this<br />
Product must be returned to the place of purchase and becomes <strong>WowWee</strong>’s property.<br />
EXCLUSIONS AND LIMITATIONS<br />
This warranty covers the normal and intended use of this Product. This warranty does not apply: (a) to damage caused by<br />
accident, abuse, unreasonable use, improper handling and care or other external causes not arising out of defects in materials or<br />
workmanship; (b) to damage caused by power line surge, lightning or acts of God; (c) to damage caused by service performed by<br />
anyone who is not an authorized representative of <strong>WowWee</strong>; (d) to any hardware, software or other add-on components installed<br />
by the end-user; (e) if this Product has been disassembled or modified in any way; (f) to faulty installation or set-up adjustments;<br />
(g) to consumable parts, such as batteries, unless damage has occurred due to a defect in materials or workmanship; (h) to<br />
cosmetic damage, including but not limited to scratches, dents or broken plastic, or normal wear and tear. Regardless of whether<br />
the camera is in use or not,exposure to extremely bright lights or objects can damage the CMOS camera sensor. This warranty<br />
specifically excludes any damage to the CMOS sensor resulting from exposure to extremely bright lights or objects, whether<br />
accidental or deliberate.<br />
THIS WARRANTY GIVES YOU SPECIFIC LEGAL RIGHTS AND YOU MIGHT ALSO HAVE OTHER RIGHTS THAT VARY FROM STATE<br />
TO STATE. WOWWEE’S RESPONSIBITLITY FOR PRODUCT DEFECTS IS LIMITED TO THE REPLACEMENT OF THIS PRODUCT OR<br />
THE REFUND OF THE PURCHASE PRICE FOR THIS PRODUCT. ALL EXPRESS AND IMPLIED WARRANTIES, INCLUDING BUT NOT<br />
LIMITED TO ANY IMPLIED WARRANTIES AND CONDITIONS OF MERCHANTABILITY AND FITNESS FOR A PARTICULAR PURPOSE,<br />
ARE LIMITED IN TIME TO THE TERM OF THIS LIMITED WARRANTY. NO WARRANTIES, WHETHER EXPRESS OR IMPLIED, WILL APPLY<br />
AFTER THE EXPIRATION OF THE LIMITED WARRANTY PERIOD. If any term of this warranty is held to be illegal or unenforceable,<br />
the legality or enforceability of the remaining terms shall not be affected or impaired.<br />
EXCEPT AS PROVIDED IN THIS WARRANTY AND TO THE EXTENT PERMITTED BY LAW, WOWWEE IS NOT RESPONSIBLE FOR<br />
DIRECT, SPECIAL, INCIDENTAL OR CONSEQUENTIAL DAMAGES HOWSOEVER CAUSED RESULTING FROM BREACH OF WARRANTY<br />
OR CONDITION OR UNDER ANY OTHER LEGAL THEORY, INCLUDING BUT NOT LIMITED TO LOSS OF USE. THE FOREGOING<br />
LIMITATION SHALL NOT APPLY TO DEATH OR PERSONAL INJURY CLAIMS, OR ANY STATUTORY LIABILITY FOR INTENTIONAL AND<br />
GROSS NEGLIGENT ACTS AND/OR OMISSIONS.<br />
SOME STATES DO NOT ALLOW THE EXCLUSION OR LIMITATION OF INCIDENTAL OR CONSEQUENTIAL DAMAGES, OR<br />
LIMITATIONS ON HOW LONG AN IMPLIED WARRANTY LASTS, SO THESE LIMITATIONS MIGHT NOT APPLY TO YOU.<br />
Valid only in U.S.A.<br />
52
Limited warranty<br />
For more information on Rovio, go to<br />
www.myrovio.com<br />
If you have any questions that are not answered in this <strong>manual</strong>, refer to<br />
www.wowweesupport.com<br />
To see the full range of <strong>WowWee</strong> products, go to<br />
www.wowwee.com<br />
Register your Rovio at<br />
www.wowwee.com<br />
53
This device complies with Part 15 of the FCC Rules. Operation is subject to the<br />
following two conditions: (1) This device may not cause harmful interference, and (2)<br />
This device must accept any interference received, including interference that may<br />
cause undesired operation.<br />
For these purposes, the party responsible is:<br />
<strong>WowWee</strong> USA Inc.<br />
875 Prospect Suite #202<br />
La Jolla, CA 92037<br />
NOTE<br />
This equipment has been tested and found to comply with the limits for a class B digital device, pursuant to part<br />
15 of the FCC rules. These limits are designed to provide reasonable protection against harmful interference in a<br />
residential installation. This equipment generates, uses and can radiate radio frequency energy and, if not installed<br />
and used in accordance with the instructions, may cause harmful interference to radio communications.<br />
However, there is no guarantee that interference will not occur in a particular Installation. If this equipment does<br />
cause harmful interference to radio or television reception, which can be determined by turning the equipment off<br />
and on, the user is encouraged to try and correct the interference by one or more of the following measures:<br />
- Reorient or relocate the receiving antenna<br />
- Increase the separation between the equipment and receiver<br />
- Connect the equipment into an outlet on a circuit different from that to which the receiver is connected<br />
- Consult the dealer or experienced radio/TV technician for help<br />
CAUTION<br />
Changes or modifications not expressly approved by the party responsible for compliance could void the user’s<br />
authority to operate the equipment.<br />
Manufactured and distributed by © 2007 <strong>WowWee</strong> Group Limited.<br />
Product names, designations, and logos are trademarks or registered<br />
trademarks of <strong>WowWee</strong> Group Limited. All rights reserved.<br />
Energy Plaza, 3/F<br />
92 Granville Road<br />
T.S.T. East, Hong Kong<br />
3500 de Maisonneuve West<br />
Suite 800<br />
Montreal, QC H3Z 3C1 Canada<br />
Consumer Hotline: 1-800-310-3033<br />
Customer Service: www.wowweesupport.com<br />
www.wowwee.com<br />
We recommend that you retain our address for<br />
future reference.<br />
Product and colors may vary.<br />
Packaging printed in China.<br />
This product is not suitable for children under 3 years<br />
because of small parts - choking hazard.<br />
8033US01TOP