Safety Manual for the Robomow RM 200 (PDF - Connox
Safety Manual for the Robomow RM 200 (PDF - Connox
Safety Manual for the Robomow RM 200 (PDF - Connox

You also want an ePaper? Increase the reach of your titles
YUMPU automatically turns print PDFs into web optimized ePapers that Google loves.
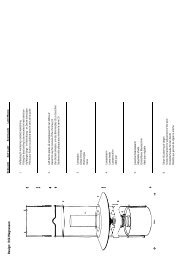
5.5 Splicing <strong>the</strong> Perimeter Wire<br />
If <strong>the</strong> perimeter wire needs to be spliced: Use <strong>the</strong> connectors supplied in <strong>the</strong> box, as shown in<br />
figure 5.2. It is waterproof and gives a reliable electrical connection.<br />
Figure 5.2<br />
Wires splicing<br />
Wire<br />
Connector<br />
1<br />
3<br />
Figure 5.3<br />
Charging<br />
2<br />
1. Strip one cm (0.5 inch) of<br />
each wire ends toge<strong>the</strong>r<br />
and twist <strong>the</strong> stripped ends<br />
toge<strong>the</strong>r using pliers.<br />
2. Insert <strong>the</strong> twisted wires into<br />
<strong>the</strong> splicing connector.<br />
3. Screw <strong>the</strong> wire connector<br />
on <strong>the</strong> twisted wires; make<br />
sure is tight.<br />
IMPORTANT INFO<strong>RM</strong>ATION!<br />
Twisted cables, or a screw terminal, insulated with insulation tape is not a satisfactory splice.<br />
Soil moisture will cause <strong>the</strong> conductors to oxidize and after a while result in broken circuit.<br />
5.6 Winter Storage<br />
<strong>Robomow</strong><br />
Remove <strong>the</strong> battery fuse and clean <strong>the</strong> <strong>Robomow</strong> (refer to sections 5.2). Store <strong>Robomow</strong> indoors in a<br />
clean a dry place, standing on its wheels; confirm <strong>the</strong> area around <strong>the</strong> bumper is free.<br />
Insert <strong>the</strong> battery fuse and connect <strong>the</strong> power Supply to <strong>the</strong> mains supply (figure 5.3) <strong>for</strong> <strong>the</strong> entire<br />
period in which <strong>Robomow</strong> will not be operating; confirm ‘Charging’ is displayed and ‘Ready – keep<br />
charging’ when <strong>the</strong> battery is fully charged.<br />
35<br />
The charging system and battery are designed such that <strong>the</strong>y can remain plugged in at all times of<br />
non-use without concern to over charging, over heating or damaging <strong>the</strong> battery.<br />
Perimeter Switch<br />
It is recommended to remove <strong>the</strong> Perimeter Switch <strong>for</strong> <strong>the</strong> winter period:<br />
- Disconnect <strong>the</strong> power supply from <strong>the</strong> mains power;<br />
- Open <strong>the</strong> Perimeter Switch cover;<br />
- Disconnect all connectors from <strong>the</strong> board;<br />
- Remove <strong>the</strong> Perimeter Switch and place it in dry storage;<br />
- Disconnect <strong>the</strong> green plot connector (keep it connected on <strong>the</strong> board <strong>for</strong> <strong>the</strong> next season) from<br />
<strong>the</strong> perimeter wire ends and protect it from moisture to prevent corrosion of <strong>the</strong> wires while not<br />
connected to <strong>the</strong> Perimeter Switch; You may place <strong>the</strong> Friendly Robotics wire nut connector onto<br />
both wire ends <strong>for</strong> protection in <strong>the</strong> winter.