Safety Manual for the Robomow RM 200 (PDF - Connox
Safety Manual for the Robomow RM 200 (PDF - Connox
Safety Manual for the Robomow RM 200 (PDF - Connox

Create successful ePaper yourself
Turn your PDF publications into a flip-book with our unique Google optimized e-Paper software.
22<br />
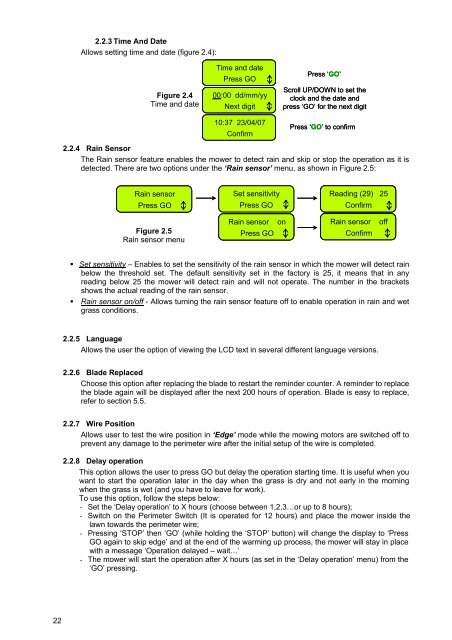
2.2.3 Time And Date<br />
Allows setting time and date (figure 2.4):<br />
Figure 2.4<br />
Time and date<br />
Rain sensor<br />
Press GO<br />
Figure 2.5<br />
Rain sensor menu<br />
Time and date<br />
Press GO<br />
00:00 dd/mm/yy<br />
Next digit<br />
10:37 23/04/07<br />
Confirm<br />
Set sensitivity<br />
Press GO<br />
Rain sensor on<br />
Press GO<br />
Press ‘ GO’<br />
Scroll UP/DOWN to set <strong>the</strong><br />
clock and <strong>the</strong> date and<br />
press ‘GO’ <strong>for</strong> <strong>the</strong> next digit<br />
Press ‘ GO’ to confirm<br />
2.2.4 Rain Sensor<br />
The Rain sensor feature enables <strong>the</strong> mower to detect rain and skip or stop <strong>the</strong> operation as it is<br />
detected. There are two options under <strong>the</strong> ‘Rain sensor’ menu, as shown in Figure 2.5:<br />
Reading (29) 25<br />
Confirm<br />
Rain sensor off<br />
Confirm<br />
� Set sensitivity – Enables to set <strong>the</strong> sensitivity of <strong>the</strong> rain sensor in which <strong>the</strong> mower will detect rain<br />
below <strong>the</strong> threshold set. The default sensitivity set in <strong>the</strong> factory is 25, it means that in any<br />
reading below 25 <strong>the</strong> mower will detect rain and will not operate. The number in <strong>the</strong> brackets<br />
shows <strong>the</strong> actual reading of <strong>the</strong> rain sensor.<br />
� Rain sensor on/off - Allows turning <strong>the</strong> rain sensor feature off to enable operation in rain and wet<br />
grass conditions.<br />
2.2.5 Language<br />
Allows <strong>the</strong> user <strong>the</strong> option of viewing <strong>the</strong> LCD text in several different language versions.<br />
2.2.6 Blade Replaced<br />
Choose this option after replacing <strong>the</strong> blade to restart <strong>the</strong> reminder counter. A reminder to replace<br />
<strong>the</strong> blade again will be displayed after <strong>the</strong> next <strong>200</strong> hours of operation. Blade is easy to replace,<br />
refer to section 5.5.<br />
2.2.7 Wire Position<br />
Allows user to test <strong>the</strong> wire position in ‘Edge’ mode while <strong>the</strong> mowing motors are switched off to<br />
prevent any damage to <strong>the</strong> perimeter wire after <strong>the</strong> initial setup of <strong>the</strong> wire is completed.<br />
2.2.8 Delay operation<br />
This option allows <strong>the</strong> user to press GO but delay <strong>the</strong> operation starting time. It is useful when you<br />
want to start <strong>the</strong> operation later in <strong>the</strong> day when <strong>the</strong> grass is dry and not early in <strong>the</strong> morning<br />
when <strong>the</strong> grass is wet (and you have to leave <strong>for</strong> work).<br />
To use this option, follow <strong>the</strong> steps below:<br />
- Set <strong>the</strong> ‘Delay operation’ to X hours (choose between 1,2,3…or up to 8 hours);<br />
- Switch on <strong>the</strong> Perimeter Switch (It is operated <strong>for</strong> 12 hours) and place <strong>the</strong> mower inside <strong>the</strong><br />
lawn towards <strong>the</strong> perimeter wire;<br />
- Pressing ‘STOP’ <strong>the</strong>n ‘GO’ (while holding <strong>the</strong> ‘STOP’ button) will change <strong>the</strong> display to ‘Press<br />
GO again to skip edge’ and at <strong>the</strong> end of <strong>the</strong> warming up process, <strong>the</strong> mower will stay in place<br />
with a message ‘Operation delayed – wait…’<br />
- The mower will start <strong>the</strong> operation after X hours (as set in <strong>the</strong> ‘Delay operation’ menu) from <strong>the</strong><br />
‘GO’ pressing.