Safety Manual for the Robomow RM 200 (PDF - Connox
Safety Manual for the Robomow RM 200 (PDF - Connox
Safety Manual for the Robomow RM 200 (PDF - Connox

You also want an ePaper? Increase the reach of your titles
YUMPU automatically turns print PDFs into web optimized ePapers that Google loves.
18<br />
1.4.2 <strong>Robomow</strong> Settings<br />
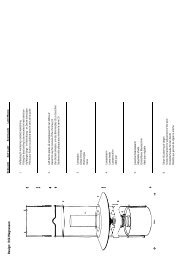
� Control Panel<br />
� On <strong>the</strong> top of <strong>the</strong> rear side of <strong>Robomow</strong> <strong>the</strong>re is a control panel. The control panel consists of a<br />
display, keypad and operating lamp (figure 1.23).<br />
Figure 1.23<br />
Control Panel<br />
Main Switch<br />
button<br />
STOP button<br />
STOP<br />
GO<br />
GO / START<br />
button<br />
Operating Lamp<br />
LCD display<br />
window<br />
DOWN<br />
arrow<br />
Rain<br />
sensor<br />
� The ‘GO’ button is used as a means to select or confirm different menu options or settings;<br />
� ‘Up ⇑ / Down ⇓’ arrow keys will allow you to scroll through <strong>the</strong> menu items;<br />
� The ‘STOP’ button has two different functions: when pressing during automatic operation it will<br />
stop <strong>Robomow</strong> and blade operation immediately and when pressing at any time during <strong>the</strong><br />
menu selection process it will bring you one step back in <strong>the</strong> menu.<br />
� ‘Main Switch’ button is used to switch off <strong>the</strong> <strong>Robomow</strong>. It is required to switch off <strong>the</strong><br />
<strong>Robomow</strong> when carrying it between zones.<br />
IMPORTANT INFO<strong>RM</strong>ATION!<br />
Follow <strong>the</strong> instructions on <strong>the</strong> LCD display - <strong>Robomow</strong> will<br />
friendly instruct you, step by step, how to complete <strong>the</strong> setup<br />
� Language, Time and Date settings<br />
� ‘Language’ is <strong>the</strong> first setting you are asked to set, as <strong>Robomow</strong> wakes up. Follow <strong>the</strong><br />
instructions below, as shown in figure 1.24.<br />
Language<br />
Press GO<br />
English (US)<br />
Confirm<br />
Time and Date<br />
Press GO<br />
00:00 dd/mm/yy<br />
next digit<br />
15:23 16/04/07<br />
Confirm<br />
Press ‘GO’ ‘ GO’<br />
Scroll ‘UP’ or ‘DOWN’<br />
to choose your language<br />
and press GO to confirm<br />
Press ‘ GO’<br />
Scroll to set <strong>the</strong> time and date<br />
and press ‘GO’ <strong>for</strong> <strong>the</strong> next digit<br />
(‘ STOP’ is used to go back)<br />
Press ‘ GO’ to confirm and continue<br />
with <strong>the</strong> instructions at <strong>the</strong> next<br />
subparagraph (‘Wire position’ test)<br />
Please note that <strong>the</strong>re are<br />
‘English’ and ‘English (US)’ under<br />
<strong>the</strong> ‘Language’ menu, as <strong>the</strong> language<br />
defines also <strong>the</strong> ‘Time and date’ <strong>for</strong>mat.<br />
Figure 1.24<br />
Language, Time<br />
and Date setting<br />
Follow <strong>the</strong> instructions, as shown in figure 1.25 to complete <strong>the</strong> test of <strong>the</strong> Perimeter Wire position:<br />
Test <strong>the</strong> perimeter wire setup by choosing <strong>the</strong> ‘Wire position’ test (If required to find <strong>the</strong> ‘Wire<br />
position’ menu refer to Figure 2.1). <strong>Robomow</strong> will follow <strong>the</strong> wire, while <strong>the</strong> mowing motor is switched<br />
off to prevent any damage to <strong>the</strong> perimeter wire after <strong>the</strong> initial setup; Walk along <strong>the</strong> side of <strong>the</strong><br />
<strong>Robomow</strong> while it is following <strong>the</strong> edge until completing one loop of <strong>the</strong> perimeter without striking any<br />
object; If <strong>Robomow</strong> collides in obstacle, it stops and drives back to allow you adjusting <strong>the</strong> wire<br />
position.<br />
UP<br />
arrow