Safety Manual for the Robomow RM 200 (PDF - Connox
Safety Manual for the Robomow RM 200 (PDF - Connox
Safety Manual for the Robomow RM 200 (PDF - Connox

You also want an ePaper? Increase the reach of your titles
YUMPU automatically turns print PDFs into web optimized ePapers that Google loves.
� Press <strong>the</strong> ‘ON’ button. A small flashing green light next to <strong>the</strong> ‘ON’ button indicates that<br />
<strong>the</strong> system is on and functioning properly. The Perimeter Switch also has indicators <strong>for</strong><br />
a disconnected/broken perimeter wire and <strong>for</strong> poor wire splicing. Figure 1.19<br />
ON button<br />
Figure 1.19<br />
Perimeter Switch<br />
Operating Panel<br />
Flashing light indicates<br />
<strong>the</strong> system is on<br />
Indicates a<br />
disconnected/broken wire<br />
Indicates poor splicing of<br />
perimeter wires or perimeter<br />
wire, which is too long<br />
� The Perimeter Switch has an automatic shutoff feature, eliminating <strong>the</strong> need <strong>for</strong> you to turn it off<br />
after each use. It will shut itself off after 12 hours of operation. You may manually turn <strong>the</strong><br />
perimeter switch off by pressing <strong>the</strong> ‘ON’ button continuously <strong>for</strong> 3 seconds. A beep will be heard<br />
after <strong>the</strong> three seconds, indicating you may release <strong>the</strong> button and <strong>the</strong> switch is off.<br />
1.4 <strong>Robomow</strong> Preparation and Settings<br />
17<br />
1.4.1 Setting The Cutting Height<br />
� Lift <strong>the</strong> Bumper Cover from <strong>the</strong> front side of <strong>the</strong> <strong>Robomow</strong> (figure 1.20).<br />
� To change <strong>the</strong> cutting height, rotate <strong>the</strong> cutting height adjustment knob, as shown in figure 1.21.<br />
Figure 1.20 -<br />
Lifting <strong>the</strong> Bumper Cover<br />
Control Panel Fuse location<br />
Power Supply<br />
connection<br />
Carrying<br />
handle Cutting height<br />
adjustment<br />
knob<br />
Figure 1.21 -<br />
<strong>RM</strong><strong>200</strong> General View<br />
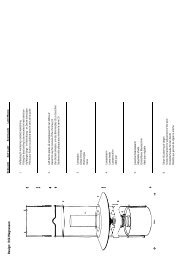
� Your <strong>Robomow</strong> is shipped with <strong>the</strong> batteries fuse removed and<br />
it will not operate without it. The fuse is supplied in a small<br />
plastic bag attached to <strong>the</strong> <strong>Robomow</strong> (located under <strong>the</strong><br />
Bumper Cover).<br />
� Lift <strong>the</strong> Bumper Cover and insert <strong>the</strong> fuse. The fuse can be<br />
inserted in ei<strong>the</strong>r direction. See figure 1.22<br />
� <strong>Robomow</strong> will now power up (wake up). The Batteries are<br />
charged at <strong>the</strong> factory and have plenty of power to per<strong>for</strong>m <strong>the</strong><br />
initial setup and test run. However, after <strong>the</strong> initial set-up<br />
process is completed <strong>the</strong> batteries need to be charged 16 hours<br />
in <strong>the</strong> Base Station be<strong>for</strong>e <strong>the</strong> first operation.<br />
Figure 1.22 -<br />
Inserting batteries fuse<br />
Mowing<br />
motor