Safety Manual for the Robomow RM 200 (PDF - Connox
Safety Manual for the Robomow RM 200 (PDF - Connox
Safety Manual for the Robomow RM 200 (PDF - Connox

You also want an ePaper? Increase the reach of your titles
YUMPU automatically turns print PDFs into web optimized ePapers that Google loves.
1.3.2 Laying Out The Perimeter Wire<br />
� Start setting <strong>the</strong> perimeter wire by placing pegs every few meters and at <strong>the</strong> lawn corners<br />
according to your plan; do not <strong>for</strong>get obstacles that need to be demarcated while laying <strong>the</strong> wire.<br />
� After removing enough wire within a given section, use <strong>the</strong> RoboRuler provided to set <strong>the</strong> correct<br />
distance from <strong>the</strong> lawn edge. The RoboRuler is used to help position <strong>the</strong> perimeter wire along<br />
walls, fences, sidewalk, driveways, flowerbeds and o<strong>the</strong>r perimeter zones.<br />
There are two basic measurements that are used on <strong>the</strong> RoboRuler (Figure 1.12).<br />
The shorter distance is used along perimeter edges where <strong>the</strong> area outside <strong>the</strong> immediate<br />
perimeter is free of obstacles and is <strong>the</strong> same relative height as <strong>the</strong> perimeter edge or lower<br />
(sidewalk on <strong>the</strong> same level or flowerbeds).<br />
The longer distance is used along perimeter edges where <strong>the</strong> area outside <strong>the</strong> immediate<br />
perimeter has obstacles or differences in <strong>the</strong> height along <strong>the</strong> perimeter edge (walls and fences).<br />
Long distance of<br />
RoboRuler – where<br />
<strong>the</strong> area outside <strong>the</strong><br />
immediate perimeter<br />
has obstacles or<br />
differences in <strong>the</strong><br />
height along <strong>the</strong><br />
perimeter edge<br />
Short distance of RoboRuler<br />
– where <strong>the</strong> area outside<br />
<strong>the</strong> immediate perimeter is<br />
free of obstacles and is <strong>the</strong><br />
same relative height as <strong>the</strong><br />
perimeter edge or lower<br />
Figure 1.12 – using <strong>the</strong> RoboRuler<br />
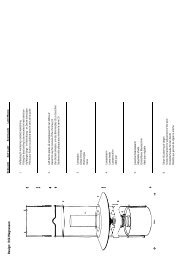
1.3.3 Fastening The Wire To The Ground<br />
� It is not necessary to bury <strong>the</strong> perimeter wire, though you may do so if you wish, up to 10 cm<br />
(4 inches) deep.<br />
� Small pegs or stakes are supplied with <strong>the</strong> <strong>Robomow</strong> and <strong>the</strong>y are used to fasten and hold<br />
<strong>the</strong> perimeter wire to <strong>the</strong> ground, below grass level.<br />
� Initially place a minimum number of pegs to fasten <strong>the</strong> wire down. Remember that you will want to<br />
test <strong>the</strong> wire set up be<strong>for</strong>e you fill in additional pegs and you may find some areas where you will<br />
need to move <strong>the</strong> wire position slightly.<br />
� Upon hammering <strong>the</strong> peg to its final depth in <strong>the</strong> ground, pull <strong>the</strong> wire tight. It is a lot easier to insert<br />
pegs into wet soil. If <strong>the</strong> soil is dry, water <strong>the</strong> yard be<strong>for</strong>e perimeter wire set up.<br />
15<br />
WARNING!<br />
Damage to <strong>the</strong> eye is possible. Use proper eye protection and wear<br />
appropriate work gloves when hammering <strong>the</strong> pegs. Hard or dry ground<br />
may cause pegs to break when driving <strong>the</strong>m in. In extreme cases,<br />
watering <strong>the</strong> lawn where <strong>the</strong> pegs will be driven can be beneficial.<br />
� Pegs should be driven at distances between one<br />
ano<strong>the</strong>r that will keep <strong>the</strong> wire down below <strong>the</strong> grass<br />
level and prevent it from becoming a tripping hazard<br />
(Figure 1.13).<br />
� When properly fastened to <strong>the</strong> ground, <strong>the</strong> wire and<br />
pegs will soon disappear under <strong>the</strong> growth of new<br />
grass and will not be visible.<br />
� If additional wire is required in order to complete <strong>the</strong><br />
set-up, use <strong>the</strong> wire connectors provided, which are<br />
waterproof, to connect between <strong>the</strong> two wire ends,<br />
as explained in chapter 5.5.<br />
Add pegs in to pull<br />
<strong>the</strong> perimeter wire down<br />
to <strong>the</strong> ground surface,<br />
below <strong>the</strong> grass tips.<br />
Figure 1.13 -<br />
Pegging <strong>the</strong> Perimeter Wire