Safety Manual for the Robomow RM 200 (PDF - Connox
Safety Manual for the Robomow RM 200 (PDF - Connox
Safety Manual for the Robomow RM 200 (PDF - Connox

Create successful ePaper yourself
Turn your PDF publications into a flip-book with our unique Google optimized e-Paper software.
1.1 Preparations<br />
10<br />
Chapter 1 - Perimeter Wire Setup<br />
� Read carefully <strong>the</strong> Operating and <strong>Safety</strong> <strong>Manual</strong> prior to setup.<br />
� It is recommended to mow your lawn using a conventional lawn mower and water <strong>the</strong> ground<br />
be<strong>for</strong>e starting <strong>the</strong> setup <strong>for</strong> easier driving of <strong>the</strong> pegs.<br />
� Confirm all parts <strong>for</strong> <strong>the</strong> setup are included (refer to ‘What’s in <strong>the</strong> Box’ page 9).<br />
� During <strong>the</strong> setup you will also need <strong>the</strong> following tools:<br />
Hammer<br />
1.2 Planning The Setup<br />
Combination<br />
Pliers<br />
Figure 1.1 – Tools required <strong>for</strong> <strong>the</strong> setup<br />
Small flat and<br />
Philips screwdrivers<br />
IMORTANT INFO<strong>RM</strong>ATION! Be<strong>for</strong>e starting <strong>the</strong> setup, it is necessary to first<br />
read this chapter in order to be aware of all setup rules and instructions so you are able<br />
to determine <strong>the</strong> best location <strong>for</strong> <strong>the</strong> Perimeter Switch and <strong>the</strong> perimeter wire layout.<br />
1.2.1 Perimeter Switch Location<br />
� Find a convenient spot outside <strong>the</strong> perimeter, but a location that is relatively easy <strong>for</strong> you to<br />
access.<br />
� The Perimeter Switch must be mounted vertically in order to maintain its’ water resistance<br />
and preferably in a dry and sheltered location.<br />
� Close to a wall socket (230V/120V) – <strong>the</strong> Perimeter Switch is supplied with 5 meters (16ft)<br />
low voltage cable that needs to be connected to an indoor Power Supply (Figure 1.2).<br />
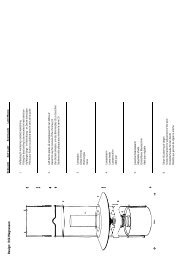
Figure 1.2<br />
Perimeter Switch<br />
Location<br />
Wires leading from <strong>the</strong> perimeter<br />
to <strong>the</strong> Perimeter Switch are<br />
adjacent and touching.<br />
Zone A<br />
The Perimeter Switch MUST be<br />
mounted vertically in order<br />
to maintain its’ water resistance<br />
5 meters<br />
low voltage<br />
cable<br />
Indoor Power<br />
Supply