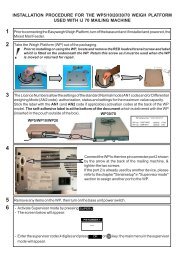
User Guide Product(range) - Neopost
User Guide Product(range) - Neopost
User Guide Product(range) - Neopost

You also want an ePaper? Increase the reach of your titles
YUMPU automatically turns print PDFs into web optimized ePapers that Google loves.
3. Enter/<br />
change the<br />
default<br />
settings<br />
• Set the values for Port Number, IP Address, Subnet Mask and<br />
Gateway IP Address according to your needs or leave the default<br />
values.<br />
Port Number: 9100<br />
IP Address: 192.168.50.180<br />
Subnet Mask: 255.255.255.0<br />
Gateway IP Address: 192.168.50.180<br />
• Confirm any changes to the values by pressing the Ok key. Now<br />
press the Cancel key until the main view is shown in the display.<br />
• Press the Ok key to turn the printer online. The bottom line of<br />
the display must now show: OnlinTCP<br />
Changing the PC’s IP address<br />
Please note all your network settings before performing the<br />
configuration described below. When you want to use this PC in your<br />
LAN again, the network settings of this PC have to be reconfigured.<br />
4. Configure<br />
the network<br />
settings of the<br />
PC<br />
In order to use this connection you have to set a fixed IP address for<br />
this PC.<br />
• Open the “Network and Sharing Center” on your PC (START ><br />
Control Panel > Network and Internet).<br />
• Click onto “Change adapter settings”.<br />
• Select the „Local Area Connection” and click onto “Change Settings<br />
of this connection”.<br />
• Deactivate the item “Internet Protocol Version 6 (TCP/IPv6)” and<br />
then select the “Internet Protocol Version 4 (TCP/IPv4)” and click<br />
onto “Properties” (see Figure 50)<br />
• Select “Use the following IP address:” and enter the following<br />
values (see Figure 51):<br />
IP address: The first three parts of the address must be the same<br />
as in the printer. The last part must be different!<br />
Subnet mask: Same as in the printer.<br />
Default gateway: Must be the same as the IP address in the<br />
printer.<br />
• Click onto “OK” and wait until the connection to the printer is<br />
established.<br />
90 <strong>User</strong> Manual Version 3.1