remote control- operating instruction
remote control- operating instruction
remote control- operating instruction

Create successful ePaper yourself
Turn your PDF publications into a flip-book with our unique Google optimized e-Paper software.
CAUTION<br />
RISK OF ELECTRIC SHOCK<br />
DO NOT OPEN
AKAI - JAPAN<br />
AS005RA-750<br />
DIGITAL ECHO KARAOKE POWER AMPLIFIER<br />
MULTI CONTROL<br />
MASTER VOLUME<br />
CH.LEVEL<br />
TONE/BAL<br />
DSP<br />
LOUDNESS<br />
CH.MODE<br />
MUTE<br />
AUDIO.AUTO RADIO.SCAN DISPLAY<br />
DIMMER<br />
POWER<br />
STANDBY<br />
INPUT<br />
MP3/WMA CONTROL<br />
MIC MENU<br />
RADIO MENU<br />
MIC1<br />
USB HOST<br />
MIC2
SAFETY PRECAUTIONS<br />
A<br />
Avoid opening the cover or back<br />
Do not open the cover, re-fix or touch the<br />
inner parts. No user-serviceable parts inside,<br />
refer servicing to qualified service personnel.<br />
A<br />
CAUTION<br />
RISK OF ELECTRIC SHOCK<br />
DO NOT OPEN<br />
B<br />
Protect voltage line<br />
Avoid high pressure and stamp on, do not<br />
pull, push excessively.<br />
B<br />
C<br />
Please put on this unit in the windy place<br />
Avoid direct sunshine and nearing heater.<br />
Do not operate in a sealed box and be sure<br />
to have enough room for heat exchange.<br />
C<br />
D<br />
Avoid covering vents<br />
Block up the vents will make the temperature<br />
in the unit become higher and will damage<br />
the unit.<br />
D<br />
E<br />
Avoid metals dropping in the unit<br />
Avoid metals dropping in, like needle,<br />
hairpin, coin, otherwise the unit will<br />
get short and out of work.<br />
E<br />
F<br />
Be sure to set the line voltage AC220V/50Hz<br />
If you are not sure of the type of power supply,<br />
consult your appliance dealer or local power company.<br />
F<br />
1
IMPORTANT SAFEGUARDS<br />
1. Read Instructions- All the safety and <strong>operating</strong> <strong>instruction</strong>s should be read before the appliance is operated.<br />
2. Retain Instructions- The safety and <strong>operating</strong> lnstructions should be retained for future reference.<br />
3. Follow Instructions- All <strong>operating</strong> <strong>instruction</strong>s should be followed.<br />
4. Heed Warnings- All warnings on the appliance and in the perating <strong>instruction</strong>s should be adhered to.<br />
5. Power Source- The appliance should be connected to a power supply only of the type specified in the<br />
<strong>operating</strong> <strong>instruction</strong>s or as marked on the appliance.<br />
6. Power Cord Protection- Power-supply cords should be routed so that they are not likely to be walked on or<br />
pinched by items placed upon or against them, pay particular attention to cords at plugs, convenience<br />
receptacles, and the point where they exit from the appliance.<br />
7. Water and Moisture- The appliance should not be used near water (for example, near a bathtub, washbowl,<br />
kitchen sink, laundry tub, in a wet basement, or near a swimming pool, etc.)<br />
8. Ventilation- The appliance should be situated so that its location or position does not interfere with its<br />
proper ventilation, Do not use the appliance on a bed, sofa, rug or similar surface that may block the<br />
ventilation openings.<br />
2
IMPORTANT SAFEGUARDS<br />
9. Heat - Keep the appliance away from heat sources such as radiators, heat registers, stoves, or other appliances<br />
(including amplifiers) that produce heat.<br />
10. Non-use Periods - The power cord of the appliance should be unplugged from the outlet when left unused<br />
for a long period of time.<br />
11. Damage Requiring Service - The appliance should be serviced by qualified service personnel when:<br />
a. The power-supply cord or plug has been damaged; or<br />
b. Objects have fallen or liquid has been spilled into the appliance; or<br />
c. The appliance has been exposed to rain; or<br />
d. The appliance does not appear to operate normally or exhibits a marked change in performance; or<br />
e. The appliance has been dropped, or the enclosure damaged.<br />
12. Servicing - The user should not attempt to service the appliance beyond that specified in <strong>operating</strong><br />
<strong>instruction</strong>s. All other servicing should be referred to qualified service personnel.<br />
13. Clean only with dry cloth.<br />
14. Unplug this apparatus during lightning storms or when unused for long periods of time.<br />
3
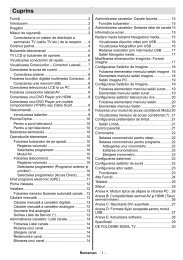
FRONT PANEL<br />
POWER<br />
STANDBY<br />
INPUT<br />
CH.LEVEL<br />
TONE/BAL<br />
DSP<br />
MP3/WMA CONTROL<br />
LOUDNESS<br />
CH.MODE<br />
MUTE<br />
MIC MENU<br />
AUDIO.AUTO RADIO.SCAN DISPLAY<br />
DIMMER<br />
RADIO MENU<br />
MIC1<br />
USB HOST<br />
MIC2<br />
1 2 3 4 5 6 7 8 9 10 11 12<br />
MULTI CONTROL<br />
1. Multi-Function <strong>control</strong> key<br />
2. Channel volume key<br />
3. Tone/Balance key<br />
4. DSP Mode selector key<br />
5. Loudness on/off key<br />
6. 2.1/3.1/5.1 Channel selection<br />
7. Output suspension<br />
8. Audio-Input auto key<br />
9. Tuner frequency scanning key<br />
10. VFD Display mode key<br />
11. VFD Dimmer mode key<br />
MASTER VOLUME<br />
13 14 15 16 17 18 19 20 21 22 23 24 25 26 27<br />
12. Master volume adjust key<br />
13. Power switch<br />
14. Power standby<br />
15. Input selection<br />
16. USB Connection previous key<br />
17. USB Connection next key<br />
18. USB Connection stop key<br />
19. USB Connection play/pause key<br />
20. MIC Menu down key<br />
21. MIC Menu button<br />
22. MIC Menu up key<br />
23. Radio menu down key<br />
24. Radio menu button<br />
25. Radio menu up key<br />
26. Microphone-2 jack<br />
27. USB Jack<br />
4
REAR PANEL<br />
RoHS<br />
AKAI - JAPAN<br />
COMPLIANT<br />
TUNER<br />
AUDIO INPUT<br />
FM<br />
AUX<br />
CD/VCD<br />
DVD<br />
L<br />
MODEL NO.:<br />
AS005RA-750<br />
R<br />
SPEAKERS OUTPUT<br />
POWER SOURCE: AC~230V/50Hz<br />
POWER CONSUMPTION: 340W<br />
AM<br />
AUX<br />
CD/VCD<br />
DVD<br />
SR SL CEN SW<br />
FR<br />
FL<br />
5.1 CH AC-3 INPUT<br />
FL<br />
SL<br />
CEN<br />
AC~230V 50Hz<br />
CAUTION<br />
FR<br />
SR<br />
SW.IN<br />
SW.OUT<br />
SR SL CEN SW<br />
FR<br />
FL<br />
RISK OF ELECTRIC SHOCK<br />
DO NOT OPEN<br />
S/NO.:<br />
28 29 30 31 32 33 34 35<br />
28. AM/FM Antenna connector<br />
29. Audio input jack<br />
30. AC-3 Audio input jack<br />
31. Sub-woofer output<br />
32. Center/Surround speaker terminals<br />
33. Subwoofer speaker terminals<br />
34. Front speaker terminals<br />
35. Power cord<br />
5
REMOTE CONTROL<br />
36<br />
37<br />
38<br />
39<br />
40<br />
41<br />
42<br />
43<br />
44<br />
45<br />
46<br />
47<br />
48<br />
49<br />
50<br />
VOL<br />
51 71<br />
52<br />
53<br />
54<br />
55<br />
56<br />
57<br />
58<br />
59<br />
60<br />
STANDBY<br />
BAL<br />
L<br />
TUNE<br />
INPUT<br />
CH<br />
VOL<br />
MUTE<br />
AUTO<br />
DISPLAY<br />
DSP<br />
AM/FM ST/MO LOUD<br />
MEMORY<br />
BASS<br />
SCAN<br />
CH.MODE<br />
TREBLE<br />
BAL<br />
R<br />
SL VOL CEN VOL SR VOL SW VOL<br />
MIC VOL<br />
M.BASS<br />
M.TRE<br />
AS005RA-750<br />
DELAY<br />
ECHO<br />
61<br />
62<br />
63<br />
64<br />
65<br />
66<br />
67<br />
68<br />
69<br />
70<br />
72<br />
73<br />
74<br />
75<br />
76<br />
77<br />
78<br />
79<br />
36. Power standby<br />
37. Audio-Input select key<br />
38. Tuner frequency adjust up<br />
39. Program select up<br />
40. Tuner frequency adjust down<br />
41. Program select down<br />
42. AM/FM Select key<br />
43. STEREO/MONO Select key<br />
44. Program memory key<br />
45. Tuner frequency scanning key<br />
46. Main channel bass up<br />
47. Main channel bass down<br />
48. Main volume up<br />
49. Left speaker balance<br />
50. USB Connection previous key<br />
51. USB Connection next key<br />
52. Main volume down<br />
53. Surround left output up<br />
54. Centre output up<br />
55. Surround left output down<br />
56. Centre output down<br />
57. MIC Volume up<br />
6
REMOTE CONTROL<br />
58. MIC Bass up<br />
59. MIC Volume down<br />
60. MIC Bass down<br />
61. Audio-Input auto key<br />
62. VFD Display mode key<br />
63. DSP Mode selector key<br />
64. Loudness on/off key<br />
65. 2.1/3.1/5.1 Channel selection<br />
66. Main channel treble up<br />
67. Main channel treble down<br />
68. Output suspension<br />
69. Right speaker balance<br />
70. USB Connection play/pause key<br />
71. USB Connection stop key<br />
72. Subwoofer output up<br />
73. Surround right output up<br />
74. Subwoofer output down<br />
75. Surround right output down<br />
76. OK Delay selector key<br />
77. MIC Treble up<br />
78. Echo adjust key<br />
79. MIC Treble down<br />
7
CONTROL OPERATIONS<br />
POWER<br />
STANDBY<br />
INPUT<br />
CH.LEVEL<br />
TONE/BAL<br />
DSP<br />
MP3/WMA CONTROL<br />
LOUDNESS<br />
CH.MODE<br />
MUTE<br />
MIC MENU<br />
AUDIO.AUTO RADIO.SCAN DISPLAY<br />
DIMMER<br />
RADIO MENU<br />
MIC1<br />
USB HOST<br />
MIC2<br />
MULTI CONTROL<br />
MASTER VOLUME<br />
30 30<br />
1.Remote distance should be within 7<br />
meters, and the angles between the<br />
central line should not wider than 30 .<br />
STANDBY<br />
INPUT AUTO<br />
DISPLAY<br />
TUNE<br />
CH<br />
DSP<br />
AM/FM ST/MO LOUD<br />
MEMORY<br />
SCAN<br />
CH.MODE<br />
2.No large obstacles between <strong>remote</strong><br />
<strong>control</strong> and the sensor.<br />
BAL<br />
L<br />
BASS<br />
VOL<br />
MUTE<br />
TREBLE<br />
BAL<br />
R<br />
VOL<br />
3.It may be out of <strong>control</strong> when the sensor<br />
directly shines by strong light, specially<br />
fluorescent lamp. Please remove the unit<br />
beyond the light.<br />
SL VOL CEN VOL SR VOL SW VOL<br />
DELAY<br />
MIC VOL M.BASS M.TRE ECHO<br />
AS005RA-750<br />
8
REMOTE CONTROL- OPERATING INSTRUCTION<br />
Normal function<br />
1. Select audio source by press INPUT key on the <strong>control</strong>. When selecting the AC-3 input the machine can be<br />
lined to the decoders 5.1 channel output.<br />
STANDBY<br />
INPUT<br />
AUTO<br />
DISPLAY<br />
TUNE<br />
CH<br />
DSP<br />
2. Press VOL+/- keys on the <strong>remote</strong> <strong>control</strong> to adjust the setting of main volume <strong>control</strong> to you listening level.<br />
VOL<br />
BAL<br />
L<br />
MUTE<br />
BAL<br />
R<br />
VOL<br />
3. Some audio sources or speakers, or incorrect speaker placing can cause unbalanced hearing.<br />
VOL<br />
BAL<br />
L<br />
MUTE<br />
BAL<br />
R<br />
VOL<br />
4. Press CH.MODE key on the <strong>remote</strong> <strong>control</strong> to select channel mode. When select AC-3 input, it will be<br />
set on 5.1 CH.<br />
TUNE<br />
CH<br />
DSP<br />
AM/FM<br />
ST/MO<br />
LOUD<br />
MEMORY<br />
SCAN<br />
CH.MODE<br />
9
REMOTE CONTROL- OPERATING INSTRUCTION<br />
5. Press LOUD key on the <strong>remote</strong> <strong>control</strong> to adjust the channel sound.<br />
DISPLAY<br />
TUNE<br />
CH<br />
DSP<br />
AM/FM<br />
ST/MO<br />
LOUD<br />
MEMORY<br />
SCAN<br />
CH.MODE<br />
6. Press TREBLE+/- or BASS+/- keys on the <strong>remote</strong> <strong>control</strong> to increase or decrease music treble or bass effect.<br />
BASS<br />
TREBLE<br />
VOL<br />
BAL<br />
L<br />
MUTE<br />
BAL<br />
R<br />
VOL<br />
7. Press DSP key on the <strong>remote</strong> <strong>control</strong> to select DSP mode. Eight modes could be selected: POPS, JAZZ, DISCO,<br />
STADIUM, MATRIX, CLASSIC, HALL, or DSP OFF.<br />
DISPLAY<br />
TUNE<br />
CH<br />
DSP<br />
AM/FM<br />
ST/MO<br />
LOUD<br />
MEMORY<br />
SCAN<br />
CH.MODE<br />
10
REMOTE CONTROL- OPERATING INSTRUCTION<br />
8. Press AUTO key, unit will automatically scan input signals. It will scan in the order of AUX, CD/VCD, DVD,<br />
AC-3 and TUNER. After detected one channel had signal input, it will stop scanning and output the signals.<br />
Press AUTO key again to start scanning from next channel. If no signal is detected in AUX, CD/VCD, DVD,<br />
AC-3 channels, it will switch to TUNER.<br />
STANDBY<br />
INPUT<br />
AUTO<br />
DISPLAY<br />
TUNE<br />
CH<br />
DSP<br />
9. Press MUTE key on the <strong>remote</strong> <strong>control</strong> to mute, press it again to unmute. Or press any keys on the front panel to<br />
unmute.<br />
VOL<br />
BAL<br />
L<br />
MUTE<br />
BAL<br />
R<br />
VOL<br />
TWINKLE<br />
10. Press STANDBY key on the <strong>remote</strong> <strong>control</strong> to make it standby. Press it again the indicator will light down and<br />
enter normal status.<br />
STANDBY<br />
INPUT<br />
AUTO<br />
POWER<br />
STANDBY<br />
INPUT<br />
DISPLAY<br />
TUNE<br />
CH<br />
DSP<br />
TWINKLE<br />
11
AM/FM TUNER- OPERATING INSTRUCTION<br />
Tuner application<br />
1. Before using radio function, you must connect the supplied antenna. Adjust the antenna to obtain<br />
optimum reception. Press INPUT key on the <strong>remote</strong> <strong>control</strong>, to select TUNER function.<br />
STANDBY<br />
INPUT<br />
AUTO<br />
DISPLAY<br />
TUNE<br />
CH<br />
DSP<br />
2. Press AM/FM key on the <strong>remote</strong> <strong>control</strong>, to select AM band or FM band.<br />
TUNE<br />
CH<br />
DSP<br />
AM/FM<br />
ST/MO<br />
LOUD<br />
MEMORY SCAN CH.MODE<br />
FM<br />
AM<br />
3. Press CH +/- keys on the <strong>remote</strong> <strong>control</strong> to find out the radio bands you've memorized before.<br />
DISPLAY<br />
TUNE<br />
CH<br />
DSP<br />
AM/FM<br />
ST/MO<br />
LOUD<br />
MEMORY<br />
SCAN<br />
CH.MODE<br />
4. Press TUN +/- keys on the <strong>remote</strong> <strong>control</strong> to adjust the radio frequency by hand.<br />
DISPLAY<br />
TUNE<br />
CH<br />
DSP<br />
FM<br />
AM/FM<br />
ST/MO<br />
LOUD<br />
MEMORY<br />
SCAN<br />
CH.MODE<br />
AM<br />
12
AM/FM TUNER- OPERATING INSTRUCTION<br />
5.Press SCAN key on the <strong>remote</strong> <strong>control</strong>, the machine can scour radio channel from low-frequency<br />
to high-frequency by itself, and memorize the channels one by one.<br />
DISPLAY<br />
TUNE<br />
CH<br />
DSP<br />
FM<br />
AM/FM<br />
ST/MO<br />
LOUD<br />
MEMORY<br />
SCAN<br />
CH.MODE<br />
AM<br />
6. Press MEMORY key on the <strong>remote</strong> <strong>control</strong> to memorize the current radio frequency in the band,<br />
the machine can memorize at most 30 radio bands.<br />
DISPLAY<br />
DISPLAY<br />
DISPLAY<br />
TUNE<br />
CH<br />
DSP<br />
TUNE<br />
CH<br />
DSP<br />
TUNE<br />
CH<br />
DSP<br />
AM/FM<br />
ST/MO<br />
LOUD<br />
AM/FM<br />
ST/MO<br />
LOUD<br />
AM/FM<br />
ST/MO<br />
LOUD<br />
MEMORY<br />
SCAN<br />
CH.MODE<br />
TWINKLE<br />
MEMORY<br />
SCAN<br />
CH.MODE<br />
TWINKLE<br />
MEMORY<br />
SCAN<br />
CH.MODE<br />
SELECT STATION NO.<br />
REPRESS<br />
7. Press STEREO/MONO keys on the <strong>remote</strong> <strong>control</strong>, to choose stereo or mono effect at FM band.<br />
DISPLAY<br />
TUNE<br />
CH<br />
DSP<br />
AM/FM<br />
ST/MO<br />
LOUD<br />
MEMORY<br />
SCAN<br />
CH.MODE<br />
STEREO<br />
MONO<br />
13
SYSTEM CONNECTION 1<br />
AKAI - JAPAN<br />
COMPLIANT<br />
TAP E<br />
CD/VCD<br />
5.1CH OUTPUT<br />
MIX OUTPUT<br />
DVD<br />
TUNER<br />
AUDIO INPUT<br />
FM<br />
AUX<br />
CD/VCD<br />
DVD<br />
L<br />
MODEL NO.:<br />
AS005RA-750<br />
R<br />
SPEAKERS OUTPUT<br />
POWER SOURCE: AC~230V/50Hz<br />
POWER CONSUMPTION: 340W<br />
AM<br />
AUX<br />
CD/VCD<br />
DVD<br />
SR SL CEN SW<br />
FR<br />
FL<br />
5.1 CH AC-3 INPUT<br />
FL SL CEN<br />
RoHS<br />
AC~230V 50Hz<br />
CAUTION<br />
FR<br />
SR<br />
SW.IN<br />
SW.OUT<br />
SR SL CEN SW<br />
FR<br />
FL<br />
RISK OF ELECTRIC SHOCK<br />
DO NOT OPEN<br />
S/NO.:<br />
14
SYSTEM CONNECTION 2<br />
AKAI - JAPAN<br />
COMPLIANT<br />
TUNER<br />
AUDIO INPUT<br />
FM<br />
AUX<br />
CD/VCD<br />
DVD<br />
L<br />
MODEL NO.:<br />
AS005RA-750<br />
R<br />
SPEAKERS OUTPUT<br />
POWER SOURCE: AC~230V/50Hz<br />
POWER CONSUMPTION: 340W<br />
AM<br />
AUX<br />
CD/VCD<br />
DVD<br />
SR SL CEN SW<br />
FR<br />
FL<br />
5.1 CH AC-3 INPUT<br />
FL SL CEN<br />
RoHS<br />
AC~230V 50Hz<br />
CAUTION<br />
FR<br />
SR<br />
SW.IN<br />
SW.OUT<br />
SR SL CEN SW<br />
FR<br />
FL<br />
RISK OF ELECTRIC SHOCK<br />
DO NOT OPEN<br />
S/NO.:<br />
CENT SPEAKER<br />
FRONT LEFT SPEAKER<br />
FRONT RIGHT SPEAKER<br />
PASSIVE SUBWOOFER<br />
SL SPEAKER<br />
SR SPEAKER<br />
15
TROUBLE SHOOTING<br />
Problem<br />
Screen displays<br />
disorder or malfunction<br />
Cause<br />
Influenced by the outside element,<br />
computer has problem.<br />
Modified methods<br />
Turn off the set, pull out the wire,<br />
reinsert it then start the set again.<br />
No sound<br />
The speaker terminal connects improper.<br />
The sound frequency in terminal wrong<br />
connects or improper.<br />
The power plug connects with the socket<br />
improper.<br />
The volume is too low.<br />
Press the MUTE key on the panel.<br />
The speaker terminal is short-circuited.<br />
Connect tightly.<br />
Check and connect the sound frequency<br />
in terminal properly.<br />
Connect the power correctly.<br />
Turn the volume to the suitable position.<br />
Press down MUTE key.<br />
Cut off the power and connect the speaker<br />
well, then start the power again.<br />
Sound distortion<br />
The amplifier input terminal wrong<br />
connects.<br />
The volume is too loud.<br />
Connect properly.<br />
Properly adjust the volume of the<br />
corresponding channel.<br />
The sound doesn't<br />
continue and the relays<br />
has 'Di-Da' noise.<br />
Using the speaker with the impedance less<br />
then 8 ohm.<br />
The volume is too loud.<br />
The speaker terminal is short-circuited or<br />
connected improperly.<br />
Using the speaker with the impedance 8<br />
ohm.<br />
Adjust the volume to the suitable position.<br />
Cut off the power and connect the speaker<br />
correctly, then turn on the power.<br />
16
TECHNICAL SPECIFICATIONS<br />
1. Power source ........................................................................... AC~230V/50Hz<br />
2. Power consumption ................................................................. 340W<br />
3. Rating output power ................................................................ 100W x 2<br />
4. Subwoofer output power .......................................................... 100W<br />
5. Center channel rating output power .......................................... 25W<br />
6. Surround channel rating output power ...................................... 25W x 2<br />
7. Frequency response (line input) ..................................... 20Hz - 20kHz<br />
8. Speaker impedance ..................................................................... 4 - 8ohm<br />
9. Signal to noise ratio (line input) ................................................. 80dB No A-weighted<br />
10. THD(1kHz, 1W) ......................................................................... 0.5%<br />
11. Input sensitivity .......................................................... 650 mV<br />
12. Tremble <strong>control</strong> .......................................................... +/-10dB(10KHz)<br />
13. Bass <strong>control</strong> ............................................................... +/-10dB(100Hz)<br />
Note:the above specifications only for your reference.<br />
17
SPEAKER ARRANGEMENT<br />
HOME CINEMA<br />
FRONT LEFT SPEAKER<br />
CENTER SPEAKER<br />
FRONT RIGHT SPEAKER<br />
PASSIVE SUBWOOFER<br />
SURROUND RIGHT SPEAKER<br />
SURROUND LEFT SPEAKER<br />
HI-FI SYSTEM<br />
FRONT RIGHT SPEAKER<br />
FRONT LEFT SPEAKER<br />
18
AKAI - JAPAN