PER Boiler Manual - Weil-McLain
PER Boiler Manual - Weil-McLain
PER Boiler Manual - Weil-McLain

Create successful ePaper yourself
Turn your PDF publications into a flip-book with our unique Google optimized e-Paper software.
<strong>PER</strong> Series 3<br />
Electric-Hydronic <strong>Boiler</strong>s<br />
Installation Instructions<br />
Installer<br />
Read all instructions before<br />
installing. Follow all instructions in<br />
proper order to prevent personal<br />
injury or death.<br />
• Consider piping and installation when determining<br />
boiler location.<br />
• Any claims for damage or shortage in shipment<br />
must be filed immediately against the<br />
transportation company by the consignee.<br />
User<br />
• This manual is for use only by<br />
your qualified heating installer/<br />
service technician.<br />
• We recommend regular service<br />
by a qualified service<br />
technician, at least annually.<br />
These Instructions must be used only by a qualified installer/service<br />
technician. Read these instructions completely before beginning. Failure to<br />
follow these instructions can cause severe personal injury, death or<br />
substantial property damage.<br />
When calling or writing about the boiler— Please have the boiler model<br />
number from the boiler rating label and the CP number from the boiler<br />
jacket. You may list the CP number in the space provided on the Installation<br />
and service certificate found on page 9.<br />
Part number 550-141-396/0801
<strong>PER</strong> Series 3 Electric-Hydronic <strong>Boiler</strong>s Installation Instructions<br />
Please read before proceeding<br />
Hazard Definitions<br />
The following defined terms are used throughout these Instructions to bring attention to the presence of hazards<br />
of various risk levels, or to important information concerning the life of the product.<br />
Indicates presence of hazards that will cause severe personal injury, death or substantial property<br />
damage.<br />
Indicates presence of hazards that can cause severe personal injury, death or substantial property<br />
damage.<br />
Indicates presence of hazards that will or can cause minor personal injury or property damage.<br />
Indicates special instructions on installation, operation or maintenance that are important but<br />
not related to personal injury or property damage.<br />
Failure to adhere to the guidelines on this page can result in severe personal injury, death<br />
or substantial property damage.<br />
When servicing boiler —<br />
• To avoid electric shock, disconnect electrical supply before performing maintenance.<br />
• To avoid severe burns, allow boiler to cool before performing maintenance.<br />
• The boiler contains fiberglass materials. Use care when handling these materials per instructions on page<br />
11 of this manual.<br />
<strong>Boiler</strong> operation —<br />
• Do not block flow of ventilation air to boiler. Will cause components to overheat.<br />
• Should overheating occur, do not disconnect electrical supply to circulator. Instead, shut off the electrical<br />
supply at a location external to the appliance.<br />
• Do not use this boiler if any part has been under water. Immediately call a qualified service technician to<br />
inspect the boiler and to replace any part of the control system that has been under water.<br />
<strong>Boiler</strong> water —<br />
• Do not use petroleum-based cleaning or sealing compounds in boiler system. This can result in substantial<br />
property damage.<br />
• Do not use "homemade cures" or "boiler patent medicines". Serious damage to boiler, personnel and/or<br />
property may result.<br />
• Continual fresh makeup water will reduce boiler life. Mineral buildup in section reduces heat transfer,<br />
overheats cast iron, and causes section failure. Addition of oxygen and other gases can cause internal<br />
corrosion. Leaks in boiler or piping must be repaired at once to prevent makeup water.<br />
• Do not add cold water to hot boiler. Thermal shock can cause sections to crack.<br />
Glycol — potential fire hazard —<br />
All glycol is flammable when exposed to high temperatures. If glycol is allowed to accumulate in or around<br />
the boiler or any other potential ignition source, a fire can develop. In order to prevent potential severe<br />
personal injury, death or substantial property damage from fire and/or structural damage:<br />
• Never store glycol of any kind near the boiler or any potential ignition source.<br />
• Monitor and inspect the system and boiler regularly for leakage. Repair any leaks immediately to prevent<br />
possible accumulation of glycol.<br />
• Never use automotive antifreeze or ethylene glycol in the system. Using these glycols can lead to hazardous<br />
leakage of glycol in the boiler system.<br />
2<br />
Part number 550-141-396/0801
<strong>PER</strong> Series 3 Electric-Hydronic <strong>Boiler</strong>s Installation Instructions<br />
Pre-installation<br />
General instructions<br />
The <strong>Weil</strong>-<strong>McLain</strong> Model <strong>PER</strong> electric-hydronic boilers<br />
are assembled units designed for use in forced hot water<br />
heating systems. The suggested design temperature rise<br />
through the boiler is 20°F. The <strong>PER</strong> boiler is a complete<br />
package including the circulator and expansion tank.<br />
Low flow rates through the boiler at elevated<br />
temperatures should be avoided. The structure to be<br />
heated should be insulated in the conventional manner<br />
used in your area for electrically heated buildings. <strong>Boiler</strong><br />
must be installed in accordance with these instructions<br />
so as not to void our warranty.<br />
Open the boiler crate and check the contents. In the<br />
event of shortage or damage, notify the transportation<br />
company immediately.<br />
Locating the boiler<br />
The compact construction of the electric-hydronic<br />
boiler permits installation in an alcove, storeroom or<br />
other small area. The location chosen should have<br />
convenient electrical service.<br />
Allow sufficient clearance above and below the boiler<br />
cabinet to permit installation of supply and return<br />
piping. A minimum of 6 inches is required at the top of<br />
the boiler for installation and accessories. A clearance<br />
of 10 inches is required on the right hand side for<br />
removal of the elements.<br />
Mounting the boiler<br />
Normally, the boiler will be installed against a frame or<br />
masonry wall. If the wall surface is rough or uneven, it<br />
may be necessary to mount plywood on the wall, then<br />
mount the boiler on the plywood. Refer to<br />
“Dimensions” on page 12 and “Ratings” on page 13, and<br />
note the boiler weight. Be sure that the wall structure<br />
will support the boiler and its piping.<br />
The 9 /16" top mounting holes and 5 /16" lower mounting<br />
holes are on 16-inch centers to permit installation on<br />
studs in standard wall construction. The use of ¼" x<br />
2½" lag screws is recommended for mounting the boiler.<br />
The head diameters of the top two screws must not<br />
exceed 9 /16".<br />
1. Locate the top mounting holes so that the boiler<br />
will be level. Install the screws so that the heads<br />
protrude ¾" from the wall.<br />
2. Raise the boiler to mounting position by placing a<br />
board across the bottom of the boiler or by grasping<br />
the lower left and right inside corners. Do not<br />
attempt to lift the boiler by grasping the bottom<br />
jacket cross tie.<br />
3. Place the top brackets over the lag screws and then<br />
install screws through the lower mounting holes.<br />
The top screws can now be tightened.<br />
Expansion tank sizing<br />
Undersized expansion tanks cause system water to be<br />
lost from relief valve and makeup water added through<br />
fill valve. Eventual section failure can result.<br />
If a Fill-Trol system is used, refer to Table 1 for proper sizing. If Fill-Trol<br />
action is not desired, size the expansion tank according to the water volume<br />
of the system. If a standard closed expansion tank (without a diaphragm)<br />
is used, the air vent tapping on the boiler casting makes a convenient point<br />
of connection. The No. 109 Fill-Trol is furnished as standard equipment.<br />
Table 1 Expansion tank sizing (Tank sizing based on 200 °F<br />
average system temperature.)<br />
<strong>Boiler</strong><br />
model<br />
number<br />
Standard Fill-Trol tank<br />
(for series loop or one-pipe system<br />
with convector baseboard)<br />
Hydrostatic pressure test<br />
Additional Ex-Trol tank<br />
(for cast-iron radiators or<br />
cast-iron baseboard)<br />
<strong>PER</strong>-15 No. 109 No. 15<br />
<strong>PER</strong>-20 No. 109 No. 15<br />
<strong>PER</strong>-25 No. 109 No. 15<br />
Note: Gravity systems converted to a forced hot water system usually require<br />
additional compression tank capacity.<br />
Pressure test boiler before attaching piping or electrical supply.<br />
1. Install air vent in tapping on top of boiler.<br />
2. Plug remaining tappings, including relief valve opening.<br />
3. Connect water supply. Fill boiler and purge all air. For more than 10<br />
minutes, pressure-test at 1½ times maximum working pressure.<br />
Do not leave boiler unattended. Cold water fill could<br />
expand and cause excess pressure, resulting in severe<br />
personal injury, death or substantial property damage.<br />
4. Check for maintained gauge pressure. Visually check for leaks if gauge<br />
pressure drops.<br />
5. Drain boiler and repair leaks if found.<br />
Leaks must be repaired at once. Failure to do so can<br />
damage boiler, resulting in substantial property damage.<br />
6. Retest boiler after repairing leaks.<br />
7. Remove testing plugs and air vent.<br />
Do not use petroleum-based cleaning or sealing<br />
compounds in boiler system. Severe damage to boiler<br />
will result, causing substantial property damage.<br />
Part number 550-141-396/0801 3
<strong>PER</strong> Series 3 Electric-Hydronic <strong>Boiler</strong>s Installation Instructions<br />
Pre-installation continued<br />
Piping the boiler<br />
After the boiler is secured to the wall, attach the supply<br />
and return piping. Refer to Table 2 for minimum pipe<br />
sizes.<br />
Install manual shut-off valves in the supply and return<br />
lines to facilitate servicing the boiler. Model <strong>PER</strong> boilers<br />
are provided with a built-in air elimination system using<br />
a float-type automatic air vent. Refer to the boiler line<br />
drawings and proceed as follows:<br />
1. Install the pressure-temperature gauge and ¾"-¼"<br />
bushing in the 1¼" x 1¼" x ¾" tee installed on the<br />
boiler supply connection. See “Dimensions” on<br />
page 12.<br />
2. The ¾" tapping, located to the left of the supply<br />
tapping, must be used for either an automatic<br />
venting device or piped directly to a standard closed<br />
expansion tank.<br />
3. Install the pressure relief valve in the ¾" tapping<br />
located on the top left hand side of the boiler (see<br />
“Dimensions” on page 12). Pipe the relief valve<br />
outlet to a floor drain or near the floor. Do not pipe<br />
the relief valve to any area where freezing<br />
temperatures might be encountered.<br />
Pipe relief valve discharge line near<br />
floor close to floor drain to eliminate<br />
potential of severe burns. Do not<br />
pipe to any area where freezing<br />
could occur. Do not plug valve or<br />
place any obstruction in discharge<br />
line.<br />
4. Connect the system supply piping to the tapping<br />
located at the right on the top of the boiler casting.<br />
5. Connect the system return piping to the circulator<br />
flange. When solder fittings are used, be sure that<br />
the gasket is not between the flanges when the solder<br />
connection is made.<br />
6. A Fill-Trol system is supplied with <strong>PER</strong> boilers<br />
follow the instructions attached to the valve.<br />
Table 2 Pipe sizes and flow rates<br />
(Recommended minimum pipe size with 20°F<br />
temperature rise through boiler.)<br />
Wiring the boiler<br />
Electric shock hazard. Can cause<br />
severe personal injury or death if<br />
power source, including service<br />
switch on boiler, is not disconnected<br />
before installing or servicing.<br />
The Model <strong>PER</strong> electric-hydronic boilers are pre-wired<br />
for use with 240-volt, single phase, 50/60-hertz power.<br />
Refer to Figure 1 on page 13 for the reduction in boiler<br />
capacity when the line voltage is less than 240 volts.<br />
An opening is provided in the left side of the jacket top<br />
panel for the field wiring. Refer to Dimensions, page<br />
12, and Ratings, page 13, for recommended wire sizes.<br />
All wiring must conform to the requirements of the<br />
National Electrical Code and any additional National,<br />
State or Local Code Requirements having jurisdiction.<br />
All safety circuit wiring should be N.E.C. Class 1. Do<br />
not use aluminum wire.<br />
When a <strong>PER</strong> boiler is used in a zoned system, the zone<br />
valves must be powered from an independent source,<br />
and have electrically isolated end switches or isolating<br />
relays wired in parallel to the boiler thermostat<br />
terminals.<br />
Do not attempt to power zone valves<br />
from the transformer in the boiler<br />
control system.<br />
Control system<br />
The control system for the <strong>PER</strong> electric boiler has<br />
electronic and thermal time delays, which are employed<br />
to sequence elements on and to sequence elements off<br />
in reverse order. The contactors used in the system<br />
disconnect all current from the heating elements.<br />
The circulator control utilizes a single pole relay.<br />
Low and high limit functions are combined in a dual<br />
limit control. The control system is operated from a<br />
low voltage transformer.<br />
<strong>Boiler</strong><br />
model<br />
number<br />
Maximum<br />
flow rate<br />
GPM<br />
Minimum<br />
supply<br />
pipe size<br />
Minimum<br />
return<br />
pipe size<br />
<strong>PER</strong>-15 5.20 ¾" ¾"<br />
<strong>PER</strong>-20 6.90 1" 1"<br />
<strong>PER</strong>-25 8.60 1¼" 1¼"<br />
4<br />
Part number 550-141-396/0801
<strong>PER</strong> Series 3 Electric-Hydronic <strong>Boiler</strong>s Installation Instructions<br />
Sequence of operation<br />
Call for heat<br />
1. The thermostat contacts close, energizing the first contactor (2K), the circulator relay<br />
(1K), and the heater in the first thermal time delay (H1).<br />
2. Approximately 15 seconds later, the thermal delay contacts (1C) close energizing the<br />
electronic circuit inside the first electronic time delay (ED1).<br />
3. After approximately 2.5 minutes, the first electronic time delay energizes the second<br />
contactor (3K) and the second thermal time delay heater (H2).<br />
4. This sequence continues until all contactors are energized or until the call for heat ends.<br />
Call for heat satisfied<br />
5. The thermostat contacts open, de-energizing the first contactor (2K), the circulator relay<br />
(1K), and the heater in the first thermal time delay (H1).<br />
6. After a minimum of 10 seconds, the contacts in the first thermal delay (1C) open, instantly<br />
de-energizing the electronic time delay (ED1), the second contactor (3K), and the second<br />
thermal delay heater (H2).<br />
7. This sequence continues until all elements are de-energized.<br />
Limit control operation<br />
8. If the high limit setting is exceeded, the transformer secondary circuit is opened and all<br />
contactors are de-energized instantly. It is recommended that the “high” side of the control<br />
be set at 220 ° F. The “low” side should be set according to the design requirements of the<br />
structure to be heated but never less than 20 ° F below the “high” setting. The differential<br />
control should be set at a minimum of 20 ° F.<br />
Part number 550-141-396/0801 5
<strong>PER</strong> Series 3 Electric-Hydronic <strong>Boiler</strong>s Installation Instructions<br />
Wiring<br />
Ladder Wiring Diagram<br />
L1 L2 N G<br />
(240 VAC)<br />
F1<br />
2K1<br />
HEATING<br />
ELEMENTS<br />
F2<br />
3K1<br />
F7<br />
2K2<br />
EQUIPMENT<br />
GROUND<br />
F8 3K2<br />
F3 4K1<br />
F9 4K2<br />
F4 5K1<br />
F10 5K2<br />
F5 6K1<br />
F11 6K2<br />
1K1<br />
F6<br />
CIRCULATOR<br />
(Note 6)<br />
TRANSFORMER<br />
B B<br />
HIGH<br />
LIMIT<br />
1K<br />
R R<br />
2K<br />
LOW<br />
LIMIT<br />
24 VAC<br />
THERMOSTAT<br />
(Note 1)<br />
H1<br />
3K ED1<br />
1C<br />
H2<br />
4K<br />
ED2<br />
2C<br />
H3<br />
5K<br />
ED3<br />
3C<br />
H4<br />
6K<br />
ED4<br />
4C<br />
ELECTRONIC TIME<br />
DELAY RELAYS<br />
THERMAL TIME<br />
DELAY RELAYS<br />
Legend<br />
HIGH VOLTAGE FIELD WIRING LOW VOLTAGE FIELD WIRING<br />
HIGH VOLTAGE FACTORY WIRING LOW VOLTAGE FACTORY WIRING<br />
Items not provided<br />
<strong>PER</strong> Series 3<br />
15 KW thru 25 KW<br />
240 VAC/single phase/60 hz<br />
2½ min. ON, 15 sec. OFF<br />
A United Dominion Company<br />
<strong>Weil</strong>-<strong>McLain</strong> • 500 Blaine St. • Michigan City, IN 46360-2388<br />
Part Number 550-224-719/0801<br />
L1<br />
N<br />
Schematic Wiring Diagram THERMOSTAT<br />
30 AMP<br />
30 AMP<br />
30 AMP<br />
30 AMP<br />
30 AMP<br />
15 AMP<br />
To:<br />
2K1<br />
3K1<br />
4K1<br />
5K1<br />
6K1<br />
(Note 5)<br />
WIRE<br />
NUTS<br />
OR<br />
RD<br />
BK<br />
TRANSFORMER<br />
1K1 1K<br />
B<br />
R<br />
B<br />
R<br />
3<br />
1<br />
4<br />
2<br />
CIRCULATOR RELAY<br />
HIGH<br />
LIMIT<br />
LOW<br />
LIMIT<br />
2K<br />
To<br />
FUSES<br />
OR END SWITCH<br />
(Note 1)<br />
2K1<br />
L2<br />
30 AMP<br />
30 AMP<br />
30 AMP<br />
30 AMP<br />
30 AMP<br />
To:<br />
2K2<br />
3K2<br />
4K2<br />
5K2<br />
6K2<br />
TD1<br />
1C<br />
TD2<br />
2C<br />
H1<br />
H2<br />
3<br />
2K2<br />
ED1<br />
1<br />
3K 3K1<br />
3<br />
3K2<br />
ED2<br />
1<br />
4K 4K1<br />
G<br />
Connect wire to<br />
last fused terminal<br />
EQUIPMENT<br />
GROUND<br />
TD3<br />
TD4<br />
3C<br />
4C<br />
H3<br />
H4<br />
3<br />
3<br />
ED3<br />
1<br />
ED4<br />
1<br />
5K<br />
6K<br />
4K2<br />
5K1<br />
5K2<br />
6K1<br />
THERMAL TIME<br />
DELAY RELAYS<br />
ELECTRONIC<br />
6K2<br />
TIME DELAY RELAYS HEATING<br />
CONTACTORS<br />
ELEMENTS<br />
CIRCULATOR<br />
(Note 6)<br />
Electrical shock hazard — can cause severe injury or<br />
death. Disconnect power before installing or servicing.<br />
Notes:<br />
1.Thermostat heat anticipator setting must be 0.45 amps.<br />
2.All wiring must be installed in accordance with the requirements of the National Electrical Code and any<br />
applicable national, state or local code requirements.<br />
3.All safety circuit wiring must be N.E.C. Class 1.<br />
4.Use only copper conductors for power input wiring. Do not use aluminum conductors.<br />
5.For 208-volt power supply, remove orange wire and replace with red wire.<br />
6.Maximum circulator motor is 1/6 hp.<br />
6<br />
Part number 550-141-396/0801
<strong>PER</strong> Series 3 Electric-Hydronic <strong>Boiler</strong>s Installation Instructions<br />
Troubleshooting<br />
This boiler contains fiberglass materials. Use care when handling these materials per instructions on page 11 of<br />
this manual. Failure to comply could result in severe personal injury.<br />
Symptom—No heat<br />
1. Check fuses. Power for the control circuit is supplied through the fuses<br />
for the heating element, and the circulator.<br />
2. If fuses are good, jumper the thermostat terminal. If boiler starts, check<br />
the thermostat and associated wiring.<br />
3. If thermostat and wiring are good, check the limit control.<br />
a. Jumper the “R” and “B” terminals on the “low” side of the control.<br />
If the boiler starts, replace the limit control.<br />
b. If the boiler does not start in step “a”, momentarily jumper the “R”<br />
and “B” terminals on the “high” side of the control. If the boiler<br />
starts, replace the limit control.<br />
4. If the limit control is good, check the transformer.<br />
a. Measure the A.C. voltage on the transformer. If the A.C. voltage is<br />
24 volts ± 15%, the transformer is good.<br />
b. If the A.C. voltage is low, remove one secondary lead from its load<br />
connection.<br />
1) If the A.C. voltage returns to 24V, the transformer is good.<br />
2) If the A.C. voltage remains low, check the primary voltage. It<br />
should measure 240 or 480 volts A.C. accordingly ± 10%. If<br />
the primary voltage is correct, replace the transformer.<br />
5. If the transformer is good, follow the voltage path using the wiring<br />
diagram. Check each control for voltage in and out. Replace where<br />
voltage fails.<br />
Symptom—<strong>Boiler</strong> does not shut<br />
down<br />
One or more contactors remain on after call for heat<br />
ends.<br />
1. Check contactors. Lower the temperature setting<br />
on “high” side of the limit control to simulate a limit<br />
operation.<br />
a. If all contactors instantly de-energize, they are<br />
good.<br />
b. If one or more contactors fail to de-energize,<br />
replace those contactors.<br />
2. If contactors are good, check the thermal delays.<br />
Return the temperature setting on the “high” side<br />
of the limit control to its original position. Allow<br />
the boiler to sequence on with a normal call for<br />
heat. When all contactors are energized, lower the<br />
setting on the “low” side of the limit control to<br />
satisfy the call for heat. Observe the shutdown<br />
sequence and note the contactor at which it stops.<br />
Remove the wire connecting terminal 1 of the<br />
electronic delay to the thermal delay: The contactor<br />
will now de-energize, and the remaining contactors<br />
will follow in the normal off sequence. Replace the<br />
defective thermal delay.<br />
Symptom—Low heat<br />
One or more contactors do not energize. Operation of any contactor, beyond<br />
the first is dependent upon the operation of three components.<br />
• Thermal time delay.<br />
• Electronic time delay; 2½ minutes.<br />
• Contactor.<br />
1. Observe the sequence of operation and note at which contactor it is<br />
interrupted. If one contactor fails to energize because of an open coil,<br />
subsequent contactors will be affected (unless one has a shorted coil).<br />
To isolate the trouble, proceed as follows:<br />
a. Check contactor. Connect a jumper from terminal 3 of the<br />
electronic delay to the transformer wire going to terminal “B” on<br />
the “low” side of the limit control.<br />
b. If the contactor energizes check electronic and thermal delays.<br />
Remove the jumper from the transformer terminal and touch it<br />
to terminal 1 of the electronic delay. (The jumper now connects<br />
terminals 1 and 3 of the electronic delay). If the contactor<br />
energizes, replace the electronic time delay. If it fails to energize,<br />
replace the thermal time delay.<br />
Symptom—Inoperative<br />
circulator<br />
1. Measure the voltage at the circulator terminals with<br />
the boiler energized. If the voltage is 120V ± 10%,<br />
the control is good. If no voltage is present, replace<br />
the circulator relay (1K).<br />
Part number 550-141-396/0801 7
<strong>PER</strong> Series 3 Electric-Hydronic <strong>Boiler</strong>s Installation Instructions<br />
Operating instructions<br />
Water treatment<br />
Do not use petroleum-based cleaning or sealing compounds in boiler<br />
system. Severe damage to boiler will result, causing substantial property<br />
damage.<br />
Eliminate all leaks. Continual fresh makeup water will reduce boiler life.<br />
Minerals can build up in section, reducing heat transfer, overheating cast<br />
iron, and causing section failure.<br />
In hard water areas or low pH conditions (below 7.0), consult local water treatment company.<br />
<strong>Boiler</strong> water pH of 7.0 to 8.5 is recommended.<br />
Freeze protection (when used)<br />
See WARNING on page 2 for important information regarding glycol hazard.<br />
Do not use automotive, ethylene glycol or undiluted antifreeze. Severe<br />
personal injury, death or substantial property damage can result.<br />
Use antifreeze especially made for hydronic systems. Inhibited propylene glycol is<br />
recommended.<br />
50% solution provides protection to about -30 ° F.<br />
Local codes may require a back-flow preventer or actual disconnect from city water supply.<br />
Determine quantity according to system water content. <strong>Boiler</strong> water content is listed in the<br />
Ratings table on page 13. Remember to add in expansion tank water content.<br />
Filling the system with water<br />
Never apply power to the boiler unless the boiler is filled with water.<br />
1. Close manual air vents, drain cocks, and automatic air vent, if used.<br />
2. Fill the boiler and system to an initial pressure of about 12 pounds per square inch.<br />
3. Open automatic air vent one turn, if used.<br />
4. Starting on the lowest floor, open air vents one at a time until water squirts out. Close<br />
vent.<br />
5. Repeat with remaining vents.<br />
6. Refill to correct pressure.<br />
8<br />
Part number 550-141-396/0801
<strong>PER</strong> Series 3 Electric-Hydronic <strong>Boiler</strong>s Installation Instructions<br />
Checkout procedure<br />
After filling and purging, start the boiler as follows:<br />
❏<br />
❏<br />
❏<br />
❏<br />
Turn the thermostat to its lowest setting so that there is no call for<br />
heat.<br />
Set the limit control as recommended in the Installation Instructions.<br />
Turn on the main electric switch to the boiler.<br />
Set the thermostat above actual room temperature. Check for proper<br />
sequencing of elements. Heat the entire system to about 200°F so that<br />
dissolved air and gases in the system water will be emitted and vented.<br />
❏<br />
❏<br />
❏<br />
❏<br />
Check limit control operation by lowering the<br />
control settings as described in the<br />
“Troubleshooting” section on page 7.<br />
Restore the limit control settings to their<br />
recommended values and set the thermostat to the<br />
desired room temperature.<br />
Fill in “Installation and service certificate” below.<br />
If the boiler operates incorrectly or fails to start,<br />
refer to “Troubleshooting” on page 7.<br />
Installation and service certificate<br />
<strong>Boiler</strong> model __________________ Series __________ CP number ___________ Date installed _______________<br />
Measured Btuh input ____________<br />
❏ Installation instructions have been followed.<br />
❏ Checkout sequence has been performed.<br />
❏ Above information is certified to be correct.<br />
❏ Information received and left with owner/maintenance person.<br />
Installer ________________________ ________________________________ ______________________________<br />
(company) (address) (phone)<br />
_____________________________________<br />
(installer’s signature)<br />
Part number 550-141-396/0801 9
<strong>PER</strong> Series 3 Electric-Hydronic <strong>Boiler</strong>s Installation Instructions<br />
Maintenance<br />
This boiler contains fiberglass materials. Use care when handling these materials per instructions<br />
on page 11 of this manual. Failure to comply could result in severe personal injury.<br />
Draining and cleaning<br />
Do not drain the boiler during periods of shutdown<br />
unless the heating system is exposed to freezing<br />
temperatures. At the end of each heating season, open<br />
the boiler drain cock just long enough to remove any<br />
impurities or sediment that may have settled to the<br />
bottom of the boiler.<br />
Keeping air vent clean<br />
Loosen the cap on the Float-Type Automatic Air Vent<br />
two turns while the system is being filled with water.<br />
Should dirt or scale lodge on the valve seat causing it to<br />
leak, remove the vent cap and push the valve core in by<br />
hand to permit water to flush the valve seat clean; release<br />
the valve core quickly and replace the vent cap. For<br />
normal operation and venting, unscrew the vent cap at<br />
least two turns.<br />
Checking relief valve<br />
Check the relief valve once a year by manually opening<br />
the valve and allowing a small quantity of water to flow.<br />
Make sure that the valve reseats and does not leak.<br />
Replace any defective valve.<br />
Checking expansion tank<br />
Undersized expansion tanks cause<br />
system water to be lost from relief<br />
valve and makeup water added<br />
through fill valve. Eventual section<br />
failure can result.<br />
If the relief valve opens frequently, check the expansion<br />
tank. If the system has a pressurized tank with a rubber<br />
diaphragm separating the air cushion from the water<br />
(an Ex-Trol or equivalent tank), use a tire pressure gauge<br />
to check the air-charging valve on the end of the tank.<br />
If water flows, the diaphragm is ruptured or leaking.<br />
The tank must be replaced. If no water flows but the air<br />
charge has been lost, recharge the tank to 12 pounds<br />
per square inch. Periodic air loss from the expansion<br />
tank probably means a leaky charging valve.<br />
If the expansion tank is of the standard closed variety,<br />
(without a rubber diaphragm) the tank must be partly<br />
drained to re-establish an air cushion.<br />
Operating temperature and<br />
pressure<br />
The maximum recommended low and high limit<br />
control settings are 200 ° F and 220 ° F, respectively. The<br />
relief valve opens at 30 pounds per square inch. The<br />
actual operating pressure will range from 12 pounds<br />
per square inch when the system is cold to as much as<br />
15 pounds per square inch at maximum operating<br />
temperature.<br />
10<br />
Part number 550-141-396/0801
<strong>PER</strong> Series 3 Electric-Hydronic <strong>Boiler</strong>s Installation Instructions<br />
Handling fiberglass materials<br />
REMOVAL OF FIBERGLASS WOOL — OR —<br />
INSTALLATION OF FIBERGLASS WOOL, COMBUSTION CHAMBER LINING OR BASE<br />
PANELS:<br />
This product contains fiberglass jacket insulation and ceramic fiber materials in combustion chamber lining or<br />
base panels in gas fired products. Airborne fibers from these materials have been listed by the State of California<br />
as a possible cause of cancer through inhalation.<br />
■ Avoid breathing dust and contact with skin and eyes.<br />
• Use NIOSH certified dust respirator (N95). This type of respirator is based on the OSHA requirements<br />
for fiberglass wool at the time this document was written. Other types of respirators may be needed<br />
depending on the job site conditions. Current NIOSH recommendations can be found on the NIOSH<br />
web site at http://www.cdc.gov/niosh/homepage.html. NIOSH approved respirators, manufacturers, and<br />
phone numbers are also listed on this web site.<br />
• Wear long-sleeved, loose fitting clothing, gloves, and eye protection.<br />
■ Operations such as sawing, blowing, tear out, and spraying may generate airborne fiber concentration requiring<br />
additional protection.<br />
■ Wash potentially contaminated clothes separately from other clothing. Rinse clothes washer thoroughly.<br />
NIOSH stated First Aid.<br />
■ Eye: Irrigate immediately<br />
■ Breathing: Fresh air.<br />
Part number 550-141-396/0801 11
<strong>PER</strong> Series 3 Electric-Hydronic <strong>Boiler</strong>s Installation Instructions<br />
Dimensions<br />
6½"<br />
27/<br />
16 "<br />
71/<br />
16 "<br />
Incoming power<br />
1¼" conduit<br />
¾" Relief<br />
valve<br />
2¼"<br />
19 5/<br />
8 "<br />
19 1/<br />
16 "<br />
Automatic<br />
air vent<br />
31 3/<br />
16 "<br />
1¼" Supply<br />
Combination pressuretemperature<br />
gauge<br />
Mounting brackets (2)<br />
½"<br />
9½"<br />
½"<br />
10" Minimum<br />
wall clearance<br />
required for<br />
element<br />
removal.<br />
28 5/<br />
8 "<br />
815/<br />
16 "<br />
215/<br />
16 "<br />
1¼" Return<br />
5"<br />
14 5/<br />
16 "<br />
16"<br />
½" Fill<br />
39603<br />
2¼"<br />
12<br />
Part number 550-141-396/0801
<strong>PER</strong> Series 3 Electric-Hydronic <strong>Boiler</strong>s Installation Instructions<br />
Ratings<br />
DOE<br />
Required wire sizes and weights<br />
<strong>Boiler</strong><br />
model<br />
number<br />
DOE heating<br />
capacity<br />
<strong>Boiler</strong> input<br />
Number of<br />
elements<br />
Element size<br />
Total<br />
amperes<br />
Volts phase<br />
wire<br />
Wire size<br />
90˚C field<br />
wiring<br />
<strong>Boiler</strong><br />
water<br />
content<br />
Approximate<br />
shipping wt.<br />
BTU/Hr KW KW (Note 2) (Note 3) Gallons lbs.<br />
<strong>PER</strong>-15 51,000 15 3 5 65 240/1/3 4 5.2 215<br />
<strong>PER</strong>-20 68,000 20 4 5 86 240/1/3 3 5.2 215<br />
<strong>PER</strong>-25 85,000 25 5 5 107 240/1/3 1 5.2 215<br />
Notes:<br />
1. Provide manual shutoff valves in the system piping at the supply outlet and the return inlet so the boiler can be drained without draining the entire<br />
system.<br />
2. For other than the standard voltages shown, consult <strong>Weil</strong>-<strong>McLain</strong> Application Engineering Department.<br />
3. Copper wire (AWG-MCM). Consult national or local electrical code manuals for runs in excess of 50 feet. Do no use aluminum wire.<br />
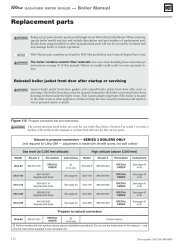
4. All ratings are based on 240-volt power input. See Figure 1 for percent of boiler capacity when the input voltage is below 240 volts. Gross output<br />
ratings. Piping loss not confined to the heated area should be added to the building loss to determine total heating equipment.<br />
Figure 1<br />
<strong>Boiler</strong> capacities at various voltages<br />
Percent of Rated Capacity<br />
39601<br />
100%<br />
90%<br />
80%<br />
70%<br />
60%<br />
200 210 220 230 240<br />
Input Voltage<br />
Part number 550-141-396/0801 13
<strong>PER</strong> Series 3 Electric-Hydronic <strong>Boiler</strong>s Installation Instructions<br />
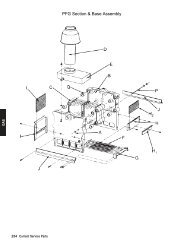
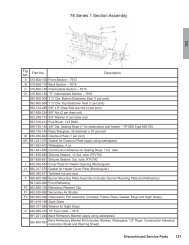
Parts<br />
This boiler contains fiberglass materials. Use care when handling these materials per instructions on page 11 of<br />
this manual. Failure to comply could result in severe personal injury.<br />
Item<br />
number Description<br />
<strong>Weil</strong>-<strong>McLain</strong><br />
part number<br />
Item<br />
number Description<br />
<strong>Weil</strong>-<strong>McLain</strong><br />
part number<br />
1 Control tray 428-800-000 6 Jacket element cover plate 428-800-015<br />
2 <strong>Boiler</strong> casting with insulation 318-806-200 7 Jacket bottom panel 428-600-004<br />
3 Jacket door 428-800-025 8 Jacket bottom cross tie 428-800-010<br />
4 Jacket side and back panel 428-800-020 9 Element opening cover plate 590-243-200<br />
5 Jacket top panel 428-800-005 10<br />
Element opening gasket<br />
1.75 diameter hole<br />
1.50 diameter hole<br />
590-317-523<br />
590-317-524<br />
14<br />
Part number 550-141-396/0801
<strong>PER</strong> Series 3 Electric-Hydronic <strong>Boiler</strong>s Installation Instructions<br />
Parts continued<br />
The following items are available but are not shown in the Parts drawing<br />
Description<br />
<strong>Weil</strong>-<strong>McLain</strong><br />
part number<br />
Jacket door latch 562-850-089<br />
Terminal block 512-050-013<br />
Marker strip 590-850-020<br />
Limit control 510-350-061<br />
Circulator relay 510-350-219<br />
Thermostat 511-950-275<br />
Electronic delay, 2½ minutes 510-350-211<br />
Thermal delay, 30 seconds 510-350-220<br />
Retainer clip for thermal delay 562-650-102<br />
Transformer 511-842-361<br />
Line terminal and fuse block (upper) 512-050-002<br />
Line terminal and fuse block (lower) 512-050-004<br />
Fuses, 15A 591-850-172<br />
Fuses, 30A 591-850-174<br />
Relief valve (30 psig) 511-546-924<br />
Temperature pressure gauge 510-218-099<br />
Element contactor, 240 volt, single phase 512-150-147<br />
Heating elements, 5KW, 240V, single phase 591-550-135<br />
Air vent 510-148-567<br />
Fill-Trol, 90˚ fill 510-632-086<br />
Circulator pump 511-405-117<br />
Universal circulator hardware kit, 1¼" 381-354-526<br />
Drain valve 511-210-423<br />
Part number 550-141-396/0801 15
<strong>Weil</strong>-<strong>McLain</strong> Limited Warranty for<br />
Residential & Commercial Cast Iron <strong>Boiler</strong>s<br />
◆ RESIDENTIAL WATER WARRANTY—Limited Lifetime<br />
◆ RESIDENTIAL STEAM WARRANTY—Limited 10 Year<br />
◆ COMMERCIAL WARRANTY—Limited 10-Year<br />
NOTE: The residential steam and water warranties do not<br />
cover residential boilers installed in buildings other than one<br />
or two family dwelling units, unless they are buildings with<br />
individual boilers for each dwelling unit.<br />
First Year-(All Residential & Commercial Cast Iron<br />
<strong>Boiler</strong>s)<br />
Limited Warranty for Cast Iron <strong>Boiler</strong>s:<br />
<strong>Weil</strong>-<strong>McLain</strong> warrants that its cast iron boilers are free from<br />
defects in material and workmanship for one year from the<br />
date of installation. If any parts are found to be defective in<br />
manufacture, <strong>Weil</strong>-<strong>McLain</strong> will provide replacement of such<br />
defective parts.<br />
Second Through Tenth Year-(Residential Water/Steam)<br />
Second Through Tenth Year-(Commercial Water/Steam)<br />
Limited Warranty for cast iron sections:<br />
<strong>Weil</strong>-<strong>McLain</strong> warrants that the cast iron sections of its water<br />
and steam boilers are free from defects in material and<br />
workmanship from the date of installation for the second<br />
through the tenth year. If, during such time period, any section<br />
is found to be defective, <strong>Weil</strong>-<strong>McLain</strong> will provide replacement<br />
for the original cast iron section(s).<br />
Eleventh Year and Beyond - (Residential Water Only)<br />
Limited Warranty for Cast Iron Sections:<br />
<strong>Weil</strong>-<strong>McLain</strong> warrants that the cast iron sections of its<br />
residential water boilers are free from defects in material and<br />
workmanship for the eleventh year and beyond from the date<br />
of installation.If, during such time period, any section(s) is<br />
found to be defective, <strong>Weil</strong>-<strong>McLain</strong> will provide replacement<br />
for the original cast iron section(s) upon the payment of a<br />
proportionate charge based on the time the boiler has been<br />
in service. The proportionate charge will be equal to the<br />
appropriate percentage of the list price of such section(s) at<br />
the time the warranty claim is made, and will be determined<br />
as follows:<br />
11th year - 5%; 12th year - 10%; 13th year - 15%;<br />
14th year - 20%; 15th year - 25%; 16th year - 30%;<br />
17th year - 35%; 18th year - 40%; 19th year - 45%;<br />
20th year - 50%; 21st year - 55%; 22nd year - 60%;<br />
23rd year - 65%; 24th year - 70%; 25th year and<br />
beyond - 75%.<br />
All Residential & Commercial Cast Iron <strong>Boiler</strong>s<br />
These warranties are subject to the condition that the boiler<br />
must have been installed by a heating contractor whose<br />
principal occupation is the sale and installation of plumbing,<br />
heating and/or air conditioning equipment.<br />
These warranties do not cover:<br />
1. Components that are part of the heating systems, but<br />
were not furnished by <strong>Weil</strong>-<strong>McLain</strong> as a part of the<br />
boiler.<br />
2. The workmanship of any installer of <strong>Weil</strong>-<strong>McLain</strong>’s<br />
boilers. In addition, this warranty does not assume any<br />
liability of any nature for unsatisfactory performance<br />
caused by improper installation.<br />
3. Any costs for labor for removal and reinstallation of the<br />
alleged defective part, transportation to <strong>Weil</strong>-<strong>McLain</strong>, if<br />
necessary, and any other materials necessary to<br />
perform the exchange.<br />
4. Improper burner adjustments, control settings,care or<br />
maintenance. Information is included in the installation<br />
Instructions, Owner’s Information <strong>Manual</strong> and/or Startup,<br />
Service and Maintenance Instructions, and other<br />
printed technical material furnished by <strong>Weil</strong>-<strong>McLain</strong> with<br />
the boiler.<br />
5. <strong>Boiler</strong>s operated with combustion air contaminated<br />
externally by chemical vapors or with improper fuel<br />
additives, or with water conditions which may have<br />
caused unusual deposits in the cast iron sections.<br />
These warranties extend only to the first retail purchaser of the boiler<br />
and only to a boiler that has not been moved from its original<br />
installation site.<br />
THE WARRANTIES DESCRIBED ABOVE ARE IN LIEU OF ALL<br />
OTHER WARRANTIES, EXPRESS OR IMPLIED, INCLUDING BUT<br />
NOT LIMITED TO ANY IMPLIED WARRANTIES OF FITNESS FOR<br />
A PARTICULAR PURPOSE AND MERCHANTABILITY. WEIL-<br />
McLAIN EXPRESSLY DISCLAIMS AND EXCLUDES ANY<br />
LIABILITY FOR CONSEQUENTIAL, INCIDENTAL, INDIRECT OR<br />
PUNITIVE DAMAGES FOR BREACH OF ANY EXPRESS OR<br />
IMPLIED WARRANTY.<br />
For prompt product warranty claims, notify the installer who, in turn,<br />
will notify the <strong>Weil</strong>-<strong>McLain</strong> distributor from whom he purchased the<br />
boiler. If this action does not result in warranty resolution, contact<br />
<strong>Weil</strong>-<strong>McLain</strong> Consumer Relations Department, 500 Blaine Street,<br />
Michigan City, Indiana 46360-2388, with details in support of the<br />
warranty claim. Alleged defective part or parts must be returned<br />
through trade channels in accordance with the <strong>Weil</strong>-<strong>McLain</strong><br />
procedure currently in force for handling returned goods for the<br />
purpose of inspection to determine cause of failure. <strong>Weil</strong>-<strong>McLain</strong><br />
will furnish new part(s) to an authorized <strong>Weil</strong>-<strong>McLain</strong> distributor who,<br />
in turn will furnish the new part(s) to the heating contractor who<br />
installed the boiler. If you have any questions about the coverage of<br />
this warranty, contact <strong>Weil</strong>-<strong>McLain</strong> at the address above.<br />
16 Part number 550-141-396/0801