Getting Started with WoodGrove Direct and Microsoft ... - Huntington
Getting Started with WoodGrove Direct and Microsoft ... - Huntington
Getting Started with WoodGrove Direct and Microsoft ... - Huntington

You also want an ePaper? Increase the reach of your titles
YUMPU automatically turns print PDFs into web optimized ePapers that Google loves.
MICROSOFT ®<br />
MONEY GETTING STARTED GUIDE<br />
<strong>Getting</strong> <strong>Started</strong> <strong>with</strong> <strong>Huntington</strong> PC<br />
Banking <strong>and</strong> <strong>Microsoft</strong> Money 2006<br />
<strong>Microsoft</strong> Money 2006 – The effortless way to h<strong>and</strong>le day-to-day finances<br />
It is easy to get started <strong>with</strong> <strong>Huntington</strong>’s online services <strong>and</strong> <strong>Microsoft</strong>® Money 2006. With <strong>Huntington</strong><br />
PC Banking, you can monitor your accounts whenever you want. You don’t have to wait for a paper<br />
statement because account activity is available to you online. It’s easy to get up <strong>and</strong> running.<br />
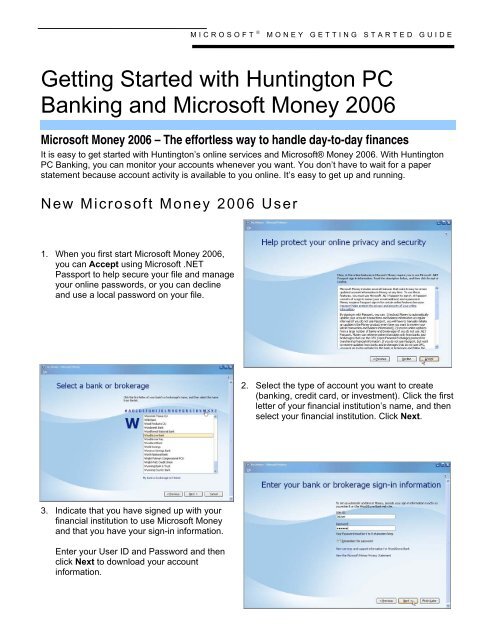
New <strong>Microsoft</strong> Money 2006 User<br />
1. When you first start <strong>Microsoft</strong> Money 2006,<br />
you can Accept using <strong>Microsoft</strong> .NET<br />
Passport to help secure your file <strong>and</strong> manage<br />
your online passwords, or you can decline<br />
<strong>and</strong> use a local password on your file.<br />
2. Select the type of account you want to create<br />
(banking, credit card, or investment). Click the first<br />
letter of your financial institution’s name, <strong>and</strong> then<br />
select your financial institution. Click Next.<br />
3. Indicate that you have signed up <strong>with</strong> your<br />
financial institution to use <strong>Microsoft</strong> Money<br />
<strong>and</strong> that you have your sign-in information.<br />
Enter your User ID <strong>and</strong> Password <strong>and</strong> then<br />
click Next to download your account<br />
information.
MICROSOFT ®<br />
MONEY GETTING STARTED GUIDE<br />
4. <strong>Microsoft</strong> Money 2006 will automatically<br />
download the latest information for you so that<br />
your accounts are current. Just tell <strong>Microsoft</strong><br />
Money how far back you want to download<br />
account transactions.<br />
5. If you use a <strong>Microsoft</strong> .NET Passport, <strong>Microsoft</strong><br />
Money can download statement information<br />
regularly for you. Just tell <strong>Microsoft</strong> Money how<br />
frequently you want to update.<br />
6. That’s all it takes! Your accounts are now<br />
set up for online services in <strong>Microsoft</strong><br />
Money 2006.<br />
Now you can take a tour of <strong>Microsoft</strong> Money<br />
2006, enter bills, create a budget, or set up<br />
more accounts, or you can do any of these<br />
tasks later.<br />
7. Click Finish <strong>and</strong> <strong>Microsoft</strong> Money shows<br />
your accounts <strong>and</strong> balances <strong>and</strong> a<br />
preliminary spending category chart. It’s that<br />
easy!
MICROSOFT ®<br />
MONEY GETTING STARTED GUIDE<br />
Current <strong>Microsoft</strong> Money User<br />
1. If <strong>Microsoft</strong> Money 2006 did not detect your<br />
most recently used file, on the File menu, click<br />
Open to locate <strong>and</strong> upgrade your latest<br />
<strong>Microsoft</strong> Money file.<br />
2. In the left pane of the <strong>Microsoft</strong> Money 2006<br />
Home page, click Manage Online Services.<br />
3. Click the link under the To Do column to the left<br />
of your financial institution’s name.<br />
4. Select the type of account you want to create<br />
(banking, credit card, or investment). Click the<br />
first letter of your financial institution’s name,<br />
<strong>and</strong> then select your financial institution. Click<br />
Next.<br />
5. Indicate that you have signed up <strong>with</strong><br />
<strong>Huntington</strong> PC Banking to use <strong>Microsoft</strong> Money<br />
<strong>and</strong> that you have your sign-in information.<br />
Enter your User ID <strong>and</strong> Password <strong>and</strong> then<br />
click Next to download your account<br />
information.
MICROSOFT ®<br />
MONEY GETTING STARTED GUIDE<br />
6. <strong>Microsoft</strong> Money 2006 asks if you are already<br />
tracking the accounts supported by your<br />
financial institution. If you click “Yes”, Money<br />
2006 will match your existing accounts, or<br />
allow you to choose to create new accounts or<br />
not to track specific accounts.<br />
7. When you click “Next”, <strong>Microsoft</strong> Money 2006<br />
automatically downloads the latest information<br />
for you so that your accounts are current. Just<br />
tell <strong>Microsoft</strong> Money how far back you want to<br />
download account transactions.<br />
You Are Now Ready to Connect!<br />
If you are using a <strong>Microsoft</strong> .NET Passport <strong>with</strong> your <strong>Microsoft</strong> Money file, <strong>Microsoft</strong> Money 2006 will<br />
download your statement information based on the schedule you selected.<br />
For additional information, review the Help topics provided in <strong>Microsoft</strong> Money 2006.<br />
Because There Is More To Life ⎯ Balance It<br />
NEED MORE INFORMATION<br />
Visit the <strong>Microsoft</strong> Money Web site at http://www.microsoft.com/money<br />
© 2005 <strong>Microsoft</strong> Corporation. All rights reserved.<br />
<strong>Microsoft</strong> is a trademark or registered trademark of <strong>Microsoft</strong> Corporation in the United States <strong>and</strong>/or other countries