Owner's Manual Osburn 2000 Wood Stove Insert - Rural Energy ...
Owner's Manual Osburn 2000 Wood Stove Insert - Rural Energy ...
Owner's Manual Osburn 2000 Wood Stove Insert - Rural Energy ...
Create successful ePaper yourself
Turn your PDF publications into a flip-book with our unique Google optimized e-Paper software.
5. If lag-bolts and anchors are to be used to secure the insert, the hole locations should be<br />
marked with the unit in place. Remove the insert and locate the anchors.<br />
6. Remove the faceplate panels from their box and assemble according to the following<br />
instructions.<br />
3.5. AIR CONTROL PLATE, FACEPLATE AND FAN ASSEMBLY<br />
INSTRUCTIONS<br />
1. Place the faceplate panels with the finished side down on a flat, soft, non-abrasive<br />
surface.<br />
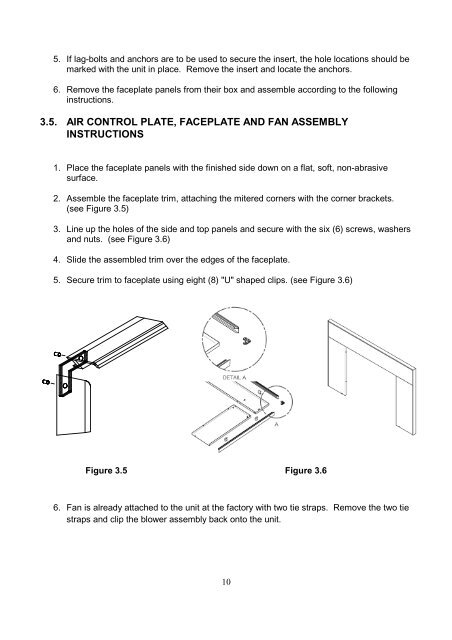
2. Assemble the faceplate trim, attaching the mitered corners with the corner brackets.<br />
(see Figure 3.5)<br />
3. Line up the holes of the side and top panels and secure with the six (6) screws, washers<br />
and nuts. (see Figure 3.6)<br />
4. Slide the assembled trim over the edges of the faceplate.<br />
5. Secure trim to faceplate using eight (8) "U" shaped clips. (see Figure 3.6)<br />
Figure 3.5 Figure 3.6<br />
6. Fan is already attached to the unit at the factory with two tie straps. Remove the two tie<br />
straps and clip the blower assembly back onto the unit.<br />
10


