Electronic Timer Instructions (continued)
Electronic Timer Instructions (continued)
Electronic Timer Instructions (continued)
Create successful ePaper yourself
Turn your PDF publications into a flip-book with our unique Google optimized e-Paper software.
MLWT - ELEC<br />
<strong>Electronic</strong> <strong>Timer</strong> <strong>Instructions</strong><br />
Tools Needed<br />
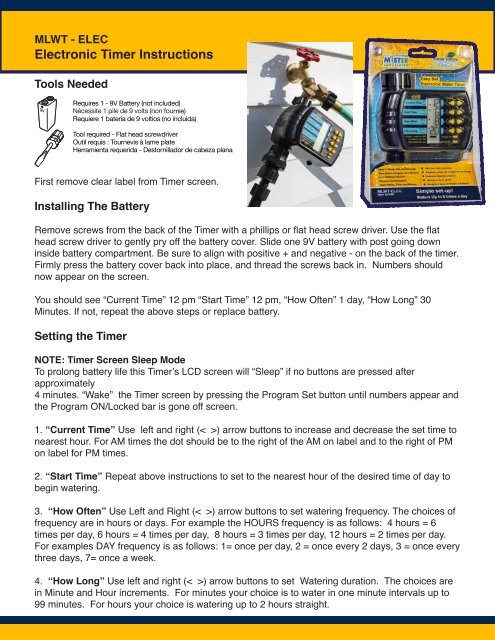
Requires 1 - 9V Battery (not included)<br />
Nécessite 1 pile de 9 volts (non fournie)<br />
Requiere 1 batera de 9 voltios (no incluida)<br />
Tool required - Flat head screwdriver<br />
Outil requis : Tournevis lame plate<br />
Herramienta requerida - Destornillador de cabeza plana<br />
First remove clear label from <strong>Timer</strong> screen.<br />
Installing The Battery<br />
Remove screws from the back of the <strong>Timer</strong> with a phillips or flat head screw driver. Use the flat<br />
head screw driver to gently pry off the battery cover. Slide one 9V battery with post going down<br />
inside battery compartment. Be sure to align with positive + and negative - on the back of the timer.<br />
Firmly press the battery cover back into place, and thread the screws back in. Numbers should<br />
now appear on the screen.<br />
You should see “Current Time” 12 pm “Start Time” 12 pm, “How Often” 1 day, “How Long” 30<br />
Minutes. If not, repeat the above steps or replace battery.<br />
Setting the <strong>Timer</strong><br />
NOTE: <strong>Timer</strong> Screen Sleep Mode<br />
To prolong battery life this <strong>Timer</strong>’s LCD screen will “Sleep” if no buttons are pressed after<br />
approximately<br />
4 minutes. “Wake” the <strong>Timer</strong> screen by pressing the Program Set button until numbers appear and<br />
the Program ON/Locked bar is gone off screen.<br />
1. “Current Time” Use left and right (< >) arrow buttons to increase and decrease the set time to<br />
nearest hour. For AM times the dot should be to the right of the AM on label and to the right of PM<br />
on label for PM times.<br />
2. “Start Time” Repeat above instructions to set to the nearest hour of the desired time of day to<br />
begin watering.<br />
3. “How Often” Use Left and Right (< >) arrow buttons to set watering frequency. The choices of<br />
frequency are in hours or days. For example the HOURS frequency is as follows: 4 hours = 6<br />
times per day, 6 hours = 4 times per day, 8 hours = 3 times per day, 12 hours = 2 times per day.<br />
For examples DAY frequency is as follows: 1= once per day, 2 = once every 2 days, 3 = once every<br />
three days, 7= once a week.<br />
4. “How Long” Use left and right (< >) arrow buttons to set Watering duration. The choices are<br />
in Minute and Hour increments. For minutes your choice is to water in one minute intervals up to<br />
99 minutes. For hours your choice is watering up to 2 hours straight.
MLWT - ELEC<br />
<strong>Electronic</strong> <strong>Timer</strong> <strong>Instructions</strong> (<strong>continued</strong>)<br />
5. Activation: Now activate this watering program you just selected in steps 1 through 4 by<br />
pressing the Program SET button; you should see a horizontal bar displayed to the right of the<br />
“Program ON/Locked”. This will signify that the program is on and locked. While Program is<br />
On/Locked, settings cannot be changed.<br />
Change Settings: To change your current settings press the “Program Set” button to remove the<br />
indicator bar. This will allow you to make changes to your program settings. After completed press<br />
the “Program Set” button to activate the indicator bar.<br />
To Disable: Turn the program off by pressing the “Program Set” button to remove the horizontal bar.<br />
Attaching The <strong>Timer</strong> to the Faucet<br />
Simply attach the swivel collar to the faucet by hand turning the collar in a clockwise motion (right<br />
twist) until it is Snug. DO NOT OVERTIGHTEN, DO NOT USE PLIERS. Once the timer is attached,<br />
turn on the faucet and leave it on. Remember to turn off the water when you need to remove the<br />
timer.<br />
Watering Manually<br />
To water Manually press the manual On/Off button and a horizontal bar will appear in the screen then<br />
you will hear a clicking noise as the valve opens. The timer will water for 30 minutes and<br />
automatically shut off. To turn off manual watering before the 30 minutes is over press the button and<br />
the bar will disappear then you will hear a clicking noise as the valve closes. Manual watering will not<br />
interfere with the set program.<br />
Low Battery<br />
When the battery is weak the low battery horizontal bar will appear on the screen. A fresh battery<br />
should last one watering season or approximately 6 to 9 months. If Low battery occurs during a<br />
watering cycle the timer will automatically shut off and discontinue running the program. The valve<br />
will not reopen until a fresh battery is installed. After inserting a new battery, the timer must be<br />
reprogrammed to resume watering.<br />
Winterize<br />
We suggest bringing the timer inside during winter months when the temperature is freezing or<br />
below.


