SINGLE CONTROL LAVATORY FAUCET
SINGLE CONTROL LAVATORY FAUCET
SINGLE CONTROL LAVATORY FAUCET

Create successful ePaper yourself
Turn your PDF publications into a flip-book with our unique Google optimized e-Paper software.
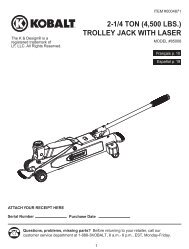
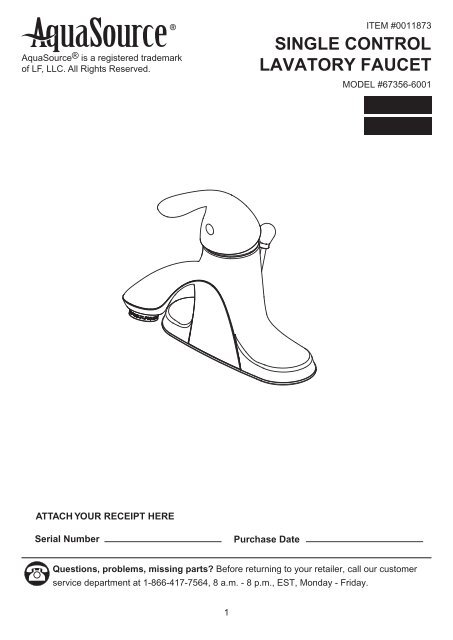
AquaSource ® is a registered trademark<br />
of LF, LLC. All Rights Reserved.<br />
ITEM #0011873<br />
<strong>SINGLE</strong> <strong>CONTROL</strong><br />
<strong>LAVATORY</strong> <strong>FAUCET</strong><br />
MODEL #67356-6001<br />
ATTACH YOUR RECEIPT HERE<br />
Serial Number<br />
Purchase Date<br />
Questions, problems, missing parts Before returning to your retailer, call our customer<br />
service department at 1-866-417-7564, 8 a.m. - 8 p.m., EST, Monday - Friday.<br />
1
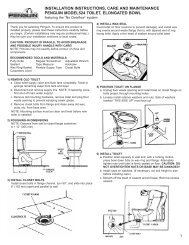
PACKAGE CONTENTS<br />
E<br />
A<br />
F<br />
B<br />
C<br />
D<br />
H<br />
I<br />
G<br />
L<br />
O<br />
M<br />
K<br />
P<br />
J<br />
N<br />
PART<br />
DESCRIPTION<br />
QUANTITY<br />
A<br />
Faucet<br />
1<br />
B<br />
C<br />
Base Plate (Preassembled to Faucet (A))<br />
Mounting Bracket (Preassembled to Faucet (A)) 2<br />
1<br />
D Mounting Nut (Preassembled to Faucet (A))<br />
2<br />
E<br />
Stopper 1<br />
F<br />
G<br />
Flange<br />
Pop-up Body<br />
1<br />
1<br />
H<br />
I<br />
J<br />
K<br />
L<br />
M<br />
N<br />
O<br />
P<br />
Gasket (Preassembled to Pop-up Body (G))<br />
1<br />
Nut (Preassembled to Pop-up Body (G)) 1<br />
Pivot Nut (Preassembled to Pop-up Body (G)) 1<br />
Lift Rod Strap 1<br />
Horizontal Rod (Preassembled to Lift Rod Strap (K)) 1<br />
Strap (Preassembled to Lift Rod Strap (K)) 1<br />
Clip (Preassembled to Lift Rod Strap (K)) 1<br />
Screw (Preassembled to Lift Rod Strap (K)) 1<br />
Lift Rod 1<br />
2
SAFTEY INFORMATION<br />
Please read and understand this entire manual before attempting to assemble, operate or install<br />
the product. If you have any questions regarding the product, please call customer service at<br />
1-866-417-7564, 8 a.m. - 8 p.m., EST, Monday - Friday.<br />
• Follow the installation instructions carefully. Proper installation is the installer's responsibility.<br />
• Failure to follow correct installation procedures can result in the faucet being loose, which can<br />
result in serious injury.<br />
• Check local building codes before beginning installation to ensure compliance.<br />
PREPARATION<br />
Before beginning the assembly of product, make sure all parts are present. Compare parts with<br />
package content list and diagram above. If any part is missing or damaged, do not attempt to<br />
assemble the product. Contact customer service for replacement parts.<br />
Estimated Assembly Time: 60 minutes, Including Removal of Old Faucet<br />
Tools Required for Assembly (not included): Adjustable Wrench, Phillips Screwdriver, Putty/Silicone,<br />
Allen Wrench<br />
Helpful Tools (not included): Basin Wrench, Water Supply Lines<br />
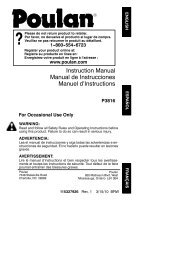
ASSEMBLY INSTRUCTIONS<br />
1. Shut off water supplies. Remove old faucet.<br />
1<br />
2. Place base plate (B) on bottom of faucet (A).<br />
Place faucet (A) through mounting holes of sink<br />
(not included). From under sink, slide mounting<br />
brackets (C) one at a time onto threaded bolts<br />
on faucet (A). Secure with mounting nuts (D).<br />
2<br />
A<br />
B<br />
C<br />
D<br />
3
ASSEMBLY INSTRUCTIONS<br />
3. Connect 1/2 in. IPS faucet connector or<br />
coupling nuts (not included) with 3/8 in.<br />
O.D.ball-nose risers (not included) to water<br />
supplies using wrenches (not included).<br />
Note: Refer to local plumbing codes for<br />
permissible types of water supply connectors.<br />
3<br />
4. Remove stopper (E) and flange (F). Screw<br />
nut (I) all the way down. Push gasket (H)<br />
down.<br />
4<br />
E<br />
F<br />
I<br />
H<br />
5. Apply silicone or putty (not included) to underside<br />
of flange (F).<br />
5<br />
SILICONE<br />
F<br />
6. Insert pop-up body (G) into sink. Screw flange<br />
(F) onto top of pop-up body (G). Pivot hole must<br />
face the back of the sink.<br />
6<br />
F<br />
G<br />
7. Tighten nut (I), but do not overtighten. Remove<br />
pivot nut (J).<br />
7<br />
I<br />
J<br />
4
ASSEMBLY INSTRUCTIONS<br />
8. Install horizontal rod (L) through the hole of<br />
stopper (E) . Hand tighten pivot nut (J).<br />
8<br />
E<br />
J L<br />
9. Attach horizontal rod (L) to strap (M) using<br />
clip (N).<br />
9<br />
M<br />
L<br />
N<br />
10. Insert lift rod (P) through faucet (A) and into<br />
strap (M). Tighten screw (O).<br />
10<br />
P<br />
O<br />
M<br />
11. After installation is completed, remove<br />
aerator on faucet (A). Turn on water supply<br />
and allow both hot and cold water to run for<br />
at least one minute each. While water is<br />
running, check for leaks. Replace aerator.<br />
11<br />
A<br />
5
CARE AND MAINTENANCE<br />
• Clean carefully by gently wiping with a grit-free damp cloth. Use only mild soap with water.<br />
Never use acids, harsh chemicals or abrasive detergents to clean surface.<br />
TROUBLESHOOTING<br />
If you have any questions regarding the product, please call our customer service at 1-866-417-7564,<br />
PROBLEM POSSIBLE CAUSE CORRECTIVE ACTION<br />
Leak from under handle Damaged cartridge Remove handle. Replace cartridge.<br />
Inconsistent flow pattern<br />
Aerator is dirty or misfitted Unscrew the aerator to check rubber<br />
washer or replace the aerator.<br />
Leak from the spout/aerator Damaged cartridge Remove handle. Replace cartridge.<br />
LIFETIME LIMITED WARRANTY<br />
This faucet has been manufactured under the highest standard of workmanship. All parts of this faucet<br />
are warranted to be free from leaks or drips during domestic use for as long as the original purchaser<br />
owns this product. THIS EXCLUDES INDUSTRIAL, COMMERCIAL, OR BUSINESS USE. The<br />
manufacturer will replace FREE OF CHARGE, under the warranty conditions the entire unit or any<br />
part (at our option) which proves defective in material and/or workmanship under normal installation,<br />
use and service. This warranty is limited to defective parts as stated. All costs of removal and<br />
installation of the faucet, including the replacement of warranty parts are the responsibility of the<br />
purchaser. The manufacturer shall not be liable for incidental, consequential or special damages<br />
arising at or in connection with product use or performance except as may otherwise be accorded by<br />
law. This warranty gives you specific legal rights, and you may also have other rights which may vary<br />
from state to state. Any damage to this faucet as a result of misuse, abuse, neglect, accident,<br />
improper installation, or any use violating instructions furnished by us, WILL VOID THIS WARRANTY.<br />
When requesting warranty service, you will need to present a copy of your sales receipt as proof of<br />
purchase. To obtain warranty service, call our customer service department at 1-866-417-7564.<br />
6
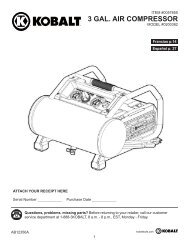
REPLACEMENT PARTS LIST<br />
For replacement parts, call our customer service department at 1-866-417-7564, 8 a.m. - 8 p.m., EST,<br />
Monday - Friday.<br />
PART<br />
1<br />
2<br />
3<br />
4<br />
5<br />
6<br />
7<br />
8<br />
9<br />
10<br />
11<br />
12<br />
13<br />
14<br />
DESCRIPTION PART #<br />
Handle<br />
Set Screw<br />
Index<br />
Connect<br />
Cap<br />
Bonnet<br />
Nut<br />
Cartridge<br />
Aerator<br />
Bolt<br />
Mounting bracket<br />
Mounting Nut<br />
Lift Rod<br />
Pop-up<br />
*Available in Polished Chrome Finish.<br />
RP13206*<br />
RP50002<br />
RP10006<br />
RP50095<br />
RP80271*<br />
RP70173<br />
RP70287<br />
RP20031<br />
RP30094*<br />
RP50040<br />
RP64083<br />
RP56033<br />
RP40050*<br />
RP40027*<br />
9<br />
2<br />
3<br />
10<br />
1<br />
4<br />
5<br />
6<br />
7<br />
8<br />
13<br />
14<br />
11<br />
12<br />
Printed in China<br />
7