Print Quality and Troubleshooting Guide - Lexmark
Print Quality and Troubleshooting Guide - Lexmark
Print Quality and Troubleshooting Guide - Lexmark

You also want an ePaper? Increase the reach of your titles
YUMPU automatically turns print PDFs into web optimized ePapers that Google loves.
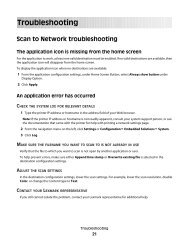
<strong>Print</strong> quality <strong>and</strong> troubleshooting<br />
guide<br />
Page 1 of 5<br />
<strong>Print</strong> quality <strong>and</strong> troubleshooting guide<br />
Many print quality problems can be solved by replacing a supply or maintenance item that is approaching the end<br />
of its intended life. Check the operator panel for a message about a printer consumable. See “Determining the<br />
status of supplies” in the User’s <strong>Guide</strong> for information about other ways to identify consumables that need to be<br />
replaced.<br />
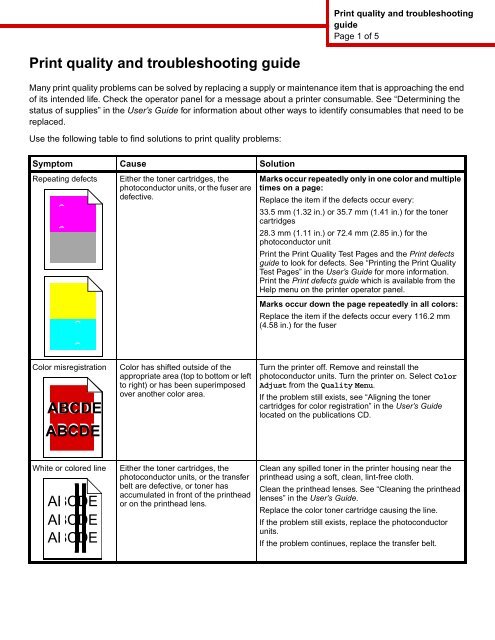
Use the following table to find solutions to print quality problems:<br />
Symptom Cause Solution<br />
Repeating defects<br />
Either the toner cartridges, the<br />
photoconductor units, or the fuser are<br />
defective.<br />
Marks occur repeatedly only in one color <strong>and</strong> multiple<br />
times on a page:<br />
Replace the item if the defects occur every:<br />
33.5 mm (1.32 in.) or 35.7 mm (1.41 in.) for the toner<br />
cartridges<br />
28.3 mm (1.11 in.) or 72.4 mm (2.85 in.) for the<br />
photoconductor unit<br />
<strong>Print</strong> the <strong>Print</strong> <strong>Quality</strong> Test Pages <strong>and</strong> the <strong>Print</strong> defects<br />
guide to look for defects. See “<strong>Print</strong>ing the <strong>Print</strong> <strong>Quality</strong><br />
Test Pages” in the User’s <strong>Guide</strong> for more information.<br />
<strong>Print</strong> the <strong>Print</strong> defects guide which is available from the<br />
Help menu on the printer operator panel.<br />
Marks occur down the page repeatedly in all colors:<br />
Replace the item if the defects occur every 116.2 mm<br />
(4.58 in.) for the fuser<br />
Color misregistration<br />
ABCDE<br />
ABCDE<br />
Color has shifted outside of the<br />
appropriate area (top to bottom or left<br />
to right) or has been superimposed<br />
over another color area.<br />
Turn the printer off. Remove <strong>and</strong> reinstall the<br />
photoconductor units. Turn the printer on. Select Color<br />
Adjust from the <strong>Quality</strong> Menu.<br />
If the problem still exists, see “Aligning the toner<br />
cartridges for color registration” in the User’s <strong>Guide</strong><br />
located on the publications CD.<br />
White or colored line<br />
ABCDE<br />
ABCDE<br />
ABCDE<br />
Either the toner cartridges, the<br />
photoconductor units, or the transfer<br />
belt are defective, or toner has<br />
accumulated in front of the printhead<br />
or on the printhead lens.<br />
Clean any spilled toner in the printer housing near the<br />
printhead using a soft, clean, lint-free cloth.<br />
Clean the printhead lenses. See “Cleaning the printhead<br />
lenses” in the User’s <strong>Guide</strong>.<br />
Replace the color toner cartridge causing the line.<br />
If the problem still exists, replace the photoconductor<br />
units.<br />
If the problem continues, replace the transfer belt.
<strong>Print</strong> quality <strong>and</strong> troubleshooting<br />
guide<br />
Page 2 of 5<br />
Symptom Cause Solution<br />
Streaked horizontal<br />
lines<br />
ABCDE<br />
ABCDE<br />
ABCDE<br />
The toner cartridges may be<br />
defective, empty, or worn.<br />
The fuser may be defective or worn.<br />
Replace the toner cartridges as needed.<br />
Replace the fuser.<br />
Streaked vertical lines<br />
ABCDE<br />
ABCDE<br />
ABCDE<br />
Toner is smeared before fusing to the<br />
media.<br />
The toner cartridges are defective.<br />
The transfer belt is defective.<br />
If media is stiff, try feeding from another tray.<br />
Replace the color toner cartridge causing the streaks.<br />
Replace the transfer belt.<br />
<strong>Print</strong> irregularities<br />
ABCDE<br />
ABCDE<br />
ABCDE<br />
The media has absorbed moisture<br />
due to high humidity.<br />
The media being used does not meet<br />
the printer specifications.<br />
The toner cartridges may be empty.<br />
The fuser is worn or defective.<br />
Make sure the media loaded in the source is not damp.<br />
Load media from a fresh package.<br />
Make sure the printer Paper Type setting matches the<br />
type of media being used.<br />
Avoid textured media with rough finishes.<br />
Replace the needed toner cartridge.<br />
Replace the fuser.
<strong>Print</strong> quality <strong>and</strong> troubleshooting<br />
guide<br />
Page 3 of 5<br />
Symptom Cause Solution<br />
<strong>Print</strong> too light Color Saver could be set to On. Set Color Saver to Off.<br />
The Toner Darkness setting in the<br />
<strong>Quality</strong> Menu is too light, the RGB<br />
Brightness setting is too bright, or the<br />
RGB Contrast is too high.<br />
The media being used does not meet<br />
the printer specifications.<br />
Select a different Toner Darkness, RGB Brightness, or<br />
RGB Contrast setting from the printer driver before<br />
sending the job to print or return the color settings to the<br />
factory defaults.<br />
Make sure the media loaded in the source is not damp.<br />
Load media from a new package. Avoid textured media<br />
with rough finishes.<br />
<strong>Print</strong> too dark<br />
Transparency print<br />
quality is poor<br />
(<strong>Print</strong> has<br />
inappropriate light or<br />
dark spots, toner is<br />
smeared, horizontal or<br />
vertical light b<strong>and</strong>s<br />
appear, or color does<br />
not project.)<br />
The toner cartridges are low on toner.<br />
The toner cartridges are defective.<br />
The Toner Darkness setting in the<br />
<strong>Quality</strong> Menu is too dark, the RGB<br />
Brightness setting is too dark, or the<br />
RGB Contrast is too high.<br />
The toner cartridges are defective.<br />
The transparencies being used do not<br />
meet the printer specifications.<br />
The Paper Type setting for the tray<br />
being used is set to something other<br />
than Transparency.<br />
Replace the toner cartridges.<br />
Select a different Toner Darkness, RGB Brightness, or<br />
RGB Contrast setting from the printer driver before<br />
sending the job to print or return the color settings to the<br />
factory defaults.<br />
Replace the toner cartridges.<br />
Use only transparencies recommended by the printer<br />
manufacturer.<br />
Make sure the Paper Type setting in the Paper Menu is set<br />
to Transparency.<br />
Toner specks The toner cartridges are defective. Replace the toner cartridges.<br />
Toner is in the media path.<br />
Call for customer support.<br />
Toner rubs off the<br />
media easily when the<br />
sheets are h<strong>and</strong>led.<br />
Gray background<br />
ABCDE<br />
ABCDE<br />
ABCDE<br />
A specialty media is being used.<br />
The Paper Weight setting in the Paper<br />
Menu is wrong for the type of paper or<br />
specialty media being used.<br />
The fuser is worn or defective.<br />
The Toner Darkness setting in the<br />
<strong>Quality</strong> Menu is too dark.<br />
The toner cartridges are defective.<br />
Make sure the correct Media Type is selected.<br />
Change Paper Weight from Normal to Heavy. If<br />
necessary change Paper Texture from Normal to Rough.<br />
Replace the fuser.<br />
Select a different Toner Darkness setting from the printer<br />
driver before sending the job to print.<br />
Remove <strong>and</strong> reinstall the toner cartridges.<br />
Replace the toner cartridges.
<strong>Print</strong> quality <strong>and</strong> troubleshooting<br />
guide<br />
Page 4 of 5<br />
Symptom Cause Solution<br />
Uneven print density The toner cartridges are defective. Replace the toner cartridges.<br />
ABCDE<br />
ABCDE<br />
ABCDE<br />
The photoconductor units are<br />
defective.<br />
Replace the photoconductor units.<br />
Ghost images<br />
The photoconductor units are not<br />
functioning properly.<br />
Make sure the Paper Type setting is correct for the paper<br />
or specialty media being used.<br />
Replace the photoconductor units.<br />
See “Repeating defects” on page 1.<br />
Call for customer support.<br />
Clipped images<br />
(Some of the print is<br />
cut off on the sides,<br />
top, or bottom of the<br />
media.)<br />
Incorrect margins<br />
Skewed print<br />
(<strong>Print</strong> is<br />
inappropriately<br />
slanted.)<br />
Blank pages<br />
Solid color pages<br />
There could be an incorrect page size<br />
selected in the driver or application.<br />
<strong>Guide</strong>s in the selected tray are set for<br />
a different size media than what is<br />
loaded in the tray.<br />
<strong>Guide</strong>s in the selected tray are set for<br />
a different size media than what is<br />
loaded in the tray.<br />
Auto size sensing is set to Off, but a<br />
different size media is loaded in a tray.<br />
For example, if A4 size paper is<br />
inserted into the selected tray, but the<br />
Paper Size was not set to A4.<br />
<strong>Guide</strong>s in the selected tray are not in<br />
the correct position for the media size<br />
loaded in the tray.<br />
An incorrect media type is loaded in<br />
the tray being printed from, or the<br />
Paper Type setting does not match<br />
the type of media loaded in the<br />
source.<br />
The toner cartridges are defective or<br />
empty.<br />
The photoconductor units are<br />
defective.<br />
The printer requires servicing.<br />
Specify the correct page size in the driver or application.<br />
Move the guides in the tray to the proper positions for the<br />
size loaded.<br />
Move the guides in the tray to the proper positions for the<br />
size loaded.<br />
Move the guides in the tray to the proper positions for the<br />
size loaded.<br />
Load the correct type media for the print job, or make sure<br />
the Paper Type setting is correct for the paper or specialty<br />
media being used.<br />
Replace the toner cartridges.<br />
Note: Make sure all packaging is removed from the<br />
photoconductor units. See the Setup sheet or Replacing<br />
a photoconductor unit.<br />
Replace the photoconductor units.<br />
Call for customer support.
<strong>Print</strong> quality <strong>and</strong> troubleshooting<br />
guide<br />
Page 5 of 5<br />
Symptom Cause Solution<br />
The media curls badly<br />
once it prints <strong>and</strong> exits<br />
to the st<strong>and</strong>ard bin.<br />
The Paper Weight setting is wrong for<br />
the type of paper or specialty media<br />
being used.<br />
The media loaded in the source is<br />
damp.<br />
Change the Paper Weight setting.<br />
Make sure the media loaded in the source is not damp.<br />
Load media from a new package.<br />
<strong>Print</strong> quality troubleshooting<br />
To help isolate print quality problems, print the <strong>Print</strong> <strong>Quality</strong> Test Pages.<br />
1 Turn the printer off.<br />
2 Press <strong>and</strong> hold <strong>and</strong> while turning the printer on.<br />
The Performing Self Test message appears followed by Config Menu.<br />
3 Press until Prt <strong>Quality</strong> Pgs appears, <strong>and</strong> then press .<br />
The pages are formatted. The <strong>Print</strong>ing <strong>Quality</strong> Test Pages message appears, then the pages print.<br />
The message remains on the operator panel until all the pages print.<br />
After the <strong>Print</strong> <strong>Quality</strong> Test Pages print, to exit the Config Menu:<br />
4 Press until Exit Config Menu appears, <strong>and</strong> then press to complete the procedure.<br />
Once the pages print, use the <strong>Print</strong> defects guide to identify the defective component.<br />
If another type of print quality problem exists, see the <strong>Troubleshooting</strong> chapter in the User’s <strong>Guide</strong> on the<br />
publications CD.