Woodcut Proforme Tool - More Woodturning
Woodcut Proforme Tool - More Woodturning
Woodcut Proforme Tool - More Woodturning

You also want an ePaper? Increase the reach of your titles
YUMPU automatically turns print PDFs into web optimized ePapers that Google loves.
<strong>More</strong> <strong>Woodturning</strong>/January 2004/Page 4<br />
Tips and Hints to Get the Most out of Your <strong>Woodcut</strong> <strong>Proforme</strong> <strong>Tool</strong>s<br />
by Lyn J. Mangiameli<br />
The <strong>Woodcut</strong> <strong>Proforme</strong> instructions<br />
are quite minimal, not unlike most hollowing<br />
tools. Nonetheless, I’ve managed<br />
to get what I consider to be outstanding<br />
performance from the tools. I can control<br />
my cuts from aggressive to fine. I<br />
never get uncontrolled catches and if I<br />
can hold on and the motor won’t stall, I<br />
can remove incredibly thick curls of wood<br />
until the wood is all gone. It is possible<br />
to overcome “bounce,” avoid ridges, and<br />
achieve a smooth surface that needs little<br />
or no shear scraping to clean up. Here is<br />
what has worked for me.<br />
Lathe Speed:<br />
Number one rule, run the lathe at low<br />
speed. If I ever have a problem with<br />
these tools, almost of any sort, the first<br />
thing I do is turn the speed down even<br />
more. Probably 90 percent of the time<br />
this immediately solves the problem.<br />
These tools cut so efficiently and so aggressively,<br />
high speed simply isn’t important.<br />
I’d guess I generally use the tools<br />
at from 200 to 300 rpm, but I imagine<br />
anything from 50 to 500 rpm may be appropriate<br />
depending on how deep a cut<br />
you are taking and the nature of the<br />
wood. If you feel your tool is way too<br />
aggressive and you are hanging on for<br />
dear life, your speed is too high and/or<br />
your gap is too large; reducing either or<br />
both will help you maintain control. It also<br />
doesn’t hurt to relax and be gentle, but I<br />
realize this advice is easier to give than<br />
achieve.<br />
Blade Exposure-Gap Width:<br />
You don’t need much of an exposed<br />
edge. That is, you don’t need much of a<br />
horizontal opening between the blade and<br />
the guard; about the thickness of a piece<br />
of paper should be quite enough for dry<br />
wood, a very little wider for wet wood<br />
(the dryer the wood, the more you want<br />
the guard closed down). The thickness<br />
from the OUTSIDE of the blade to the<br />
edge of the cap is set from .015 to .020<br />
on all six of my heads. I never measure<br />
this, I just adjust them to the opening that<br />
works best for me, and this was what<br />
they measured to be. Keep in mind this<br />
is from the outside of the blade, so the<br />
actual gap between the blade and the<br />
guard is less. Those figures would suggest<br />
I generally work with a gap at or<br />
slightly less than 1/64 of an inch. Yes,<br />
occasionally I open it up two to three<br />
times that for deliberately hogging wet<br />
wood (if I’m feeling strong), but for most<br />
hollowing work, a gap less than 1/64 of<br />
an inch works just fine for me. With such<br />
a narrow horizontal gap, the guard will<br />
leave you pretty safe from catches.<br />
Blade Exposure-Area Exposed:<br />
The cutter forms a J shape. Try to<br />
have a roughly even gap in the area of<br />
the J from the bottom of the J on around<br />
to a third of the way up the rising long<br />
side of the J. This will allow you to make<br />
straight forward “plunge” cuts and also<br />
allow you to make side cuts. Use anywhere<br />
along this opened up area to make<br />
your cut, according to the access you<br />
have, the width of cut you want, and simply<br />
what gives you the best cut for your<br />
purposes at the moment. It is usually<br />
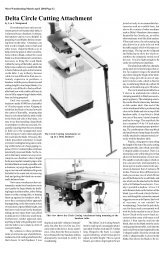
A close up of the New <strong>Proforme</strong> Head.<br />
easier to first adjust the guard forward<br />
and back for the appropriate gap, then<br />
use the eccentric Allen head screw to<br />
tune the exposure. If any one area should<br />
have the most gap, it should be the area<br />
where the J begins to curve upwards<br />
along the long side of the J. However, if<br />
the gap is limited only to that area, the<br />
narrow slices make it more likely to create<br />
concentric (well actually tight spiraling)<br />
ridges in the wood, rather than a flat<br />
smooth surface. The more you can move<br />
your cut up the side of the J, the more<br />
level your cut, that is, the cut surface will<br />
be more even along the wall sides. With<br />
practice, you can achieve an internal finish<br />
that is superior to any scraping tool<br />
I’ve owned (including the Stewart and<br />
the Kelton hollowers) and that usually<br />
doesn’t need sheer scraping or sanding<br />
to level and smooth the interior surfaces.<br />
At about the price of a good woodturning gouge<br />
Orientation of Cutter to the Wood:<br />
You need to approach the wood so<br />
that the edge of the blade can reach the<br />
wood without being blocked by the guard.<br />
Unlike a gouge, you can control your cut<br />
by rolling up along the bevel (the<br />
manufacturer’s recommended approach),<br />
or by rolling down off the guard<br />
(what I do about half the time). This is<br />
achieved by simply rotating the shaft of<br />
the tool to get the best cut. If the gap is<br />
not outrageously wide, either approach<br />
will work uneventfully and help you find<br />
the best angle for cutting. With the cutting<br />
edge straight up, you want the tool<br />
to be near the 9 o’clock centerline of the<br />
vessel or a little above. Within a degree<br />
or two of vertical, will be the best cutting<br />
angle. You can help judge this by placing<br />
the shaft in the tool handle with the locking<br />
bolts/screw/wingnut (depending on<br />
handle) oriented to the 12 o’clock position<br />
when the blade is vertical. Thus even<br />
when the head is hidden, you will have<br />
those mounting fasteners to orient it.<br />
Generally, if you are having troubles getting<br />
the blade to cut, slightly raise the<br />
cutting head inside the form and turn<br />
clockwise. When you find what some call<br />
the “sweet spot,” notice (on an open vessel)<br />
just what is the angle between the<br />
blade and the wood. Once you have a<br />
sense of that angle, you can cut anywhere<br />
from 11 clock down to roughly 6 o’clock<br />
as long as you turn the tool head to maintain<br />
the same angle to the wood. I often<br />
make cuts down around 4 to 5 o’clock<br />
when it serves my purposes (you pretty<br />
much need a toolgate or pin rest to do<br />
this). For a cut off the bottom of the J,<br />
keep the tool at centerline but have the<br />
toolrest slightly raised so the shaft will<br />
angle down. This will get you off the bevel<br />
(not that there is much of one, in the traditional<br />
sense) and allow a cut.<br />
Since the edge is guarded, it is pretty<br />
safe to experiment with all sorts of positions<br />
without major ill effects, feel free<br />
to try the unorthodox, though I recommend<br />
you learn with the straight shaft,<br />
as it will be much easier to master during<br />
your initial experiments. As long as you<br />
keep the gap closed down, you can try<br />
all sorts of plunge cuts, side cuts, approach<br />
angles, tilts, and back cuts without<br />
worrying that you are going to sink<br />
that edge a half inch into the side of the<br />
vessel. The area of the curve of the J as<br />
it goes up the side should be the easiest<br />
place to achieve a cut, but feel free to<br />
experiment with anywhere from the short<br />
side of the J, through the very tip, to the<br />
full length of the long side. Once you get<br />
the hang of it, you will be able to take<br />
cuts from any of these locations.<br />
EXCLUSIVE TO:CRAFT SUPPLIES USA<br />
woodturnerscatalog.com Tel:800-551-8876<br />
Clogging:<br />
These tools can clog in one of two<br />
ways: the first is when wood fibers<br />
become so packed and jammed between<br />
the edge of the guard and the<br />
cutting edge that the tool can no<br />
longer take a shaving; the second is<br />
when wood fibers are left stuck between<br />
the guard and the blade or<br />
packed under the guard at the<br />
completion of tool use. The latter is<br />
largely an inconvenience, doesn’t effect<br />
the ability of the blade to cut efficiently<br />
as they are self clearing<br />
when cutting is taking place, and can<br />
be removed easily without taking off<br />
the guard by some judicious probing<br />
with a metal awl from the open end<br />
of the J shaped cutter. It is worth the<br />
trouble to remove them, for if initially<br />
green, they can harden in place and<br />
be troublesome to remove later. This<br />
sort of clog is not uncommon, particularly<br />
on the earlier versions of the<br />
<strong>Proforme</strong> that used a flat guard that<br />
covered the entire head.<br />
Very uncommon, at least for me,<br />
are those clogs where prior shavings<br />
are so jammed and packed against<br />
or behind the cutting edge that the<br />
newly cut wood cannot push by. The<br />
only clogs I have had of this sort occurred<br />
when I was first learning to<br />
use the tool. Now, I never have clogs<br />
of this sort. This leads me to believe<br />
those clogs that prevent cutting are<br />
most often caused when there is an<br />
insufficient vertical gap between the<br />
top of the blade and the bottom of<br />
the guard. This is different than the<br />
horizontal gap between the blade and<br />
the side of the guard that you set to<br />
control the shaving size. As discussed<br />
above, provision is made for horizontal<br />
adjustment of the guard, but no<br />
factory provision has been made for<br />
vertical adjustment of the height of<br />
the guard above the top of the blade<br />
edge.<br />
The <strong>Proforme</strong> has had several<br />
different guards and the earlier ones<br />
have the least vertical gap, while the<br />
most recent has a raised section on<br />
the bottom of the guard to increase<br />
the vertical gap. I suspect that the<br />
reason I no longer have clogs that<br />
prevent cutting is that the newer<br />
guards have more vertical clearance<br />
from the cutting edge, and with my<br />
<strong>Tool</strong> Sharpening System<br />
NZ Patent Appl. No. 521080<br />
Give your tools<br />
a new edge<br />
*Accurately sharpens all woodturning<br />
tools<br />
*Can be set up quickly and used easily<br />
*Clean grind on the bevel of all tools<br />
*Edge stays sharper for longer<br />
*Totally adjustable in all directions<br />
*Any grinding shape easily achieved<br />
*Patented dual pivot system for perfect<br />
scrapers, will also dress your wheel<br />
*Instructional booklet and CD<br />
rom included<br />
ONLY: $114.99
<strong>More</strong> <strong>Woodturning</strong>/January 2004/Page 5<br />
heads that carry the older flatter guards,<br />
the blade has worn back and thus the<br />
gap has increased as the blade height<br />
diminished from sharpening. So one way<br />
of increasing the vertical gap is just to<br />
use your <strong>Proforme</strong> a lot and wear down<br />
that blade edge. Of course a more immediate<br />
way to increase the vertical gap<br />
is to install a thin shim or washer of paper,<br />
plastic or metal between the guard<br />
and the head. The shim should be very<br />
thin, no more than the thickness of a business<br />
card. Then, as the blade wears, you<br />
can remove or use a thinner shim.<br />
Though unlikely to be present, you should<br />
also examine the bottom of the guard for<br />
lumps or burrs, and remove them to allow<br />
for the smoothest passage of wood<br />
fibers past the guard. It is also possible<br />
to use a Dremel like tool to polish the<br />
internal surfaces of the head behind the<br />
blade. I’ve done this, but I can’t honestly<br />
say that I find it has made any real<br />
difference (but then I wasn’t having<br />
clogging problems in the first place).<br />
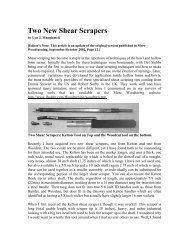
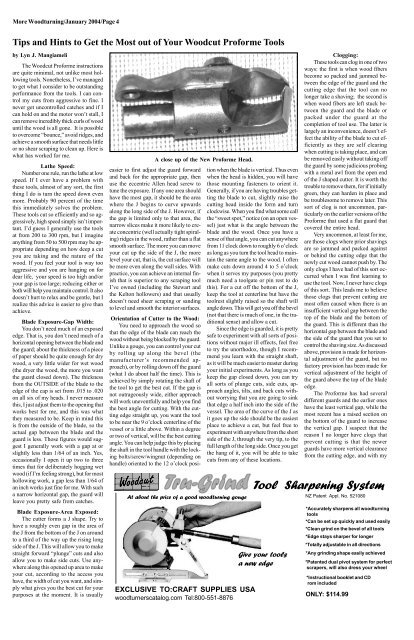
This photo shows a selection of <strong>Proforme</strong> shafts available, plus three<br />
cutter heads, two with adapters to enable them to fit onto different<br />
handles. In the far right hand corner is the teardrop scraper that is<br />
available from <strong>Woodcut</strong>.<br />
The standard <strong>Proforme</strong> handle shown with one of the shafts.<br />
Shafts:<br />
The <strong>Proforme</strong> currently comes in<br />
with a choice of three different shafts: a<br />
straight shaft, a slightly canted shaft and<br />
a swan necked shaft.<br />
My favorite shaft is the shaft with<br />
the slightly angled (canted) shaft. <strong>Woodcut</strong><br />
calls this their Slight Bent Head. For<br />
a while, Ken Port the manufacturer, discontinued<br />
this shaft, replacing it with a<br />
totally straight shaft. However, after<br />
many requests, has re-introduced the<br />
slightly canted version of this shaft. I<br />
would recommend anyone who only has<br />
the fully straight shaft to consider obtaining<br />
the slightly canted version as well.<br />
Both have their preferred applications<br />
and can largely substitute for each other,<br />
but I much prefer the canted version for<br />
hollow forms that are rounded and/or<br />
semi-enclosed.<br />
The “straight” shaft is good for many<br />
purposes, but I find it forces one to angle<br />
the rear of the shaft a bit farther over to<br />
the right, in order to present what is usually<br />
the preferred area of the blade<br />
(where the blade begins to transition from<br />
the bottom of the J to the long side) to<br />
the wood. This is not a problem when a<br />
turning has a moderately wide mouth, but<br />
is sometimes difficult to achieve when<br />
dealing with a hollow form with a very<br />
narrow mouth. However, the straight<br />
shaft does work well for very deep hollowing<br />
when coupled to the <strong>Woodcut</strong><br />
long handle or the Hutson handles (discussed<br />
in the next section).<br />
The “swan necked” <strong>Proforme</strong> shaft<br />
(<strong>Woodcut</strong> calls this their Bent Head or<br />
Heavy Bend) can be handy to have, but<br />
does not adapt to as wide a range of situations<br />
as its straight and canted brothers.<br />
Still, the “swan necked” shaft will<br />
make it easier to get aggressive “front<br />
of the J” plunge cuts in deeply rounded<br />
forms, and makes it easier to get “side<br />
of the J” cuts on the peripheral upper<br />
edge of such forms. I don’t find the<br />
angle of the neck very useful for getting<br />
directly inside the opening of a small<br />
mouthed hollow form, and have to resort<br />
to another tool like a Kelton or small<br />
Jordan Hollower for this area.<br />
All <strong>Proforme</strong> shafts are somewhat<br />
limited when used by themselves for<br />
large forms and very deep hollowing because<br />
of their modest length and 5/8ths<br />
diameter. You can get around these restrictions<br />
of length and rigidity by installing<br />
the stock shafts into the <strong>Woodcut</strong> or<br />
Hutson long straight handles, or by making<br />
up an adapter (I start with 1/2 X 3/4<br />
inch aluminum bar-see accompanying<br />
photos) that will allow the <strong>Proforme</strong><br />
heads to mount in a Stewart/Pencil/Jordan<br />
Omni<strong>Tool</strong> style straight shaft, or on<br />
a Don Pencil Scorpion Hooker or<br />
Stewart Bottom Hooker (the cutting edge<br />
will not align on axis with the usual top<br />
mount Steward/Sorby Hooker). The profile<br />
of these Hookers are particularly effective<br />
in allowing the <strong>Proforme</strong> head to<br />
be optimally oriented when working in<br />
larger hollow forms.<br />
Handles:<br />
The relatively short standard handle<br />
is quite comfortable for making hollow<br />
forms on the small side of medium. I like<br />
my standard handles to be weighted with<br />
lead shot for the last several inches (it is<br />
easy to pull the rear cap, put in a wood or<br />
plastic plug about five to six inches down,<br />
fill the end with lead shot, and replace<br />
the cap). I find this weighted handle to<br />
be quite effective at reducing the stresses<br />
that arise from little kickbacks common<br />
to hollowing, and to allow for more control<br />
in general.<br />
Any metal shafted handle offering a<br />
5/8 inch bore will work fine with these<br />
tools. For larger forms, you will achieve<br />
much greater control with a longer<br />
handle, something in the 20-26 inch range.<br />
<strong>Woodcut</strong> now offers a 20 inch long, 1.125<br />
inch diameter handle, that can be paired<br />
with a second for very deep work. Also<br />
for very deep forms, one can use the<br />
<strong>Woodcut</strong> or Hutson long handles. Presently,<br />
<strong>Woodcut</strong> is not showing their 1 inch<br />
diameter long handle to be available, but<br />
I bet Ken would be willing to make one<br />
up on special order. Between the <strong>Woodcut</strong><br />
and the Hutson, I much prefer the<br />
<strong>Woodcut</strong> versions, as they allow the extension<br />
of the <strong>Proforme</strong> shaft to be varied<br />
over nearly the shaft’s entire length<br />
to achieve the best balance between<br />
length and rigidity, while the Hutson version<br />
only has a short socket, that means<br />
the 5/8’s shaft is always fully exposed<br />
and thus the overall combination is less<br />
rigid. The only downside of the <strong>Woodcut</strong><br />
Long Shaft is that if you want the handle<br />
weighted you must load your own lead<br />
shot (easily and inexpensively obtained<br />
from a gun or hunting supply store). Ken<br />
makes this easy to do by pre installing an<br />
internal plug and an endcap on his long<br />
handle. The <strong>Proforme</strong> head mounted on<br />
the standard straight shaft, coupled to<br />
these long lead filled handles with their 1<br />
inch shafts, makes an excellent tool for<br />
very deep hollowing.<br />
Finally, with a 5/8 to 3/4 adapter<br />
(which can be a simple sleeve made from<br />
metal tubing, or you can use one of the<br />
excellent Don Pencil Scorpion adapters).<br />
Indeed, one of the favorite ways for me<br />
to use my <strong>Proforme</strong> tools is to have them<br />
mounted in a Scorpion Armbrace. The<br />
<strong>Proforme</strong> shafts also work very well<br />
when used with a Stewart style armbrace<br />
or even the Jamieson or Kelton<br />
rotationally constrained hollowing rigs.<br />
For very deep work with a rotationally<br />
restrained system, you can make up an<br />
adapter to mount the <strong>Proforme</strong> cutting<br />
head alone to a thick boring bar.<br />
<strong>Tool</strong> Rests:<br />
You almost have to have a gated and/<br />
or pin tool rest to get the most out of the<br />
<strong>Proforme</strong>s. A toolgate or pin rest allows<br />
for considerably more control, reduces<br />
physical effort, and allows you to lever<br />
the tool to the side (when the head is oriented<br />
vertically,” this helps to achieve a<br />
cut off the rising long side of the J shaped<br />
blade) rather than down near the tip. Indeed,<br />
when you get used to the tool, you<br />
can even lever in the other direction and<br />
get a cut off the short side of the J (know<br />
what you are doing before you start doing<br />
this as the blade is less supported and<br />
more vulnerable on this open side).<br />
Though you often need this sideways<br />
force to make the tool bite, be judicious<br />
in how much force is applied as too much<br />
force will make the cut too aggressive.<br />
The BestWood<strong>Tool</strong>s adjustable pin rest<br />
(particularly if you ask him to make my<br />
version with two additional holes drilled<br />
to allow Delrin toolgates), a Phil Iron’s<br />
toolgate, the new Kelton <strong>Tool</strong> Gate, or a<br />
Hegner Deep hollowing toolrest are presently<br />
the best of the deep hollowing tool<br />
rests. That said, my preference is for<br />
making up my own Delrin toolgates sized<br />
specifically for the shafts diameters I most<br />
often use. This is an easy task using a<br />
drill press, a couple of sizes of Forstner<br />
bits, and a clevis pin; the Delrin rod can<br />
be obtained in small quantities from<br />
ENCO. If you don’t want to make up your<br />
own, the Phil Irons tool gate, in its latest<br />
configuration, comes with two U shaped<br />
gates sized with interior dimensions of 5/<br />
8 and 1.125 that are a perfect match for<br />
the <strong>Woodcut</strong> shaft and handle diameters<br />
Practical Aspects of Use:<br />
Since the <strong>Proforme</strong> head can be adjusted<br />
to take such an aggressive cut, be<br />
careful to limit the gap until you get used<br />
to the tool, and take care to gently approach<br />
the wood when you do have wider<br />
gaps. With a wide gap, a long weighted<br />
handle and/or a strong handle like an<br />
armbrace or rotationally restrained handle,<br />
it is quite possible to get controlled, long,<br />
greater than 1/4 inch shavings from green<br />
wood as long as you are strong enough<br />
and your motor is too. However, if you<br />
aren’t attentive and don’t have good control<br />
at such times, it is possible to cut right<br />
through the side of a form before you even<br />
know it (I haven’t actually done this, but<br />
I’ve sure heard reports of people who<br />
started with a 3/4 inch thick bowl and cut<br />
right through the wall or bottom before<br />
they even knew what was going on).<br />
Again, a reason to use slow speeds and<br />
also a reason to check your progress with<br />
calipers more often than you might do with<br />
other tools such as gouges or scrapers.<br />
Another side effect of the efficient<br />
action of a cutting tool like the <strong>Proforme</strong><br />
is that you will produce shavings/chips<br />
more rapidly and thus have to clear them<br />
more often. Just as with the scraping tools,<br />
frequent removal of shavings is necessary<br />
to allow the tool to maintain constant and<br />
controlled presentation to the solid wood<br />
surface. If you want good cuts, take the<br />
time to clear shavings frequently. While<br />
compressed air works well to remove the<br />
smaller chips formed by scraping tools, a<br />
vacuum cleaner is often more effective<br />
in removing the larger shavings created<br />
by the <strong>Proforme</strong> and other cutting tools.<br />
The most efficient technique for me is to<br />
use a piece of stiff wire or rod, bent on<br />
the end, to help “rake” the longest shavings<br />
out of a tight mouthed vessel. I mount<br />
the wire in a removable file handle to make<br />
it easier to pull the shavings out. Often<br />
you can use one of the swan necked micro<br />
hollowing tools for this task if the form<br />
is not too deep.<br />
Sharpening:<br />
Keep the blades sharp, but don’t grind<br />
them (I have yet to find the need to actually<br />
grind on the blades); consider yourself<br />
dressing or honing them instead. As I<br />
see it, there are two ways to hone the<br />
<strong>Proforme</strong> blades, my way and Ken’s way.<br />
The way that Ken Port recommends is to<br />
use fine (600-1200) Diamond “stones”<br />
[Continued on Page 7.]
<strong>More</strong> <strong>Woodturning</strong>/January 2004/Page 6<br />
<strong>Proforme</strong> from <strong>Woodcut</strong> Continued from Page 5<br />
shaped in the “credit card” or “paddle”<br />
style. Ken uses the hone along the outside<br />
of the blade in a specific pattern. It<br />
is best viewed looking down from the top<br />
as something like this: )( The first arced<br />
curve is the blade of the tool, the second<br />
arced curve is the path the honing tool<br />
takes across the outside face of the<br />
blade. You have to repeat this motion as<br />
you go around the entire blade. This will<br />
allow for the most accurate contact with<br />
the blade. If the complimentary curve<br />
throws you, then think of it more like )/.<br />
The face of the blade is concave, so your<br />
honing tool will actually be contacting only<br />
the top and bottom of the face of the<br />
blade. Peter Hemsley shows essentially<br />
the same motions in his description of<br />
sharpening the Hamlet Big Brother on<br />
his website: http://www.toolpost.co.uk/<br />
system/index.html<br />
My method is faster but requires<br />
more expensive equipment; a 1 inch vertical<br />
belt sander with a leather belt<br />
charged with green (chromium oxide)<br />
honing compound sticks. At somewhere<br />
between .5 and 2.0 micron, this green<br />
chromium oxide honing compound is far<br />
smaller in grit than any diamond stone<br />
(though not raw diamond paste), and you<br />
can use it without any fear of over grinding.<br />
I use three <strong>Proforme</strong> heads a lot (and<br />
two to a lesser amount) and none have<br />
yet to approach any need for refurbishment.<br />
The technique I have found most effective<br />
and convenient is to use a leather<br />
belt and chromium oxide with the vertical<br />
belt sander fitted with a flat platen.<br />
Just bring the head to the sander with<br />
the shaft attached (it is usually easier to<br />
manipulate if you leave the handle off,<br />
so you may want to use only the shaft<br />
and head for your initial sharpenings).<br />
Turn the head upside down, with the<br />
guard and cutting edge facing down, i.e.,<br />
in the direction the belt is moving. Bring<br />
the head to the belt and just match the<br />
two to achieve full contact between the<br />
blade and the belt in the area where you<br />
will have full platen support. As the outside<br />
of the blade has a broad low angle<br />
bevel, the <strong>Proforme</strong> head will not be held<br />
vertically, but tilted slightly in to the center<br />
(towards the guard). Just move the<br />
head along the path of the blade to hone<br />
the entire edge. This sharpens from bottom<br />
to top (of the tool, or vice versa with<br />
respect to belt movement) rather than<br />
side to side in Ken’s technique. That’s<br />
all it takes and all it will ever take if you<br />
do not get a stone nick. If that happens<br />
one will need something like a 9 or 15<br />
micron belt, but be conservative in its use.<br />
I have only had to go this far just once<br />
on one of my blades. For all other times,<br />
the honing belt has been quite sufficient,<br />
and one does not have to go back to this<br />
very often. With a couple of heads in different<br />
shafts, I can usually get through<br />
an entire hollow form on one honing. I<br />
suspect that even using only one head, a<br />
person will need to hone no more than<br />
once more.<br />
The great thing is that the <strong>Proforme</strong><br />
blades require remarkably little maintenance<br />
and they last for a very long time.<br />
Ken says roughly 1.5 years of use before<br />
there typically is a need for refurbishing<br />
with a new blade (he does this<br />
cheaply, but you have to send them to<br />
New Zealand), but I have used mine for<br />
longer than that and don’t feel mine are<br />
anywhere close to being in need of replacement<br />
(mind you, I am just a recreational<br />
turner, so my tools are not in constant<br />
everyday use).<br />
That is pretty much it. The <strong>Proforme</strong><br />
system has stood the test of time, and<br />
remains one of my most favored hollowing<br />
tools. Ken Port continues to look for<br />
ways to refine its performance, and thus<br />
far all of the little changes he has developed<br />
have been made available for retrofit.<br />
Frankly, I use all the versions interchangeably,<br />
and in the end find that technique<br />
makes a greater difference than<br />
any of the tool refinements. Hopefully the<br />
above discussion will help you get the<br />
most from yours.<br />
http://www.woodturningplus.com<br />
The “Best Of The Best”<br />
Norfolk Island Pine<br />
Turning Logs<br />
Logs from 4 inches to 20 inches<br />
In diameter<br />
My logs are shipped to your<br />
door - Bark off - Sprayed for<br />
Insects - Knots Trimmed -<br />
Ready to be Turned<br />
Call: Bill at 941-275-0135<br />
woodweisel@aol.com<br />
http:www.Woodturners.com/<br />
TropicalTurnings.htm<br />
PENTACRYL Has Been Improved!<br />
It Stops green wood from cracking and checking!<br />
Pentacryl No Longer reacts with Tannic Acid which can darken in the wood.<br />
Pentacryl now penetrates twice as fast.<br />
• Easy to use • Non-toxic • Speeds up drying • Fast Penetration<br />
• Wood can be finished • Makes carving and turning easier<br />
$14.95/qt* $44.95/gal* (*plus shipping)<br />
For more information or to place an order, contact us at:<br />
PRESERVATION SOLUTIONS<br />
1060 Bunker Hill Road, Jefferson ME 04348<br />
TEL: (207) 563-5414<br />
E-Mail: info@preservation-solutions.com<br />
Web Site: http://www.preservation-solutions.com<br />
Call or Write for your FREE Copy of our<br />
130 Page Color Catalog!<br />
Featuring:<br />
• Pen Kits and Supplies<br />
• Project Kits<br />
• Mini-Lathes<br />
• Turning Squares<br />
• Dymondwood<br />
• Henry Taylor and Sorby <strong>Tool</strong>s<br />
all at the best prices!<br />
Order Your Free Woodturners Catalog Today<br />
Craft Supplies USA<br />
1287 E. 1120 S.<br />
Provo, Utah 84606 USA<br />
TEL: 800-551-8876<br />
Overseas Telephone: 001-801-373-0919