- Page 1 and 2:
Tutorial Xilinx Virtex-5 FPGA ML506
- Page 3 and 4:
Blank Page 3
- Page 5 and 6:
Setting up the ML506 board The ML50
- Page 7 and 8:
• Set SW6 (on the back side of th
- Page 9 and 10:
• Go to setup → serial port, an
- Page 11 and 12:
Illustration 1: SACE ERR, CF card i
- Page 13 and 14:
Once this is complete, right-click
- Page 15 and 16:
After connecting your board. Run Te
- Page 17 and 18:
The VHDL Design Open up Xilinx ISE.
- Page 19 and 20:
Now setup the project settings for
- Page 21 and 22:
Select VHDL module and name the fil
- Page 23 and 24:
p1
- Page 25 and 26:
At the top click on Project → New
- Page 27 and 28:
Now that our code is finished we ha
- Page 29 and 30:
Programming the FPGA using iMPACT N
- Page 31 and 32:
If all is well, you should see the
- Page 33 and 34:
That's it! Your 2-bit greater-than
- Page 35 and 36:
Creating the Design First make sure
- Page 38 and 39:
Once Simulink is open make a new mo
- Page 40 and 41:
Now we will create a new compilatio
- Page 42 and 43:
Leave the board on and click 'Detec
- Page 44 and 45:
Click Save and Close, then click 'A
- Page 46:
Once the installation is complete,
- Page 49 and 50:
After dragging in the box, a window
- Page 51 and 52:
Double-click on the System Generato
- Page 54 and 55:
Click ok. Make sure your board is o
- Page 56 and 57:
Then you can toggle the GPIO switch
- Page 58 and 59:
Now within this folder make two emp
- Page 60 and 61: In the Project File section point i
- Page 62 and 63: Choose the development board, in ou
- Page 64 and 65: Choose these default values for the
- Page 66 and 67: Click Next on the Cache window as w
- Page 68 and 69: The base system is now finished but
- Page 70 and 71: Xilinx SDK Close Xilinx XPS and ope
- Page 72 and 73: The Xilinx SDK will prompt you to s
- Page 74 and 75: In the next window, name the projec
- Page 76 and 77: Expand the 'src' folder under the '
- Page 78 and 79: Now right-click on the hello_uart p
- Page 80 and 81: Turn on the ML506 and open up a ser
- Page 82 and 83: Create a folder on the local drive
- Page 84 and 85: Then copy these files and put them
- Page 86 and 87: Since this Xilinx project was creat
- Page 88 and 89: Finally, click Finish: 88
- Page 90 and 91: Xilinx SDK Close Xilinx XPS and ope
- Page 92 and 93: Name the C project 'play_sine' and
- Page 94 and 95: The files I will be using can be fo
- Page 96 and 97: * local prototypes */ volatile int
- Page 98 and 99: WriteAC97Reg(AC97_ExtendedAudioStat
- Page 100 and 101: XIo_Out32(AC97_InFIFO, j); } } int
- Page 102 and 103: Next we need to add some header fil
- Page 104 and 105: Program the FPGA Turn on the ML506
- Page 106 and 107: Some instructions are also displaye
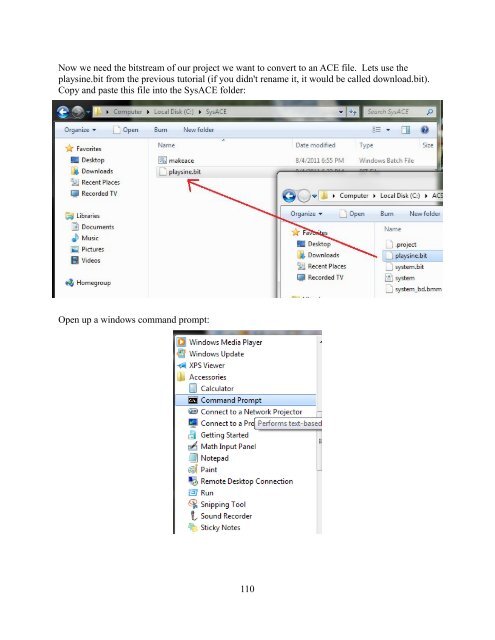
- Page 108 and 109: Create a folder on your local drive
- Page 112 and 113: Setting up the Compact Flash Make s
- Page 114: Since our file is in cfg1, we need