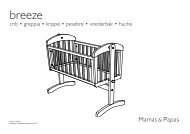
Orchard Cot Bed instructions - Mamas & Papas
Orchard Cot Bed instructions - Mamas & Papas
Orchard Cot Bed instructions - Mamas & Papas

Create successful ePaper yourself
Turn your PDF publications into a flip-book with our unique Google optimized e-Paper software.
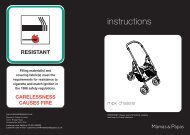
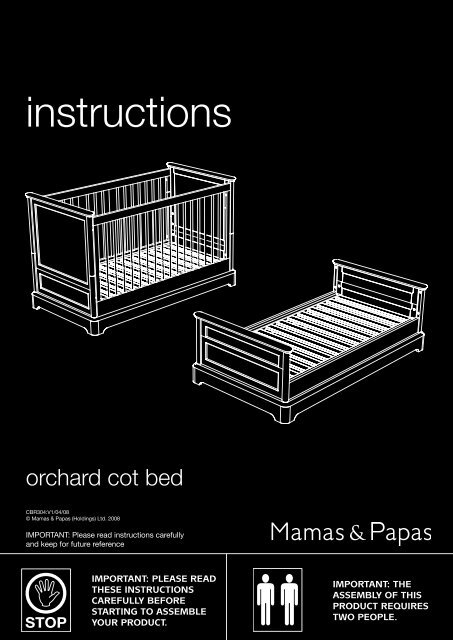
<strong>instructions</strong><br />
orchard cot bed<br />
CBR304:V1/04/08<br />
© <strong>Mamas</strong> & <strong>Papas</strong> (Holdings) Ltd. 2008<br />
IMPORTANT: Please read <strong>instructions</strong> carefully<br />
and keep for future reference<br />
Important: Please read<br />
these <strong>instructions</strong><br />
carefully before<br />
starting to assemble<br />
your product.<br />
Important: the<br />
assembly of this<br />
product requires<br />
two people.
orchard cot bed<br />
Before assembling your product...<br />
Do not discard any packaging until you are certain you have all the correct components and fittings.<br />
If any items are damaged or missing, please contact your retailer or <strong>Mamas</strong> & <strong>Papas</strong> on +44 (0)845 268<br />
2000. Allow plenty of time and space when beginning the construction of your product.<br />
Components<br />
4<br />
7<br />
2<br />
2<br />
5<br />
1<br />
6<br />
1<br />
3<br />
Please note that components 1 & 2 are supplied pre-assembled.<br />
Item Name<br />
Qty Item Name<br />
Qty<br />
1 <strong>Cot</strong>/bed end bottom section 2 5 <strong>Bed</strong> base 1<br />
2 <strong>Cot</strong> end top sections 2 6 <strong>Bed</strong> end top sections 2<br />
3 Plinth 1 7 <strong>Bed</strong> side rails 2<br />
4 <strong>Cot</strong> side 2<br />
FITTINGS<br />
A x 4 B x 8<br />
Metal Stud (pre-fitted to cot ends)<br />
C x 6<br />
Medium bolt<br />
E x 4<br />
<strong>Bed</strong> base bracket<br />
G x 4<br />
Side rail insert<br />
Short bolt (x4 pre-fitted to cot ends)<br />
D x 8<br />
Long bolt<br />
F x 4<br />
Base bracket nut<br />
H x 1<br />
Ball ended allen key<br />
ADDITIONAL TOOLS REQUIRED<br />
Important: The use of powered screwdrivers is not recommended for assembling this product.<br />
-2-<br />
Flat head screwdriver
STEP 1<br />
Assembling the cot:<br />
Attach the cot ends to<br />
the plinth (3) using six<br />
medium bolts (C) and the<br />
ball ended allen key (H) as<br />
shown.<br />
3<br />
Please ensure that all six<br />
bolts are located before<br />
tightening.<br />
C<br />
H<br />
STEP 2<br />
IMPORTANT: You will<br />
need the help of another<br />
person to complete this<br />
step.<br />
Flip the assembled<br />
sections so that it is in the<br />
upright position.<br />
-3-
4<br />
STEP 3<br />
Attach one of the cot<br />
sides (4) to the cot ends<br />
using four long bolts (D)<br />
and the ball ended allen<br />
key (H) as shown.<br />
Please ensure that all four<br />
bolts are located before<br />
tightening.<br />
D<br />
H<br />
5<br />
Insert four bed base<br />
brackets (E) into the<br />
bottom holes of the cot<br />
ends, ensuring that the<br />
threaded ends of the<br />
bracket are left exposed,<br />
then lower the bed base<br />
(5) into position.<br />
E<br />
STEP 4<br />
Secure the bed base<br />
using four base bracket<br />
nuts (F) and a flat head<br />
screwdriver as shown.<br />
IMPORTANT - The<br />
bottom base position is<br />
the safest. You should use<br />
this position as soon as<br />
your baby is old enough<br />
to sit up.<br />
F<br />
-4-
STEP 5<br />
Attach the remaining cot<br />
side (4) to the cot ends<br />
using four long bolts (D)<br />
and tighten using the ball<br />
ended allen key (H).<br />
Please ensure that all four<br />
bolts are located before<br />
tightening.<br />
4<br />
H<br />
D<br />
STEP 6<br />
The cot is now assembled.<br />
Before use, ensure that<br />
all fittings are tightened<br />
properly.<br />
Store the bed end top<br />
sections (6) and the bed<br />
side rails (7) in a safe<br />
place as these are not<br />
needed for the cot.<br />
-5-
STEP 7<br />
Assembling the bed:<br />
Before constructing the<br />
junior bed you will need<br />
to dismantle the cot.<br />
Remove the base bracket<br />
nuts, the base and then<br />
base brackets.<br />
Remove the bolts from<br />
the cot sides.<br />
Place the cot sides in<br />
storage and retrieve the<br />
bed side rails.<br />
Place all of the fittings in<br />
a safe place.<br />
Remove the short bolts<br />
from the cot end top<br />
section (2) using the ball<br />
ended allen key (H).<br />
B<br />
H<br />
2<br />
STEP 8<br />
Remove the cot end top<br />
section (2) from the cot/<br />
bed end bottom section<br />
(1).<br />
Remove the metal studs<br />
(A) from the cot end top<br />
section (2) by threading<br />
the ball ended allen key<br />
(H) through the hole<br />
in the metal stud and<br />
turning anti-clockwise to<br />
loosen it then remove it<br />
by hand.<br />
1<br />
H<br />
A<br />
-6-
STEP 9<br />
Attach the cot/bed end<br />
bottom section (1) to the<br />
bed end top section (6) by<br />
inserting four metal studs<br />
(A) into the bed end top<br />
section (1) and tighten<br />
by hand, then using the<br />
ball ended allen key (H) to<br />
securely tighten it.<br />
Push the top and bottom<br />
sections together and<br />
secure using four short<br />
bolts (B) and the ball<br />
ended allen key (H) as<br />
shown.<br />
H<br />
1<br />
A<br />
1<br />
B<br />
H<br />
7<br />
STEP 10<br />
Attach the two bed<br />
side rails (7) to the bed<br />
ends using four side rail<br />
inserts (G) and four long<br />
bolts (D) inserted into<br />
the inside of the rails as<br />
shown.<br />
To secure the bolts you<br />
will need to use the ball<br />
end of the allen key (H) at<br />
an angle as shown.<br />
D G H<br />
-7-
STEP 11<br />
IMPORTANT: You will<br />
need the help of another<br />
person to complete this<br />
step.<br />
Flip the assembled<br />
sections over so that<br />
the bed is on it’s side as<br />
shown.<br />
Step 12<br />
Attach the plinth to the<br />
assembled sections using<br />
six medium bolts (C) and<br />
the ball ended allen key<br />
(H).<br />
Please ensure that all six<br />
bolts are located before<br />
tightening.<br />
C<br />
3<br />
H<br />
-8-
Step 13<br />
IMPORTANT: You will<br />
need the help of another<br />
person to complete this<br />
step.<br />
Flip the assembled<br />
sections over so that the<br />
bed is upright as shown.<br />
5<br />
Step 14<br />
To fit the bed base, insert<br />
four bed base brackets<br />
(E) into the bottom holes<br />
on the bed ends ensuring<br />
that the threaded end<br />
of the bracket is left<br />
exposed. Lower the bed<br />
base (5) into position and<br />
secure using four base<br />
bracket nuts (F) and a<br />
flat head screwdriver as<br />
shown.<br />
E<br />
F<br />
-9-
Insert four blanking bolts<br />
(B) into the bed ends.<br />
Secure using the allen key<br />
(H).<br />
STEP 15<br />
The bed is now fully<br />
assembled. Before use<br />
ensure that all fittings are<br />
tightened and secure.<br />
Store the cot end top<br />
sections (2) and the cot<br />
sides (4) in a safe place as<br />
these are not needed for<br />
the bed.<br />
H<br />
B<br />
Notes...<br />
-10-
INSTRUCTIONS FOR SAFE USE & maintenance<br />
The bottom position of the base is the safest. You should use the cot in this position as soon<br />
as your baby is old enough to sit up.<br />
Never leave anything in the cot/bed which could provide a foothold for your child to climb<br />
out or would present a danger of suffocation or strangulation.<br />
The junior day bed should only be used once the child no longer requires the confinement of<br />
a cot.<br />
All assembly fittings should be tightened properly and care should be taken to ensure that no<br />
screws are loose, a child could trap parts of the body, or clothing (e.g. ribbons, drawstrings,<br />
necklaces ) this could pose a risk of strangulation.<br />
Regularly check that all fittings and components of the cot/bed are fully tightened and in<br />
working order. If any parts have become worn or damaged then do not use the cot/bed, seek<br />
advice from your retailer or call our Customer Services Helpline on: +44 (0)845 268 2000.<br />
Do not use replacement parts that are not recommended or supplied by <strong>Mamas</strong> & <strong>Papas</strong>.<br />
Non-approved parts may render the repair or cot/bed unsafe.<br />
Do not place your cot/bed in the close proximity of an open fire and other sources of heat,<br />
such as radiators, electric or gas fires.<br />
For reasons of safety we only recommend the use of the <strong>Mamas</strong> & <strong>Papas</strong> size 400 mattress<br />
for this cot/bed.<br />
The mattress should be no more than 40mm shorter or narrower than the internal length or<br />
width of the cot/bed.<br />
The thickness of the mattress chosen should be such that the internal height (the distance<br />
between the surface of the mattress to the upper edge of the cot side) is a minimum of<br />
500mm when the base is set in the lowest position and a minimum of 200mm when the cot<br />
base is set in the highest position.<br />
Your cot/bed may be cleaned with a damp cloth. Never use bleach or harsh abrasives.<br />
The maximum height (i.e. upper surface) of any mattress fitted must not exceed the line<br />
engraved on the inside of the cot side. We recommend the use of the <strong>Mamas</strong> & <strong>Papas</strong> size:<br />
400 mattress.<br />
Due to constant updating and improvements, some components may occasionally differ slightly from the diagrams shown in<br />
these <strong>instructions</strong>. We reserve the right to change the specifications of any product without prior notice.<br />
After sales Service: If you need assistance, spare parts or you are unhappy with any aspect of the goods please<br />
contact Customer Services on: +44 (0)845 268 2000, or e-mail us at: customer.services@mamasandpapas.<br />
com. Visit our website at www.mamasandpapas.com for the latest product information.<br />
-11-
www.mamasandpapas.com<br />
<strong>Mamas</strong> & <strong>Papas</strong><br />
Colne Bridge Road<br />
Huddersfield, HD5 0RH<br />
customer services helpline: +44(0)845 268 2000<br />
customer services email: customer.services@mamasandpapas.com<br />
-12-