A. SAFETY MESSAGES B. CONTENTS - Prof Bunsen
A. SAFETY MESSAGES B. CONTENTS - Prof Bunsen
A. SAFETY MESSAGES B. CONTENTS - Prof Bunsen

Create successful ePaper yourself
Turn your PDF publications into a flip-book with our unique Google optimized e-Paper software.
A. <strong>SAFETY</strong> <strong>MESSAGES</strong><br />
1. Adult supervision and assistance are recommended for all the experiments.<br />
2. Intended for children aged over 8.<br />
3. This kit and its finished products contain small parts which may cause choking if<br />
misused. Keep away from children under 3 years old.<br />
4. Kitchen materials are also required from home to perform the experiments. Adults’<br />
assistance is required in collecting these materials.<br />
5. When performing the rocket experiment outdoors, launch the rocket in an open<br />
area. Do not point the rocket at a person or pet. Never watch the launching rocket<br />
from above to avoid any injury.<br />
6. Adult assistance and supervision are required when handling hot water in the<br />
Rock Candy Factory experiment.<br />
B. <strong>CONTENTS</strong><br />
To Parents: Please read through these instructions<br />
before giving gudiance to your children.<br />
12ml<br />
10ml<br />
8ml<br />
6ml<br />
4ml<br />
2ml<br />
1 x Vinegar Rocket 1 x Launcher pad<br />
1 x Small spoon<br />
1 x Volcano<br />
1 x brush<br />
2 x Skewers 1 x wire 2 x zinc plates<br />
1 x watch<br />
movement<br />
FINGERPRINT DUSTING PAD<br />
8 x finger print<br />
record sheets<br />
8 x secret<br />
message sheets<br />
1 x kitchen spy finger<br />
print development pad<br />
1 x adhesive tape<br />
Materials required from home kitchen: vinegar, baking soda, red food colouring, washing up liquid, measuring cup,<br />
sugar, cloth pegs, teaspoon, forks, corn starch, black currant/grape juice concentrate, lemon. Ask for adults’ permission<br />
and assistance in getting these materials for the experiments.
2ml<br />
4ml<br />
8ml<br />
10ml<br />
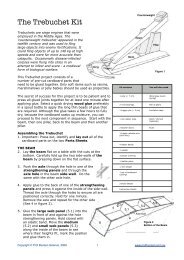
C. VINEGAR ROCKET<br />
From the kit: foam rocket, launcher pad, small spoon<br />
From the kitchen: baking soda, vinegar<br />
Safety messages:<br />
Find an outdoor open space with a level surface, preferably with a concrete floor, e.g. a garden yard.<br />
Cover the area with old newspaper as the launching could be messy.<br />
Do not point the rocket at a person or pet. Never watch the launching rocket from above.<br />
Warning! Do not aim at eyes or face.<br />
1. Put 2ml of vinegar into the launch pad and place it on the floor.<br />
2. Using the small spoon provided, put a spoonful of baking soda into the hole at<br />
the bottom of the rocket. Remove excess baking soda from the edge of the rocket so<br />
that the baking soda just fills up the bottom cavity.<br />
3. Insert the rocket into the launch pad. Hold the launch pad and rocket as shown<br />
in Diagram 3 and shake gently three times.<br />
4. Quickly place the rocket and the launch pad on the floor vertically and move<br />
away. Keep your distance. Watch how your rocket shoots up into the sky! 3, 2, 1 …<br />
Blast off!<br />
1<br />
VINEGAR<br />
12ml<br />
10ml<br />
8ml<br />
6ml<br />
4ml<br />
2ml<br />
6ml<br />
4ml<br />
2ml<br />
2<br />
baking soda<br />
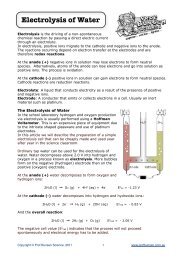
How does it work<br />
A chemical reaction takes place when the vinegar is mixed with the baking soda. The<br />
acidic vinegar reacts with the alkaline baking soda to produce carbon dioxide. There<br />
is no place for the carbon dioxide to escape inside the launch pad. The pressure<br />
builds up and eventually it gets so great that the launch pad propels the rocket high<br />
up into the sky.<br />
Troubleshooting<br />
If your rocket does not blast off, the connection between the rocket and the launch<br />
pad is probably too loose meaning that the air leaks out, or it may be too tight so<br />
that friction prevents the rocket from shooting up.<br />
Hold the rocket and the launch pad so that the<br />
rocket faces away from you and not pointing at<br />
anyone. Remove the rocket from the launch pad<br />
carefully. If you hear a big pop sound (which is<br />
produced by the escaping air) then the rocket<br />
and launch pad connection was probably too<br />
tight. If the pop sound is small, the connection<br />
is too loose and the air is leaking already. Repeat<br />
the launching steps and adjust the force used to<br />
insert the rocket accordingly.<br />
Fun Facts<br />
In a real rocket, fuel is burned inside which causes hot gases to shoot out of the<br />
back of the rocket. This propels the rocket forward according to Newton’s Third Law<br />
of Motion, which states that every action creates an equal and opposite reaction.<br />
The force that pushes the gases out of the back of the rocket is the action. The<br />
rocket moving forward in an upward direction is the counter-reaction. Since rockets<br />
are heavy, it takes a large force to make a rocket speed up to the point where it can<br />
escape the Earth’s gravity (Newton’s Second Law states that the force is proportional<br />
to the mass and acceleration). Once the rocket is in motion, it keeps moving in a<br />
straight line until another force makes it turn or stop. This is the result of Newton’s<br />
First Law, which states that an object will remain at rest or in uniform motion in a<br />
straight line unless acted upon by an external force.<br />
2ml<br />
4ml<br />
6ml<br />
8ml<br />
10ml<br />
12ml<br />
3 4<br />
12ml<br />
12ml<br />
10ml<br />
6ml<br />
8ml<br />
6ml<br />
4ml<br />
2ml<br />
Remarks: Rinse the launcher pad and rocket with water after each use. The vinegar residual will erode<br />
the plastic of the foam rocket and the launcher pad.<br />
12ml<br />
10ml<br />
8ml<br />
6ml<br />
4ml<br />
2ml<br />
2 3
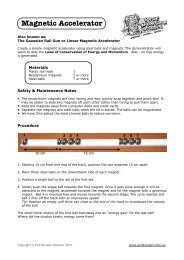
D. TABLE TOP VOLCANO<br />
From the kit: volcano<br />
From the kitchen: tray, baking soda,<br />
vinegar, washing up liquid, red food<br />
colouring, teaspoon<br />
1. Place the volcano on a large flat tray<br />
to avoid making a mess. Cover the table<br />
with old newspaper. Put two teaspoonfuls<br />
of baking soda into the volcano. Add a<br />
few drops of washing up liquid and red<br />
food colouring. This will make the ‘lava’<br />
effect look more dramatic. The washing<br />
up liquid slows down the eruption and<br />
makes the volcano foam.<br />
2. Slowly pour a teaspoonful of vinegar<br />
into the volcano and watch it erupt with<br />
‘bubbly lava’.<br />
3. You can continue to add more vinegar<br />
to cause more ‘lava’ to erupt out of the<br />
volcano. Eventually the eruptions will<br />
cease.<br />
Washing<br />
up liquid<br />
1<br />
2<br />
Red food<br />
coloring<br />
Baking soda<br />
Vinegar<br />
Fun Facts<br />
Volcanoes are openings in the Earth’s surface. When they are active they can shoot<br />
out ash, gas and hot liquid rock known as magma. Once the magma comes out of<br />
the volcano, it is known as lava. Lava can flow at a rapid speed. The most lava ever<br />
recorded from a single volcanic eruption was the 1783 Laki eruption in Iceland. A<br />
quarter of the population of Iceland was killed by the poisonous gases and clouds of<br />
ash that resulted in severe destruction of crops and starvation.<br />
Below is a sectional diagram of a volcano:<br />
Ash & gas cloud<br />
Remarks: You could repeat the eruption<br />
process unlimited times. However,<br />
remember to rinse the volcano with<br />
water after each use to prevent the<br />
vinegar residual eroding the plastic.<br />
Main vent<br />
Lava<br />
Crater<br />
Side vent<br />
How does it work<br />
When the vinegar and the baking soda<br />
are mixed together, a chemical reaction<br />
takes place which produces carbon<br />
dioxide. The carbon dioxide escapes<br />
from the volcano in the form of bubbles.<br />
When all the carbon dioxide has escaped<br />
into the air, the solution becomes flat and<br />
the volcano stops ‘erupting’. You can try<br />
using lemon juice instead of vinegar and<br />
see what effect this has on the eruption.<br />
Or add some starch or sand to the baking<br />
soda to see if you can get a better ‘lava’.<br />
3<br />
Layers of ash and lava formed<br />
from previous eruptions<br />
Magma<br />
Sill<br />
4 5
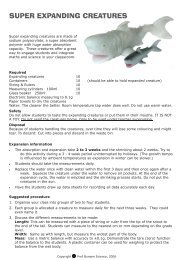
E. ROCK CANDY FACTORY<br />
From the kit: 2 skewers<br />
From the kitchen: sugar, steaming hot water, a glass container (glass or empty<br />
jam jar) which is a similar height to the skewers, 2 clothes pegs, paper<br />
towel, teaspoon, measuring cup.<br />
Optional: food colouring and flavouring oil.<br />
1. First prepare the skewer. Ask an adult to help you with the<br />
following steps as hot water is involved. Wet the skewer with hot<br />
water and roll it in some sugar to coat the surface. Leave the skewer<br />
to dry for at least 6 hours. This sugar layer provides a surface for<br />
sugar crystals to grow in the later steps.<br />
2. In the kitchen use the measuring cup to prepare a cup of<br />
steaming hot water. Pour it into the glass container. Mix it<br />
with 2 cups of sugar. Remarks: the combination of water to sugar is<br />
always 1 to 2. Adjust the contents in accordance to the size of the glass<br />
container. Do not fill the container to the top with hot water as when<br />
the sugar is added the volume will increase and cause an overflow.<br />
Two thirds of the container’s height will be ideal.<br />
1 CUP<br />
2/3<br />
1/2<br />
1/3<br />
sugar<br />
5. Place the prepared skewer (already coated with sugar) into the glass container<br />
and hold it in place using 2 clothes pegs as in Diagram 5. Rest the clothes pegs<br />
across the top of the glass container allowing the skewer to hang down. Adjust its<br />
position so that it is about 2cm from the bottom of the container. Avoid touching the<br />
bottom of the container as the candy will stick to the bottom.<br />
6. Leave the glass container in a cool place, away from strong light. Place a paper<br />
towel over the top to prevent dust from falling into the container. You should see<br />
sugar crystals forming on the skewer after about 1 day. The longer you wait, the<br />
bigger the crystals will be. Allow the rock candy to grow to the size you want. Remove<br />
it from the sugar solution and let it dry for a few minutes. It is ready for you to enjoy!<br />
Or you can wrap it in plastic wrap and savour it later.Or you can wrap it in plastic<br />
wrap and savour it later.<br />
sugar<br />
12<br />
1<br />
2<br />
3. Stir the mixture until all the sugar has dissolved.<br />
4. Add half a spoon of flavouring oil and 2-3 drops of food colouring to the hot sugar<br />
solution (this is optional). Allow the sugar solution to cool for about 6 hours.<br />
Red food<br />
coloring<br />
flavouring oil<br />
5<br />
3cm<br />
How does it work<br />
The sugar solution you made is called a supersaturated solution. This means that<br />
it contains more dissolved sugar than possible under normal conditions. This is<br />
achieved by mixing the sugar with very hot water. A supersaturated solution is very<br />
unstable and will crystallise easily. As time passes, the water will slowly evaporate,<br />
allowing more sugar crystals to collect on the skewer. By first coating the skewer<br />
with a layer of sugar, you provide a “seeded” surface for sugar crystals to grow more<br />
easily.<br />
6<br />
Fun Facts<br />
Many crystals can be found on Earth. They are minerals that have had the chance<br />
to grow into their natural shapes which are determined by the chemicals they are<br />
composed of. Most of the Earth’s crystals were formed millions of years ago when<br />
the hot liquid rock (lava) inside the Earth has cooled and hardened. Most of these<br />
crystals took thousands of years to ‘grow’.<br />
3 4<br />
6 7
F. KITCHEN DETECTIVE - FINGERPRINTS<br />
From the kit: kitchen spy finger print development pad, brush, fingerprint record<br />
sheets, adhesive tape<br />
From home: fine corn starch<br />
Handy tip: you may photocopy more fingerprint record sheets for future use.<br />
How does it works<br />
When a person touches something with his or her fingers, a visible or invisible<br />
residue is usually left on the touched surface. The residue shows a copy of the<br />
person’s fingerprint. The invisible prints are called ‘latent fingerprints’. These prints<br />
can be ‘developed’ by dusting powder made of finely grounded chalk coal or corn<br />
starch.<br />
1. Ask a volunteer to make a latent fingerprint by pressing a finger onto the<br />
development pad. For best results, ask the volunteer to touch their nose or hair first<br />
before touching the development pad.<br />
2. Dip the brush in some corn starch and tap the brush gently to remove the excess.<br />
3. Gently use the brush on the latent fingerprint area in a circular motion. You<br />
should be able to see the fingerprint appearing after a few strokes. Tap the brush<br />
again to remove all the corn starch. Brush the fingerprint again with the clean brush<br />
to get rid of any remaining corn starch on the print.<br />
1<br />
FINGERPRINT DUSTING PAD<br />
2 3<br />
Corn Starch<br />
FINGERPRINT DUSTING PAD<br />
Examine and classify the fingerprints:<br />
Each fingerprint has ridges, which belongs to one of four patterns: WHORLS,<br />
ARCHES, LOOPS and ACCIDENTAL (also called COMPOSITES).<br />
Use a magnifying lens to study the fingerprints you have collected, then classify<br />
them to different types as mentioned above to complete your fingerprint record<br />
sheet. Continue to collect fingerprints from different people to build up your very<br />
own fingerprint database. Familiarise yourselves with all these print patterns. They<br />
are very useful in identifying the print’s owner.<br />
The WHORL pattern<br />
looks like a bull’s<br />
eye. Whorl has lines<br />
entering at the side<br />
of the finger pad and<br />
spiralling inward,<br />
ending in the centre.<br />
The ARCHES pattern<br />
is like a hill with<br />
lines entering at one<br />
side of the finger pad<br />
and leaving from the<br />
opposite side.<br />
4. Put a piece of adhesive tape onto the dusted fingerprint and press gently. Smooth<br />
out any bubbles under the adhesive tape. Do not rub too hard as this may distort the<br />
developed fingerprint.<br />
5. Lift the adhesive tape slowly and gently. You should see the developed fingerprint<br />
being lifted with the tape.<br />
6. Stick the adhesive tape onto the black square of the fingerprint record sheet.<br />
Smooth the surface gently to remove any bubbles. Now you have a fingerprint of the<br />
volunteer! Fill in the fingerprint record sheet. Collect the fingerprints of your family<br />
and compare.<br />
4 Adhesive tape<br />
5 6<br />
FINGERPRINT DUSTING PAD<br />
FINGERPRINT DUSTING PAD<br />
SUSPECT:<br />
NOTES:<br />
FINGER PRINT<br />
PRINT TYPE:<br />
ARCH<br />
WHORL<br />
LOOP<br />
ACCIDENTAL<br />
The LOOP pattern is<br />
like an upside down<br />
U and slanted left<br />
or right. Loops have<br />
lines entering at one<br />
side of the finger pad<br />
and leaving from the<br />
same side.<br />
The ACCIDENTAL<br />
pattern is made up of<br />
a combination of the<br />
other 3 patterns.<br />
Fun facts<br />
Fingerprints help us grip things properly. The skin on the palms of our hands and the<br />
soles of our feet are covered with tiny raised lines called friction ridges that allow<br />
us to pick up and handle objects easily. The ridges also contain pores which are<br />
attached to sweat glands under the skin and we leave behind fingerprints on surfaces<br />
because of sweat from these. The unique patterns on our fingertips are caused by<br />
ridges in the bottom layer of our skin. No two people have the same fingerprints, not<br />
even identical twins. This is why fingerprints are used to identify people.<br />
8 9
G. KITCHEN SPY - INVISIBLE INK<br />
From the kit: paintbrush, secret message sheets<br />
From the kitchen: 1/4 cup of water, 3 tablespoons of baking soda, blackcurrant<br />
or grape juice concentrate (or other deep colour juice concentrate), teaspoon, cup<br />
Handy tip: you may photocopy more secret message sheets for future use.<br />
1. Mix the water and the baking soda in a cup<br />
with a teaspoon.<br />
2. Dip the paintbrush into the solution and<br />
write your secret message on the secret<br />
message sheets. You can also use a toothpick<br />
or a cotton swab to write your message. Let<br />
it dry completely. You should not be able to<br />
see anything at this stage. Send this invisible<br />
message to your agent or simply put it on the<br />
fridge to puzzle your family.<br />
3. To reveal the message, brush some<br />
blackcurrant/grape juice concentrate across<br />
the secret message sheet carefully. Your<br />
message will appear magically!<br />
How does it work<br />
Baking soda is alkaline. Blackcurrant/grape<br />
juice concentrate is acidic. When you put<br />
these juice concentrates on top of baking<br />
soda, a chemical reaction takes place which<br />
produces a colour change in the paper.<br />
Fun Facts<br />
Spies of all nations have been sending secret<br />
messages since ancient times in order to<br />
protect their battle plans and important<br />
baking soda<br />
SECRET MESSAGE<br />
blackcurrant<br />
juice concentrate<br />
information from their enemies. Writing with invisible ink is one of the ways spies<br />
communicate but there are many other ways to create secret messages. For example,<br />
you can change the spaces between words, such as “Wh ati sthi sme ssa ge” (What<br />
is this message); or write the sentence backwards: “EGASSEM A UOY LLET OT<br />
TNAW I.” (I want to tell you a message.) Another way is to substitute numbers in<br />
place of the letters of the alphabet, e.g. 1 = A, 2 = B, etc. Can you create your own<br />
secret message using this spy system<br />
1<br />
2<br />
3<br />
SECRET MESSAGE<br />
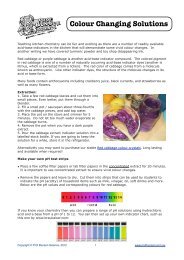
H. FRUIT BATTERY<br />
From the kit: 2 zinc plates, LCD watch movement, connection wire, adhesive tape<br />
From the kitchen: 2 forks, 1 lemon - halved (or other fruits, e.g. apple, tomato)<br />
1. Connect the red wire on the LCD watch to a fork and the black wire to a zinc plate.<br />
Secure the wires in place with adhesive tape.<br />
2. Get another fork and zinc plate and connect them with the connection wire using<br />
adhesive tape.<br />
3. Insert the forks and zinc plates into the lemon halves to activate the LCD watch<br />
movement as shown in the diagram. You will see your watch start blinking.<br />
2<br />
Adhesive tape<br />
3<br />
zinc<br />
connection wire<br />
How does it work<br />
The forks act like the positive electrodes of a battery. They are plated with a metal<br />
which is less reactive than zinc. When the forks and zinc plates are inserted into<br />
the lemon, a chemical reaction takes place. Electrons (extremely small particles<br />
with negative charge) move from the zinc plates to the forks to form a current, thus<br />
activating the LCD watch. The lemon juice helps to conduct electricity. You can<br />
replace the lemon with a potato, a grapefruit or use soft drinks and see what effect<br />
this has.<br />
Fun Facts<br />
The development of the battery started in 1775 when a scientist called Alessandro<br />
Volta invented a machine that produced and stored static electricity by rubbing cat<br />
fur across a metal plate. A few years later, a doctor called Luigi Galvani noticed<br />
that dissected frogs’ legs twitched when they were in contact with two different<br />
metals. Volta realised that the electricity came from the metals and began doing<br />
experiments with different types of metal. In 1800, he made the first ever battery<br />
which consisted of copper and zinc strips separated by a piece of paper soaked in<br />
salt water and dipped in diluted acid.<br />
1<br />
zinc<br />
10 11
Setting the watch<br />
Press A twice and the display will show the set month mode, then<br />
Press B to adjust to the right month.<br />
After the month is set, Press A to confirm, and the set day<br />
mode will be displayed, Press B to adjust to the the right<br />
day.<br />
After the day is set, Press A to confirm and the set<br />
hour mode will be displayed, Press B to adjust to the<br />
right hour.<br />
After the hour is set, Press A to confirm and the set<br />
minute mode will be displayed, Press B to adjust to<br />
the right minute.<br />
After the minute is set, Press A to confirm and the<br />
normal time will be displayed. You should see the<br />
two dots flashing on the display between the hours and<br />
minutes.<br />
The LCD watch may temporary lose its function in an electrostatic discharge<br />
environment, but normal function can be resumed by resetting the device.<br />
Viewing the time<br />
By default, the clock display shows the current time.<br />
To view the Date: Press B once. The clock display will resume showing the<br />
current time after 2 second.<br />
To view the Seconds: Press B twice. To resume to normal time, Press B again.<br />
To view the Time and Date alternately, Press A once. To resume to normal time<br />
display, Press A 5 times to skip all set clock modes.<br />
41-03296/1 101209<br />
QUESTIONS & COMMENTS<br />
We treasure you as a customer and your satisfaction with this product is important<br />
to us. In case you have any comments or questions, or you find any parts of<br />
this kit missing or defective, please do not hesitate to contact our distributor in<br />
your country, whose address is printed on the package. You are also welcome to<br />
contact our marketing support team at Email: infodesk@4M-IND.com, Fax (852)<br />
25911566, Tel (852) 28936241, Web site: WWW.4M-IND.COM<br />
©2010 4M Industrial Development Limited. All rights reserved.