ncr/doc/RealPOS/7455/Technical_Manuals/7455_Re... - Alsys Data
ncr/doc/RealPOS/7455/Technical_Manuals/7455_Re... - Alsys Data ncr/doc/RealPOS/7455/Technical_Manuals/7455_Re... - Alsys Data
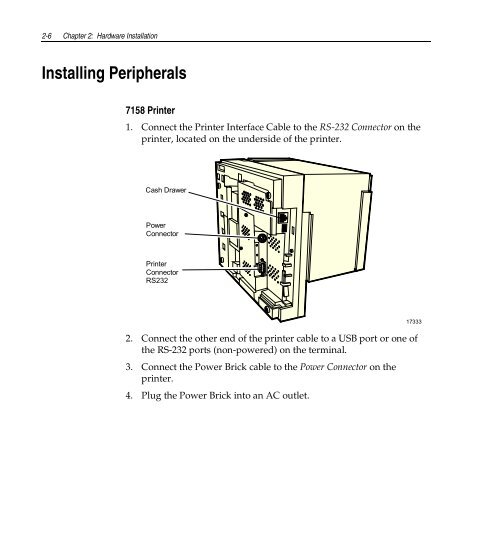
2-6 Chapter 2: Hardware Installation Installing Peripherals 7158 Printer 1. Connect the Printer Interface Cable to the RS-232 Connector on the printer, located on the underside of the printer. Cash Drawer Power Connector Printer Connector RS232 2. Connect the other end of the printer cable to a USB port or one of the RS-232 ports (non-powered) on the terminal. 3. Connect the Power Brick cable to the Power Connector on the printer. 4. Plug the Power Brick into an AC outlet. 17333
Chapter 2: Hardware Installation 2-7 7166 Printer 1. Connect the Printer Interface Cable to the RS-232 Connector on the printer, located on the underside of the printer. Printer Connector RS232 Cash Drawer Power Connector 17332 2. Connect the other end of the printer cable to one of the RS-232 ports (non-powered) on the terminal. 3. Connect the Power Brick cable to the Power Connector on the printer. 4. Plug the Power Brick into an AC outlet.
- Page 5 and 6: iii Table of Contents Chapter 1: Pr
- Page 7 and 8: v Introduction ....................
- Page 9 and 10: vii Memory Map.....................
- Page 11 and 12: ix Revision Record Issue Date Remar
- Page 13: xi Declaration of Conformity Manufa
- Page 16 and 17: 1-2 Chapter 1: Product Overview Ser
- Page 18 and 19: 1-4 Chapter 1: Product Overview Har
- Page 20 and 21: 1-6 Chapter 1: Product Overview •
- Page 22 and 23: 1-8 Chapter 1: Product Overview Har
- Page 24 and 25: 1-10 Chapter 1: Product Overview Li
- Page 26 and 27: 1-12 Chapter 1: Product Overview Ha
- Page 28 and 29: 1-14 Chapter 1: Product Overview Wh
- Page 30 and 31: 1-16 Chapter 1: Product Overview In
- Page 32 and 33: 1-18 Chapter 1: Product Overview Be
- Page 34 and 35: 1-20 Chapter 1: Product Overview Pl
- Page 36 and 37: 1-22 Chapter 1: Product Overview LC
- Page 38 and 39: 1-24 Chapter 1: Product Overview Ta
- Page 40 and 41: 1-26 Chapter 1: Product Overview Pr
- Page 42 and 43: 1-28 Chapter 1: Product Overview 71
- Page 44 and 45: 1-30 Chapter 1: Product Overview In
- Page 46 and 47: 1-32 Chapter 1: Product Overview Po
- Page 48 and 49: 1-34 Chapter 1: Product Overview It
- Page 50 and 51: 1-36 Chapter 1: Product Overview
- Page 52 and 53: 2-2 Chapter 2: Hardware Installatio
- Page 54 and 55: 2-4 Chapter 2: Hardware Installatio
- Page 58 and 59: 2-8 Chapter 2: Hardware Installatio
- Page 60 and 61: 2-10 Chapter 2: Hardware Installati
- Page 62 and 63: 2-12 Chapter 2: Hardware Installati
- Page 64 and 65: 2-14 Chapter 2: Hardware Installati
- Page 66 and 67: 7 8 9 4 5 6 1 2 3 2-16 Chapter 2: H
- Page 68 and 69: 7 8 9 4 5 6 1 2 3 2-18 Chapter 2: H
- Page 70 and 71: 2-20 Chapter 2: Hardware Installati
- Page 72 and 73: 2-22 Chapter 2: Hardware Installati
- Page 74 and 75: 2-24 Chapter 2: Hardware Installati
- Page 76 and 77: 3-2 Chapter 3: Setup Entering Setup
- Page 78 and 79: 3-4 Chapter 3: Setup Setup Menus Ma
- Page 80 and 81: 3-6 Chapter 3: Setup Advanced Menu
- Page 82 and 83: 3-8 Chapter 3: Setup Cache System B
- Page 84 and 85: 3-10 Chapter 3: Setup Serial Port x
- Page 86 and 87: 3-12 Chapter 3: Setup Fdc On Lpt Us
- Page 88 and 89: 3-14 Chapter 3: Setup Base I/O Addr
- Page 90 and 91: 3-16 Chapter 3: Setup MSR Interrupt
- Page 92 and 93: 3-18 Chapter 3: Setup Large Disk Ac
- Page 94 and 95: 3-20 Chapter 3: Setup Enable Memory
- Page 96 and 97: 3-22 Chapter 3: Setup PCI/PNP UMB R
- Page 98 and 99: 3-24 Chapter 3: Setup Boot menu ret
- Page 100 and 101: 3-26 Chapter 3: Setup Fixed Disk Bo
- Page 102 and 103: 3-28 Chapter 3: Setup Customized Mo
- Page 104 and 105: 3-30 Chapter 3: Setup Boot Menu Opt
2-6 Chapter 2: Hardware Installation<br />
Installing Peripherals<br />
7158 Printer<br />
1. Connect the Printer Interface Cable to the RS-232 Connector on the<br />
printer, located on the underside of the printer.<br />
Cash Drawer<br />
Power<br />
Connector<br />
Printer<br />
Connector<br />
RS232<br />
2. Connect the other end of the printer cable to a USB port or one of<br />
the RS-232 ports (non-powered) on the terminal.<br />
3. Connect the Power Brick cable to the Power Connector on the<br />
printer.<br />
4. Plug the Power Brick into an AC outlet.<br />
17333


