Download Assembly Instructions - Big Lots
Download Assembly Instructions - Big Lots
Download Assembly Instructions - Big Lots

You also want an ePaper? Increase the reach of your titles
YUMPU automatically turns print PDFs into web optimized ePapers that Google loves.
DO NOT RETURN TO RETAILER<br />
IF YOU HAVE ANY QUESTIONS OR CONCERNS<br />
PLEASE VISIT OUR WEBSITE AT:<br />
www.yotrioint.com<br />
OR TOLL FREE AT:<br />
1-866-905-4107<br />
MONDAY-FRIDAY 8:30 AM TO 5:00 PM PACIFIC STANDARD TIME / 11:30<br />
AM TO 8:00PM EASTERN STANDARD TIME<br />
YOTRIO CUSTOMER CARE<br />
Warranty Coverage Requirements:<br />
1. Copy of your Original Store Receipt.<br />
2. Pictures of the damaged parts.<br />
3. You must know the name of your product and any corresponding<br />
item numbers as well as the name of the store where you purchased<br />
the item.<br />
4. Please gather all of this information BEFORE you call customer service.<br />
CARE INSTRUCTIONS<br />
For best results, clean frame with damp cloth and dry thoroughly. This<br />
will help prevent mildew by removing dirt particles that may accumulate.<br />
Do not use abrasive materials or cleaners. In order to prolong the life of<br />
your umbrella when not in use or during inclement weather (rain, hail,<br />
sleet, snow, wind), fire, extreme heat and freezing conditions, the<br />
umbrella needs to be stored in a dry, sheltered place. In addition, when<br />
not in use your umbrella needs to be stored.<br />
Important!Please read instructions thoroughly before assembling.<br />
Familiarize yourself with the inventory of parts and the<br />
accompanying illiustrations to assure safe and proper<br />
assembly.<br />
Note: Repeated assembly can weaken the locking ability of the washers. Periodically<br />
check all bolted connections on your furniture to make sure they are tight and<br />
secure. Retain these instructions for future reference.<br />
Warning: In excessively windly conditions, be sure to close umbrella to prevent the<br />
umbrella from tipping over and possible damage.<br />
1
PARTS LIST<br />
10′ Patio Offset Umbrella <strong>Assembly</strong> <strong>Instructions</strong><br />
PARTS<br />
NO.<br />
QTY DESCRIPTION NAME<br />
A<br />
1 PC<br />
Lower Bracket<br />
B<br />
1 PC<br />
Upper Bracket<br />
C<br />
1 PC<br />
Base Tube<br />
D<br />
4 PCS<br />
M8x20mm Bolts<br />
E<br />
4 PCS<br />
Flat Washer<br />
F<br />
1 PC<br />
Screw-in Knob<br />
G<br />
1 PC<br />
Tube Rim<br />
H 1 PC<br />
Metal Clip<br />
I<br />
1 PC<br />
Sunshade<br />
J<br />
4 PCS<br />
Plastic Angle Plate<br />
K<br />
4 PCS<br />
Side Piece On Base<br />
L<br />
1 PC<br />
Fabric Cover<br />
M<br />
1 PC<br />
Sand Bag (Sand not included)<br />
2
10′ Patio Offset Umbrella <strong>Assembly</strong> <strong>Instructions</strong><br />
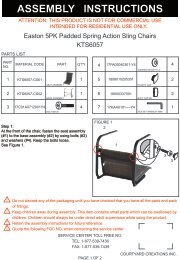
Step 01:<br />
Place Upper Bracket (B) onto Lower Bracket (A) as shown.<br />
Step 02:<br />
Line up the bolt holes on the Base Tube (C) with the corresponding bolt holes on<br />
the two brackets. Screw the M8x20 Bolts (D) with the Washers (E) into BaseTube<br />
(C).<br />
Step 03:<br />
Put the Plastic Angle Plate (J) into the four corner of the brackets as shown.<br />
3
10′ Patio Offset Umbrella <strong>Assembly</strong> <strong>Instructions</strong><br />
Step 04:<br />
Insert the 4 Side Pieces On Base (K) into the slot of the Plastic Angle Plate (J) as<br />
shown.<br />
Step 05:<br />
Pour the sand into the Sand Bag (M) through the velcro openings. Each sand bag<br />
holds 88 lbs of sand. Close the velcro openings, then put into the plastic base as<br />
shown.<br />
Step 06:<br />
Attach the two sand bags together using the locking mechanism as shown in<br />
diagram below.<br />
4
10′ Patio Offset Umbrella <strong>Assembly</strong> <strong>Instructions</strong><br />
Step 07:<br />
Place Fabric Cover (L) over base and hook securely as shown.<br />
Step 08:<br />
1) Overlap the Metal Clip (H) and Tube Rim (G) on the Base Tube. 2) Insert<br />
Screw-in Knob (F) through the hole of the Metal Clip (H) and into the Base Tube as<br />
shown.<br />
Step 09:<br />
Insert the stem of the Sunshade (I) into the Base Tube (C), turn the Screw-in Knob<br />
(F) clockwise until tight as shown.<br />
5
10′ Patio Offset Umbrella <strong>Assembly</strong> <strong>Instructions</strong><br />
Step 10:<br />
1) Open the Spanner by pulling up on the Spanner Lever. 2) Raise the Spanner to<br />
desired height.<br />
Step 11:<br />
1) Close the Spanner. 2) Push the Crank upward. 3) Slide Locking Cover downward<br />
to lock the Umbrella.<br />
Step 12:<br />
Turn the Crank clockwise to unfold the Umbrella.<br />
6
10′ Patio Offset Umbrella <strong>Assembly</strong> <strong>Instructions</strong><br />
Step 13:<br />
To adjust the position: 1) Open the Spanner Lever; 2) Pull down the Spanner;<br />
3) Close the Spanner Lever to lock the Umbrella.<br />
Step 14:<br />
Turn the Crank counter clockwise to fold the Umbrella.<br />
Step 15:<br />
Push up the Locking Cover to unlock the Umbrella, then pull Crank downward.<br />
7
10′ Patio Offset Umbrella <strong>Assembly</strong> <strong>Instructions</strong><br />
Step 16:<br />
Open the Spanner Lever, then pull the Spanner down.<br />
Step 17:<br />
Close the Spanner by pushing Spanner Lever down.<br />
8