Code PDF file - Cornerstonerobotics.org
Code PDF file - Cornerstonerobotics.org
Code PDF file - Cornerstonerobotics.org

You also want an ePaper? Increase the reach of your titles
YUMPU automatically turns print PDFs into web optimized ePapers that Google loves.
C:\Users\Jeff\Desktop\Website 2007\staging\code\LCD1.pbp<br />
'--------Title--------<br />
' File......LCD1.pbp<br />
' Started....3/18/06<br />
' Microcontroller used: Microchip Technology PIC16F88<br />
'<br />
microchip.com<br />
' PicBasic Pro <strong>Code</strong>: micro-Engineering Labs, Inc.<br />
'<br />
melabs.com<br />
'--------Program Desciption--------<br />
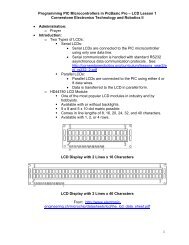
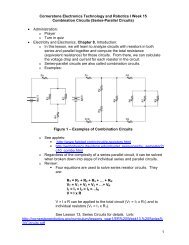
' Prints simple message to 16 x 2 parallel<br />
' LCD which uses Hitachi 44780 controller.<br />
' Most hobby LCD's use this controller.<br />
'----------Related Lessons---------<br />
' See LCD BASICS lesson at:<br />
' http://cornerstonerobotics.<strong>org</strong>/curriculum/lessons_year2/erii14_lcd1.pdf<br />
'<br />
' lcd1.pbp is used in the lesson LCD Command Control <strong>Code</strong>s at:<br />
' http://cornerstonerobotics.<br />
<strong>org</strong>/curriculum/lessons_year2/erii15_lcd2_lcd_command_control_codes.pdf<br />
'------------Comments--------------<br />
' A practical guide to interfacing and<br />
' programming LCD modules can be found at<br />
' www.epemag.wimborne.co.uk/resourses.htm<br />
' or by googling everyday practical electronics lcd<br />
' The article includes LCD pin functions.<br />
'-----New PicBasic Pro Command-----<br />
' The PicBasic Pro Compiler Manual is on line at:<br />
' http://www.microengineeringlabs.com/resources/index.htm#Manuals<br />
'<br />
' LCDOUT Item{,Item...}<br />
' Display Items on an intelligent Liquid Crystal Display. PBP<br />
' supports LCD modules with a Hitachi 44780 controller or<br />
' equivalent.<br />
' Look around page 95 in the PicBasic Pro Compiler Manual<br />
'---------PIC Connections---------<br />
' 16F88 Pin Wiring<br />
' --------- ----------<br />
' RA0 LCD pin 11(DB4)<br />
' RA1 LCD pin 12(DB5)<br />
' RA2 LCD pin 13(DB6)<br />
' RA3 LCD pin 14(DB7)<br />
' RA4 LCD Register Select(RS)<br />
' RB3 LCD Enable(E)<br />
' See schematic for the other usual PIC connections<br />
Page 1 of 2<br />
10/10/2013 10:02 AM
C:\Users\Jeff\Desktop\Website 2007\staging\code\LCD1.pbp<br />
'---------LCD Connections---------<br />
' LCD Pin Wiring<br />
' --------- ----------<br />
' 1 Ground(Vss)<br />
' 2 + 5v(Vdd)<br />
' 3 Center of 20K Pot(Contrast)<br />
' 4 RA4(Register Select,RS)<br />
' 5 Ground(Read/Write,R/W)<br />
' 6 RB3(Enable)<br />
' 7 No Connection(DB0)<br />
' 8 No Connection(DB1)<br />
' 9 No Connection(DB2)<br />
' 10 No Connection(DB3)<br />
' 11 RA0(DB4)<br />
' 12 RA1(DB5)<br />
' 13 RA2(DB6)<br />
' 14 RA3(DB7)<br />
'---------Revision History--------<br />
' 11/28/07 Change MCU from 16F84A to 16F88<br />
' 11/28/07 Add 16F88 oscillator and ANSEL = 0<br />
'<br />
initializations<br />
'----------Initialization---------<br />
ANSEL = 0<br />
OSCCON = $60<br />
' Configure all pins to digital<br />
' operation since not using ADC<br />
' (Analog to Digital Converter)<br />
' Sets the internal oscillator in the<br />
' 16F88 to 4 MHz<br />
'------------Main <strong>Code</strong>------------<br />
PAUSE 1000<br />
' Pause to allow LCD to setup<br />
start:<br />
LCDOUT $FE,1,"Hello World"<br />
PAUSE 500<br />
GOTO start<br />
' Clears LCD screen, displays<br />
' Hello World<br />
' Pause 1/2 second<br />
' Go to start label<br />
END<br />
Page 2 of 2<br />
10/10/2013 10:02 AM